vue-cli3快速开发
更多详见:https://dfairy.github.io/dfairyblog/document/documents/vue-cli3%E6%95%99%E7%A8%8B.html
1、升级到vue-cli3版本
npm install -g @vue/cli2、查看版本
vue --version
3.1.3
3、创建项目
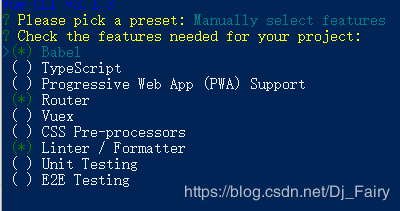
vue create app4、选择自己所需要的项目(空格选择)
5、根据选择选择自己需要的选项
6、配置别名,在vue.config.js下面配置,(ps:在css中,webpack正常情况下,不会对路径进行处理。如果你想让webpack对路径进行处理,那么,可以在路径前标识 ~ )
const webpack = require('webpack')
const path = require('path')

function resolve(dir) {
  return path.join(__dirname, dir)
}

module.exports = {
  chainWebpack(config) {
    config.resolve.alias
      .set('components', resolve('src/components'))
      .set('views', resolve('src/views'))
      .set('common', resolve('src/common'))
      .set('api', resolve('src/api'))
  }
}
7、取消eslint验证
lintOnSave:false //取消eslint验证8、删除console.log注释
const UglifyJsPlugin = require('uglifyjs-webpack-plugin');
    configureWebpack: {
        optimization: {
            minimizer: [
                new UglifyJsPlugin({
                    uglifyOptions: {
                        compress: {
                            warnings: false,
                            drop_console: true, //console
                            drop_debugger: false,
                            pure_funcs: ['console.log'] //移除console
                        }
                    }
                })
            ]
        }
    },
在上方要记得引入require('uglifyjs-webpack-plugin')
如果npm run build还会报错的话还要npm install uglifyjs-webpack-plugin
9、代码打包后没有.map后缀文件
productionSourceMap: false10、配置跨域
devServer: {
        proxy: {
            '/api': {
                target: 'http://localhost:3000',
                changeOrigin: true,
                ws: true,
                pathRewrite: {
                    '^/api': '/'
                }
            }
        }
    },
11、vue.congfig.js
const path = require('path');
function resolve(dir) {
  return path.join(__dirname, dir)
}
const UglifyJsPlugin = require('uglifyjs-webpack-plugin');

module.exports = {
  runtimeCompiler: true,//是否使用包含运行时编译器的 Vue 构建版本
  baseUrl: '',
  productionSourceMap: false, //不在production环境使用SourceMap,打包没有.map后缀文件
  css: {
    loaderOptions: {
      less: {
        javascriptEnabled: true,
      }
    }
  },
  lintOnSave: process.env.NODE_ENV !== 'production',
    /**
     * 下面的这段代码是打包之后删除console.log
     */
    configureWebpack: {
        optimization: {
            minimizer: [
                new UglifyJsPlugin({
                    uglifyOptions: {
                        compress: {
                            warnings: false,
                            drop_console: true, //console
                            drop_debugger: false,
                            pure_funcs: ['console.log'] //移除console
                        }
                    }
                })
            ]
        }
    },
    // configureWebpack:(config)=>{
    //     //入口文件
    //     config.entry.app = ['babel-polyfill', './src/main.js'];
    //     //删除console插件
    //     let plugins = [
    //       new UglifyJsPlugin({
    //         uglifyOptions: {
    //           compress: {
    //             warnings: false,
    //             drop_console:true,
    //             drop_debugger:true
    //           },
    //           output:{
    //             // 去掉注释内容
    //             comments: false,
    //           }
    //         },
    //         sourceMap: false,
    //         parallel: true,
    //       })
    //     ];
    //     //只有打包生产环境才需要将console删除
    //     if(process.env.VUE_APP_build_type=='production'){
    //       config.plugins = [...config.plugins, ...plugins];
    //     }
    // },
  //允许对内部的 webpack 配置进行更细粒度的修改。
  chainWebpack: (config) => {
    //命名
    config.resolve.alias
      .set('SRC', resolve('src'))
      .set('ASSET', resolve('src/assets'))
      .set('VIEW', resolve('src/components/page'))
      .set('COMPONENT', resolve('src/components/common'))
      .set('UTIL', resolve('src/utils'))
      .set('SERVICE', resolve('src/services'));

     config.plugin('context')
      .use(webpack.ContextReplacementPlugin,
        [/moment[/\\]locale$/, /zh-cn/])
    //打包文件带hash
    config.output.filename('[name].[hash].js').end();

    //为了补删除换行而加的配置
    config.module
      .rule("vue")
      .use("vue-loader")
      .loader("vue-loader")
      .tap(options => {
        // modify the options...
        options.compilerOptions.preserveWhitespace = true;
        return options;
      });
  },
  devServer: {//跨域
    port: 8081,// 端口号
    open: true, //配置自动启动浏览器
    proxy: {// 配置跨域处理 可以设置多个
      '/api': {
        target: 'xxxx',
        ws: true,
        changeOrigin: true
      },
    }
  }
}
使用vue-cli3遇到的问题及解决方法
1)、在使用框架iview的时候,遇到了less引入报错,报错如下:
Module build failed (from ./node_modules/less-loader/dist/cjs.js):
// https://github.com/ant-design/ant-motion/issues/44
.bezierEasingMixin();^Inline JavaScript is not enabled. Is it set in your options?in F:\dong_jing\2018-12-12\i-manage-system\node_modules\iview\src\styles\color\bezierEasing.less (line 110, column 0)
解决方法:
错误信息中我们可以看到错误是在less中的mixin部分编译中出现的,注意上面标蓝的那句话,mixin在less-loader中需要配置javascriptEnabled: true。
vue-cli3需要在vue.config.js里面配置
css: {
    loaderOptions: {
      less: {
        javascriptEnabled: true,
      }
    }
  },

