JSPatch学习
JSPatch 是一个 iOS 动态更新框架,只需在项目中引入极小的引擎,就可以使用 JavaScript 调用任何 Objective-C 原生接口,获得脚本语言的优势:为项目动态添加模块,或替换项目原生代码动态修复 bug。 原文
闲话不说进入正题:简单集成JSPatch SDK
以下过程为参照JSPatch官方集成介绍写就
第一步 获得 AppKey
在JSPatch平台上注册帐号,可以任意添加新 App,每一个 App 都有一个唯一的 AppKey 作为标识。
第二步 集成SDK
通过 cocoapods 集成
在 podfile 中添加命令:
pod ‘JSPatchPlatform’
再执行 pod install 即可。
注意: 若使用 XCode8 接入,需要在项目 Capabilities 打开 Keychain Sharing 开关,否则在模拟器下载脚本后会出现 decompress error, md5 didn’t match 错误(真机无论是否打开都没问题):

第三步 运行
在 AppDelegate.m 里载入文件,并调用 +startWithAppKey: 方法,参数为第一步获得的 AppKey。接着调用 +sync 方法检查更新。:
- (BOOL)application:(UIApplication *)application didFinishLaunchingWithOptions:(NSDictionary *)launchOptions {
    // Override point for customization after application launch.

    [JSPatch startWithAppKey:@"9a013eaea38bc749"];
    [JSPatch sync];

    // set rootViewController
    self.window = [[UIWindow alloc] initWithFrame:[UIScreen mainScreen].bounds];
    JPViewController *rootViewController = [[JPViewController alloc] init];
    UINavigationController *navigationController = [[UINavigationController alloc] initWithRootViewController:rootViewController];
    self.window.rootViewController = navigationController;
    [self.window makeKeyAndVisible];

    [[UINavigationBar appearance] setBackgroundImage:nil forBarMetrics:UIBarMetricsCompact];

    return YES;
}
至此 JSPatch 接入完毕,下一步可以开始在后台为这个 App 添加 JS 补丁文件了。
上述例子是把 JSPatch 同步放在 -application:didFinishLaunchingWithOptions: 里,若希望补丁能及时推送,可以放在 -applicationDidBecomeActive: 里,每次唤醒都能同步更新 JSPatch 补丁,不需要等用户下次启动:
#import 第四步 测试:在后台为这个 App 添加 JS 补丁
准备.js文件

main.js中的示例代码(定义了两个控制器类文件, 并改写或增添了一些方法):
defineClass('JPViewController', {
handleBtn: function(sender) {
var tableViewCtrl = JPTableViewController.alloc().init()
self.navigationController().pushViewController_animated(tableViewCtrl, YES)
}
})
defineClass('JPTableViewController : UITableViewController ' , ['data'], {
dataSource: function() {
var data = self.data();
if (data) return data;
var data = [];
for (var i = 0; i < 20; i ++) {
data.push("cell from js " + i);
}
self.setData(data)
return data;
},
numberOfSectionsInTableView: function(tableView) {
return 1;
},
tableView_numberOfRowsInSection: function(tableView, section) {
return self.dataSource().length;
},
tableView_cellForRowAtIndexPath: function(tableView, indexPath) {
var cell = tableView.dequeueReusableCellWithIdentifier("cell")
if (!cell) {
cell = require('UITableViewCell').alloc().initWithStyle_reuseIdentifier(0, "cell")
}
cell.textLabel().setText(self.dataSource()[indexPath.row()])
return cell
},
tableView_heightForRowAtIndexPath: function(tableView, indexPath) {
return 30
},
tableView_didSelectRowAtIndexPath: function(tableView, indexPath) {
var alertView = require('UIAlertView').alloc().initWithTitle_message_delegate_cancelButtonTitle_otherButtonTitles("Alert",self.dataSource()[indexPath.row()], self, "OK", null);
alertView.show()
},
alertView_willDismissWithButtonIndex: function(alertView, idx) {
console.log('click btn ' + alertView.buttonTitleAtIndex(idx).toJS())
}
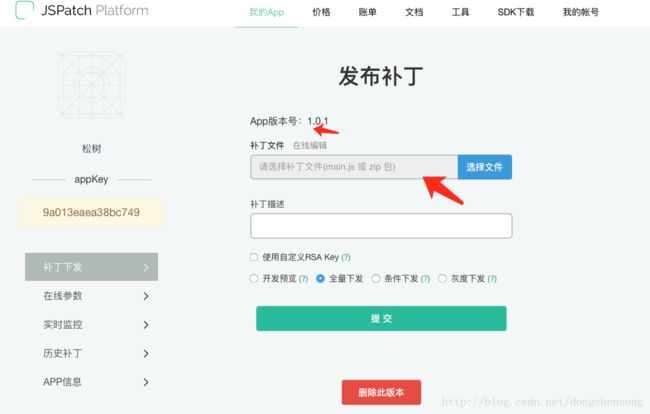
})接下来就要在JSPatch的管理后台上传该main.js文件了(可以设置下发限制):
这之后运行项目便能请求到设置的脚本.
JPViewConroller.m中代码
#import "JPViewController.h"

@implementation JPViewController

- (void)viewDidLoad {
    [super viewDidLoad];

    self.view.backgroundColor = [UIColor whiteColor];

    UIButton *btn = [[UIButton alloc] initWithFrame:CGRectMake(20, 200, [UIScreen mainScreen].bounds.size.width - 40, 50)];
    [btn setTitle:@"to JPTableViewController" forState:UIControlStateNormal];
    [btn addTarget:self action:@selector(handleBtn:) forControlEvents:UIControlEventTouchUpInside];
    [btn setBackgroundColor:[UIColor grayColor]];
    [self.view addSubview:btn];
}

- (void)handleBtn:(id)sender
{
}

@end
效果图:
以上可见, 我并没有在原生App中写很多代码, 包括定义JPTableViewController. 但最终实现了较多的功能, 这些功能都是在js中添加的.
demo下载: github