小程序学习问题总结
1.微信小程序placeholder设置自定义颜色


.phcolor{
    color: #18acff;
}
2.小程序js中的onLoad函数: (页面加载,自动执行)
wx.request:小程序的请求函数(类比于ajax)
文档:https://developers.weixin.qq.com/miniprogram/dev/api/network/request/wx.request.html
setData:设置Page中的data的值
wx.request发起的是 https 请求,而不是 http 请求。一个小程序 同时 只能有 5个 网络请求。开发过程中,可以通过开发者工具调试http的情况
微信小程序对HTTPS的要求
每个微信小程序必须事先设置一个通讯域名,并通过HTTPS请求进行网络通信,不满足条件的域名和协议无法请求。也就是说,请求request地址必须是合法域名(必须是https请求),需要有SSL证书认证过。
2.小程序js中的onLoad函数:

注意点:
(1)onLoad中的形参是一个对象
(2)onLoad是一个生命周期函数,表示页面加载,不需要手动调,小程序自动调取
(3)拿到后台返回的数据,渲染的时候,要先setData,在页面再渲染

 onLoad:function(a){
    if(typeof a=='object'){
      var url = 'https://www.apiopen.top/weatherApi';
    }else{
      var url = 'https://www.apiopen.top/weatherApi?city='+a;
    }
    var that=this;
    wx.request({
      url: url,
      success:function(res){
        console.log(res)
        var list = res.data.data.forecast;
        var yesterday = res.data.data.yesterday;
        yesterday.extended_high = yesterday.high.split(" ")[1];
        for(var k in list){
          list[k].extended_temp = list[k].low.split(" ")[1]+'-'+list[k].high.split(" ")[1];
          list[k].extended_date = list[k].date.slice(0, list[k].date.search(/日/)+1)
        }
          that.setData({
            weatherList: list,
            cityName: res.data.data.city,
            yesterdays: yesterday
          })
      }
    })
  },


//wxml


   {{item.extended_date}}
   {{item.extended_temp}}
   {{item.type}}


{{yesterdays.extended_high}}
{{yesterdays.type}}
3.微信小程序中,获取当前地理位置(城市位置)
1. 申请开发者密钥(key):申请密钥
2. 下载微信小程序JavaScriptSDK,微信小程序JavaScriptSDK v1.0
3. 安全域名设置,需要在微信公众平台添加域名地址 https://apis.map.qq.com
4. 小程序示例
//index.js
//获取应用实例
const app = getApp();
var QQMapWX = require('../../../utils/qqmap-wx-jssdk.js');
var qqmapsdk;
Page({
  data: {
    province: '',
    city: '',
    latitude: '',
    longitude: ''
  },
  onLoad: function () {
    qqmapsdk = new QQMapWX({
      key: 'XXXX-XXXX-XXXX-XXXX' //这里自己的key秘钥进行填充
    });
  },
  onShow: function () {
    let vm = this;
    vm.getUserLocation();
  },
  getUserLocation: function () {
    let vm = this;
    wx.getSetting({
      success: (res) => {
        console.log(JSON.stringify(res))
        // res.authSetting['scope.userLocation'] == undefined    表示 初始化进入该页面
        // res.authSetting['scope.userLocation'] == false    表示 非初始化进入该页面,且未授权
        // res.authSetting['scope.userLocation'] == true    表示 地理位置授权
        if (res.authSetting['scope.userLocation'] != undefined && res.authSetting['scope.userLocation'] != true) {
          wx.showModal({
            title: '请求授权当前位置',
            content: '需要获取您的地理位置,请确认授权',
            success: function (res) {
              if (res.cancel) {
                wx.showToast({
                  title: '拒绝授权',
                  icon: 'none',
                  duration: 1000
                })
              } else if (res.confirm) {
                wx.openSetting({
                  success: function (dataAu) {
                    if (dataAu.authSetting["scope.userLocation"] == true) {
                      wx.showToast({
                        title: '授权成功',
                        icon: 'success',
                        duration: 1000
                      })
                      //再次授权,调用wx.getLocation的API
                      vm.getLocation();
                    } else {
                      wx.showToast({
                        title: '授权失败',
                        icon: 'none',
                        duration: 1000
                      })
                    }
                  }
                })
              }
            }
          })
        } else if (res.authSetting['scope.userLocation'] == undefined) {
          //调用wx.getLocation的API
          vm.getLocation();
        }
        else {
          //调用wx.getLocation的API
          vm.getLocation();
        }
      }
    })
  },
  // 微信获得经纬度
  getLocation: function () {
    let vm = this;
    wx.getLocation({
      type: 'wgs84',
      success: function (res) {
        console.log(JSON.stringify(res))
        var latitude = res.latitude
        var longitude = res.longitude
        var speed = res.speed
        var accuracy = res.accuracy;
        vm.getLocal(latitude, longitude)
      },
      fail: function (res) {
        console.log('fail' + JSON.stringify(res))
      }
    })
  },
  // 获取当前地理位置
  getLocal: function (latitude, longitude) {
    let vm = this;
    qqmapsdk.reverseGeocoder({
      location: {
        latitude: latitude,
        longitude: longitude
      },
      success: function (res) {
        console.log(JSON.stringify(res));
        let province = res.result.ad_info.province
        let city = res.result.ad_info.city
        vm.setData({
          province: province,
          city: city,
          latitude: latitude,
          longitude: longitude
        })

      },
      fail: function (res) {
        console.log(res);
      },
      complete: function (res) {
        // console.log(res);
      }
    });
  }


    所在城市
4.小程序的template的使用:
步骤一:先定义模板(通过name属性来区别)
1、新建一个template文件夹用来管理项目中所有的模板;
2、新建一个courseList.wxml文件来定义模板;
3、使用name属性,作为模板的名字。然后在内定义代码片段。
注意:
a.可以看到一个.wxml文件中可以定义多个模板,只需要通过name来区分;
b.模板中的数据都是展开之后的属性。
{{courseName}}
- {{teacherName}}
{{playCount}}
{{score}}
{{studyProgress}}
{{courseName}}
- {{teacherName}}
{{playCount}}
{{score}}
{{studyProgress}}
二、使用模板
1、使用 is 属性,声明需要的使用的模板
2、将模板所需要的 data 传入,一般我们都会使用列表渲染。
注意:
a.可以通过表达式来确定使用哪个模板is="{{index%2 === 0 ? 'courseLeft' : 'courseRight'}}"
或者通过wx:if来确定。index是数组当前项的下标。
b. data 是要模板渲染的数据,data="{{...item}}" 写法是ES6的写法,item是wx:for当前项,... 是展开运算符,在模板中不需要再{{item.courseName}} 而是直接{{courseName}} 。
三、模板样式
1、在新建模板的时候同时新建一个courseList.wxss 的文件,与CSS同样的写法控制样式。
2、在需要使用模板的页面 .wxss文件中import进来;或者直接在app.wxss中引入,这样只需要一次引入,其他文件就不用引入了。
@import "../template/courseList.wxss";
/小程序自带的icon的使用/
文档:https://developers.weixin.qq.com/miniprogram/dev/component/icon.html
样式如下:
小程序底部的tabBar导航的配置:
文档:https://developers.weixin.qq.com/miniprogram/dev/reference/configuration/app.html#tabBar
在 app.json中配置
其中 list 接受一个数组,只能配置最少 2 个、最多 5 个 tab。tab 按数组的顺序排序,每个项都是一个对象,其属性值如下:
selectedIconPath注意是一定要配置的,不然选中的时候会没有icon,变成空白
小程序的跳转
跳转有两种
①标签方式:
文档:https://developers.weixin.qq.com/miniprogram/dev/component/navigator.html
使用 navigate标签,url填写路径,路径注意pages前面必须有/,且后面不需要加文件后缀名,例如跳转到detail.wxml,只需要写detail就可以了,后面可以跟参数,跟的参数可以在js的onLoad中拿到,如下
跳转到新页面
②js事件的方式: wx.navigateTo
文档:https://developers.weixin.qq.com/miniprogram/dev/api/route/wx.navigateTo.html
// index.wxml 点击按钮的是跳转,可以通过给按钮绑定事件 bindtap来绑定事件
//index.js
// 跳转
toLogs: function() {
wx.navigateTo({
url: '/pages/detail/detail?name=wowo'
})
}
注意:存在一种跳转失效的问题
无论使用navigator 还是wx.navigateTo都不能跳转
先排查以下问题:(可参考navigateTo的文档,里面有详细说明)

1、保证文件夹名称与文件夹内的 4 个文件的文件名称一致;
2、在用的是绝对路径的 url 时需要在最开始加"/";
3、在 toolBar 定义过的页面不能二次跳转;
4、在 tabBar 定义过的页面不能二次跳转,当页面中的跳转路径与app.json中配置的tabBar 相重复时,页面中的跳转会失效;
5、在 app.json 的 pages{} 对象中是否有这 url 的定义;

对于某些需求,如进入到详情页后,通过按钮再跳转到首页,但由于已经在 tabBar 中定义了首页路径,直接 navigator 的标签跳转将会失效。
如果需要跳转到 tabBar 的地址,使用 wx.navigateTo() 也会是不行,可以通过 wx.switchTab() 来实现跳转到 tabBar 的地址。

例:
wx.switchTab({
  url: '/pages/index/index',
});
小程序中地图的使用,配合获取当前位置的API
map 文档:https://developers.weixin.qq.com/miniprogram/dev/component/map.html
wx.getLocation 文档:https://developers.weixin.qq.com/miniprogram/dev/api/location/wx.getLocation.html
// map.js
Page({
  data: {
    markers: [{
      iconPath: "/resources/others.png",
      id: 0,
      latitude: 23.099994,
      longitude: 113.324520,
      width: 50,
      height: 50
    }],
    polyline: [{
      points: [{
        longitude: 113.3245211,
        latitude: 23.10229
      }, {
        longitude: 113.324520,
        latitude: 23.21229
      }],
      color:"#FF0000DD",
      width: 2,
      dottedLine: true
    }],
    controls: [{
      id: 1,
      iconPath: '/resources/location.png',
      position: {
        left: 0,
        top: 300 - 50,
        width: 50,
        height: 50
      },
      clickable: true
    }]
  },
  regionchange(e) {
    console.log(e.type)
  },
  markertap(e) {
    console.log(e.markerId)
  },
  controltap(e) {
    console.log(e.controlId)
  }
})
wx.getLocation({//获取当前的地理位置
 type: 'wgs84',
 success (res) {
   const latitude = res.latitude
   const longitude = res.longitude
   const speed = res.speed
   const accuracy = res.accuracy
 }
})
wx.chooseLocation:打开地图选择位置。
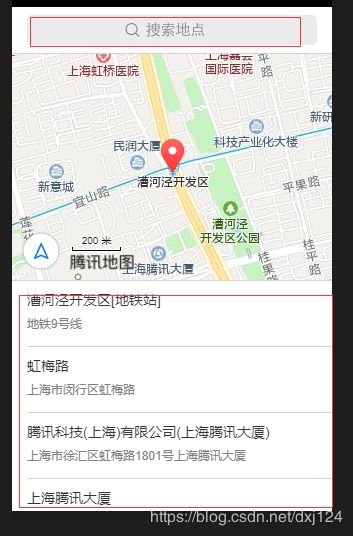
配置后,会多出这个选择位置的功能
wx.authorize :授权功能
文档:https://developers.weixin.qq.com/miniprogram/dev/api/open-api/authorize/wx.authorize.html
// 可以通过 wx.getSetting 先查询一下用户是否授权了 "scope.record" 这个 scope
wx.getSetting({
  success(res) {
    if (!res.authSetting['scope.record']) {
      wx.authorize({
        scope: 'scope.record',
        success () {
          // 用户已经同意小程序使用录音功能,后续调用 wx.startRecord 接口不会弹窗询问
          wx.startRecord()
        }
      })
    }
  }
})
onShareAppMessage:小程序点击右上角 三个点的 分享功能
文档:https://developers.weixin.qq.com/miniprogram/dev/reference/api/Page.html
Page({
  onShareAppMessage: function (res) {
    if (res.from === 'button') {
      // 来自页面内转发按钮
      console.log(res.target)
    }
    return {
      title: '自定义转发标题',
      path: '/page/user?id=123'
    }
  }
})
scanCode:扫一扫 调起客户端扫码界面进行扫码
文档:https://developers.weixin.qq.com/miniprogram/dev/api/device/scan/wx.scanCode.html
// 允许从相机和相册扫码
wx.scanCode({
  success (res) {
    console.log(res)
  }
})

// 只允许从相机扫码
wx.scanCode({
  onlyFromCamera: true,
  success (res) {
    console.log(res)
  }
})
判断H5页面环境是否在小程序的webview中
引入jweixin的js文件,才能调用wx的方法
文档:https://developers.weixin.qq.com/miniprogram/dev/component/web-view.html
微信的jssdk的使用:
文档:https://mp.weixin.qq.com/wiki?t=resource/res_main&id=mp1421141115
module.exports
将一些公共的代码抽离成为一个单独的 js 文件,作为一个模块。模块只有通过 module.exports 或者 exports 才能对外暴露接口。
// common.js

function sayHello(name) {
  console.log(`Hello ${name} !`)
}
function sayGoodbye(name) {
  console.log(`Goodbye ${name} !`)
}

module.exports.sayHello = sayHello
在需要使用这些模块的文件中,使用 require(path) 将公共代码引入:
注意:require 暂时不支持绝对路径。
var common = require('common.js')
Page({
  helloMINA: function() {
    common.sayHello('MINA')
  }
})
条件渲染:
文档:https://developers.weixin.qq.com/miniprogram/dev/framework/view/wxml/
 WEBVIEW
 APP
 MINA


  {{index}}: {{item.message}}


默认数组的当前项的下标变量名默认为 index,数组当前项的变量名默认为 item。


