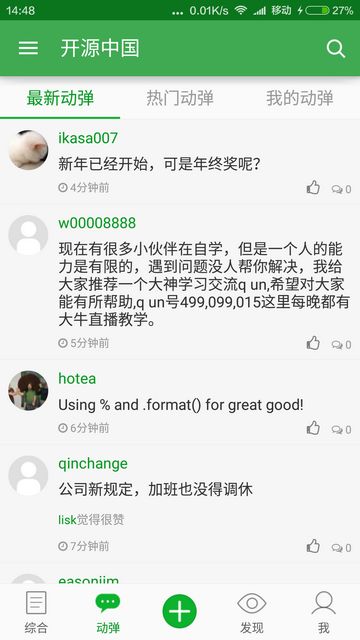
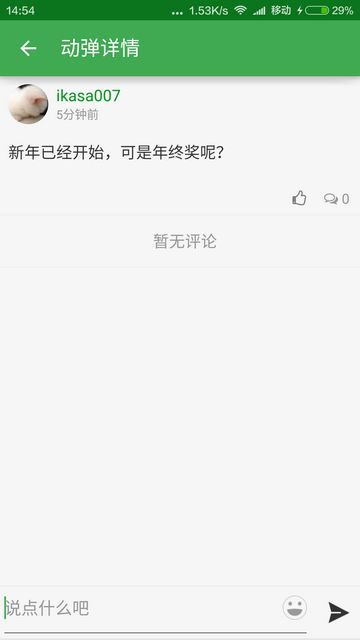
跟前篇完全一样的方法追踪源码进行分析。而在这之前也不妨先进行一下预估:UI呈现上与综合是相同的,仅在单个数据项上多出了左侧的圆形头像以及右下角的评论数展示,还有就是动弹的内容也是可以显示图片的。所以,可能还会看到相应的图片加载与缓存处理。
TweetsViewPagerFragment extends BaseViewPagerFragment
/**
 * 动弹界面(包括最新动弹、热门动弹、我的动弹)
 *
 * @author FireAnt(http://my.oschina.net/LittleDY)
 * @created 2014年9月25日 下午2:21:52
 *
 */
public class TweetsViewPagerFragment extends BaseViewPagerFragment
BaseViewPagerFragment在之前篇章中已分析过,所以略去。
这里覆盖的关键方法:
    @Override
    protected void onSetupTabAdapter(ViewPageFragmentAdapter adapter) {

        String[] title = getResources().getStringArray(
                R.array.tweets_viewpage_arrays);
        adapter.addTab(title[0], "new_tweets", TweetsFragment.class,
                getBundle(TweetsList.CATALOG_LATEST));
        adapter.addTab(title[1], "hot_tweets", TweetsFragment.class,
                getBundle(TweetsList.CATALOG_HOT));
        adapter.addTab(title[2], "my_tweets", TweetsFragment.class,
                getBundle(TweetsList.CATALOG_ME));
    }
TweetsFragment extends BaseListFragment
应该说这个类的结构也跟之前分析综合时所见是完全雷同的,所不同的只在于多了长按、删除等功能的支持。
直接看实现的Adapter:
    @Override
    protected TweetAdapter getListAdapter() {
        return new TweetAdapter();
    }
ListBaseAdapter extends BaseAdapter
提供多种状态:
public static final int STATE_EMPTY_ITEM = 0;
    public static final int STATE_LOAD_MORE = 1;
    public static final int STATE_NO_MORE = 2;
    public static final int STATE_NO_DATA = 3;
    public static final int STATE_LESS_ONE_PAGE = 4;
    public static final int STATE_NETWORK_ERROR = 5;
    public static final int STATE_OTHER = 6;
数据集采用protected ArrayList
    public int getDataSizePlus1(){
        if(hasFooterView()){
            return getDataSize() + 1;
        }
        return getDataSize();
    }

    public int getDataSize() {
        return mDatas.size();
    }
FooterView操作:
    public void setFooterViewLoading(String loadMsg) {
        ProgressBar progress = (ProgressBar) mFooterView
                .findViewById(R.id.progressbar);
        TextView text = (TextView) mFooterView.findViewById(R.id.text);
        mFooterView.setVisibility(View.VISIBLE);
        progress.setVisibility(View.VISIBLE);
        text.setVisibility(View.VISIBLE);
        if (StringUtils.isEmpty(loadMsg)) {
            text.setText(_loadmoreText);
        } else {
            text.setText(loadMsg);
        }
    }
getView()中switch case不同的状态,最末返回getRealView(position, convertView, parent);,而这是留给子类实现的,写成抽象方法会更好一些:
protected View getRealView(int position, View convertView, ViewGroup parent) {
        return null;
    }
TweetAdapter extends ListBaseAdapter
这个recordBitmap一眼看上去并不明白是用来干什么的:
    private Bitmap recordBitmap;
    private Context context;
看关键方法getRealView的实现。
代码很长就不贴全了,大意是先ViewHolder的使用,再是各项赋值控件显隐什么的惯常操作:
        vh.face.setUserInfo(tweet.getAuthorid(), tweet.getAuthor());
        vh.face.setAvatarUrl(tweet.getPortrait());
        vh.author.setText(tweet.getAuthor());
        vh.time.setText(StringUtils.friendly_time(tweet.getPubDate()));
        vh.content.setMovementMethod(MyLinkMovementMethod.a());
        vh.content.setFocusable(false);
        vh.content.setDispatchToParent(true);
        vh.content.setLongClickable(false);
查布局知这里的vh.face为一个自定义控件,保存用户信息及显示——包含圆形头像。
粗略看看它的实现,CircleImageView extends ImageView:
    private static final ScaleType SCALE_TYPE = ScaleType.CENTER_CROP;

    private static final Bitmap.Config BITMAP_CONFIG = Bitmap.Config.ARGB_8888;
    private static final int COLORDRAWABLE_DIMENSION = 1;

    private static final int DEFAULT_BORDER_WIDTH = 0;
    private static final int DEFAULT_BORDER_COLOR = Color.BLACK;
可以看到它使用了置中放缩,色彩格式上使用了最大的ARGB_8888,依据情况也可以考虑换成ARGB_4444之类。另外从最后两项来看,这个自定义控件应该是设置边框宽度和色彩的。默认宽度为0,色彩为黑。
看CircleImageView#onDraw:
    @Override
    protected void onDraw(Canvas canvas) {
        if(!isDisplayCircle) {
            super.onDraw(canvas);
            return;
        }
        if (getDrawable() == null) {
            return;
        }

        canvas.drawCircle(getWidth() / 2, getHeight() / 2, mDrawableRadius, mBitmapPaint);
        if(mBorderWidth != 0){
          canvas.drawCircle(getWidth() / 2, getHeight() / 2, mBorderRadius, mBorderPaint);
        }
    }
画笔初始化,可以看到它是使用了BitmapShader来实现圆形绘制的:
        mBitmapShader = new BitmapShader(mBitmap, Shader.TileMode.CLAMP, Shader.TileMode.CLAMP);

        mBitmapPaint.setAntiAlias(true);
        mBitmapPaint.setShader(mBitmapShader);
另一种实现可以参考这篇鸿洋的博文。
接着看图片加载vh.face.setAvatarUrl(tweet.getPortrait());
    public void setAvatarUrl(String url) {
        if (StringUtils.isEmpty(url)) {
            setImageResource(R.drawable.widget_dface);
            return;
        }
        // 由于头像地址默认加了一段参数需要去掉
        int end = url.indexOf('?');
        final String headUrl;
        if (end > 0) {
            headUrl = url.substring(0, end);
        } else {
            headUrl = url;
        }

        Core.getKJBitmap().display(this, headUrl, R.drawable.widget_dface, 0, 0,
                new BitmapCallBack() {
                    @Override
                    public void onFailure(Exception e) {
                        super.onFailure(e);
                        aty.runOnUiThread(new Runnable() {
                            @Override
                            public void run() {
                                setImageResource(R.drawable.widget_dface);
                            }
                        });
                        setImageResource(R.drawable.widget_dface);
                    }
                });
    }
onFailure写得有点奇怪,最后的setImageResource(R.drawable.widget_dface);应该是不需要的。
可以看到,这里加载使用了其自家的开发框架KJFrameForAndroid,具体资料可以另行查看,所以再往下分析就没有必要了。
动弹详情
这与之前分析过的资讯详情基本是一个套路,这里就不赘述了,实现上也是使用一个WebView进行呈现,最主要的差异应该是体现在填充方法:
    /**
     * 填充webview内容
     */
    private void fillWebViewBody() {
        StringBuffer body = new StringBuffer();
        body.append(ThemeSwitchUtils.getWebViewBodyString());
        body.append(UIHelper.WEB_STYLE + UIHelper.WEB_LOAD_IMAGES);

        StringBuilder tweetbody = new StringBuilder(mTweet.getBody());

        String tweetBody = TextUtils.isEmpty(mTweet.getImgSmall()) ? tweetbody
                .toString() : tweetbody.toString() + "
";
        body.append(setHtmlCotentSupportImagePreview(tweetBody));

        UIHelper.addWebImageShow(getActivity(), mContent);
        // 封尾
        body.append("
