使用open***构建安全***
***概述
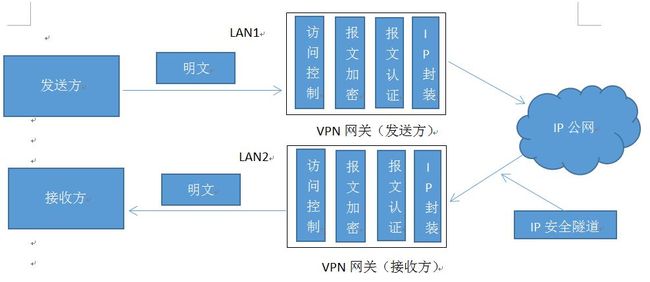
×××(Virtual PrivateNetwork)虚拟专用网络,是依靠ISP和其他的NSP在公共网络中建立专用的数据通信网络的技术,可以为企业之间或者个人之间提供安全的数据传输隧道服务。在×××中任意两点之间的连接并没有传统专网所需要的端到端的物理链路,而是利用公共网络资源动态组成的,可以理解为通过私有的隧道技术在公共数据网络上模拟出来的和专网有同样功能的点到点的专线技术,所谓虚拟是指***不需要去拉实际的物理线路,而是借用了公共Internet网络来实现。
***的作用
×××功能可以帮助公司远程用户公司的分支机构、商业合作伙伴及供应商等公司和自己的公司内部网络之间建立可信的安全连接或者是局域网连接,确保数据的加密安全传输和业务访问,对于运维工程师来说,可以连接不同的机房作为局域网,处理相关的业务。
open ***的加密通信原理过程
open ***使用TLS加密是通过使用公开密钥(非对称密钥,加密解密使用不同的key,一个称为public key,另一个是private key)对数据进行加密的。对于open ***使用TLS mode,首先server和client要有相同的CA证书,双方通过交换证书验证对方的合法性以决定是否建立***通信,然后使用对方CA把自己目前使用的数据加密方法(类似密钥)加密后发送给对方,由于使用对方的CA加密,所以只有对方CA的对应的private key才能解密该字串,保证此密钥的安全性,并且此密钥定期改变,对于***来说,可能还没有破解出密钥,通信双方已经更换密钥了。
open***的基本信息处理过程
理解了open***的基本概念,我们来做一个小实验来实现open***的功能:
实验
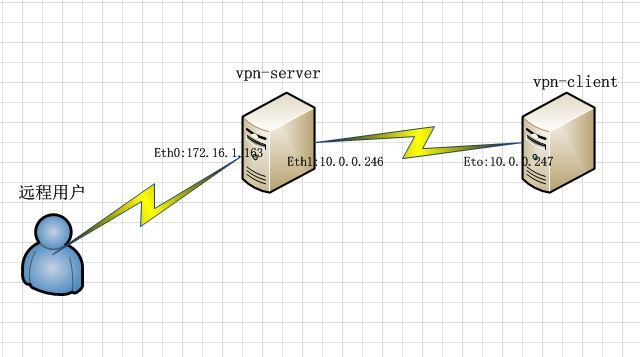
环境
| ***-server | eth0 IP:172.16.1.163 GW:172.16.1.2 |
eth1 IP:10.0.0.246 |
| ***-client | eth0 IP:10.0.0.247 GW:10.0.0.246(可选) |
拓扑
***服务端的配置
同步时间
[root@***-server ~]# ntpdate pool.ntp.org
[root@***-server ~]# echo '*/5 * * * * /usr/sbin/ntpdate pool.ntp.org > /dev/null 2>&1' >>/var/spool/cron/root
[root@***-server ~]# crontab -l -uroot
*/5 * * * * /usr/bin/ntpdatepool.ntp.org > /dev/null 2>&1
安装epel源,open***要在epel中下载安装
[root@***-server ~]#yum -y install epel-release
安装依赖包
[root@***-server~]#yum install -y openssl openssl-devel lzo lzo-devel pam pam-devel automake pkgconfig
安装open***
[root@***-server~]# yum -y install open***
生成Open×××需要的证书
[root@***-server~]# yum -y install easy-rsa #新版的***需要先下载easy-rsa
[root@***-server~]# cp -a /usr/share/easy-rsa/2.0/* /etc/open***/
[root@***-server~]# cd /etc/open***/
[root@***-serveropen***]# vi vars #修改vars配置如下使得生成证书时不用再次输入只需一路回车即可
exportKEY_COUNTRY="CN"
exportKEY_PROVINCE="BJ"
exportKEY_CITY="Beijing"
exportKEY_ORG="***-test"
exportKEY_EMAIL="[email protected]"
exportKEY_OU="testdomain"
[root@***-serveropen***]# chmod +x vars #添加可执行权限
[root@***-serveropen***]# source vars #执行脚本
NOTE:If you run ./clean-all, I will be doing a rm -rf on /etc/open***/keys
[root@***-serveropen***]# source clean-all #初始化keys目录并创建所需要的文件和目录
[root@***-serveropen***]# source build-ca #生成CA证书,用于签发server和client证书,完成后生成ca.crt ca.key index.txt serial文件
[root@***-serveropen***]# source build-key-server server #生成服务器端密钥
[root@***-serveropen***]# source build-key client #生成客户器端密钥
[root@***-serveropen***]# source build-dh #生成Diffie Hellman文件,TLS server 需要使用的一个文件完成后生成dh1024.pem或dh2048.pem文件,大小在配置文件中定义。
编辑open***服务端配置文件
[root@***-server~]# cp /usr/share/doc/open***-2.3.13/sample/sample-config-files/server.conf/etc/open***/ #把配置文件模板拷贝到/etc/open***/
[root@***-serveropen***]# grep -Ev ";|#|^$" server.conf > 1 #去掉空行和注释
[root@***-serveropen***]# cat 1 > server.conf #输出重定向到server.conf文件
[root@***-serveropen***]# vi server.conf #编辑如下
port 1194 #监听端口
proto tcp #使用的协议
dev tun #基于路由的隧道
push "route 10.0.0.0 255.255.255.0" #open***服务器所在局域网的网段
ca /etc/open***/keys/ca.crt #ca证书的路径
cert /etc/open***/keys/server.crt #服务器端证书的路径
key /etc/open***/keys/server.key #服务器端密钥的路径
dh /etc/open***/keys/dh2048.pem #DiffieHellman文件的路径
server 10.8.0.0 255.255.255.0 #配置×××客户端使用的网段,Open×××会自动提供基于该网段的DHCP服务但不能和任何一方的局域网段重复,必须保证唯一
ifconfig-pool-persist ipp.txt #维持一个客户端和virtual IP的对应表以方便客户端重新连接时可以获得同样的IP
keepalive 10 120 #设置服务端检测的间隔和超时时间 每 10 秒 ping 一次如果 120 秒没有回应则认为对方已经宕机
cipher AES-256-CBC #设置OPEN×××密码使用AES-256
persist-key #通过keepalive检测超时后,重新启动×××,不重新读取keys,保留第一次使用的keys
persist-tun #通过keepalive检测超时后,重新启动×××,一直保持tun或者tap设备是linkup的,否则网络连接会先linkdown然后linkup
status open***-status.log #输出短日志,每分钟刷新一次,以显示当前的客户端
verb 3 #设置日志记录冗长级别
启动OPEN×××服务端
[root@***-server~]# systemctl start open***@server.service
[root@***-server~]# systemctl enable open***@server.service
查看是否获得了一个VIP
[root@***-serveropen***]# ip add show
6:tun0:
link/none
inet 10.8.0.1 peer 10.8.0.2/32 scope global tun0
valid_lft forever preferred_lft forever
配置防火墙和开启内核转发功能
[root@***-server~]# vi /etc/sysctl.conf
net.ipv4.ip_forward= 1
[root@***-server~]# sysctl -p
net.ipv4.ip_forward= 1
[root@***-server~]# firewall-cmd --permanent --add-port=1194/tcp
success
[root@***-server~]# firewall-cmd --permanent --add-masquerade
success
[root@***-server~]# firewall-cmd --reload
success
Window7_64客户端配置
步骤:
先在win7上安装open***客户端
把open***服务器的ca.crt,client.crt,client.key,还有模板文件client.conf拷贝到open***的安装目录下的config目录
修改client.conf如下,然后更改后缀名为client.o***
client #定义这是一个client,配置从server端pull拉取过来,如IP地址,路由信息之类,Server使用push指令推送过来。
dev tun #定义open***运行的模式,这个地方需要严格和Server端保持一致
proto tcp #使用的协议
remote 172.16.1.163 1194 #服务端的IP和端口
resolv-retry infinite #始终重新解析Server的IP地址(如果remote后面跟的是域名),保证Server IP地址是动态的使用DDNS动态更新DNS后,Client在自动重新连接时重新解析Server的IP地址。这样无需人为重新启动,即可重新接入×××
nobind #定义在本机不邦定任何端口监听incoming数据
persist-key
persist-tun
ca ca.crt #定义CA证书文件
cert client.crt #定义客户端证书文件
key client.key #定义客户端密钥文件
remote-cert-tls server #指定采用服务器校验方式
cipher AES-256-CBC
verb 3 #设置日志记录冗长级别
验证
启动客户端,尝试连接,成功之后会获得一个IP以及open***服务器推送过来的路由、IP
路由
![]()
ping测试open***服务器所在内网的主机是否可以连通
查看服务器端的日志
[root@***-server open***]# cat open***-status.log
Open××× CLIENT LIST
Updated,Thu Jun 22 23:24:26 2017
Common Name,Real Address,Bytes Received,Bytes Sent,Connected Since
client,172.16.1.1:57718,15899,7283,Thu Jun 22 23:23:31 2017
ROUTING TABLE
Virtual Address,Common Name,Real Address,Last Ref
10.8.0.6,client,172.16.1.1:57718,Thu Jun 22 23:23:33 2017
GLOBAL STATS
Max bcast/mcast queue length,0
END
linux客户端配置
下载open***
[root@open***-client~]# yum -y install epel-release
[root@open***-client~]#yum install -y openssl openssl-devel lzo lzo-devel pam pam-devel automake pkgconfig
[root@open***-client~]#yum -y install open***
拉取在服务端的客户端证书、密钥、CA证书,还有配置文件
[root@open***-client~]#cd /etc/open***/
scp 172.16.1.163:/etc/open***/keys/{client.key,client.crt,ca.crt} .
scp /usr/share/doc/open***-2.3.13/sample/sample-config-files/client.conf .
[root@open***-client open***]# ll
total 20
-rw-r--r--.1 root root 1724 Dec 7 07:40 ca.crt
-rw-r--r--.1 root root 205 Dec 7 08:14 client.conf
-rw-r--r--.1 root root 5355 Dec 7 07:40 client.crt
-rw-r--r--.1 root root 1704 Dec 7 07:40 client.key
修改配置文件如下
[root@open***-client open***]# cat client.conf
client
dev tun
proto tcp
remote 172.16.1.163 1194
resolv-retry infinite
nobind
persist-key
persist-tun
ca ca.crt
cert client.crt
key client.key
remote-cert-tls server
cipher AES-256-CBC
以后台方式启动open***客户端
[root@open***-clientopen***]# /usr/sbin/open*** --config /etc/open***/client.conf &
查看进程
[root@open***-clientopen***]# ps -ef|grep open***
avahi 920 1 0 09:07 ? 00:00:00 avahi-daemon: running[open***-client.local]
root 7759 3278 0 09:41 pts/0 00:00:00 /usr/sbin/open*** --config/etc/open***/client.conf
root 7836 3278 0 09:43 pts/0 00:00:00 grep --color=auto open***
验证是否获得一个open***所在网段的IP
[root@open***-clientopen***]# ip add show
6:tun0:
link/none
inet 10.8.0.6 peer 10.8.0.5/32 scope globaltun0
valid_lft forever preferred_lft forever
获得的路由
[root@open***-clientopen***]# route -n
10.0.0.0 10.8.0.5 255.255.255.0 UG 0 0 0 tun0
测试连通性
[root@open***-clientopen***]# ping 10.0.0.247
PING10.0.0.247 (10.0.0.247) 56(84) bytes of data.
64bytes from 10.0.0.247: icmp_seq=1 ttl=63 time=3.19 ms
64bytes from 10.0.0.247: icmp_seq=2 ttl=63 time=1.73 ms
64bytes from 10.0.0.247: icmp_seq=3 ttl=63 time=1.63 ms
查看日志
[root@***-server~]# cat /etc/open***/open***-status.log
Open×××CLIENT LIST
Updated,Thu Jun 22 23:39:29 2017
CommonName,Real Address,Bytes Received,Bytes Sent,Connected Since
client,172.16.1.168:36040,5742,6154,Thu Jun 22 23:43:31 2017
ROUTINGTABLE
VirtualAddress,Common Name,Real Address,Last Ref
10.8.0.6,client,172.16.1.168:36040,Thu Jun 22 23:43:31 2017
GLOBALSTATS
Maxbcast/mcast queue length,0
END
增加证书
[root@***-serveropen***]# . vars 执行脚本
[root@***-serveropen***]# . build-key xiaoli 创建证书
[root@***-serveropen***]# ls keys/|grep xiaoli
xiaoli.crt
xiaoli.csr
xiaoli.key
然后把xiaoli.key,xiaoli.crt,还有模板配置文件client.conf拷贝到open***的安装目录下的config目录,把client.conf改名为为xiaoli.o***,如下
吊销证书
[root@***-serveropen***]# . vars 执行脚本
[root@***-serveropen***]# . revoke-full client 吊销证书
Usingconfiguration from /etc/open***/openssl-1.0.0.cnf
RevokingCertificate 02.
DataBase Updated
Usingconfiguration from /etc/open***/openssl-1.0.0.cnf
client.crt:C = CN, ST = BJ, L = Beijing, O = ***-test, OU = testdomain, CN = client, name= EasyRSA, emailAddress = [email protected]
error23 at 0 depth lookup:certificate revoked
成功注销某个证书之后,可以打开keys/index.txt文件,可以看到被注销的证书前面,已标记为R
[root@***-serverkeys]# cat index.txt
V 261205114539Z 01 unknown /C=CN/ST=BJ/L=Beijing/O=***-test/OU=testdomain/CN=server/name=EasyRSA/[email protected]
R 261205114553Z 161207153029Z 02 unknown /C=CN/ST=BJ/L=Beijing/O=***-test/OU=testdomain/CN=client/name=EasyRSA/[email protected]
V 261205150854Z 03 unknown /C=CN/ST=BJ/L=Beijing/O=***-test/OU=testdomain/CN=xiaoli/name=EasyRSA/[email protected]
在配置文件中告诉Open×××服务器以后与客户端连接的时候,通过crl.pem文件验证该客户端的证书是否已经被注销。因此,我们需要在服务器端的配置文件加上相关配置然后重启***服务
[root@***-serveropen***]# echo "crl-verify /etc/open***/keys/crl.pem" >>server.conf
[root@***-serverkeys]# systemctl restart open***@server.service
如有纰漏,欢迎指正。


