原文地址: https://www.ethereum.org/token
翻译: terryc007
版本:1.0
The Coin
We are going to create a digital token. Tokens in the Ethereum ecosystem can represent any fungible tradable good: coins, loyalty points, gold certificates, IOUs, in-game items, etc. Since all tokens implement some basic features in a standard way, this also means that your token will be instantly compatible with the Ethereum wallet and any other client or contract that uses the same standards.
代币
我们将会创建一个数字Token。 在以太坊生态系统,Token可用来代表任何可以交易的商品:货币,忠诚积分,金牌证书,IOU, 游戏道具,等等。因为所有的Token使用标准的方式实现了一些基础功能,这也意味着你的Token可以立马兼容以太坊钱包,以及其他使用相同标准的客户端或合约。
MINIMUM VIABLE TOKEN
The standard token contract can be quite complex. But in essence a very basic token boils down to this:
最小可用Token
标准的Token合约可能会相当的复杂。但是本质上讲,一个Token合约代码可精简到如下样子:
pragma solidity ^0.4.20;

contract MyToken {
    /* This creates an array with all balances */
    mapping (address => uint256) public balanceOf;

    /* Initializes contract with initial supply tokens to the creator of the contract */
    function MyToken(
        uint256 initialSupply
        ) public {
        balanceOf[msg.sender] = initialSupply;              // Give the creator all initial tokens
    }

    /* Send coins */
    function transfer(address _to, uint256 _value) public {
        require(balanceOf[msg.sender] >= _value);           // Check if the sender has enough
        require(balanceOf[_to] + _value >= balanceOf[_to]); // Check for overflows
        balanceOf[msg.sender] -= _value;                    // Subtract from the sender
        balanceOf[_to] += _value;                           // Add the same to the recipient
    }
}
THE CODE
But if you just want to copy paste a more complete code, then use this:
代码
但如果你仅仅想复制粘贴一份更为完整的代码,那请使用下面的:
pragma solidity ^0.4.16;

interface tokenRecipient { function receiveApproval(address _from, uint256 _value, address _token, bytes _extraData) external; }

contract TokenERC20 {
    // Public variables of the token
    string public name;
    string public symbol;
    uint8 public decimals = 18;
    // 18 decimals is the strongly suggested default, avoid changing it
    uint256 public totalSupply;

    // This creates an array with all balances
    mapping (address => uint256) public balanceOf;
    mapping (address => mapping (address => uint256)) public allowance;

    // This generates a public event on the blockchain that will notify clients
    event Transfer(address indexed from, address indexed to, uint256 value);

    // This notifies clients about the amount burnt
    event Burn(address indexed from, uint256 value);

    /**
     * Constructor function
     *
     * Initializes contract with initial supply tokens to the creator of the contract
     */
    function TokenERC20(
        uint256 initialSupply,
        string tokenName,
        string tokenSymbol
    ) public {
        totalSupply = initialSupply * 10 ** uint256(decimals);  // Update total supply with the decimal amount
        balanceOf[msg.sender] = totalSupply;                // Give the creator all initial tokens
        name = tokenName;                                   // Set the name for display purposes
        symbol = tokenSymbol;                               // Set the symbol for display purposes
    }

    /**
     * Internal transfer, only can be called by this contract
     */
    function _transfer(address _from, address _to, uint _value) internal {
        // Prevent transfer to 0x0 address. Use burn() instead
        require(_to != 0x0);
        // Check if the sender has enough
        require(balanceOf[_from] >= _value);
        // Check for overflows
        require(balanceOf[_to] + _value >= balanceOf[_to]);
        // Save this for an assertion in the future
        uint previousBalances = balanceOf[_from] + balanceOf[_to];
        // Subtract from the sender
        balanceOf[_from] -= _value;
        // Add the same to the recipient
        balanceOf[_to] += _value;
        emit Transfer(_from, _to, _value);
        // Asserts are used to use static analysis to find bugs in your code. They should never fail
        assert(balanceOf[_from] + balanceOf[_to] == previousBalances);
    }

    /**
     * Transfer tokens
     *
     * Send `_value` tokens to `_to` from your account
     *
     * @param _to The address of the recipient
     * @param _value the amount to send
     */
    function transfer(address _to, uint256 _value) public {
        _transfer(msg.sender, _to, _value);
    }

    /**
     * Transfer tokens from other address
     *
     * Send `_value` tokens to `_to` on behalf of `_from`
     *
     * @param _from The address of the sender
     * @param _to The address of the recipient
     * @param _value the amount to send
     */
    function transferFrom(address _from, address _to, uint256 _value) public returns (bool success) {
        require(_value <= allowance[_from][msg.sender]);     // Check allowance
        allowance[_from][msg.sender] -= _value;
        _transfer(_from, _to, _value);
        return true;
    }

    /**
     * Set allowance for other address
     *
     * Allows `_spender` to spend no more than `_value` tokens on your behalf
     *
     * @param _spender The address authorized to spend
     * @param _value the max amount they can spend
     */
    function approve(address _spender, uint256 _value) public
        returns (bool success) {
        allowance[msg.sender][_spender] = _value;
        return true;
    }

    /**
     * Set allowance for other address and notify
     *
     * Allows `_spender` to spend no more than `_value` tokens on your behalf, and then ping the contract about it
     *
     * @param _spender The address authorized to spend
     * @param _value the max amount they can spend
     * @param _extraData some extra information to send to the approved contract
     */
    function approveAndCall(address _spender, uint256 _value, bytes _extraData)
        public
        returns (bool success) {
        tokenRecipient spender = tokenRecipient(_spender);
        if (approve(_spender, _value)) {
            spender.receiveApproval(msg.sender, _value, this, _extraData);
            return true;
        }
    }

    /**
     * Destroy tokens
     *
     * Remove `_value` tokens from the system irreversibly
     *
     * @param _value the amount of money to burn
     */
    function burn(uint256 _value) public returns (bool success) {
        require(balanceOf[msg.sender] >= _value);   // Check if the sender has enough
        balanceOf[msg.sender] -= _value;            // Subtract from the sender
        totalSupply -= _value;                      // Updates totalSupply
        emit Burn(msg.sender, _value);
        return true;
    }

    /**
     * Destroy tokens from other account
     *
     * Remove `_value` tokens from the system irreversibly on behalf of `_from`.
     *
     * @param _from the address of the sender
     * @param _value the amount of money to burn
     */
    function burnFrom(address _from, uint256 _value) public returns (bool success) {
        require(balanceOf[_from] >= _value);                // Check if the targeted balance is enough
        require(_value <= allowance[_from][msg.sender]);    // Check allowance
        balanceOf[_from] -= _value;                         // Subtract from the targeted balance
        allowance[_from][msg.sender] -= _value;             // Subtract from the sender's allowance
        totalSupply -= _value;                              // Update totalSupply
        emit Burn(_from, _value);
        return true;
    }
}
UNDERSTANDING THE CODE
理解代码
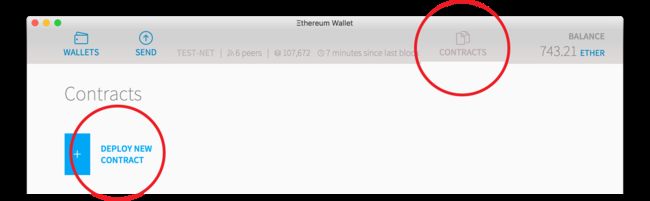
So let's start with the basics. Open the Wallet app, go to the Contracts tab and then Deploy New Contract. On the Solidity Contract Source code text field, type the code below:
我们先从基础开始,打开以太坊钱包App,点击Contract标签,再点击Deploy New Contract. 在Solidity合约代码文本区域,输入下面的代码:
    pragma solidity ^0.4.16;
    contract MyToken {
        /* This creates an array with all balances */
        mapping (address => uint256) public balanceOf;
    }
A mapping means an associative array, where you associate addresses with balances. The addresses are in the basic hexadecimal Ethereum format, while the balances are integers, ranging from 0 to 115 quattuorvigintillion. If you don't know how much a quattuorvigintillion is, it's many vigintillions more than anything you are planning to use your tokens for. The public keyword, means that this variable will be accessible by anyone on the blockchain, meaning all balances are public (as they need to be, in order for clients to display them).
一个mapping是一个关联数组,你可以把余额跟地址关联。这些地址是16进制的以太坊格式地址,余额是整数型,范围是0 ~ 2256. public 关键词,表示在区块链,这个变量可被任何人访问,也就是说所有的余额是公开的(因为需要这样,为了让客户端能够显示他们)。

If you published your contract right away, it would work but wouldn't be very useful: it would be a contract that could query the balance of your coin for any address–but since you never created a single coin, every one of them would return 0. So we are going to create a few tokens on startup. Add this code before the last closing bracket, just under the mapping.. line.
如果你立马发布你的合约,它是可以正常工作,但是没有什么用处: 它就是一个你可以查询地址上token余额的一个合约, 但因为你一个币没发行,所以查询每个地址时,返回都会是0. 因此我们将在启动的时,要创建一些币。 把这些代码就在最后的大括号之前,就在 mapping行后。
   function MyToken() public {
        balanceOf[msg.sender] = 21000000;
    }
Notice that the function MyToken has the same name as the contract MyToken. This is very important and if you rename one, you have to rename the other too: this is a special, startup function that runs only once and once only when the contract is first uploaded to the network. This function will set the balance of msg.sender, the user which deployed the contract, with a balance of 21 million.
注意函数MyToken的名字跟合约MyToken的名字是一样的。这非常重要,如果你重命名其中一个,你就必须重命名另外一个: 这是一个特殊的,启动函数,它仅执行一次,仅合约在上传到网络中时,执行一次。 这个函数会设置msg.sender的的余额, 部署这个合约的用户会得到2100万个币。
The choice of 21 million was rather arbitrary, and you can change it to anything you want in the code, but there's a better way: instead, supply it as a parameter for the function, like this:
选择2100万这个数值是很随意的,你可以在代码里面,随意改成任何数值,但是有一个更好的方法: 给这个函数增加一个参数,如下:
    function MyToken(uint256 initialSupply) public {
        balanceOf[msg.sender] = initialSupply;
    }
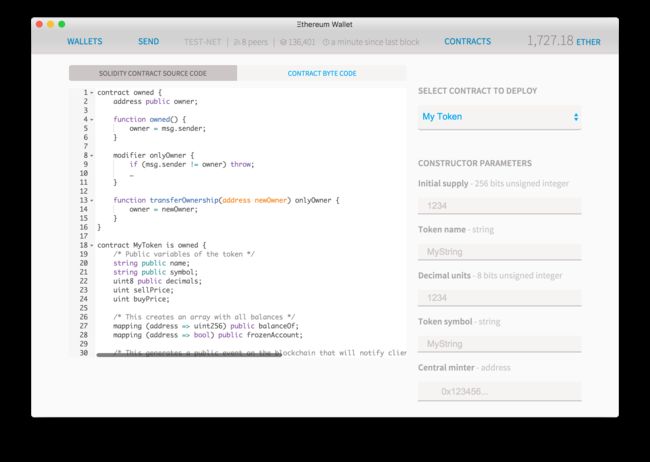
Take a look at the right column beside the contract and you'll see a drop-down list, written pick a contract. Select the "MyToken" contract and you'll see that now it shows a section called Constructor parameters. These are changeable parameters for your token, so you can reuse the same code and only change these variables in the future.
看下合约的右边栏目,你会看到一个下拉菜单,上面有pick a contract. 然后选择"MyToken"合约,你会看到现在它会显示一个区域叫: 构造参数。 对于你的Token而言,这些是可变参数,因此你能重用通用的代码,以后只需要修改这些变量就可以。

Right now you have a functional contract that created balances of tokens but since there isn't any function to move it, all it does is stay on the same account. So we are going to implement that now. Write the following code before the last bracket.
现在你有一个带功能的合约,它为Token创建了余额。 但是因为没有其他函数来移动这些币,它只能呆在同一个账号。所以我们下面会实现一个转移功能。 在最后的大括号前面,加入下面的代码。
    /* Send coins */
    function transfer(address _to, uint256 _value) public {
        /* Add and subtract new balances */
        balanceOf[msg.sender] -= _value;
        balanceOf[_to] += _value;
    }
This is a very straightforward function: it has a recipient and a value as the parameter and whenever someone calls it, it will subtract the _value from their balance and add it to the _to balance. Right away there's an obvious problem: what happens if the person wants to send more than it owns? Since we don't want to handle debt in this particular contract, we are simply going to make a quick check and if the sender doesn't have enough funds the contract execution will simply stop. It's also to check for overflows, to avoid having a number so big that it becomes zero again.
这是一个非常简单的函数: 有一个接受者,一个值作为参数,在任何时候,调用它,它会从发送者余额中减掉_value ,并加到 to的余额中。 现在明显有一个问题:如果有人发送的数量超过它账号中的余额时,会出现什么情况?因为在这个特定的合约中,我们不想去处理债务,仅是简单的做一个快速的检查,如果发送者没有足够的资金,合约的执行会被终止。为了避免一个超大的数字导致余额再次变为0,它也会检查是否溢出。
To stop a contract execution mid-execution you can either return or throw The former will cost less gas but it can be more headache as any changes you did to the contract so far will be kept. In the other hand, 'throw' will cancel all contract execution, revert any changes that transaction could have made and the sender will lose all Ether he sent for gas. But since the Wallet can detect that a contract will throw, it always shows an alert, therefore preventing any Ether to be spent at all.
在合约执行过程中,要停止它,你可以使用return 或 throw。 return会消耗更少的gas,但是可能会更麻烦,因为之前所做的任何修改还会有效。另外一方面,'throw'会取消合约执行,复原这个交易所做的所有修改。发送者用于gas的ETH会丢失掉。但是因为钱包能检查到合约将会抛出异常,它总是会显示一个警告,所以可以防止ETH丢失。
    function transfer(address _to, uint256 _value) {
        /* Check if sender has balance and for overflows */
        require(balanceOf[msg.sender] >= _value && balanceOf[_to] + _value >= balanceOf[_to]);

        /* Add and subtract new balances */
        balanceOf[msg.sender] -= _value;
        balanceOf[_to] += _value;
    }
Now all that is missing is having some basic information about the contract. In the near future this can be handled by a token registry, but for now we'll add them directly to the contract:
现在还缺少有关合约的基本信息。不远的未来,可以通过Token注册来处理,但是现在我们会直接在合约设置他们:
string public name;
string public symbol;
uint8 public decimals;
And now we update the constructor function to allow all those variables to be set up at the start:
现在我们更新下构造函数,在启动的时候,允许设置这些变量。
 /* Initializes contract with initial supply tokens to the creator of the contract */
 function MyToken(uint256 initialSupply, string tokenName, string tokenSymbol, uint8 decimalUnits) {
    // Give the creator all initial tokens
     balanceOf[msg.sender] = initialSupply;
     // Set the name for display purposes
     name = tokenName;
     // Set the symbol for display purposes
     symbol = tokenSysmbol;
     // Amount of decimals for display purposes
     decimals = decimlUnits;
 }
Finally, we now need something called Events. These are special, empty functions that you call to help clients like the Ethereum Wallet keep track of activities happening in the contract. Events should start with a capital letter. Add this line at the beginning of the contract to declare the event:
最后,我们需要一些称之为:事件 的东西。 这些是一些特殊的空函数,你调用它来帮助客户端,比如以太坊钱包来跟踪合约的动态。事件以大写字母开头。在合约的开始处,加入下面的代码:
event Transfer(address indexed from, address indexed to, uint256 value);
And then you just need to add these two lines inside the "transfer" function:
然后,你仅需要把下面的代码插入到 transfer函数中。
        /* Notify anyone listening that this transfer took place */
        Transfer(msg.sender, _to, _value);
And now your token is ready!
现在我们的token准备好了!
NOTICED THE COMMENTS?
What are those @notice and @param comments, you might ask? That's Natspec an emerging standard for a natural language specification, which allows wallets to show the user a natural language description of what the contract is about to do. While not currently supported by many wallets, this will change in the future, so it's nice to be prepared.
注意注释
你可能想问,注释中的@notice,@param是什么? 这是Natspec,是一种为自然语言规范设计的新型标准。它允许钱包以自然语言的方式向用户显示合约将要做的事情。 然而目前大多数钱包并不支持这个功能,不会未来会改变,所以做好准备也是很好的。
HOW TO DEPLOY
If you aren't there already, open the Ethereum Wallet, go to the contracts tab and then click "deploy new contract".
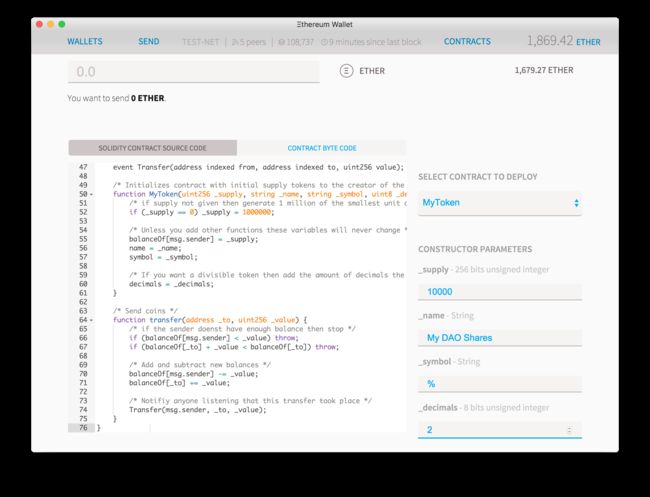
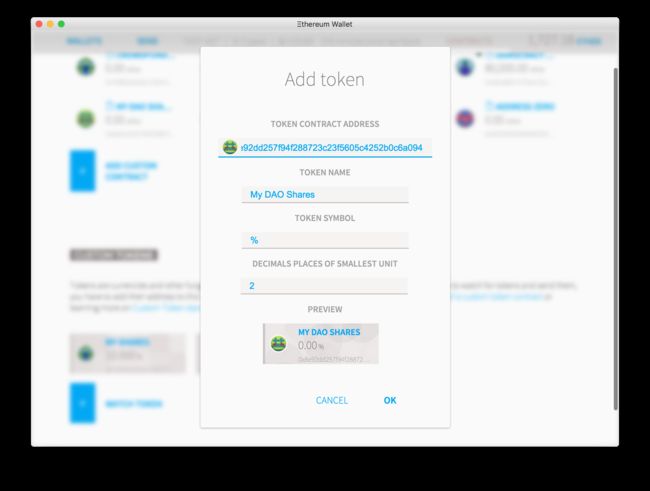
Now get the token source from above and paste it into the "Solidity source field". If the code compiles without any error, you should see a "pick a contract" drop-down list on the right. Get it and select the "MyToken" contract. On the right column, you'll see all the parameters you need to personalize your own token. You can tweak them as you please, but for the purpose of this tutorial we recommend you to pick these parameters: 10,000 as the supply, any name you want, "%" for a symbol and 2 decimal places. Your app should be looking like this:
如何部署
如果你还没准备好,请打开以太坊钱包,然后点击“合约”标签,再点击“部署新合约”。
现在把上面的代码复制粘贴到"Solidity source field". 如果代码编译正常,在右边,你应可以看到一个“pick a contract”下拉菜单。点击它,然后选择“MyToken”. 在右边栏目,你可以看到所有的,你可以自定义Token的参数。你能根据你的需要来微调,但是对于本教程,我们建议你这样设置参数: Token供应量为: 10000, 名字可以任意起, 符号为: %, Token小数点位数:2位。 你的应用看起来如下:
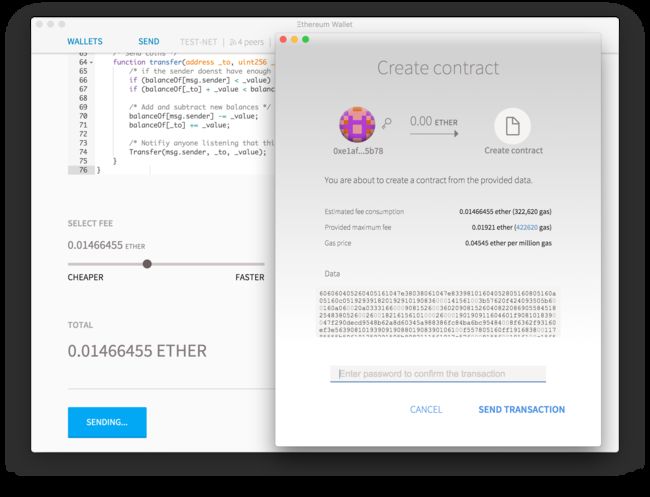
Scroll to the end of the page and you'll see an estimate of the computation cost of that contract and you can select a fee on how much Ether you are willing to pay for it. Any excess Ether you don't spend will be returned to you so you can leave the default settings if you wish. Press "deploy", type your account password and wait a few seconds for your transaction to be picked up.
滚到到页面底部,你会看到执行这个合约,所需要花费的ETH的一个估算值,然后你选择你想要支付的费用。 剩余没有花掉的ETH会退回给你,因此如果你愿意,可以使用默认的设置。 点击“部署”, 输入你账号密码,然后等几秒,你的交易就会被矿工处理。
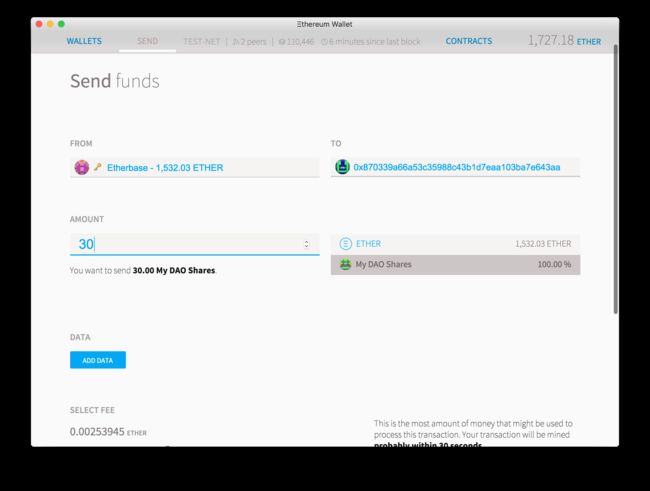
You'll be redirected to the front page where you can see your transaction waiting for confirmations. Click the account named "Etherbase" (your main account) and after no more than a minute you should see that your account will show that you have 100% of the shares you just created. To send some to a few friends: select "send", and then choose which currency you want to send (Ether or your newly created share), paste your friend's address on the "to" field and press "send".
点击“发送交易”,显示一个等待交易确认页面,点击"Etherbase"(你的主账号)账号,不到1分钟左右,你应该能看到,你的账号会显示你拥有你创建token的100%股份。要发送给你朋友,选择“发送”, 然后选择要发送的Token(ETH或你刚创建的Token), 在“to”区域,粘贴你朋友的钱包地址,最后点击“Send”
If you send it to a friend, they will not see anything in their wallet yet. This is because the wallet only tracks tokens it knows about, and you have to add these manually. Now go to the "Contracts" tab and you should see a link to your newly created contract. Click on it to go to its page. Since this is a very simple contract page there isn't much to do here, just click "copy address" and paste the contract address into a text editor, you'll need it shortly.
To add a token to watch, go to the contracts page and then click "Watch Token". A pop-up will appear and you only need to paste the contract address. The token name, symbol and decimal number should be automatically filled but if it's not you can put anything you want (it will only affect how it displays on your wallet). Once you do this, you'll automatically be shown any balance you have of that token and you'll be able to send it to anyone else.
如果你把Token发送给你朋友,他们在钱包里是看不到这个新Token。这是因为钱包仅跟踪那些它知道的Token,所以你必须自己手动添加新建的Token。现在去"合约"标签,你会看到一个你新建合约的链接。 点击它。因为它是一个非常简单的合约,所以没有什么可以做的,你需要点击“复制地址”,然后把这个合约地址粘贴一个文本编辑器,一会你会用到它。
要添加一个Token来观察,去合约页面,点击“观察Token”。会弹出一个页面,你只需要把合约地址粘贴上去。合约名字,符号,小数点位数会自动填充上。 但如果没有自动填充,你可以自己随意填(它仅会在你的钱包上有效)。完成后,就会自动显示你的Token余额,然后你就可以给其他任何人发送token。
And now you have your own crypto token! Tokens by themselves can be useful as value exchange on local communities, ways to keep track of worked hours or other loyalty programs. But can we make a currency have an intrinsic value by making it useful?
现在你有了自己的加密Token了! Token在本地社区中,用来做价值交换是非常有用的,比如用来追踪工作时长,其他忠诚程序。 但是我们能否让Token有用,让一个货币有其内在价值了?
Improve your token
You can deploy your whole crypto token without ever touching a line of code, but the real magic happens when you start customizing it. The following sections will be suggestions on functions you can add to your token to make it fit your needs more.
改进Token
不需写一行代码,你就可以部署一个加密Token,但是当你开始自定义它时,才会发现它的神奇之处。下面的章节是一些建议,你可以根据你的需要,给你的token加一些功能。
MORE BASIC FUNCTIONS
You'll notice that there some more functions in your basic token contract, like approve, sendFrom and others. These functions are there for your token to interact with other contracts: if you want, say, sell tokens to a decentralized exchange, just sending them to an address will not be enough as the exchange will not be aware of the new tokens or who sent them, because contracts aren't able to subscribe to Events only to function calls. So for contracts, you should first approve an amount of tokens they can move from your account and then ping them to let them know they should do their thing - or do the two actions in one, with approveAndCall.
Because many of these functions are having to reimplement the transferring of tokens, it makes sense to change them to an internal function, which can only be called by the contract itself:
更多基础功能
你将注意到,在你的基础token合约里面,会有更多的功能,像approve, sendFrom以及其他的功能。这些函数能让你的Token跟其他合约交互用: 比如说,把token卖给一个去中心的交易所,你仅仅发送token到一个地址是不够的,因为交易所并不会注意到这些新的Token,或谁发给它的。因为合约并能对函数调用进行事件订阅。因此,对于合约,你首先需要批准合约能从你的账号移动多少token,然后ping下合约,让他们知道,他们应用要做一些事情或使用approveAndCall来一次完成这两部操作。
因为很多函数不得不重新实现token的转移功能,所以把他们改成内部函数还是很有意义的。所谓的内部函数,就是指他们只能被合约自己调用。
/* Internal transfer, can only be called by this contract */
function _transfer(address _from, address _to, uint256 _value) internal {
    // Prevent transfer to 0x0 address. Use burn() instead
    require(_to != 0x0);
    // Check if the sender has enough
    require(balanceOf[_from] >= _value);
    // Check for overflows
    require(balanceOf[_to] + _value >= balanceOf[_to]);
    // Check if sender is frozen
    require(frozenAccount[_from]);
    // Check if recipient is frozen
    require(frozenAccount[_to]);
    // Subtract from then sender
    balanceOf[_from] -= _value;
    // Add the same to the recipient
    balanceOf[_to] += _value;
    Transfer(_from, _to, _value);
}
Now all your functions that result in the transfer of coins, can do their own checks and then call transfer with the correct parameters. Notice that this function will move coins from any account to any other, without requiring anyone's permission to do so: that's why it's an internal function, only called by the contract: if you add any function calling it, make sure it properly verifies if the caller should be have permission to move those.
现在所有会引起token转移的函数,能自己做参数检查,然后使用正确的参数来调用transfer函数。需要注意的是,在不需任何人的授权,这个函数就可以把token从一个账号移动到另外一种账号。这也就是为什么把它称为内部函数的原因,且只能被合约自己调用: 如果你新增任何函数调用它,务必要正确地验证:调用者应有权限来移动token。
CENTRALIZED ADMINISTRATOR
All dapps are fully decentralized by default, but that doesn't mean they can't have some sort of central manager, if you want them to. Maybe you want the ability to mint more coins, maybe you want to ban some people from using your currency. You can add any of those features, but the catch is that you can only add them at the beginning, so all the token holders will always know exactly the rules of the game before they decide to own one.
For that to happen, you need a central controller of currency. This could be a simple account, but could also be a contract and therefore the decision on creating more tokens will depend on the contract: if it's a democratic organization that can be up to vote, or maybe it can be just a way to limit the power of the token owner.
In order to do that we'll learn a very useful property of contracts: inheritance. Inheritance allows a contract to acquire properties of a parent contract, without having to redefine all of them. This makes the code cleaner and easier to reuse. Add this code to the first line of your code, before contract MyToken {.
中心管理员
默认情况下,所有的DApp都是完全去中心化的,但是这并不是说,当你需要一些中心化话的功能时,他们也不能拥有一些中心管理者。比如你可能想要再多发一些币,禁止一些人使用你的Token。 你能添加这种功能,但是你仅能在开始的时候添加这些功能,这样所有token持有者在他们决定拥有这些Token前,清楚的知道游戏规则。
为应对这种情况,你需要一个货币的中心控制台。 它只是一个简单的账号,但也可以是一个合约,这样决定是否创建更多的token的就取决于这个合约: 如果它是一个有投票决定的民主组织,或者是一种限制token拥有者权利方法。
为实现这样的功能,我们需要学习一个非常有用的合约属性: 继承。 不需要重新定义,继承使得合约可以获取父合约所有的属性。这让编码更加简洁,易于重用。在**contract MyToken之前,把下面的代码加入第一行。
 contract owned{
     address public owner;
     function owned(){
         owner = msg.sender;
     }

     modifier onlyOwner {
         require(msg.sender == owner);
         _;
     }

     function transferOwnership(address newOwner) onlyOwner{
         owner = newOwner;
     }
 }
This creates a very basic contract that doesn't do anything except define some generic functions about a contract that can be "owned". Now the next step is just to add the text is owned to your contract:
上面的代码创建了一个基础合约,它除了定义一些通用函数(合约能够被“拥有”),啥也没干。 接下来,就是把owned添加到你的合约:
contract MyToken is owned {
    /* the rest of the contract as usual*/
This means that all the functions inside MyToken now can access the variable owner and the modifier onlyOwner. The contract also gets a function to transfer ownership. Since it might be interesting to set the owner of the contract at startup, you can also add this to the constructor function:
这就意味着MyToken中的所有函数可以访问owner变量,修改描述符 onlyOwner. 这个合约也获得一个转移合约拥有关系的函数。因为合约可能喜欢在合约启动的时候,设置自己的拥有者,所以你也可以把它加到构造函数中去:
 function MyToken(uint256 initialSupply, string tokenName, uint8 decimalUnits, string tokenSymbol, address centralMinter) {
     if (centerMinter != 0) owner = centralMinter;
 }
CENTRAL MINT
Suppose you want the amount of coins in circulation to change. This is the case when your tokens actually represent an off blockchain asset (like gold certificates or government currencies) and you want the virtual inventory to reflect the real one. This might also be the case when the currency holders expect some control of the price of the token, and want to issue or remove tokens from circulation.
First, we need to add a variable to store the totalSupply and assign it to our constructor function.
中心铸币
假设你想改变token的发行量。 当你的token实际代表一个线下资产(像金牌证书,或法币),你想使得虚拟的存货跟实际存货保持一致时,就属于这种情况。当货币持有者想控制token的价格时,想从发行量中,发行或删掉一些token,也属于这种情况。
首先,你需要加一个totalSupply变量,并加到构造函数中。
 contract MyToken is owned {
     uint256 public totalSupply;

     function MyToken(...) {
         totalSupply = initialSupply;
         ...
     }
     ...
 }
Now let's add a new function finally that will enable the owner to create new tokens:
现在我们加一个新的函数,它能让拥有者创建新的token:
function mintToken(address target, uint256 mintedAmount) onlyOwner {
    balanceOf[target] += mintedAmount;
    totalSuplly += mintedAmount;
    Transfer(0, owner, mintedAmount);
    Transfer(owner, target, mintedAmount);
}
Notice the modifier onlyOwner on the end of the function name. This means that this function will be rewritten at compilation to inherit the code from the modifier onlyOwner we had defined before. This function's code will be inserted where there's an underline on the modifier function, meaning that this particular function can only be called by the account that is set as the owner. Just add this to a contract with an owner modifier and you'll be able to create more coins.
注意函数后面的修改符onlyOwner。 它的意思是在编译时,这个函数会被重写, 以便从我们之前定义的修改描述符onlyOwner继承代码。 这个函数中的代码会插入到这个修改描述符函数中,带有下划线的地方。 这就是说,这个特定的函数只能被设置的owner调用。把这个带有owner修改描述符函数加入到你的合约,你就可以创建更多的token了。
FREEZING OF ASSETS
Depending on your use case, you might need to have some regulatory hurdles on who can and cannot use your tokens. For that to happen, you can add a parameter that enables the contract owner to freeze or unfreeze assets.
Add this variable and function anywhere inside the contract. You can put them anywhere but for good practice we recommend you put the mappings with the other mappings and events with the other events.
资产冻结
根据你的情况,你可能需要一些管理哪些人可以或不可以使用你的token,为应对这种情况,你可以通过添加一个参数来允许合约拥有者冻结或解冻资产。
可以在合约任何地方,添加这些变量,函数。 虽然你可以把他们放到任何位置,但作为最佳实践,我们建议你把mapping跟mapping放在一起,event跟event放在一起。
mapping (address => bool) public frozenAccount;
event FrozenFunds(address target, bool frozen);

function freezeAccount(address target, bool freeze) onlyOwner {
    frozenAccount[target] = freeze;
    FrozenFunds(target, freeze);
}
With this code, all accounts are unfrozen by default but the owner can set any of them into a freeze state by calling Freeze Account. Unfortunately, freezing has no practical effect because we haven't added anything to the transfer function. We are changing that now:
这上面的代码中,所以的账号默认是解冻状态,但是token拥有者可以通过调用freezeAccount来冻结账号。不幸的是,冻结没有任何实际效果,因为我们没有在transfer函数中添加任何东西。 现在我们来改一下:
function transfer(address _to, uint256 _value) {
    require(!frozenAccount(msg.sender));
}
Now any account that is frozen will still have their funds intact, but won't be able to move them. All accounts are unfrozen by default until you freeze them, but you can easily revert that behavior into a whitelist where you need to manually approve every account. Just rename frozenAccount into approvedAccount and change the last line to:
现在任何被冻结的账号,他们的资金依然原封不动,但是不能移动他们。所有的账号默认是解冻状态,直到你冻结了他们。但是你能很容易通过白名单的方式恢复这种行为。你需要手动的把需要解冻的账号加入到白名单。 只需把frozenAccount重命名为approvedAccount, 然后修改最后一行代码如下:
require(approvedAccount(msg.sender));
AUTOMATIC SELLING AND BUYING
So far, you've relied on utility and trust to value your token. But if you want you can make the token's value be backed by Ether (or other tokens) by creating a fund that automatically sells and buys them at market value.
First, let's set the price for buying and selling:
自动交易
到目前为止,你已依赖工具并确信使你的token变的有价值。但是如果你想,你可以通过创建一个以市场价自动买卖这些token的基金,让你的token的价值以ETH(或其他token)来背书。
首先,先设置买卖的价格:
uint256 public sellPrice;
uint256 public buyPrice;

function setPrices(uint256 newSellPrice, uint256 newBuyPrice) onlyOwner {
    sellPrice = newSellPrice;
    buyPrice = newBuyPrice;
}
This is acceptable for a price that doesn't change very often, as every new price change will require you to execute a transaction and spend a bit of Ether. If you want to have a constant floating price we recommend investigating standard data feeds
The next step is making the buy and sell functions:
不经常改成价格是可以接受的,因为每设置一个新的价格需要你执行一个交易,并花费一点ETH。 如果你想要一个固定浮动的价格,我们建议你研究下标准数据流。
下一步就是实现买卖函数:
function buy() payable returns (uint amount){
    // calculates the amount
    amount = msg.value / buyPrice;
    // checks if it has enough to sell
    require(balanceOf[this] >= amount);
    // adds the amount to buyer's balance
    balanceOf[msg.sender] += amount;
    // substracts amount from seller's balance
    balanceOf[this] -= amount;
    // excute an event reflecting the change
    Transfer(this, msg.sender, amount);
    return amount;
}

function sell(uint amount) returns (uint revenue) {
    // checks if the sender has enough to sell
    require(balanceOf[msg.sender] >= amount);
    // adds the amount to owner's balance
    balanceOf[this] += amount;
    // substracts the amount from seller's balance
    balanceOf[msg.sender] -= amount;
    revenue = amount * sellPrice;
    // senders ether to the seller; it's important to do this last to
    msg.sender.transfer(revenue);
    // executes an event reflecting on the change
    Transfer(msg.sender, this, amount);
    return revenue;
}
Notice that this will not create new tokens but change the balance the contract owns. The contract can hold both its own tokens and Ether and the owner of the contract, while it can set prices or in some cases create new tokens (if applicable) it cannot touch the bank's tokens or Ether. The only way this contract can move funds is by selling and buying them.
注意这并不会创建一些新的token,而是改进合约拥有的token余额。合约能持有自己的token,ETH,合约的拥有者,然而它能设置价格,或者在一些情况,它能创建一些新的token(如果可适应的话),但它不会接触到银行的token或ETH。 这个合约只能通过买卖token来转移资金。
Note Buy and sell "prices" are not set in Ether, but in wei the minimum currency of the system (equivalent to the cent in the Euro and Dollar, or the Satoshi in Bitcoin). One Ether is 1000000000000000000 wei. So when setting prices for your token in Ether, add 18 zeros at the end.
注意设置买卖价格并不是以ETH来计价, 而是用系统中最小的货币单位 wei.(它相当于与欧元,美元中的分,或比特币中的Satoshi)。 1ETH = 1000000000000000000 wei. 所以在以ETH为计价单位,设置token的价格时,需要在后面加18个0。
When creating the contract, send enough Ether to it so that it can buy back all the tokens on the market otherwise your contract will be insolvent and your users won't be able to sell their tokens.
当创建合约时,需要给合约发送足够的ETH,这样它才能在市场上买回所有的Token。否则你的合约就无法偿还,你的用户就没法卖掉他们的Token。
The previous examples, of course, describe a contract with a single central buyer and seller, a much more interesting contract would allow a market where anyone can bid different prices, or maybe it would load the prices directly from an external source.
在之前的例子中,合约中只有一个中心买卖者,更加有意思的合约可以允许在一个市场上,任何人可以出不同价格,或直接从外部数据载入价格信息。
AUTOREFILL
Everytime, you make a transaction on Ethereum you need to pay a fee to the miner of the block that will calculate the result of your smart contract. While this might change in the future, for the moment fees can only be paid in Ether and therefore all users of your tokens need it. Tokens in accounts with a balance smaller than the fee are stuck until the owner can pay for the necessary fee. But in some use cases, you might not want your users to think about Ethereum, blockchain or how to obtain Ether, so one possible approach would have your coin automatically refill the user balance as soon as it detects the balance is dangerously low.
In order to do that, first you need to create a variable that will hold the threshold amount and a function to change it. If you don't know any value, set it to 5 finney (0.005 Ether).
自动填充
在以太坊上每发起一个交易,你就需要给挖出区块的矿工支付一笔费用。用于支付矿工计算出你合约结果。 然而在未来,这可能会有所改变。 现在只能以ETH的方式来支付费用,因此持有你token的所有用户都需要ETH。 如果用户账号里面ETH的余额不够支付费用,那么就无法进行交易,直到拥有者有足够的ETH来支付交易费用。但是在一些情况,你不需要你的用户去考虑以太坊,区块链,或如何获得ETH, 因此一种可能的方法就是: 一旦检测到余额非常低的时候,你自动给用户冲点ETH.
为了实现这个功能,首先你需要创建一个变量,来保存一个最低阀值,然后用一个函数来改变它。 如果你不知道怎么设置,就设 0.005ETH。
uint public minBalanceForAccounts;
function setMinBalance(uint minmumBalanceInFinney) onlyOwner {
    minBalanceForAccounts = minmumBalanceInFinney * 1 finney
}
Then, add this line to the transfer function so that the sender is refunded:
然后,把这行加到transfer函数,这样可以给发送者退款。
/* Send coins */
function transfer(address _to, uint256 _value){
    ...
    if (msg.sender.balance < minBalanceForAccounts)
        sell((minBalanceForAccounts - msg.sender.balance) / sellPrice);
}
You can also instead change it so that the fee is paid forward to the receiver by the sender:
你也可以改成直接让付款人把费用支付给收款人。
 /* Send coins */
  function transfer(address _to, uint256 _value) {
      ...
      if (_to.balance < minBalanceForAccount)
        _to.send(sell((minBalanceForAccount - _to.balance) / sellPrice));
  }
这可以确保接受token的账号上ETH的余额不少于交易费用。
PROOF OF WORK
There are some ways to tie your coin supply to a mathematical formula. One of the simplest ways would be to make it a "merged mining" with Ether, meaning that anyone who finds a block on Ethereum would also get a reward from your coin, given that anyone calls the reward function on that block. You can do it using the special keyword coinbase that refers to the miner who finds the block.
工作量证明
有一些方法可以把你的币的供应跟数学公式绑定在一起。其中一个最简单的办法就是:和ETH一起“联合挖矿”, 这就意味着在以太坊上挖出区块的人,也可以获得你的币的奖励,给予在这个区块上调用这个奖励函数的任何人。你可以使用特殊的关键词:coinbase来引用挖出区块的矿工。
 function giveBlockReward(){
     balanceOf[block.coinbase] += 1;
 }
It's also possible to add a mathematical formula, so that anyone who can do math can win a reward. On this next example you have to calculate the cubic root of the current challenge gets a point and the right to set the next challenge:
同样也可以增加一个数学公式,这样任何完成数学计算的人都可以获取奖励。下面的例子,你必须要算出当前数值的立方,然后了再设置新的要计算的数值。
 // can you figure out the cubic root of this number
uint public currentChallenge = 1;

function rewardGeniuses(uint answerToCurrentReward, uint nextChanllenge) {
    require(answerToCurrentReward**3 == currentChallenge);
    balanceOf[msg.sender] += 1;
    currentChallenge = nextChanllenge;
}
Of course, while calculating cubic roots can be hard for someone to do on their heads, they are very easy with a calculator, so this game could be easily broken by a computer. Also since the last winner can choose the next challenge, they could pick something they know and therefore would not be a very fair game to other players. There are tasks that are easy for humans but hard for computers but they are usually very hard to code in simple scripts like these. Instead, a fairer system should be one that is very hard for a computer to do, but isn't very hard for a computer to verify. A great candidate would be to create a hash challenge where the challenger has to generate hashes from multiple numbers until they find one that is lower than a given difficulty.
当然,当对于一些人来说,用心算来计算数值的立方可能是很难时,他们可以使用计算器,所以这个游戏很容易被计算机破坏掉。还有因为最后的胜利者可以选择下一个要挑战的数字,他们可以选一些他们知道的,因此对于其他玩家来说,是不公平的。有一些任务对于人类来说是很容易的,但对计算机来说是困难的,但是这样的任务通常很难用简单的脚本来编码。取而代之,一个更公平的系统应该是: 对于计算机而言是很难完成的,但是很容易让计算机验证。一个非常好的候选方案是生成哈希挑战,挑战者不得不多次尝试生成哈希,直到他们找到一个低于给定难度值的哈希。
This process was first proposed by Adam Back in 1997 as Hashcash and then was implemented in Bitcoin by Satoshi Nakamoto as Proof of work in 2008. Ethereum was launched using such system for its security model, but is planning to move from a Proof of Work security model into a mixed proof of stake and betting system called Casper.
在1997年,Adam Back 首先提出了这种处理,叫Hashcash。 并在2008年,被中本聪在比特币中实现。因为它是一种安全的模型,所以以太坊初始发布的时,就使用这种系统。不过,以太坊计划从工作量证明安全模型迁移到Casper — 一种混合权益证明(POS)+ 博弈系统。
But if you like Hashing as a form of random issuance of coins, you can still create your own Ethereum based currency that has a proof of work issuance:
但是如果你喜欢使用哈希这种方式来发行随机的币,你仍然可以创建基于以太坊的货币,让它通过工作量证明来发行你的token。
// The coin starts with a challenge
bytes32 public currentChallenge;
// Variable to keep track of when rewards were given
uint public timeOfLastProof;
//Difficulty starts reasonabley low
uint public difficulty = 10**32;

function proofOfWork(uint nonce){
    // Generate a random hash based on input
    bytes8 n = bytes8(sha3(none, currentChanllenge));
    // Check if it's under the difficulty
    require( n >= bytes8(difficulty));

    // Calculate time since last reward was given
    uint timeSinceLastProot = (now -  timeOfLastProof);
    // Rewards cannot be given too quickly
    require(timeSinceLastProof >= 5 seconds);
    // The reward to the winner grows by the minute
    balanceOf[msg.sender] += timeSinceLastProof / 60 secons;

    // Adjust the difficulty
    difficulty = difficulty * 10 minutes / timeSinceLastProof + 1;

    // Reset the counter
    timeOfLastProof = now;
    // Save a hash that will be
    currentChallenge = sha3(nonce, currentChallenge, block.blockhash(block.number - 1));
}
Also change the Constructor function (the one that has the same name as the contract, which is called at first upload) to add this line, so the difficulty adjustment will not go crazy:
并且修改下构造函数(它跟合约的名字一样,只在上传合约时,被调用一次),把下面的代码加入到构造函数,这样难度调整就不会失控。
timeOfLastProof = now;
Once the contract is online, select the function "Proof of work", add your favorite number on the nonce field and try to execute it. If the confirmation window gives a red warning saying "Data can't be execute" go back and pick another number until you find one that allows the transaction to go forward: this process is random. If you find one you will be awarded 1 token for every minute that has passed since the last reward was given, and then the challenge difficulty will be adjusted up or down to target an average of 10 minutes per reward.
This process of trying to find the number that will give you a reward is what is called mining: if difficulty rises it can be very hard to find a lucky number, but it will always be easy to verify that you found one.
一但合约上线,选择“Proof of work”这个函数,在nonce区域填入你喜欢的数字,试着去执行这个函数。如果出现一个确认对话窗口,并给出一个红色警告 "数据不能被执行", 就退回去再选一个数字,再执行,直到你选到一个可以让你执行这个交易的数字: 这个过程时随机的。 如果你发现一个匹配的哈希,那么从上次给予奖励的时间起,每过1分钟,你就会获得1个token的奖励,然后调整难度会来回调整到大约每10分钟奖励一次。
这个尝试去找一个数字,以获取奖励的过程,称之为挖矿。如果难度提升,找到幸运数字的难度也会更大,但是还是非常容易去验证否找到一个数字。
Improved Coin
FULL COIN CODE
If you add all the advanced options, this is how the final code should look like:
改进代币
完整Token代码
如果你添加了所有的高级选项功能,最终的代码看起来如下图所示:
PS: 原文的合约代码在部署的时候,有不少问题,无法通过编译,下面的我修正过了,亲测可以成功部署。
pragma solidity ^0.4.18;

contract owned{
  address public owner;

  function owned() public {
    owner = msg.sender;
  }

  modifier onlyOwner{
      require(msg.sender == owner);
      _;
  }

  function transferOwnership(address newOwner) onlyOwner public {
    owner = newOwner;
  }
}

interface tokenRecipient { function receiveApproval(address _from, uint256 _value, address _token, bytes _extraData) external ;}

contract TokenERC20 {
  // Public variable of the token
  string public name;
  string public symbol;
  // 18 decimals  is the strongly suggested default, avoid chaning it
  uint8 public decimals = 18;
  uint256 public totalSupply;

  // This creates an array with all balance
  mapping( address => uint256 ) public balanceOf;
  mapping( address => mapping( address => uint256 ) ) public allowance;

  // This generates a public event on the blockchain that will notify clients
  event Transfer(address indexed from, address indexed to, uint256 value);

  // This notifies clients about the amount burnt
  event Burn(address indexed from, uint256 value);

  /**
    * Construct function
    * Initializes contract with initial supply tokens to the creator of the contract
  **/
  function TokenERC20(
    uint256 initialSupply,
    string tokenName,
    string tokenSymbol
    ) public {
      // Update total supply with the decimal amout
      totalSupply = initialSupply * 10 ** uint256 (decimals);
      // Give the creator all initial tokens
      balanceOf[msg.sender] = totalSupply;
      // Set the name for display purposes
      name = tokenName;
      // Set the symbol for display purposes
      symbol = tokenSymbol;
    }

    /**
     *  Internal transfer, only can be called by this contract
    **/
    function _transfer(address _from, address _to, uint _value) internal {
       // Prevent transfer to 0x0 address. Use burn() instead
       require( _to != 0x0);
       // Check if the sender has enough
       require(balanceOf[_from] >= _value);
       // Check for overflows
       require(balanceOf[_to] + _value > balanceOf[_to]);
       // Save this for an assertion in the future
       uint previousBalances = balanceOf[_from] + balanceOf[_to];
       // Substract from the sender
       balanceOf[_from] -= _value;
       // Add the same to the recipient
       balanceOf[_to] += _value;
       emit Transfer(_from, _to, _value);
       // Asserts are used to use static analysis to find bugs in your code. They should never fail
       assert(balanceOf[_from] + balanceOf[_to] == previousBalances);

    }

    /**
     * Transfer tokens
     * Send '_value' tokens to '_to' from your account
     *
     * @param _to The address of the recipient
     * @param _value The amount to send
    **/
    function transfer(address _to , uint256 _value) public{
      _transfer(msg.sender, _to, _value);
    }

    /**
     * Transfer tokens from other address
     *
     * Send '_value' tokens to '_to' in behalf of '_from'
     *
     * @param _from The address of the sender
     * @param _to The address of the recipient
     * @param _value The amount to send
    **/
    function transferFrom(address _from, address _to, uint256 _value) public returns (bool success) {
      // Check allowance
      require( _value <= allowance[_from][msg.sender]);
      allowance[_from][msg.sender] -= _value;
      _transfer(_from, _to, _value);
      return true;
    }

    /**
     *  Set allowance for other address
     *
     *  Allows '_spender' to spend no more than '_value' tokens in your behalf
     *
     * @param _spender The address authorized to spend
     * @param _value The max amount they can spend
    **/
    function approve(address _spender, uint256 _value) public returns (bool success){
        allowance[msg.sender][_spender] = _value;
        return true;
    }

    /**
     * Set allowance for other address and notify
     *
     * Allow '_spender' to spend no more than '_value' tokens in your behalf, and then
     * ping the contract about it.
     *
     * @param _spender The address authorized to spend
     * @param _value The max amount they can spend
     * @param _extraData Some extra information to send to the approved contract
    **/
    function approveAndCall(address _spender, uint256 _value, bytes _extraData) public returns (bool success){
      tokenRecipient spender = tokenRecipient(_spender);
      if (approve(_spender, _value)){
        spender.receiveApproval(msg.sender, _value, this, _extraData);
        return true;
      }
    }

    /**
     * Destory tokens
     *
     * Remove '_value' tokens from the system irreversibly
     *
     * @param _value The amount of money to burn
    **/
    function burn(uint256 _value) public returns (bool success) {
      // Check if the sender has enough
      require(balanceOf[msg.sender] >= _value);
      // Substract from the sender
      balanceOf[msg.sender] -= _value;
      // Updates totalSupply
      totalSupply -= _value;
      emit Burn(msg.sender, _value);
      return true;
    }

    /**
     * Destroy tokens from other account
     *
     * Remove '_value' tokens from the system irreversibly on behalf of '_from'
     *
     * @param _from The address of the sender
     * @param _value The amount of money to burn
    **/
    function burnFrom(address _from, uint256 _value) public returns (bool success){
      // Check if the targeted balance is enough
      require(balanceOf[_from] >= _value);
      // Check allowance
      require(_value <= allowance[_from][msg.sender]);
      // Subtract from the targeted balance
      balanceOf[_from] -= _value;
      // Subtract from the sender's allowance
      allowance[_from][msg.sender] -= _value;
      // Update totalSupply
      totalSupply -= _value;
      emit Burn(_from, _value);
      return true;
    }

}

/****************************************************************/
/*             ADVANCED TOKEN STARTS HERE                       */
/****************************************************************/

contract MyAdvancedToken is owned, TokenERC20 {
  uint256 public sellPrice;
  uint256 public buyPrice;

  mapping(address => bool) public frozenAccount;

  /*
   This generates a public event on the blockchain that will notify clients
  */
  event FrozenFuns(address target, bool frozen);

  /*
    Initializes contract with initial supply tokens to the creator of the contract
  */
  function MyAdvancedToken(
    uint256 initialSupply,
    string tokenName,
    string tokenSymbol
    ) TokenERC20(initialSupply, tokenName, tokenSymbol) public{}

  // Internal transfer, only can be called by this contract
  function _transfer(address _from, address _to, uint _value) internal {
    // Prevent transfer to 0x0 address. Use burn() instead
    require(_to != 0x0);
    // Check if the sender has enough
    require(balanceOf[_from] >= _value);
    // Check for overflows
    require(balanceOf[_to] + _value > balanceOf[_to]);
    // Check if sender is frozen
    require(!frozenAccount[_from]);
    // Check if recipient is frozen
    require(!frozenAccount[_to]);
    // Subtract from sender
    balanceOf[_from] -= _value;
    // Add the same to the recipient
    balanceOf[_to] += _value;
    emit Transfer(_from, _to, _value);
  }

  /// @notice Create 'mintedAmount' tokens and send it to 'target'
  /// @param target Address to receive the tokens
  /// @param mintedAmount The amount of tokens it will receive
  function mintToken(address target, uint256 mintedAmount) onlyOwner public{
    balanceOf[target] += mintedAmount;
    totalSupply += mintedAmount;
    emit Transfer(0, this, mintedAmount);
    emit Transfer(this, target, mintedAmount);
  }

  /// @notice 'freeze? Prevent | Allow' 'target' from sending & receiving tokens
  /// @param target Address to be frozen
  /// @param freeze either to freeze it or not
  function freezeAccount(address target, bool freeze) onlyOwner public{
    frozenAccount[target] = freeze;
    emit FrozenFuns(target, freeze);
  }

  /// @notice Allow users to buy tokens for 'newBuyPrice' eth and sell tokens for 'newSellPrice' eth
  /// @param newSellPrice Price the users can sell to the contract
  /// @param newBuyPrice Price the users can buy from the contract
  function setPrices(uint256 newSellPrice, uint256 newBuyPrice) onlyOwner public{
      sellPrice = newSellPrice;
      buyPrice = newBuyPrice;
  }

  /// @notice Buy tokens from contract by sending ether
  function buy() payable public{
    // calculates the amount
    uint amount = msg.value / buyPrice;
    // Make the transfers
    _transfer(this, msg.sender, amount);
  }

  /// @notice Sell 'amount' tokens to contract
  /// @param amount Amount of tokens to be sold
  function sell(uint256 amount) public {
    // Checks if the contract has enough ether to by
    require(address(this).balance >= amount * sellPrice);
    // Make the transfers
    _transfer(msg.sender, this, amount);
    // Send ether to the seller. It's important to do this last to avoid recursion attacks
    msg.sender.transfer(amount * sellPrice);
  }

}
DEPLOYING
Scroll down and you'll see an estimated cost for deployment. If you want you can change the slider to set a smaller fee, but if the price is too below the average market rate your transaction might take longer to pick up. Click Deploy and type your password. After a few seconds you'll be redirected to the dashboard and under Latest transactions you'll see a line saying "creating contract". Wait for a few seconds for someone to pick your transaction and then you'll see a slow blue rectangle representing how many other nodes have seen your transaction and confirmed them. The more confirmations you have, the more assurance you have that your code has been deployed.
部署
滚动到底部,你可以看到部署合约所需花费。如果你愿意,也可以用滑动条设置一个更低的费用,但是如果设置的价格低于市场均价,你的交易可以需要等很长时间才会被矿工处理。点击“部署”,输入你的账号密码。等一会,会自动跳到主控制台页面,在下面的最新交易区域,你可以看到一行信息"正在创建合约"。等几秒后,一些矿工会处理你的交易,然后你可以看到一个慢慢移动的蓝色框,它表示目前有多少节点以及看到你的交易,并确认了。交易被确认的次数越多,就越能保证你的合约被成功部署。

Click on the link that says Admin page and you'll be taken the simplest central bank dashboard in the world, where you can do anything you want with your newly created currency.
点击“Admin page”链接,你会跳到世界上最简单的中央银行控制台,你可以在这里做跟你新建的货币相关的任何事情。
On the left side under Read from contract you have all the options and functions you can use to read information from the contract, for free. If your token has an owner, it will display its address here. Copy that address and paste it into Balance of and it will show you the balance of any account (the balance is also automatically shown on any account page that has tokens).
在左边"Read from contract"下面,列有所有免费读取合约信息的选项,函数。如果你的token有一个拥有者,就会在这里显示拥有者的的地址。复制粘贴它的地址到Balance of,会显示地址上的余额(在任何拥有token的账号页面,余额会自动显示)。
On the right side, under Write to Contract you'll see all the functions you can use to alter or change the blockchain in any way. These will cost gas. If you created a contract that allows you to mint new coins, you should have a function called "Mint Token". Select it.
在右边"Write to Contract" 下面,你可以看到所有相关的修改函数。执行这些函数会消耗gas。如果你创建的合约允许你增发token,你会有一个叫做Mint Token的函数,选中它。
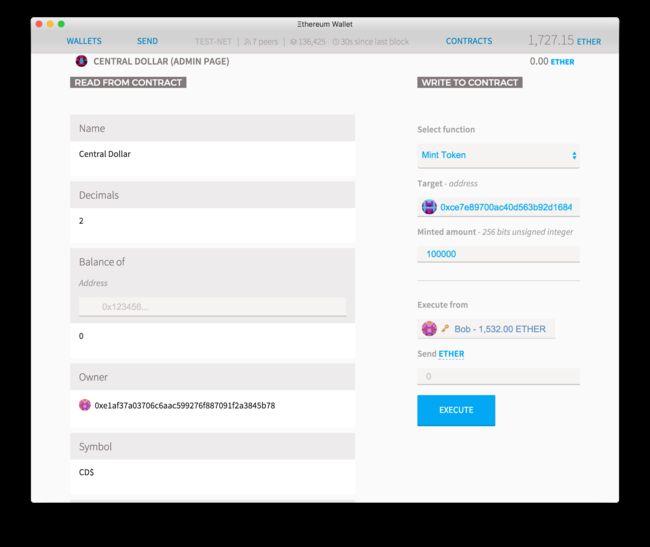
Select the address where those new currencies will be created and then the amount (if you have decimals set at 2, then add 2 zeros after the amount, to create the correct quantity). On Execute from select the account that set as owner, leave the Ether amount at zero and then press execute.
选择一个接受增发token的地址,以及增发的数量(如果你的token设置的小数点位数是2,需要在数量后面加2个0,来创建正确数量的token)。在Execute from栏目选择token的拥有者,Ether数量设置为0,然后点击Execute按钮。
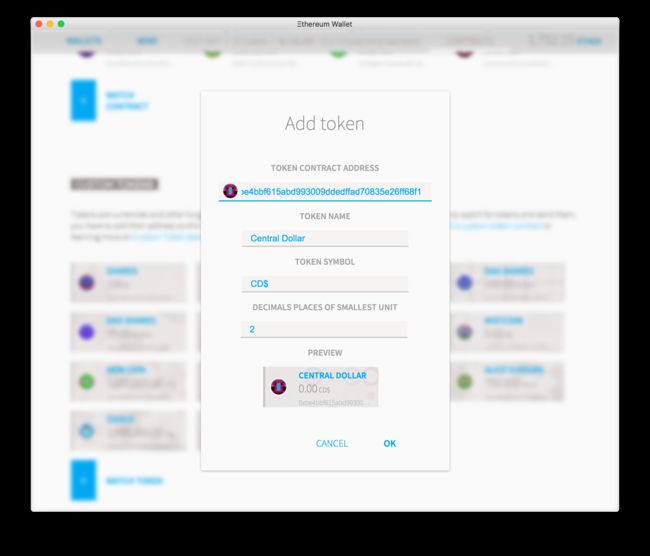
After a few confirmations, the recipient balance will be updated to reflect the new amount. But your recipient wallet might not show it automatically: in order to be aware of custom tokens, the wallet must add them manually to a watch list. Copy your token address (at the admin page, press copy address) and send that to your recipient. If they haven't already they should go to the contracts tab, press Watch Token and then add the address there. Name, symbols and decimal amounts displayed can be customized by the end user, especially if they have other tokens with similar (or the same) name. The main icon is not changeable and users should pay attention to them when sending and receiving tokens to ensure they are dealing with the real deal and not some copycat token.
等过了几个确认后,新的支付会在收款人的账号余额中体现出来。但是你的收款人钱包可能不会自动显示。要让钱包知道这些自定义的token,钱包必须把这些token手动添加到观察列表中。复制你的token合约地址(在Admin page, 点击复制地址),然后把它发给你的收款人。如果他们还没有设置,可先去合约标签页面,点击"Watch Token", 然后添加token合约地址。用户可以在自己的钱包里,自定义合约的名字,符号,小数点位数,特别是当其他的otken的名字跟现在新增的token名字相似或类似的时候。token的主Icon是不能改变的,用户在发送,接受token的时候,需要留意这个,确保处理的是真的token,而不是假的。
Using your coin
Once you've deployed your tokens, they will be added to your list of watched tokens, and the total balance will be shown on your account. In order to send tokens, just go to the Send tab and select an account that contains tokens. The tokens the account has will be listed just under Ether. Select them and then type the amount of tokens you want to send.
If you want to add someone else's token, just go to the Contracts tab and click Watch token. For example, to add the Unicorn () token to your watch list, just add the address 0x89205A3A3b2A69De6Dbf7f01ED13B2108B2c43e7 and the remaining information will be loaded automatically. Click Ok and your token will be added.
使用你的代币
一旦完成token的部署,它就会被自动的加入token观察列表,token的总量会在账号上显示出来。 要发送token,仅需要去发送页面,选择一个有这个token的账号。这些token会以列表的形式在ETHER下面显示。选中token,然后输入想发送token数量。
如果想添加一些别的token到观察列表,去合约页面,点击Watch token。比如,添加Unicorn token到观察列表,只需添加地址0x89205A3A3b2A69De6Dbf7f01ED13B2108B2c43e7,其他信息会自动加载。然后点击OK,这个token就成功添加到观察列表。
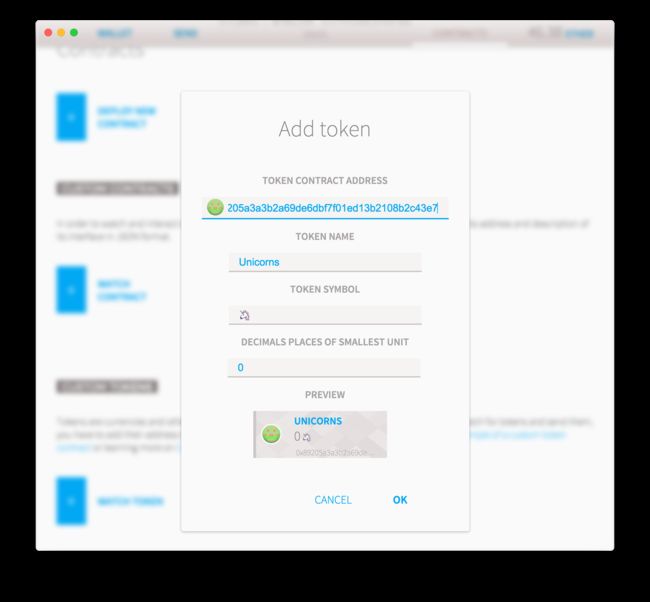
Unicorn tokens are memorabilia created exclusively for those who have donated to the address 0xfB6916095ca1df60bB79Ce92cE3Ea74c37c5d359 that is controlled by the Ethereum Foundation. For more information about them read it here
Unicorn token是一种纪念品,每个token都是独一无二的被创建出来,并发给那些给0xfB6916095ca1df60bB79Ce92cE3Ea74c37c5d359地址捐赠过的人。目前这个地址是以太坊基金在管理。更多信息请查看这里.
测试合约前的准备
- 从https://www.ethereum.org/下载Ethereum 钱包

- 在钱包上,注册2个账号

- 切换到Rinkeby测试网络
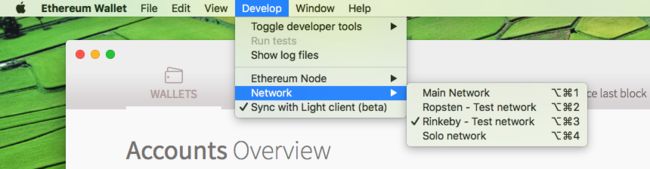
因为在Rinkeby测试网络,无法通过挖矿获取测试网上的ETH。但可以在rinkeby网站上申请。
- 申请rineby测试网上的ETH
先复制你的刚创建的钱包地址,发到你的twitter上,复制这条twitter的链接,
打开https://faucet.rinkeby.io/,然后粘贴到下面首页的输入框,如下:

然后,在点击"Give me Ether", 选中其中任何一个,即可。
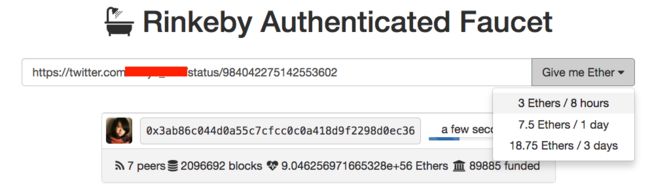
如果成功,策划显示如下的提示框。

PS: 需要科学上网。
- 过几分钟,估计在你的钱包账号里面,收到刚申请的ETH
其他工具
- 浏览器
https://www.rinkeby.io/#stats
- 在线编译solidity
https://ethereum.github.io/browser-solidity/#optimize=false&version=soljson-v0.4.21+commit.dfe3193c.js
因为在Ethereum钱包,部署代码时候,虽然也有代码与语法错误提示功能,但是非常有限,但这个功能就强大很多。