项目负责人:这个版本做一个类似于新浪微博拍摄的功能(不带美颜以及后续对视频图片的编辑),一天时间能不能搞定?
你:......(内心:你行你上啊)
我:Github。点击下载,只需专注界面开发,一天?妥妥的!
言归正传,在那段小情景中已经将今天的主要内容放出。很简单,Github中的代码是对AVFoundation的一些简单封装,使开发者无需考虑录制视频以及拍照相关的流程,只需要专注于你的界面逻辑。
此文围绕对AVFoundation的封装进行展开,TYCamera借助于新浪微博的视频录制相关的基本功能进行封装,当然,其他的录制视频,拍照等相关的功能均大同小异,不一样的只是业务逻辑而已。所以TYCamera能使开发者专注于界面业务逻辑开发,提高开发效率。
仿新浪微博demo效果:
知识点简介
要完成相机基本功能并不繁琐,当然AVFoundation是十分强大的。作者通过分解相机的录制过程引出相关的类。
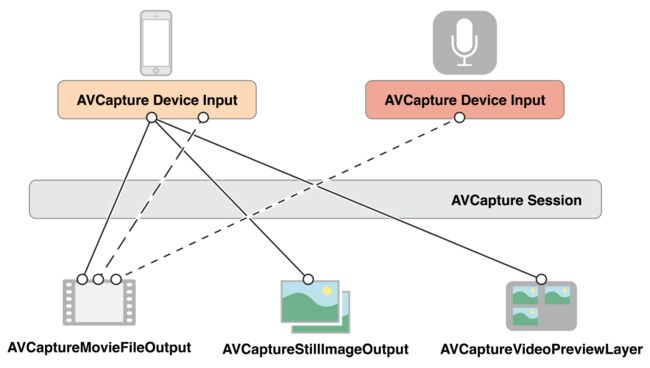
个人认为实现录像/拍照基础功能可以总结为多个输入设备以及多个输出通过数据采集硬件,连接而成的一次会话任务。那么需要实现的类便可以从这段总结中简单地得出了。
多个输入设备:当然属于相机以及麦克风,这样AVCaptureInput是必不可少的,但我们使用更高一层的封装,使用AVCaptureInput的子类AVCaptureDeviceInput来表示相机、麦克风设备的输入。
多个输出:一般来说,摄像头的主要作用是采集音视频数据,所以音频输出的相关类AVCaptureAudioDataOutput以及视频输出相关的类AVCaptureVideoDataOutput是需要使用的,此外AVFoundation也可拍摄静态图片(照片),故而静态图片相关的类AVCaptureStillImageOutput也是不可或缺的。
硬件连接:输入与输出之间需要构建相应的联系,则需要桥梁AVCaptureConnection构建microConnection和cameraConnection。
会话:毋庸置疑AVCaptureSession。
苹果的文档很清晰地给出了几者之间的关系:
如对其中的基础知识不是很清楚的同学请直接跳转 在 iOS 上捕获视频
TYCamera的封装说明
类说明:
TYCamera一共由四个类组成。TYCameraVC类用于与开发者界面布局;TYRecordEngine是TYCamera的核心类,TYRecordEngine将相机相关的功能进行了封装,并暴露相关接口,方便调用者简单使用实现相关功能,若开发者不想集成TYCameraVC实现相关功能,完全可以使用TYRecordEngine类的相关API进行自定义功能实现;TYRecordEncoder是负责数据写入相关的功能;TYRecordHelper提供一些工厂方法实现视频编辑的一些操作。
类详解:
TYRecordEngine
TYRecordEngine为外界提供了相机对应功能的API,那么我们可以从结果分析需求。
一个基本的相机功能一般具有闪光灯模式的切换,前后置摄像头的切换。这样我们就可以暴露这样两个简单地功能。在TYRecordEngine.h文件中声明两个方法。
/**
设置闪光灯的模式
@param mode 为闪光灯设置的模式
*/
- (void)setupFlashLight:(AVCaptureFlashMode)mode;
// 切换摄像头
- (void)switchCamera;
为了方便地控制相机的相关的流程,作者提取了几个重要的步骤。
1.开启相机功能并采集相关的音视频数据,客户端调用startRunning方法将输入端采集到的数据流通过AVCaptureConnection实例传输到输出端;
2.写入音视频数据为本地文件
3.停止数据的写入
4.关闭相机功能
5.合成视频并暴露视频的相关内容,例如封面图,资源地址,以及视频时长等
因此,下面五个方法便应用而生。
- (void)openRecordFunctions;
- (void)closeRecordFunctions;
- (void)startRecord;
- (void)stopRecord;
- (void)finishCaptureHandler:(void(^)(UIImage *coverImage, NSString *filePath, NSTimeInterval duration))handler failure:(void(^)(NSError *error))failure;
在我们开启相机相关功能之前,我们可能还需要做一些基本设置,为方便开发者调用,我们自定义相关的类方法和实例方法来创建TYRecordEngine实例。
/**
 初始化TYRecordEngines实例对象
 @param preset 设置录制视频的质量
 @param position 设置摄像头(前置摄像头/后置摄像头)
 @param recordType 录制视频的类型
 @return 返回TYRecordEngines实例对象
 */
- (instancetype)initRecordEngineSessionPreset:(NSString *)preset
                        devicePosition:(AVCaptureDevicePosition)position
                            recordType:(TYRecordEngineType)recordType;
最后比较重要的一个实例是显示数据流的Layer:
@property (nonatomic, strong) AVCaptureVideoPreviewLayer *previewLayer;
下面我们便来实现相关的方法:
在上文中作者已经通过一句话总结出了实现相机功能的基本类,所以起始必然是对这些类使用懒加载的方式进行实例化。
@property (nonatomic, strong) AVCaptureSession *captureSession;
@property (nonatomic, strong) AVCaptureDeviceInput *cameraInput;
@property (nonatomic, strong) AVCaptureDeviceInput *microInput;
@property (nonatomic, strong) AVCaptureVideoDataOutput *cameraOutput;
@property (nonatomic, strong) AVCaptureAudioDataOutput *microOutput;
@property (nonatomic, strong) AVCaptureStillImageOutput *photoOutput;
@property (nonatomic, strong) AVCaptureConnection *cameraConnection;
@property (nonatomic, strong) AVCaptureConnection *microConnection;
相关的懒加载代码便不在此处贴出,具体细节请查看TYRecordEngine.m文件相关的代码。在这里需要指出的是microOutput以及cameraOutput实例需要设置相应的delegate(调用方法setSampleBufferDelegate:queue:),实现相应的代理方法才能正确监测到摄像头以及麦克风采集的buffer.如若对应的类不清楚如何实例化的同学,可跳入对应类的头文件进行查看相关API。
一些必备的实例初始化成功后,我们便可实现我们前面在TYRecordEngine.h文件中声明的相关的方法。
- (instancetype)initRecordEngineSessionPreset:(NSString *)preset
                           devicePosition:(AVCaptureDevicePosition)position
                               recordType:(TYRecordEngineType)recordType {
    if (self = [self init]) {
        _presetName = preset;
        _position = position;
        _recordType = recordType;
        [self addInputOutput];
    }
    return self;
}
初始化方法的实现,主要记录相关的基本属性,并为session增加对应的输出与输入。因功能类型不一致所以我们构造一个私有方法去实现不同类型的输入与输出的添加。
- (void)addInputOutput {
    [self.captureSession beginConfiguration];

    if ([self.captureSession canAddInput:self.cameraInput]) {
        [self.captureSession addInput:self.cameraInput];
    }

    switch (_recordType) {
        case TYRecordEngineTypeBoth: {
            [self addVideoInputOutput];
            if ([self.captureSession canAddOutput:self.photoOutput]) {
                [self.captureSession addOutput:self.photoOutput];
            }
        }
            break;

        case TYRecordEngineTypeVideo: {
            [self addVideoInputOutput];
        }
            break;

        case TYRecordEngineTypePhoto: {
            if ([self.captureSession canAddOutput:self.photoOutput]) {
                [self.captureSession addOutput:self.photoOutput];
            }
        }
            break;

        default:
            break;
    }

    [self.captureSession commitConfiguration];
}
在该过程中我们又发现在类型为TYRecordEngineTypeBoth和TYRecordEngineTypeVideo的情况下都需要加入与视频相关的输入与输出,为了代码的复用性,我们再实现一个添加视频相关输入输出的方法。
- (void)addVideoInputOutput {
    if ([self.captureSession canAddInput:self.microInput]) {
        [self.captureSession addInput:self.microInput];
    }

    if ([self.captureSession canAddOutput:self.cameraOutput]) {
        [self.captureSession addOutput:self.cameraOutput];
        [self.cameraOutput setSampleBufferDelegate:self queue:self.captureQueue];
    }

    if ([self.captureSession canAddOutput:self.microOutput]) {
        [self.captureSession addOutput:self.microOutput];
        [self.microOutput setSampleBufferDelegate:self queue:self.captureQueue];
    }

    self.cameraConnection.videoOrientation = AVCaptureVideoOrientationPortrait;
    }
TYRecordEngine初始化方法实现完成,我们开始打开相机的相关功能。在此之前我们跳入到AVCaptureSession头文件中查看相关的API,可以发现,在该类中与开始结束相关的方法只有startRunning和stopRuning方法,而要实现一进入到控制器相机就采集到相关数据我们需要在viewWillApperar或者viewDidLoad方法中实现,但是我们一般是在一些操作后才开始录制视频,所以我们此时需要声明一个私有属性来表示是否正在录制视频的一个全局变量。
@property (atomic, assign) BOOL isCapturing;
因此,在关闭视频功能时需要将isCapturing属性设置为NO。
- (void)openRecordFunctions {
    if (![self.captureSession isRunning]) {
        [self.captureSession startRunning];
    }
}

- (void)closeRecordFunctions {
    if ([self.captureSession isRunning]) {
        [self.captureSession stopRunning];
    }
    self.isCapturing = NO;
}
紧接着我们可以实现摄像头切换以及闪光灯模式切换的功能,摄像头切换功能实现起来也是比较简单的,大概来讲就是移除当前的输入,添加新的输入,并添加动画。而切换闪光灯模式只要设置后置摄像头的mode属性为相应的枚举值即可,但在此处需要注意的是在设置mode的值之前调用lockForConfiguration:方法,设置完后调用unlockForConfiguration方法。
在这两个方法中我们需要频繁地获取对应的摄像头设备,我们可以总结出这样的私有方法去获取对应的摄像头设备。
- (AVCaptureDevice *)captureDeviceInput:(AVCaptureDevicePosition)position {
    NSArray *devices = [AVCaptureDevice devicesWithMediaType:AVMediaTypeVideo];
    for (AVCaptureDevice *device in devices) {
        if (device.position == position) {
            return device;
        }
    }
    return nil;
}
这样一来便可以减少代码的冗余。
- (void)switchCamera {
    AVCaptureDevicePosition currentDevicePositon = [self.cameraInput device].position;
    if (currentDevicePositon == AVCaptureDevicePositionBack) {
        currentDevicePositon = AVCaptureDevicePositionFront;
    } else {
        currentDevicePositon = AVCaptureDevicePositionBack;
    }

    NSError *error = nil;
    AVCaptureDeviceInput *newCameraInput = [AVCaptureDeviceInput deviceInputWithDevice:[self captureDeviceInput:currentDevicePositon] error:&error];
    if (error) {
        NSLog(@"Get New Camera Input Failure! Error:%@", error);
        return;
    }

    [self.captureSession beginConfiguration];

    [self.captureSession removeInput:self.cameraInput];
    if ([self.captureSession canAddInput:newCameraInput]) {
        [self.captureSession addInput:newCameraInput];
        self.cameraInput = newCameraInput;
    } else {
        [self.captureSession addInput:self.cameraInput];
    }

    [self.captureSession commitConfiguration];

    [self switchCameraAnimation];
}

- (void)switchCameraAnimation {
    CATransition *switchAnimation = [CATransition animation];
    switchAnimation.delegate = self;
    switchAnimation.duration = 0.45f;
    switchAnimation.type = @"oglFlip";
    switchAnimation.subtype = [self isFrontFacingCameraPreset] ? kCATransitionFromRight : kCATransitionFromLeft;
    switchAnimation.timingFunction = UIViewAnimationCurveEaseInOut;
    [self.previewLayer addAnimation:switchAnimation forKey:@"changeAnimation"];
}

- (void)setupFlashLight:(AVCaptureFlashMode)mode {
    AVCaptureDevice *backCamera = [self captureDeviceInput:AVCaptureDevicePositionBack];
    if (backCamera.hasFlash) {
        [backCamera lockForConfiguration:nil];
        backCamera.flashMode = mode;
        [backCamera unlockForConfiguration];
    }
    [self.captureSession startRunning];
}
在这些简单的功能实现以后,我们开始实现核心的功能。上文已经提及到,AVCaptureSession只有startRunning和stopRuning方法去实现开始和停止,但是我们在TYRecordEngine.h文件中声明了startRecord和stopRecord方法,并且声明了isCapturing私有属性,所以我们借助isCapturing属性来实现数据写入功能。那么在startRecord方法中我们需要设置isCapturing属性为YES。又由于我们需要得出录制视频对应的时长,所以我们使用Dispatch_source_t创建一个定时器。并使用全局属性currentDuration计时。
- (void)startRecord {
    self.isCapturing = YES;

    self.timer = dispatch_source_create(DISPATCH_SOURCE_TYPE_TIMER, 0, 0, self.captureQueue);
    dispatch_source_set_timer(_timer, DISPATCH_TIME_NOW, 0.1 * NSEC_PER_SEC, 0 * NSEC_PER_SEC);
    dispatch_source_set_event_handler(_timer, ^{
        self.currentDuration += 0.1;
    });
    dispatch_resume(_timer);
}
获取设备采集到的音视频数据是通过AVCaptureVideoDataOutputSampleBufferDelegate的代理方法进行监听的,因此我们在这里做相关的操作。在此该代理方法中我们主要是处理将数据写入至本地,并且给出录制的总时长小于设置的最低时长,录制的总时长大于等于设置的最大时长,以及录制某段视频时的当前进度。
- (void)captureOutput:(AVCaptureOutput *)captureOutput didOutputSampleBuffer:(CMSampleBufferRef)sampleBuffer
   fromConnection:(AVCaptureConnection *)connection {
    // 处理视频镜像问题
    self.cameraConnection.videoMirrored = [self isFrontFacingCameraPreset];
    // 非录制状态不做任何处理
    if (!self.isCapturing) {  return; }
    // 获取音频相关参数
    if (!self.recordEncoder && captureOutput == self.microOutput) {
        // 使用TYRecordHelper获取要写入文件的地址
        self.filePath  = [TYRecordHelper videoPath];
        // videosPath为可变数组,存入视频片段地址,为后续的删除指定视频片段提供支持
        [self.videosPath addObject:self.filePath];
        // 获取音频相关的属性,因本项目使用ALAssertWriter写文件,初始化音频输入的时候一定需要指定相应的setting,否则初始化失败会造成crash
        [self setAudioFormat:sampleBuffer];
        // 初始化TYRecordEncoder
        self.recordEncoder = [TYRecordEncoder recordEncoderPath:self.filePath videoWidth:_videoW videoHeight:_videoH audioChannel:_channel audioRate:_rate];
    }
    // 回调录制当前视频的进度
    if (self.delegate && [self.delegate respondsToSelector:@selector(recordProgress:)]) {
        dispatch_async(dispatch_get_main_queue(), ^{
           [self.delegate recordProgress:self.currentDuration];
        });
    }
    // 回调录制录制时间大于等于剩余录制时间即录制的总时间大于等于录制允许的最大时间
    if (self.currentDuration >= (self.maxRecordTime - self.videoDuration)) {
        [self closeRecordFunctions];
        return;
    }
    // 使用TYRecordEncoder实例的相关方法将数据写入本地
    [self.recordEncoder encoderFrame:sampleBuffer isVideo:captureOutput != self.microOutput];
}

// 获取音频必备的两个属性值
- (void)setAudioFormat:(CMSampleBufferRef)sampleBuffer {
    CMFormatDescriptionRef fmt = CMSampleBufferGetFormatDescription(sampleBuffer);
    const AudioStreamBasicDescription *asbd = CMAudioFormatDescriptionGetStreamBasicDescription(fmt);
    _rate = asbd->mSampleRate;
    _channel = asbd->mChannelsPerFrame;
}
停止视频录制后,我们需要重新设置一些状态值,例如currentDuration,isCapturing,并计算视屏录制的总时长videoDuration,关闭定时器,告诉ALAssertWritter写入数据完成。最后比较当前视频录制的总时间与设置的最低时长以及最大时长并给出相应的回调。
- (void)stopRecord {
    self.isCapturing = NO;

    self.videoDuration += self.currentDuration;
    [self.durations addObject:@(self.currentDuration)];
    dispatch_source_cancel(self.timer);
    self.timer = nil;
    self.currentDuration = 0.f;

    [self.recordEncoder encoderFinishCompletionHandler:^{
        self.recordEncoder = nil;

        if (self.videoDuration < self.minRecordTime) {
            if (self.delegate && [self.delegate respondsToSelector:@selector(recordDurationLessMinRecordDuration)]) {
                dispatch_async(dispatch_get_main_queue(), ^{
                   [self.delegate recordDurationLessMinRecordDuration];
                });
            }
        } else if (self.videoDuration >= self.maxRecordTime) {
            if (self.delegate && [self.delegate respondsToSelector:@selector(recordDurationLargerEqualMaxRecordDuration)]) {
                dispatch_async(dispatch_get_main_queue(), ^{
                   [self.delegate recordDurationLargerEqualMaxRecordDuration];
                });
            }
        }
    }];
}
这样就实现了音视频数据的采集并写入到本地的过程,最后,我们需要获取最终的视频文件,我们需要获取视频的封面图,并转换相应的格式。毕竟音视频也需要在安卓设备或其他设备上播放,所以我们一般讲视频转换为MP4格式即可。当然多个视频片段的话我们就需要对视频进行拼接。这些方法都在TYRecordHelper类中使用类方法实现了相关功能,我们只需要进行相关调用,并给出对应回调即可。
- (void)finishCaptureHandler:(void (^)(UIImage *, NSString *, NSTimeInterval))handler failure:(void (^)(NSError *))failure {
NSMutableArray *avassets = [NSMutableArray array];
     for (NSString *videoPath in self.videosPath) {
        AVAsset *asset = [AVAsset assetWithURL:[NSURL fileURLWithPath:videoPath]];
        [avassets addObject:asset];
    }
    AVMutableComposition *compisition = [TYRecordHelper combineVideosWithAssetArray:avassets];
    [TYRecordHelper transformFormatToMp4WithAsset:compisition presetName:AVAssetExportPreset1280x720 success:^(UIImage *coverImage, NSString *filePath) {
        if (handler) {
            handler(coverImage, filePath, self.videoDuration);
        }
    } failure:^(NSError *error) {
        if (failure) {
            failure(error);
        }
    }];
}
所有工作完成,最后关闭相关的功能停止采集数据。
- (void)closeRecordFunctions {
    if ([self.captureSession isRunning]) {
        [self.captureSession stopRunning];
    }
    self.isCapturing = NO;
}
在看项目中的代码的时候我们会看到一些数组,它们都是为实现视频片段拼接、删除等操作而存在的。逻辑的话较为简单,便不再此赘述。
TYRecordEncoder
TYRecordEncoder类的作用很明显,是与音视频编码相关的类,该类主要使用是对AVAssetWriter的一个封装。在该类的.h文件中我们暴露了几个相关的API,类方法与实例方法的初始化方法,将buffer写入本地文件的方法和结束写入资源的方法。在此类中我们还需要初始化相应的音视频输入,使用AVAssetWriterInput类,在初始化对应的音视频输入实例时,这里需要注意的是,初始化videoInput时,需要为以下三个key设置对应的值,分别是AVVideoCodecKey、AVVideoWidthKey、AVVideoHeightKey;初始化microInput时,需要下面这些key的值,分别是AVFormatIDKey、AVNumberOfChannelsKey、AVSampleRateKey。如果没有设置的话会crash,不清楚的可以跳入相关的头文件,其中的描述有具体的说明。
- (AVAssetWriterInput *)videoInput {
    if (!_videoInput) {
        NSDictionary *setting = [NSDictionary dictionaryWithObjectsAndKeys:
                              AVVideoCodecH264, AVVideoCodecKey,
                             [NSNumber numberWithInteger: _videoW], AVVideoWidthKey,
                             [NSNumber numberWithInteger: _videoH], AVVideoHeightKey,
                              nil];
        _videoInput = [AVAssetWriterInput assetWriterInputWithMediaType:AVMediaTypeVideo outputSettings:setting];
        _videoInput.expectsMediaDataInRealTime = YES;
}
     return _videoInput;
}

- (AVAssetWriterInput *)audioInput {
     if (!_audioInput) {
         NSDictionary *setting = [NSDictionary dictionaryWithObjectsAndKeys:
                              @(kAudioFormatMPEG4AAC), AVFormatIDKey,
                              @(_channel), AVNumberOfChannelsKey,
                              @(_rate), AVSampleRateKey,
                              nil];
        _audioInput = [AVAssetWriterInput assetWriterInputWithMediaType:AVMediaTypeAudio outputSettings:setting];
        _audioInput.expectsMediaDataInRealTime = YES;
     }
    return _audioInput;
}
这样我们对AVFoundation的封装便基本完成了。详细用法请下载Github参考其中的Demo,如果觉得不错给个star吧。后续会添加一些自定义的滤镜。需要学习AVFoundation其它知识点的同学可以直接阅读AVFoundation Programming Guide。
总结:
录像或者拍照基础功能的实现可以总结为多个输入设备以及多个输出通过数据采集硬件,连接而成的一次会话任务