一.准备工作
1、安装 Node.js: https://nodejs.org/en/
2、安装 Git: https://github.com/waylau/git-for-win
Git教程 https://github.com/waylau/git-for-win廖雪峰老师的教程,非常好。
3、安装完成后,在开始菜单里找到“Git”->“Git Bash”,名称和邮箱是Github上的。
4、安装 Hexo。所有必备的应用程序安装完成后,即可使用 npm 安装 Hexo。
$ npm install -g hexo-cli
4.1 安装hexo出错:
unable to verify the first certificate(无法验证第一证书)
查找到解决方案:
参考网址:npm报错
依据解决方案所述,在命令行输入如下命令,来取消ssl验证:
npm config set strict-ssl false
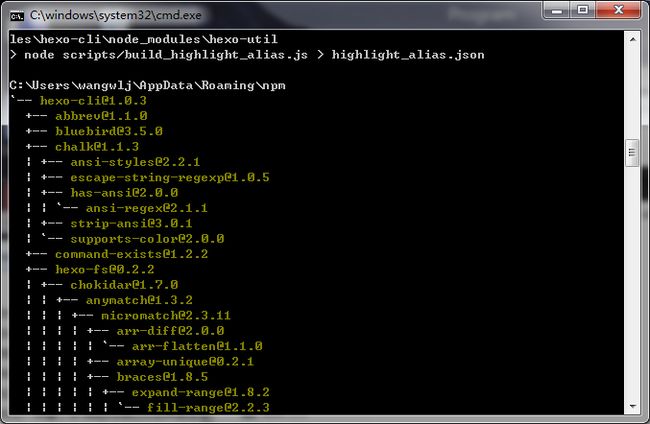
之后安装就会成功了,显示如下:
二、配置Github
首先注册、登录 https://github.com/
记住自己的Username(很重要)
然后右上角选择 Create a new repository https://github.com/new
Repository name(填自己的名字) yourname.github.io(yourname与你的注册用户名一致,这个就是你博客的域名了)
仓库创建完成后,开始生成添加秘钥。
在终端(cmd)输入:
ssh-keygen -t rsa -C "Github的注册邮箱地址"
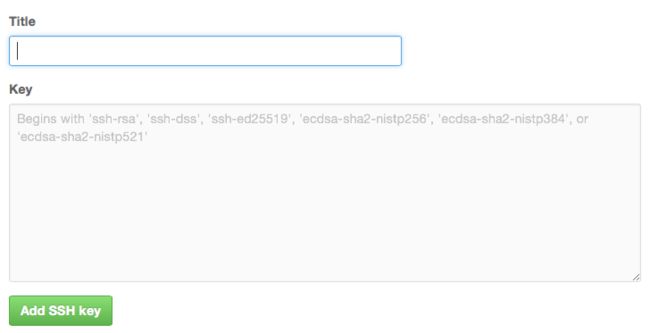
一路Enter过来就好,待秘钥生成完毕,会得到两个文件id_rsa和id_rsa.pub,用带格式的记事本打开id_rsa.pub,Ctrl + a复制里面的所有内容,然后进入https://github.com/settings/ssh:
将复制的内容粘贴到Key的输入框,随便写好Title里面的内容,点击Add SSH key按钮即可。
若没有配置GitHub,就执行第三步(初始化博客),会出现如下错误:
三、初始化博客
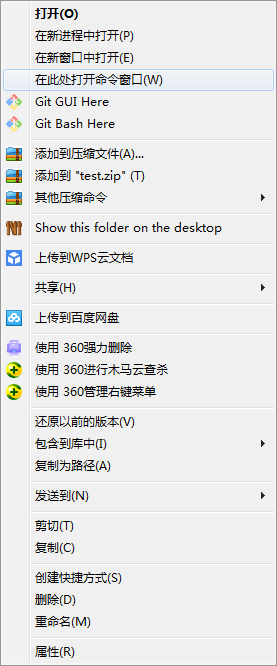
在电脑F盘(自己随意)目录下新建文件夹 test,进入test,按住Shift键点击鼠标右键,点击“在此处打开命令窗口”:
输入
hexo init blog
稍微等待下,速度有点慢。成功提示:
INFO Start blogging with Hexo!
因为你初始化hexo 之后source目录下自带一篇hello world文章, 所以直接执行下方命令:
$ hexo generate
# 启动本地服务器
$ hexo server
# 在浏览器输入 http://localhost:4000/就可以看见网页和模板了
INFO  Start processing
INFO  Hexo is running at http://localhost:4000/. Press Ctrl+C to stop.
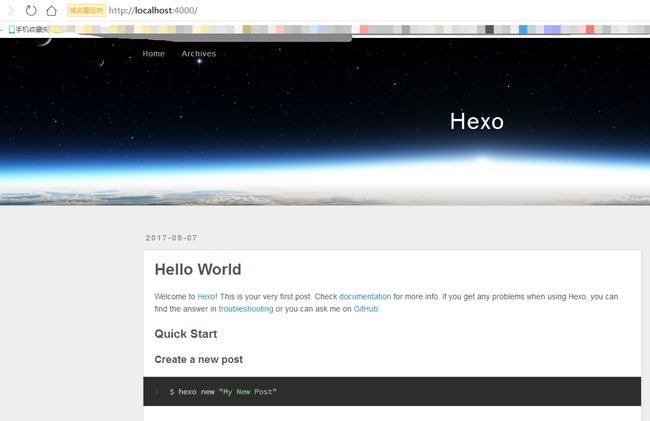
访问http://localhost:4000/,便可以看到网站初步的模样,不要激动,我们还要把网页发布到Github上去。
四、配置博客
在blog目录下,用sublime/notepad++等文本编辑器打开_config.yml文件,修改参数信息
特别提醒,在每个参数的:后都要加一个空格
1.修改网站相关信息
title: wangwlj测试所用博客
subtitle: 积跬步以至千里!
description: 网页描述
author: wangwlj
language: zh-Hans
timezone: Asia/Shanghai
language和timezone都是有输入规范的,详细可参考 语言规范和时区规范。
2.配置部署(qwerty200696,修改成自己的)
deploy:
  type: git
  repo: https://github.com/qwerty200696/qwerty200696.github.io
  branch: master
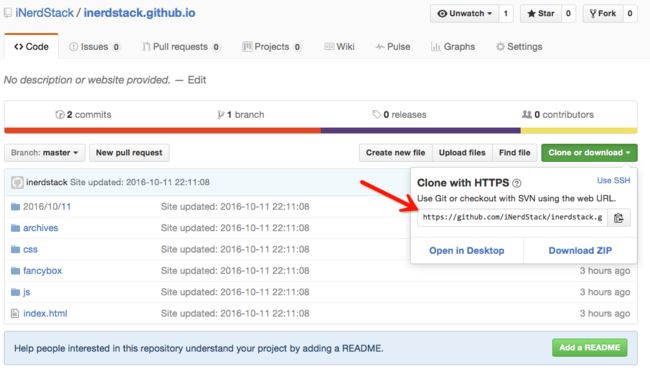
其中repo项是之前Github上创建好的仓库的地址,可以通过如下图所示的方式得到:
branch是项目的分支,我们默认用主分支master。
3.配置统一资源定位符(个人域名)
如果有个人域名的话可以设置,否则跳过即可。GitHub地址也可以。
url: http://inerdstack.com
对于root(根目录)、permalink(永久链接)、permalink_defaults(默认永久链接)等其他信息保持默认。
五、发表文章
1.新建一篇博文,在CMD中输入
$ hexo new "我的测试文章"

INFO  Created: F:\test\blog\source\_posts\我的测试文章.md
2.找到该文章,打开,使用Markdown语法,该语法介绍可以查看:markdown语法
3.接着输入如下的一系列命令:
F:\test\blog
$ hexo clean
INFO  Deleted database.
INFO  Deleted public folder.

F:\test\blog
$ hexo generate
INFO  Start processing
INFO  Files loaded in 1.48 s
#省略
INFO  29 files generated in 4.27 s

$ hexo server
INFO  Start processing
INFO  Hexo is running at http://localhost:4000/. Press Ctrl+C to stop.
我直接跑的server,也可以。
最后一步,发布到网上,执行:
F:\test\blog
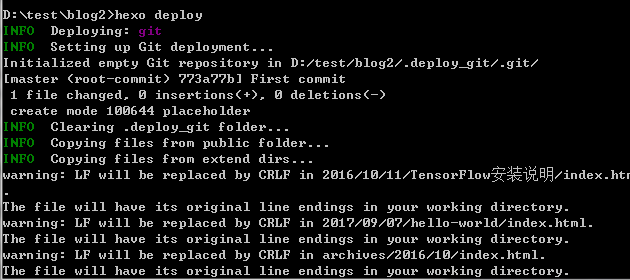
$ hexo deploy
INFO  Deploying: git
INFO  Clearing .deploy_git folder...
INFO  Copying files from public folder...
#省略
其中会跳出Github登录,直接登录,如果没有问题,在浏览器输入qwerty200696(换成你的).github.io/
然后就可以看到已经发布了。
4.错误记录一:
deploy not found: git
解决方案:执行如下语句后, 再部署即可:
npm install hexo-deployer-git --save
参考自:https://www.v2ex.com/t/175940
5.错误记录二:
今天运行:
hexo deploy
同步文章到github时,出错:
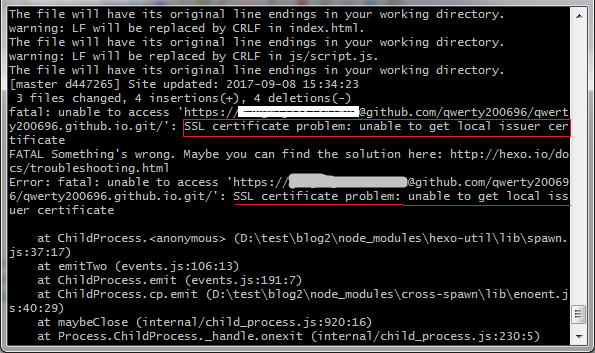
fatal: unable to access 'https://username:[email protected]/username/username.github.io.git/': SSL certificate problem: unable to get local issuer certificate
FATAL Something's wrong. Maybe you can find the solution here: http://hexo.io/docs/troubleshooting.html
Error: fatal: unable to access 'https://username:[email protected]/username/username.github.io.git/': SSL certificate problem: unable to get local issuer certificate

    at ChildProcess. (D:\test\blog2\node_modules\hexo-util\lib\spawn.js:37:17)
    at emitTwo (events.js:106:13)
    at ChildProcess.emit (events.js:191:7)
    at ChildProcess.cp.emit (D:\test\blog2\node_modules\cross-spawn\lib\enoent.js:40:29)
    at maybeClose (internal/child_process.js:920:16)
    at Process.ChildProcess._handle.onexit (internal/child_process.js:230:5)
解决方法:执行如下语句:
$ git config --global http.sslVerify false
参考自:git获取代码提示SSL certificate problem: unable to get local issuer certificate
(optional)另外,可将_config.yml中的repo修改为如下标准格式:
repo: https://用户名:密码@github.com/用户名/用户名.github.io.git
参考自: hexo提交报错 unable to access
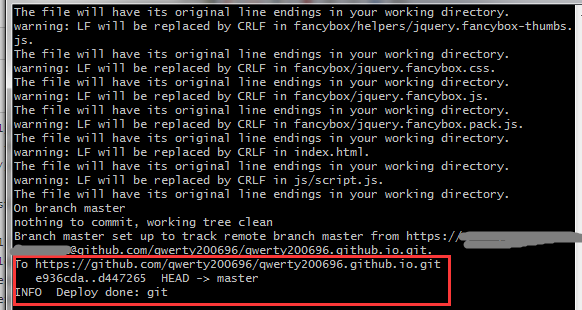
之后再次运行发布指令,终于成功:
hexo deploy
六、添加图片
经过上面的配置后,发现上传的博客文章里面的本地图片居然显示不来(没有同步上传)。
于是,找到解决方案:
1 把主页配置文件_config.yml 里的post_asset_folder:这个选项设置为true
2 在你的hexo目录下执行这样一句话npm install hexo-asset-image --save,这是下载安装一个可以上传本地图片的插件
3 等待一小段时间后,再运行hexo n "xxxx"来生成md博文时,/source/_posts文件夹内除了xxxx.md文件还有一个同名的文件夹
4 最后在xxxx.md中想引入图片时,先把图片复制到xxxx这个文件夹中,然后只需要在xxxx.md中按照markdown的格式引入图片:

注意: xxxx是这个md文件的名字,也是同名文件夹的名字。只需要有文件夹名字即可,不需要有什么绝对路径。你想引入的图片就只需要放入xxxx这个文件夹内就好了,很像引用相对路径。
5 最后检查一下,hexo g生成页面后,进入public\2017\02\26\index.html文件中查看相关字段,可以发现,html标签内的语句是,而不是</p>
<p>6.<code>hexo s</code>,运行本地服务器,打开<code>http://localhost:4000/</code>,可实时查看修改情况。</p>
<p>7.<code>hexo g</code>,同步到github。</p>
<h2>七、总结</h2>
<p>发布文章的步骤:</p>
<p>1、<code>hexo new</code> 创建文章</p>
<p>2、<code>Markdown</code>语法编辑文章</p>
<p>3、部署(所有打开CMD都是在blog目录下)</p>
<pre><code>hexo clean #清除缓存 网页正常情况下可以忽略此条命令
hexo generate #生成
hexo server #启动服务预览,非必要,可本地浏览网页
hexo deploy #部署发布
</code></pre>
<p>简写Tips:</p>
<ol>
<li><p>hexo n “我的博客” == hexo new “我的博客” #新建文章</p></li>
<li><p>hexo p == hexo publish</p></li>
<li><p>hexo g == hexo generate#生成</p></li>
<li><p>hexo s == hexo server #启动服务预览</p></li>
<li><p>hexo d == hexo deploy#部署</p></li>
</ol>
<p>参考文献:</p>
<ol>
<li>教你免费搭建个人博客,Hexo&Github</li>
<li>hexo生成博文插入图片</li>
</ol>
<p>本文在GitHub博客上即时更新 https://qwerty200696.github.io/2017/09/08/blog_setup/</p>
</article>
</div>
</div>
</div>
<!--PC和WAP自适应版-->
<div id=)


