以下最小需求支持概念验证环境,使用核心服务和几个:term:`CirrOS`实例:
控制节点: 1 处理器, 4 GB 内存, 及5 GB 存储,两张网卡
计算节点: 1 处理器, 2 GB 内存, 及10 GB 存储,两张网卡
上面的是最小的硬件支持,不过你最好要超过这个硬件支持。
为了避免混乱和为OpenStack提供更多资源,我们推荐你最小化安装你的Linux发行版。同时,你必须在每个节点安装你的发行版的64位版本。
控制节点的管理IP是192.168.10.100(eth0)另外的IP是192.168.111.134(eth1)
控制节点的管理IP是192.168.10.200(eth0)另外的IP是192.168.111.135(eth1)
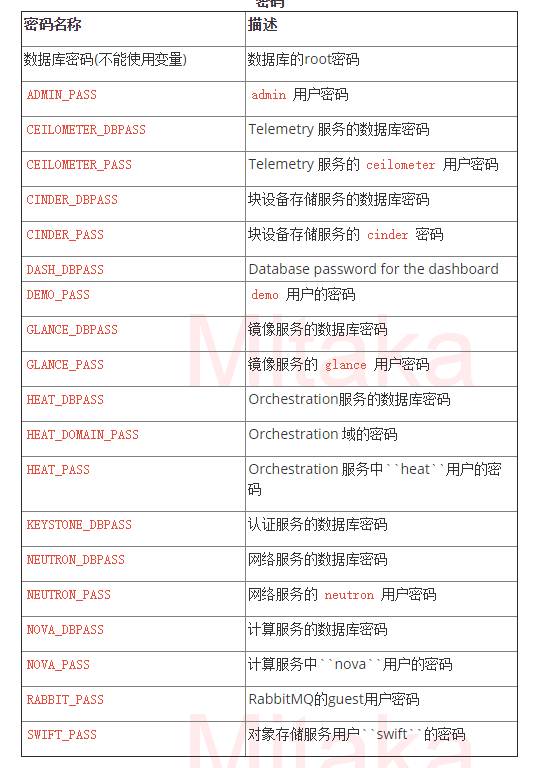
下面是各个服务的密码
一开始我们就要关闭防火墙
systemctl stop firewalld
setenforce 0
vim /etc/selinux/config
SELINUX=permissive
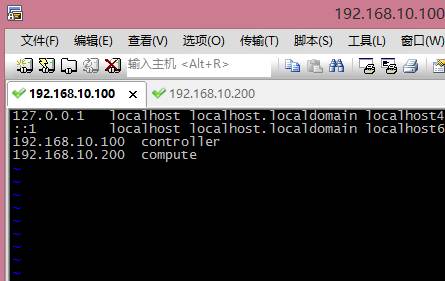
在/etc/hosts文件加入
192.168.10.100 controller
192.168.10.200 compute
如图:
让服务器把controller解析为192.168.10.100,把compute解析为192.168.10.200
配置yum文件
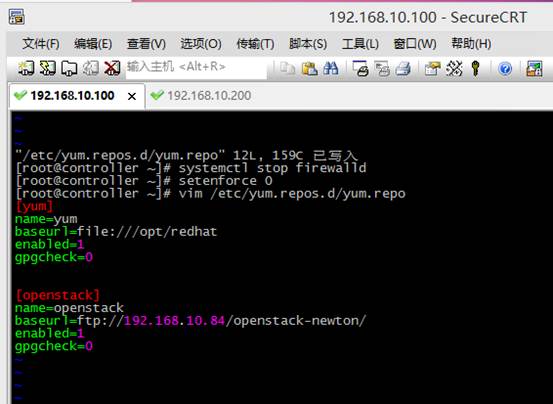
创建并写入/etc/yum.repos.d/yum.repo文件以下内容
[yum]
name=yum
baseurl=ftp://192.168.10.84/redhat
enabled=1
gpgcheck=0
[openstack]
name=openstack
baseurl=ftp://192.168.10.84/openstack-newton/
enabled=1
gpgcheck=0
如图:
配置时间同步
yum install chrony -y
上面的操作在两个节点上都要执行。
在控制节点上配置
编辑/etc/chrony.conf
加入上面两行
然后设置开机自启并启动服务。注意如果重启服务出现下面报错说明你可能打错了。
ln -s '/usr/lib/systemd/system/mariadb.service' '/etc/systemd/system/multi-user.target.wants/mariadb.service'
systemctl enable chronyd.service(开机自启)
systemctl start chronyd.service(开启服务)
下面在计算节点上,让它去同步controller的时间
注释上面的服务器,加入controller服务器
设置开机自启并启动服务
systemctl enable chronyd.service
systemctl start chronyd.service
在控制节点和计算节点都要安装openstack的客户端的包和openstack服务的安全策略(可能会卡顿,不过是正常的)
yum install python-openstackclient -y
yum install openstack-selinux -y
下面的是在控制节点上安装的
首先我们要先安装数据库
yum install ftp://192.168.10.84/system-packages/systemd-libs-219-19.el7.x86_64.rpm --setopt=protected_multilib=false
yum install mariadb mariadb-server python2-PyMySQL -y
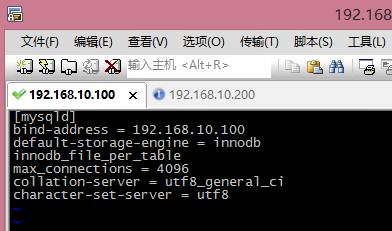
创建并编辑/etc/my.cnf.d/openstack.cnf文件,加入下面行
[mysqld]
bind-address = 192.168.10.100
default-storage-engine = innodb
innodb_file_per_table
max_connections = 4096
collation-server = utf8_general_ci
character-set-server = utf8
如图:
其中,192.168.10.100是控制节点的管理IP
设置开机自启并启动服务
systemctl enable mariadb.service
systemctl start mariadb.service
为了保证数据库服务的安全性,运行``mysql_secure_installation``脚本。特别需要说明的是,为数据库的root用户设置一个适当的密码。
mysql_secure_installation
Telemetry 服务使用 NoSQL 数据库来存储信息,典型地,这个数据库运行在控制节点上。向导中使用MongoDB。
下面也把这个数据库安装上去吧!
yum install mongodb-server mongodb -y
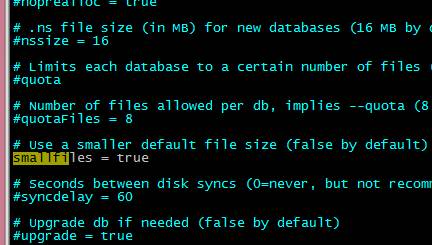
编辑/etc/mongod.conf这个文件
其中192.168.10.100是控制节点的管理IP
去掉smallfiles的注释
设置开机自启并启动服务
systemctl enable mongod.service
systemctl start mongod.service
下面安装消息队列,消息队列是keystone glance nova neutron都要用到的服务。它们用它来让计算节点和控制节点来通讯。同样的,这个也在控制节点上安装,一般没有写在哪里安装的都在控制节点上安装
yum install rabbitmq-server -y
设置开机自启并启动服务
systemctl enable rabbitmq-server.service
systemctl start rabbitmq-server.service
添加 openstack 用户:
rabbitmqctl add_user openstack 000000
给``openstack``用户配置写和读权限:
rabbitmqctl set_permissions openstack ".*" ".*" ".*"
如图:
认证服务认证缓存使用Memcached缓存令牌。缓存服务memecached运行在控制节点。在生产部署中,我们推荐联合启用防火墙、认证和加密保证它的安全。
执行以下命令安装
yum install memcached python-memcached -y
启动Memcached服务,并且配置它随机启动。
systemctl enable memcached.service
systemctl start memcached.service
下面配置keystone服务
mysql -uroot -p
create database keystone;
grant all privileges on keystone.* to keystone@'localhost' identified by '0000
00';
grant all privileges on keystone.* to keystone@'%' identified by '000000';
上面000000是用户keystone的密码。
生成一个随机值在初始的配置中作为管理员的令牌
openssl rand -hex 10
记住上面的随机数
yum install ftp://192.168.10.84/system-packages/python-jinja2-2.7.2-2.el7.noarch.rpm ftp://192.168.10.84/system-packages/python-zope-interface-4.0.5-4.el7.x86_64.rpm -y
yum install openstack-keystone httpd mod_wsgi -y
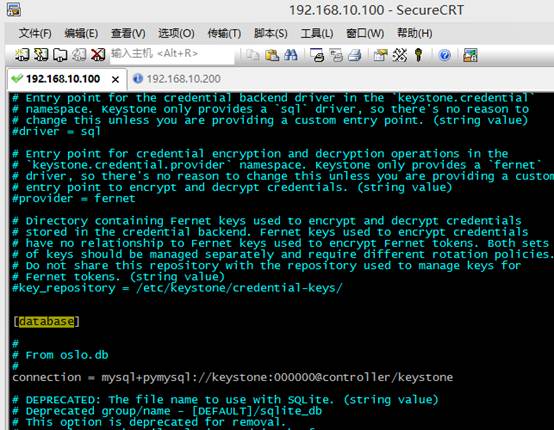
编辑/etc/keystone/keystone.conf文件
把刚刚的随机数加在admin_token后面
其中000000是keystone的密码
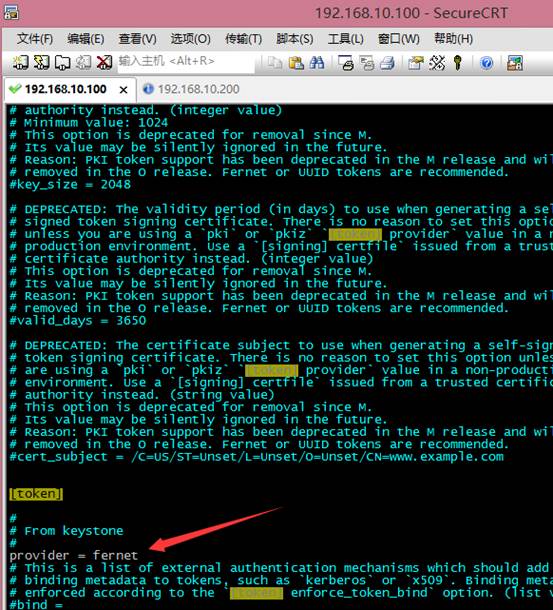
在``[token]``部分,配置Fernet UUID令牌的提供者。
如图:
初始化身份认证服务的数据库:
su -s /bin/sh -c "keystone-manage db_sync" keystone
初始化Fernet keys:
keystone-manage fernet_setup --keystone-user keystone --keystone-group keystone
编辑``/etc/httpd/conf/httpd.conf`` 文件,配置``ServerName`` 选项为控制节点
如图:
创建文件/etc/httpd/conf.d/wsgi-keystone.conf并加入以下内容
Listen 5000
Listen 35357
WSGIDaemonProcess keystone-public processes=5 threads=1 user=keystone group=keystone display-name=%{GROUP}
WSGIProcessGroup keystone-public
WSGIScriptAlias / /usr/bin/keystone-wsgi-public
WSGIApplicationGroup %{GLOBAL}
WSGIPassAuthorization On
ErrorLogFormat "%{cu}t %M"
ErrorLog /var/log/httpd/keystone-error.log
CustomLog /var/log/httpd/keystone-access.log combined
Require all granted
WSGIDaemonProcess keystone-admin processes=5 threads=1 user=keystone group=keystone display-name=%{GROUP}
WSGIProcessGroup keystone-admin
WSGIScriptAlias / /usr/bin/keystone-wsgi-admin
WSGIApplicationGroup %{GLOBAL}
WSGIPassAuthorization On
ErrorLogFormat "%{cu}t %M"
ErrorLog /var/log/httpd/keystone-error.log
CustomLog /var/log/httpd/keystone-access.log combined
Require all granted
启动 Apache HTTP 服务并配置其随系统启动:
systemctl enable httpd.service
systemctl start httpd.service
配置认证令牌:
vim /etc/keystone/keystone.sh
export OS_TOKEN=6f7b8ee0788f18500b61
export OS_URL=http://controller:35357/v3
export OS_IDENTITY_API_VERSION=3
如图:
创建服务实体和身份认证服务:
openstack service create --name keystone --description "OpenStack Identity" identity
这时候会有一个报错信息是:Missing value auth-url required for auth plugin password
我们可以执行source /etc/keystone/keystone.sh
然后我们再去执行openstack service create --name keystone --description "OpenStack Identity" identity就不会报错了
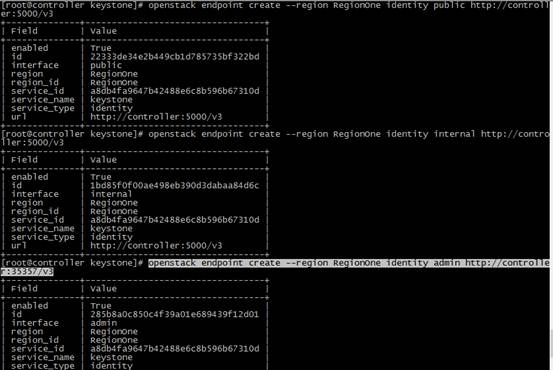
创建认证服务的 API 端点:
openstack endpoint create --region RegionOne identity public http://controller:5000/v3
openstack endpoint create --region RegionOne identity internal http://controller:5000/v3
openstack endpoint create --region RegionOne identity admin http://controller:35357/v3
如图:
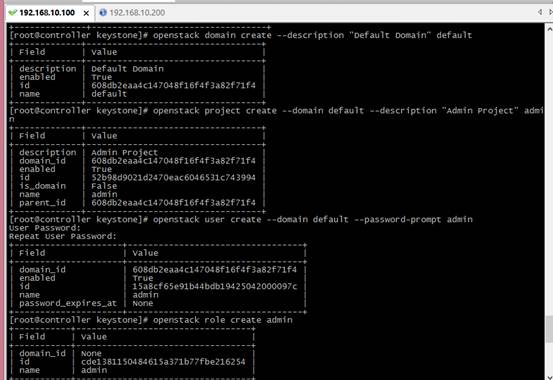
openstack domain create --description "Default Domain" default
创建 admin 项目:
openstack project create --domain default --description "Admin Project" admin
创建 admin 用户:
openstack user create --domain default --password-prompt admin
创建 admin 角色:
openstack role create admin
添加``admin`` 角色到 admin 项目和用户上:
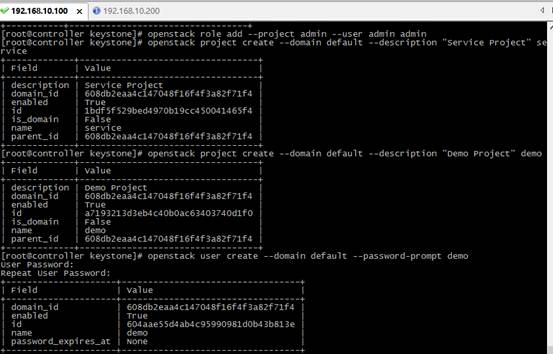
openstack role add --project admin --user admin admin
创建``service``项目:
openstack project create --domain default --description "Service Project" service
常规(非管理)任务应该使用无特权的项目和用户。作为例子,本指南创建 demo 项目和用户。
创建``demo`` 项目:
openstack project create --domain default --description "Demo Project" demo
创建``demo`` 用户:
openstack user create --domain default --password-prompt demo
创建 user 角色:
openstack role create user
添加 user``角色到 ``demo 项目和用户:
openstack role add --project demo --user demo user
如图:
下面验证一下我们上面有没有问题
编辑 /etc/keystone/keystone-paste.ini 文件,找到[pipeline:public_api]、[pipeline:admin_api]和[pipeline:api_v3] 把admin_token_auth字段删除。
执行下面命令,重置环境变量
unset OS_TOKEN OS_URL
如果你不执行重置环境变量的命令可能会出现下面报错:
Only an authorized user may issue a new token
下面执行命令验证
openstack --os-auth-url http://controller:35357/v3 --os-project-domain-name default --os-user-domain-name default --os-project-name admin --os-username admin token issue
openstack --os-auth-url http://controller:5000/v3 --os-project-domain-name default --os-user-domain-name default --os-project-name demo --os-username demo token issue
如图:
为了方便我们要创建两个脚本放在/etc/keystone目录下
创建admin-openrc 并添加如下内容
export OS_PROJECT_DOMAIN_NAME=default
export OS_USER_DOMAIN_NAME=default
export OS_PROJECT_NAME=admin
export OS_USERNAME=admin
export OS_PASSWORD=000000
export OS_AUTH_URL=http://controller:35357/v3
export OS_IDENTITY_API_VERSION=3
export OS_IMAGE_API_VERSION=2
其中000000是认证服务中admin的密码。
如图:
创建demo-openrc并添加如下内容
export OS_PROJECT_DOMAIN_NAME=default
export OS_USER_DOMAIN_NAME=default
export OS_PROJECT_NAME=demo
export OS_USERNAME=demo
export OS_PASSWORD=000000
export OS_AUTH_URL=http://controller:5000/v3
export OS_IDENTITY_API_VERSION=3
export OS_IMAGE_API_VERSION=2
其中000000是demo的密码。
如图:
验证一下我们的脚本有没有写错
source /etc/keystone/admin-openrc
openstack token issue
下面安装glance服务
(如果执行过database.sh和password.sh脚本就不用执行下面的四条命令)
mysql -u root -p
create database glance;grant all privileges on glance.* to 'glance'@'localhost'identified by '000000';
grant all privileges on glance.* to 'glance'@'%' identified by '000000';
exit
000000是glance用户的密码,可以更改的
source /etc/keystone/keystone.sh
创建 glance 用户:
openstack user create --domain default --password-prompt glance
添加 admin 角色到 glance 用户和 service 项目上。
openstack role add --project service --user glance admin
创建``glance``服务实体
openstack service create --name glance --description "OpenStack Image" p_w_picpath
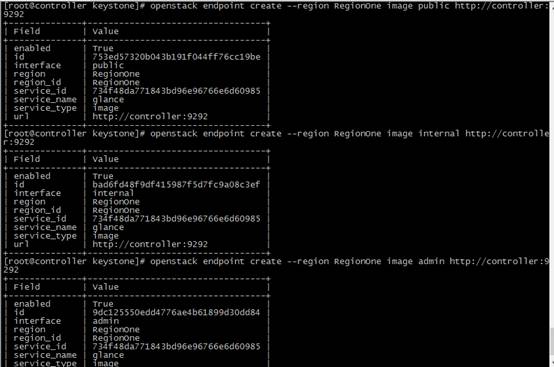
创建镜像服务的 API 端点:
openstack endpoint create --region RegionOne p_w_picpath public http://controller:9292
openstack endpoint create --region RegionOne p_w_picpath internal http://controller:9292
openstack endpoint create --region RegionOne p_w_picpath admin http://controller:9292
如图
安装glance软件包:
yum install openstack-glance -y
编辑文件 /etc/glance/glance-api.conf 并完成如下动作:
在 [database] 部分加入
connection = mysql+pymysql://glance:000000@controller/glance
其中000000是glance的密码
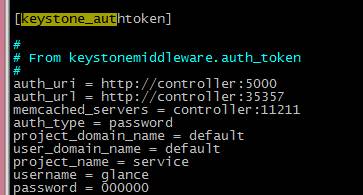
在 [keystone_authtoken]加入
auth_uri = http://controller:5000
auth_url = http://controller:35357
memcached_servers = controller:11211
auth_type = password
project_domain_name = default
user_domain_name = default
project_name = service
username = glance
password = 000000
其中000000是glance的密码
在[paste_deploy]中加入
flavor = keystone
在 [glance_store] 部分,配置本地文件系统存储和镜像文件位置:
stores = file,http
default_store = file
filesystem_store_datadir = /var/lib/glance/p_w_picpaths/
vim /etc/glance/glance-registry.conf
在 [database] 部分,加入
connection = mysql+pymysql://glance:000000@controller/glance
在 [keystone_authtoken] 部分加入:
auth_uri = http://controller:5000
auth_url = http://controller:35357
memcached_servers = controller:11211
auth_type = password
project_domain_name = default
user_domain_name = default
project_name = service
username = glance
password = 000000
其中000000是glance用户的密码
在[paste_deploy]部分加入
flavor = keystone
写入镜像服务数据库:
su -s /bin/sh -c "glance-manage db_sync" glance
如图
systemctl enable openstack-glance-api.service
systemctl enable openstack-glance-registry.service
systemctl start openstack-glance-api.service
systemctl start openstack-glance-registry.service
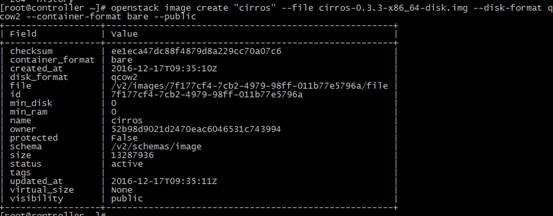
下面我们来上传一下镜像看看有没有问题:
source /etc/keystone/admin_openrc
把镜像cirros-0.3.3-x86_64-disk.img上传到服务器上。
执行下面命令看看能不能上传镜像
上传镜像的时候可能会出现505的报错,如果有这个报错,一般是你的数据库连不上,你要看看你的数据库有没有问题,然后看看你的配置文件有没有写错,如果写错了你修改好了还要去执行下面命令,写入镜像服务数据库(命令是:su -s /bin/sh -c "glance-manage db_sync" glance),重启一下服务就可以啦
下面是nova配置
mysql -uroot -p
create database nova;
create database nova_api;
grant all privileges on nova_api.* 'nova'@’localhost’ identified by '000000';
grant all privileges on nova_api.* to 'nova'@'%' identified by '000000';
grant all privileges on nova.* to 'nova'@'localhost' identified by '000000';
grant all privileges on nova.* to 'nova'@'%' identified by '000000';
获得 admin 凭证来获取只有管理员能执行的命令的访问权限:
source /etc/keystone/admin_openrc
创建 nova 用户:
openstack user create --domain default --password-prompt nova
给 nova 用户添加 admin 角色:
openstack role add --project service --user nova admin
创建 nova 服务实体:
openstack service create --name nova --description "OpenStack Compute" compute
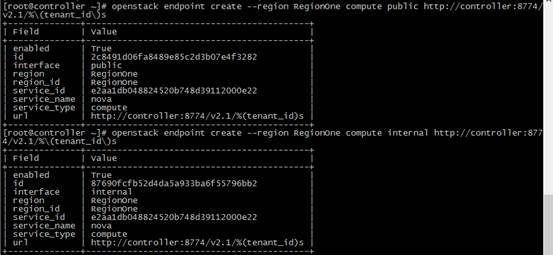
创建 Compute 服务 API 端点:
openstack endpoint create --region RegionOne compute public http://controller:8774/v2.1/%\(tenant_id\)s
openstack endpoint create --region RegionOne compute internal http://controller:8774/v2.1/%\(tenant_id\)s
openstack endpoint create --region RegionOne compute admin http://controller:8774/v2.1/%\(tenant_id\)s
如图:
安装软件包
yum install ftp://192.168.10.84/system-packages/python-cheetah-2.4.4-5.el7.centos.x86_64.rpm ftp://192.168.10.84/system-packages/python-markdown-2.4.1-1.el7.centos.noarch.rpm -y
yum install openstack-nova-api openstack-nova-conductor \
openstack-nova-console openstack-nova-novncproxy \
openstack-nova-scheduler
编辑/etc/nova/nova.conf文件
在``[DEFAULT]``部分加入
只启用计算和元数据API
enabled_apis = osapi_compute,metadata
配置“RabbitMQ”消息队列访问
rpc_backend = rabbit
使用控制节点的管理接口的IP 地址
my_ip = 192.168.10.100
使能 Networking 服务
use_neutron = True
默认情况下,计算服务使用内置的防火墙服务。由于网络服务包含了防火墙服务,你必须使用``nova.virt.firewall.NoopFirewallDriver``防火墙服务来禁用掉计算服务内置的防火墙服务
firewall_driver = nova.virt.firewall.NoopFirewallDriver
auth_strategy=keystone
如图:
在[oslo_messaging_rabbit]中加入
rabbit_host = controller
rabbit_userid = openstack
rabbit_password = 000000
上面是配置消息认证的其中000000是之前在做消息认证的时候创建的openstack用户的密码
在[api_database]中加入
connection = mysql+pymysql://nova:000000@controller/nova_api
其中000000是nova的密码
在[database]中加入
connection = mysql+pymysql://nova:000000@controller/nova
其中000000是nova的密码
在[keystone_authtoken]中加入
auth_uri = http://controller:5000
auth_url = http://controller:35357
memcached_servers = controller:11211
auth_type = password
project_domain_name = default
user_domain_name = default
project_name = service
username = nova
password = 000000
在[vnc]中加入
vncserver_listen = $my_ip
vncserver_proxyclient_address = $my_ip
在[glance]中加入
api_servers = http://controller:9292
在[oslo_concurrency]中加入
lock_path = /var/lib/nova/tmp
su -s /bin/sh -c "nova-manage api_db sync" nova
su -s /bin/sh -c "nova-manage db sync" nova
开机自启并启动服务
systemctl enable openstack-nova-api.service
systemctl enable openstack-nova-consoleauth.service
systemctl enable openstack-nova-scheduler.service
systemctl enable openstack-nova-conductor.service
systemctl enable openstack-nova-novncproxy.service
systemctl start openstack-nova-api.service
systemctl start openstack-nova-consoleauth.service
systemctl start openstack-nova-scheduler.service
systemctl start openstack-nova-conductor.service
systemctl start openstack-nova-novncproxy.service
下面是在计算节点上执行的
yum install ftp://192.168.10.84/system-packages/python-jinja2-2.7.2-2.el7.noarch.rpm
yum install openstack-nova-compute -y
编辑/etc/nova/nova.conf
在[DEFAULT]中加入
rpc_backend = rabbit
auth_strategy = keystone
my_ip = 192.168.10.200
use_neutron = True
firewall_driver = nova.virt.firewall.NoopFirewallDriver
在[oslo_messaging_rabbit](一定要看清楚,后面是rabbit不是amqp)中加入
rabbit_host = controller
rabbit_userid = openstack
rabbit_password = 000000
在[keystone_authtoken]中加入
auth_uri = http://controller:5000
auth_url = http://controller:35357
memcached_servers = controller:11211
auth_type = password
project_domain_name = default
user_domain_name = default
project_name = service
username = nova
password = 000000
在[vnc]中加入
enabled = True
vncserver_listen = 0.0.0.0
vncserver_proxyclient_address = $my_ip
novncproxy_base_url = http://controller:6080/vnc_auto.html
在[glance]中加入
api_servers = http://controller:9292
在[oslo_concurrency]中加入
lock_path = /var/lib/nova/tmp
确定您的计算节点是否支持虚拟机的硬件加速
egrep -c '(vmx|svm)' /proc/cpuinfo
如果这个命令返回了 one or greater 的值,那么你的计算节点支持硬件加速且不需要额外的配置。
如果这个命令返回了 zero 值,那么你的计算节点不支持硬件加速。你必须配置 libvirt 来使用 QEMU 去代替 KVM
编辑/etc/nova/nova.conf
在[libvirt]中加入
virt_type = qemu
启动计算服务及其依赖,并将其配置为随系统自动启动
systemctl enable libvirtd.service
systemctl enable openstack-nova-compute.service
systemctl start libvirtd.service
systemctl start openstack-nova-compute.service
如果最后一个服务起不来,看看日志,有可能是消息认证出问题了,如果是消息认证出问题了,你就去看看/etc/nova/nova.conf文件中[oslo_messaging_rabbit]部分有没有错,如果错了你改好了之后最后一个服务还是起不来的话,你可以先用这个命令
systemctl stop openstack-nova-compute.service
再
systemctl start openstack-nova-compute.service
应该就可以啦。
下面我们来验证一下有没有问题
source /etc/keystone/admin_openrc
openstack compute service list
这样就可以啦。
下面是neutron服务
下面命令是在控制节点上执行的
mysql -uroot -p
create database neutron;
grant all privileges on neutron.* to 'neutron'@'localhost' identified by '000000';
grant all privileges on neutron.* to 'neutron'@'%' identified by '000000';
获得 admin 凭证来获取只有管理员能执行的命令的访问权限
source /etc/keystone/admin_openrc
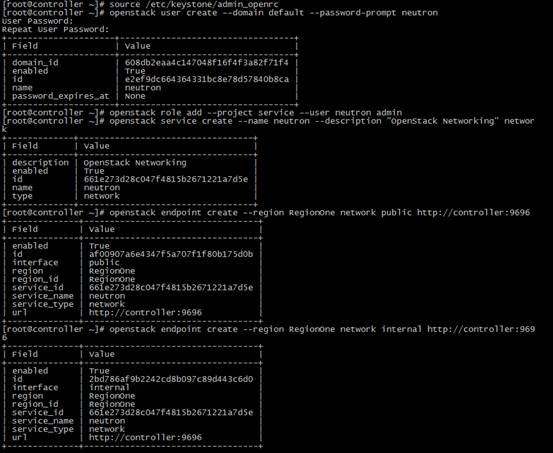
创建``neutron``用户
openstack user create --domain default --password-prompt neutron
添加``admin`` 角色到``neutron`` 用户:
openstack role add --project service --user neutron admin
创建``neutron``服务实体:
openstack service create --name neutron --description "OpenStack Networking" network
创建网络服务API端点:
openstack endpoint create --region RegionOne network public http://controller:9696
openstack endpoint create --region RegionOne network internal http://controller:9696
openstack endpoint create --region RegionOne network admin http://controller:9696
yum install ftp://192.168.10.1/system-packages/libxslt-python-1.1.28-5.el7.x86_64.rpm -y
yum install openstack-neutron openstack-neutron-ml2openstack-neutron-linuxbridge ebtables
您可以部署网络服务使用选项1和选项2两种架构中的一种来部署网络服务。
选项1采用尽可能简单的架构进行部署,只支持实例连接到公有网络(外部网络)。没有私有网络(个人网络),路由器以及浮动IP地址。只有``admin``或者其他特权用户才可以管理公有网络
选项2在选项1的基础上多了layer-3服务,支持实例连接到私有网络。``demo``或者其他没有特权的用户可以管理自己的私有网络,包含连接公网和私网的路由器。另外,浮动IP地址可以让实例使用私有网络连接到外部网络,例如互联网
典型的私有网络一般使用覆盖网络。覆盖网络,例如VXLAN包含了额外的数据头,这些数据头增加了开销,减少了有效内容和用户数据的可用空间。在不了解虚拟网络架构的情况下,实例尝试用以太网最大传输单元 (MTU) 1500字节发送数据包。网络服务会自动给实例提供正确的MTU的值通过DHCP的方式。但是,一些云镜像并没有使用DHCP或者忽视了DHCP MTU选项,要求使用元数据或者脚本来进行配置。
下面我们安装私有网络。
yum install ftp://192.168.10.1/system-packages/libxslt-python-1.1.28-5.el7.x86_64.rpm -y
yum install openstack-neutron openstack-neutron-ml2 openstack-neutron-linuxbridge ebtables
编辑``/etc/neutron/neutron.conf`` 文件并完成如下操作
在 [database] 部分,配置数据库访问:
connection = mysql+pymysql://neutron:000000@controller/neutron
000000是你的数据库的密码
在``[DEFAULT]``部分,启用Modular Layer 2 (ML2)插件,路由服务和重叠的IP地址:
core_plugin = ml2
service_plugins = router
allow_overlapping_ips = True
rpc_backend = rabbit
auth_strategy = keystone
notify_nova_on_port_status_changes = True
notify_nova_on_port_data_changes = True
[oslo_messaging_rabbit]”部分加入
rabbit_host = controller
rabbit_userid = openstack
rabbit_password = 000000
在[keystone_authtoken]部分加入
auth_uri = http://controller:5000
auth_url = http://controller:35357
memcached_servers = controller:11211
auth_type = password
project_domain_name = default
user_domain_name = default
project_name = service
username = neutron
password = 000000
在[nova]加入
auth_url = http://controller:35357
auth_type = password
project_domain_name = default
user_domain_name = default
region_name = RegionOne
project_name = service
username = nova
password = 000000
在[oslo_concurrency]部分加入
lock_path = /var/lib/neutron/tmp
编辑/etc/neutron/plugins/ml2/ml2_conf.ini文件
在[ml2]部分加入
type_drivers = flat,vlan,vxlan
tenant_network_types = vxlan
mechanism_drivers = linuxbridge,l2population
extension_drivers = port_security
在[ml2_type_flat]部分加入
flat_networks = provider
在[ml2_type_vxlan]部分加入
vni_ranges = 1:1000
在[securitygroup]部分加入
enable_ipset = True
编辑/etc/neutron/plugins/ml2/linuxbridge_agent.ini
在[linux_bridge]中加入
physical_interface_mappings = eth1(不是管理IP的那张网卡)
在[vxlan]部分加入
enable_vxlan = True
local_ip = IP(管理IP)
l2_population = True
在[securitygroup]部分加入
enable_security_group = True
firewall_driver = neutron.agent.linux.iptables_firewall.IptablesFirewallDriver
编辑/etc/neutron/l3_agent.ini
在[DEFAULT]中
interface_driver = neutron.agent.linux.interface.BridgeInterfaceDriver
external_network_bridge =
编辑``/etc/neutron/dhcp_agent.ini``文件
在[DEFAULT]中加入
interface_driver = neutron.agent.linux.interface.BridgeInterfaceDriver
dhcp_driver = neutron.agent.linux.dhcp.Dnsmasq
enable_isolated_metadata = True
编辑``/etc/neutron/metadata_agent.ini
在[DEFAULT]部分加入
nova_metadata_ip = controller
metadata_proxy_shared_secret = 000000
000000是元数据代理的密码
ln -s /etc/neutron/plugins/ml2/ml2_conf.ini /etc/neutron/plugin.ini
su -s /bin/sh -c "neutron-db-manage --config-file /etc/neutron/neutron.conf --config-file /etc/neutron/plugins/ml2/ml2_conf.ini upgrade head" neutron
去计算节点执行
systemctl stop openstack-nova-compute.service
systemctl start openstack-nova-compute.service
systemctl enable neutron-linuxbridge-agent.service
systemctl start neutron-linuxbridge-agent.service
返回控制节点上
systemctl stop openstack-nova-api.service
systemctl start openstack-nova-api.service
systemctl enable neutron-server.service
systemctl enable neutron-linuxbridge-agent.service
systemctl enable neutron-dhcp-agent.service
systemctl enable neutron-metadata-agent.service
systemctl start neutron-server.service
systemctl start neutron-linuxbridge-agent.service
systemctl start neutron-dhcp-agent.service
systemctl start neutron-metadata-agent.service
systemctl enable neutron-l3-agent.service
systemctl start neutron-l3-agent.service
在控制节点上source /etc/keystone/admin-openrc
执行neutron ext-list
[root@controller neutron]# neutron ext-list
+---------------------------+---------------------------+
| alias | name |
+---------------------------+---------------------------+
| default-subnetpools | Default Subnetpools |
| availability_zone | Availability Zone |
| network_availability_zone | Network Availability Zone |
| binding | Port Binding |
| agent | agent |
| subnet_allocation | Subnet Allocation |
| dhcp_agent_scheduler | DHCP Agent Scheduler |
| tag | Tag support |
| external-net | Neutron external network |
| flavors | Neutron Service Flavors |
| net-mtu | Network MTU |
| network-ip-availability | Network IP Availability |
| quotas | Quota management support |
| provider | Provider Network |
| multi-provider | Multi Provider Network |
| address-scope | Address scope |
| subnet-service-types | Subnet service types |
| standard-attr-timestamp | Resource timestamps |
| service-type | Neutron 服务类型管理 |
| extra_dhcp_opt | Neutron Extra DHCP opts |
| standard-attr-revisions | Resource revision numbers |
| pagination | Pagination support |
| sorting | Sorting support |
| security-group | security-group |
| rbac-policies | RBAC Policies |
| standard-attr-description | standard-attr-description |
| port-security | Port Security |
| allowed-address-pairs | Allowed Address Pairs |
| project-id | project_id field enabled |
+---------------------------+---------------------------+
