上一篇博客介绍了mach_header相关内容,Mach-O文件介绍之mach_header。这篇博客主要介绍Mach-O 的加载命令。
Load command
Mach-O文件的主要功能在于加载命令(load command)。加载命令紧跟在文件头之后,文件头中的两个字段——ncmds和sizeofncmds——用于解析加载命令。
每一条指令都采用“类型——长度——值”的格式:32位的cmd值(表示类型),32位的cmdsize值(32位二进制位4的倍数,64位二进制位8的倍数),以及命令本身(有cmdsize指定的任意长度)。有一些命令是由内核加载器(定义在bsd/kern/mach_loader.c文件中)直接使用的,其他命令是由动态连接器处理的。
内核加载器命令
加载过程在内核的部分负责新进程的基本设置——分配虚拟内存,创建主线程,以及处理任何可能的代码签名/加密的工作。然而对于动态链接的可执行文件(大部分可执行文件都是动态链接的)来说,真正的库加载和符号解析的工作都是通过LC_LOAD_DYLINKER命令指定的动态连接器在用户态完成的。控制权会装交给连接器,链接器进而接着处理文件头中的其他加载命令。
加载命令总共有30多条。下表列出了内核加载器使用的命令
下面详细讨论这些加载命令。
1、LC_SEGMENT以及进程虚拟内存设置
LC_SEGMENT(或LC_SEGMENT_64)命令是最主要的加载命令,这条命令知道内核如何设置新运行的进程的内存空间。这些 segment直接从Mach-O二进制文件加载到内存中。
每一条LC_SEGMENT命令都提供了段布局的所有必要细节信息,如下表:
Objectice-C中segment加载命令的定义如下:
/*
 * The segment load command indicates that a part of this file is to be
 * mapped into the task's address space.  The size of this segment in memory,
 * vmsize, maybe equal to or larger than the amount to map from this file,
 * filesize.  The file is mapped starting at fileoff to the beginning of
 * the segment in memory, vmaddr.  The rest of the memory of the segment,
 * if any, is allocated zero fill on demand.  The segment's maximum virtual
 * memory protection and initial virtual memory protection are specified
 * by the maxprot and initprot fields.  If the segment has sections then the
 * section structures directly follow the segment command and their size is
 * reflected in cmdsize.
 */
struct segment_command { /* for 32-bit architectures */
uint32_t cmd; /* LC_SEGMENT */
uint32_t cmdsize; /* includes sizeof section structs */
char segname[16]; /* segment name */
uint32_t vmaddr; /* memory address of this segment */
uint32_t vmsize; /* memory size of this segment */
uint32_t fileoff; /* file offset of this segment */
uint32_t filesize; /* amount to map from the file */
vm_prot_t maxprot; /* maximum VM protection */
vm_prot_t initprot; /* initial VM protection */
uint32_t nsects; /* number of sections in segment */
uint32_t flags; /* flags */
};

/*
 * The 64-bit segment load command indicates that a part of this file is to be
 * mapped into a 64-bit task's address space.  If the 64-bit segment has
 * sections then section_64 structures directly follow the 64-bit segment
 * command and their size is reflected in cmdsize.
 */
struct segment_command_64 { /* for 64-bit architectures */
uint32_t cmd; /* LC_SEGMENT_64 */
uint32_t cmdsize; /* includes sizeof section_64 structs */
char segname[16]; /* segment name */
uint64_t vmaddr; /* memory address of this segment */
uint64_t vmsize; /* memory size of this segment */
uint64_t fileoff; /* file offset of this segment */
uint64_t filesize; /* amount to map from the file */
vm_prot_t maxprot; /* maximum VM protection */
vm_prot_t initprot; /* initial VM protection */
uint32_t nsects; /* number of sections in segment */
uint32_t flags; /* flags */
};
对于每一个段,将文件中相对应的内容加载到内存中:从偏移量为fileoff处加载filesize字节到虚拟内存地址vmaddr处的vmsize字节。每一个段的页面都根据initprot进行初始化,initprot指定了如何通过读/写/执行位初始化页面保护级别。段的保护设置可以动态改变,但是不能超过maxprot中指定的值(iOS中,+x 和+w 是互斥的)。
_PAGEZERO段(空指针陷阱)、_TEXT段(程序代码)、_DATA段(程序数据)和_LINKEDIT(链接器使用的符号和其他表)段提供了LC_SEGMENT命令。段也可以进一步分解为区(section).
Mach-O可执行文件中常见的段和区
段也可以设置一些
2、LC_MAIN
LC_MAIN设置程序主线程的入口地址和栈大小.
使用 otool -l /bin/ls 查看加载命令,LC_MAIN加载 命令中的entryoff指向的是main还是的入口地址。可以使用
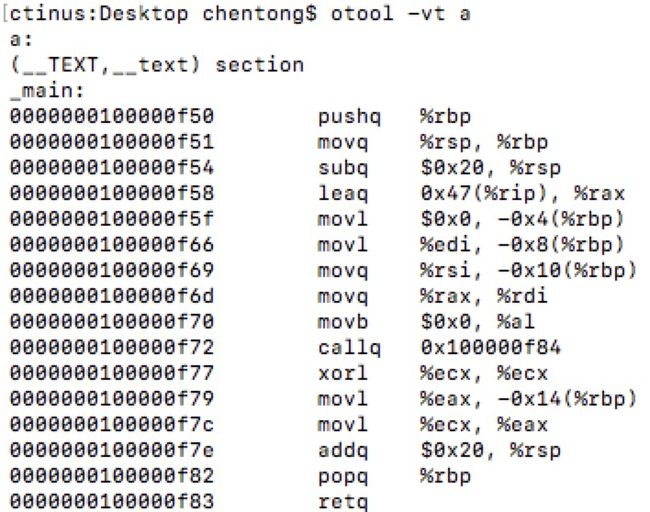
*otool -vt * 反编译出汇编代码,查看main函数的入口。
下面是演示:
a.c文件中的代码
#include "stdio.h"
int main(int argc, char **argv)
{
    printf("hello world/n");
    return 0;
}
1、使用 gcc -g a.c -o a 进行编译a.c文件。
2、使用 otool -l /bin/ls 查看a的加载命令,其中LC_MAIN加载命令如下:
entryoff对应的数字3920,转为16进制是 0xf50.
3、再使用 otool -vt a 反编译出汇编代码,查看main函数:
可以看到main函数的首句汇编代码的地址正是 0xf50。这个位置同样也是__TEXT段中,__text组的起始地址
动态连接器命令
Mach-O镜像中有很多“空洞”——即对外部的库和符号的引用——这些空洞要在程序启动时填补。这项工作需要由动态链接器来完成。这个过程有时候也被称为符号绑定(binding)。
动态链接器是在内核执行LC_DYLINKER加载命令时启动的,通常是使用/usr/lib/dyld作为动态链接器。
由dyld处理的加载命令
加载命令所对应的结构体在
例如LC_SYMTAB的结构体如下:
/*
 * The symtab_command contains the offsets and sizes of the link-edit 4.3BSD
 * "stab" style symbol table information as described in the header files
 *  and .
 */
struct symtab_command {
uint32_t cmd; /* LC_SYMTAB */
uint32_t cmdsize; /* sizeof(struct symtab_command) */
uint32_t symoff; /* symbol table offset */
uint32_t nsyms; /* number of symbol table entries */
uint32_t stroff; /* string table offset */
uint32_t strsize; /* string table size in bytes */
};
iOS符号绑定分为两种:non-lazy和lazy绑定符号。non-lazy符号位于Mach-O文件__DATA Segment 的__nl_symbol_ptr section,lazy符号位于__DATA Segment 的__la_symbol_ptr section。对于non-lazy的符号绑定时机为动态库加载(load),lazy符号的绑定时机则与Linux相同即函数第一次被调用。
在 iOS 系统中,当程序调用动态库的函数时,它实际上是执行__TEXT 段的 __stubs 节的代码。外部函数的地址放在 __DATA 段的__la_symbol_ptr 中,而__stub 的作用便是找到相应的 __la_symbol_ptr,并跳转到它所包含的地址。第一次使用printf时,__la_symbol_ptr中还没有记录printf的真正地址,这时的地址是指向__TEXT 段的 __stub_helper 节中的相关内容。__stub_helper 会调用 dyld_stub_binder(动态链接器的入口) 进行符号绑定,最后会将 printf 的地址放到 __la_symbol_ptr 处。
这里主要讨论下lazy符号绑定。
测试代码 a.c
#include
int main(int argc, const char * argv[]) {
    // insert code here...
    printf("Hello, World!\n");
    printf("Hello World Again!\n");
    return 0;
}
1、编译代码 gcc a.c -o a
2、使用lldb调试a文件 lldb a,并反编译出main函数的汇编代码
3、在第一次调用printf处添加断点 b 0x100000f42 ,然后运行代码
4、使用MachOView打开a文件查看__TEXT段中的__stubs组,可以发现printf的调用地址就是_stubs中的桩。
__stubs会到__DATA段的__la_symbol_ptr中找到函数的入口地址。
在lldb中 si(step in)查看printf的执行步骤
可以发现printf执行的第一条语句就是跳转到0x0000000100000f7c.这与__la_symbol_ptr中printf对应的值是一致的。第一次时,这个地址并没有指向printf函数入口,而是指向了__TEXT段中的__stub_helper中的地址。
然后在下一条语句0x100000F81中,会跳转到__stub_helper的头部0x100000f6c。顺序执行到第三条命令就是跳转到dyld_stub_binder进行符号绑定了。
5、在第二个printf出添加断点。并继续执行
6、再次si查看第二个printf的调用,这里可以看到这里第一条指令的跳转地址已经指向的真正的 printf函数入口。
本文作者: ctinusdev
原文链接: https://ctinusdev.github.io/2017/08/20/Mach-OBasis_Loadcommand/
转载请注明出处!


