虚拟化技术有两种类型的实现:
Type-I
hypervisor --> vm
Type-II
host --> vmm --> vms
Xen:
hypervisor, Dom0 kernel
KVM:Kernel-based Virtual Machine,Qumrane公司,依赖于HVM;Inter VT-x,ADM ADM-V;
KVM模块载入后的系统运行模式:
内核模式:GuestOS执行I/O类操作,或其他的特殊指令的操作;称作“来宾-内核”模式;
用户模式:代表GuestOS请求I/O类操作,
来兵模式:GuestOS的非I/O类操作;事实上,它被称作“来宾-用户”模式;
KVM的组件:
两类组件:
/dev/kvm:工作于hypervisor在用户空间,可通过ioctl()系统调用来完成VM创建、启动等管理功能;它是字符设备;
功能:创建VM,为VM分配内存,读写VCPU的寄存器、向VCPU注入终端,运行VCPU等等;
qemu进程:工作于用户空间,主要用于实现模拟PC机的IO设备;
KVM特性:
内存管理:
将分配给VM的内存交换至SWAP;
支持使用Huge Page;
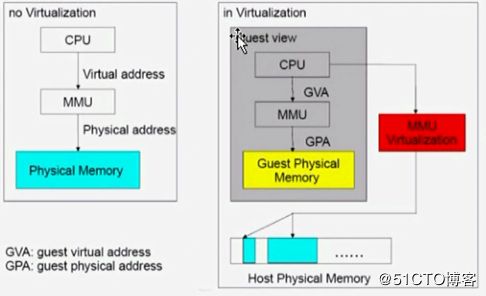
支持使用Inter EPT或AMD RVI技术完成内存地址映像;GVA-->GPA-->HPA
支持KSM(Kernel Same-Page Merging)
硬件支持:
取决于Linux内核;
存储:
本地存储:
网络附加存储:
存储区域网络:
分布式存储:例如GlustFS
实时迁移:
支持的GuestOS:
Linux,Windows,OpenBSD,FreeBSD,OpenSolaris;
设备驱动:
IO设备的完全虚拟化:模拟应急
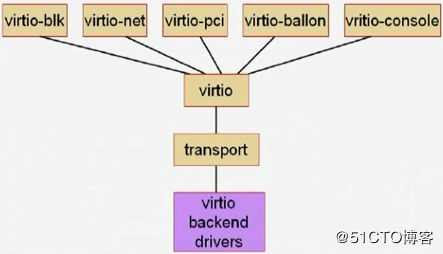
IO设备的半虚拟化:在GuestOS中安装驱动;virtio
virtio-blk,virtio-net,virtio-pci,virtio-console,virtio-ballon
KVM内存管理:
KVM继承了Linux系统管理内存的诸多特性,比如,分配给虚拟实用的内存可以被交换至交换空间、能够实用大内存页以实现更好的性能,以及对NUMA的支持能够让虚拟机高效访问更大的内存空间等。
KVM局限性:
一般局限性:
CPU overcommit
时间记录难以精确,依赖于时间同步机制
MAC地址:
VM量特别大时,存在冲突的可能性;
实时迁移:
性能局限性:
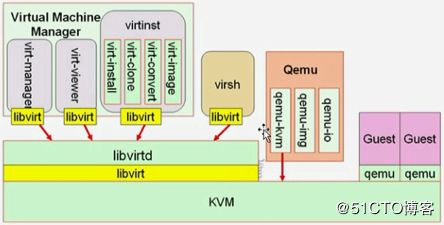
KVM的工具栈:
qemu:
qemu-kvm
qemu-img
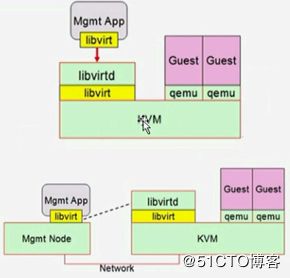
libvirt
GUI:virt-manager,virt-viewer
CLI:virt-install,virsh
    QEMU主要提供以下几个部分:
        处理器模拟器
          仿真IO设备
            关联模拟的设备至真实设备;
            调试器
            与模拟器交互的用户接口
安装:
(1) 确保CPU支持HVM
# grep -E --color=auto "(vmx|svm)" /proc/cpuinfo
(2) 装载模块
        \# modprobe kvm
            \# modprobe kvm-intel

    (3) 验证:
        \/dev/kvm

管理工具栈:
[root@kvm ~]# yum grouplist | grep -i "virtualization"
Virtualization: qemu-kvm,
Virtualization Client: python-virtinst,virt-manager,virt-viewer
Virtualization Platform: libvirt, libvirt-client
Virtualization Tools: libguestfs
KVM:hvm
kvm,kvm-intel,/dev/kvm
管理工具栈:
        qemu-kvm
            libvirt
    管理Kvm虚拟的方案:
        qemu: /usr/libexec/
            libvirt:
                安装工具:
                    virt-install
                        virt-manager
                  管理工具:
                        virsh
                            virt-manager
                            virt-viewer
qemu-kvm:
qemu-kvm [ options ] [ disk_image ]
使用qemu-kvm管理工具:
yum install qemu-kvm
/usr/libexec/qemu-kvm
命令选项:
标准选项:
显示选项:
块设备选项:
网络选项:
i386平台专用选项:
字符设备选项:
蓝牙设备选项:
Linux启动专用选项:
调试/专家模式选项:
cirros project:为cloud环境测试vm提供的微缩版Linux:
启动第一个虚拟:qemu-kvm -m 128 -smp 2 -name test -hda /images/kvm/cirros-0.3.4-i386.disk.img
用-drive制定磁盘映像文件:# qemu-kvm -m 128 -name test -smp 2 -drive file=/images/kvm/cirros-0.3.4-i386-disk.img,if=virtio,media=disk,cache=writeback,format=qcow2
通过cdrom启动winxp安装:# qemu-kvm -name winxp -smp 4,sockets=1,cores=2,threads=2 -m 512 -drive file=/images/kvm/winxp.img,if=ide,media=disk,cache=writeback,format=qcow2 -drive file=/root/winxp_ghost.iso,media=cdrom
指定使用桥接网络接口:qemu-kvm -m 128 -name test -smp 2 -drive file=/images/kvm/cirros-0.3.4-i386-disk.img,if=virtio,media=disk,cache=writeback,format=qcow2 -net nic -net tap,script=/etc/if-up,downscript=no -nographic
指定以网络接口启动vm:
qemu-kvm -m 512 -smp 2 -name centos -drive file=/images/centos/centos6.img,media=disk,if=virtio -net nic,model=virtio,macaddr=52:54:00:55:32:19 -net tap,ifname=centos6.0,script=/etc/qemu-ifup -boot order=nc,once=n
显示选项:
SDL:Simple DirectMedia Layer:C语言开发,夸平台且开元多媒体程序库文件;
在qemu中使用"-sdl"即可
VNC:Virtual Network Computing,使用RFB(Remote FrameBuffer)协议远程控制另外的主机;
CentOS 6.6
(1) yum install tigervnc-server
(2) vncpasswd
(3) vncserver :N
    qemu-kvm
        -vnc display,option,option
            示例:-nvc -N,password
            启动qemu-kvm时,额外使用-monitor stdio选项,并使用change vnc password命令设置密码;
补充资料:qemu-kvm使用文档
2.5.6 使用qemu-kvm管理KVM虚拟机
Qemu时一个广泛使用的开源计算机仿真器和虚拟机,当做仿真器时,可以在一种架构(如PC机)下运行另一种架构(如PC机)下运行另一种架构(如ARM)下的操作系统和程序,而通过动态转换,其可以获得很高的运行效率。当作为一个虚拟机时,qemu可以通过直接使用真机的系统资源,让虚拟系统能够获得接近于物理机的性能表现,qemu支持xen或者kvm模式下的虚拟化。当用kvm时,qemu可以虚拟x86、服务器和嵌入式powerpc,以及s390的系统。
QEMU当运行与主机架构相同的目标架构时可以使用KVM,例如,当在一个x86兼容处理器上运行qemu-system-x86时,可以利用KVM加速为宿主机和客户机提供更好的性能。
Qemu有如下几个部分组成:
处理器模拟器(x86、PowerPC和Sparc);
仿真设备(显卡、网卡、硬盘、鼠标等);
用于将仿真设备连接至主机设备(真实设备)的通用设备;
模拟卷的描述信息;
调试器;
与模拟器交互的用户接口;
2.5.6.1 使用qemu-kvm安装Guest
如2.5.5中所述,给予libvirt的工具如virt-manager何virt-install提供了非常便捷的虚拟机管理接口,但它们事实上经过二次开发后又封装了qemu-kvm的工具,因此,直接使用qemu-kvm命令也能够完成此前的任务。
2.5.6.1.1 qemu-kvm命令
在RHEL6上,qemu-kvm位于/usr/libexec目录中,由于此目录不属于PATH环境变量,故无法直接使用,这样也阻止了可以直接使用qemu作为创建并管理虚拟机。如若想使用qemu虚拟机,可以通过将/usr/libexec/qemu-kvm链接为/usr/bin/qemu实现。
# ln -sv /usr/lib/exec/qemu-kvm /usr/bin/qemu-kvm
qemu-kvm命令使用格式为"qemu-kvm [options] [disk_image]",其选项非常多,不过,大致可分为如下几类。
标准选项:
USB选项:
显示选项:
i386平台专用选项:
网络选项:
字符设备选项:
蓝牙相关选项:
Linux系统引导专用选项:
调试/专家模式选项:
PowerPC专用选项:
Sparc32专用选项:
考虑到篇幅及使用需要,这里介绍的选项主要涉及到标准选项、显示选项、i386平台专用选项及Linux系统引导专用选项相关的选项。
2.5.6.1.2 qemu-kvm的标准选项
qemu-kvm的标准选项主要涉及制定主机类型、CPU模式、NUMA、软驱设备、光驱设备及硬件设备等。
-name name:设定虚拟机名称;
-M machine:制定要模拟的主机类型,如Standard PC、ISA-only PC或Intel-Mac等,可以使用"qemu-kvm -M ?"获取所支持的所有类型;
-m megs:设定虚拟机的RAM大小;
-cpu model:设定CPU模型,如coreduo、qemu64等,可以使用"qemu-kvm -cpu ?"获取所支持的所有模型;
-smp n[,cores=cores][,threads=threads][,sockets=sockets][,maxcpus=maxcpus]:设定模拟的SMP架构中CPU的个数等、每个CPU的核心数及CPU的socket数目等;PC机上最多可以模拟255颗CPU;maxcpus用于指定热插入的CPU个数上限;
-numa opts:指定模拟多节点的numa设备;
-fda file
-fdb file:使用指定文件(file)作为软盘镜像,file为/dev/fd0表示使用物理软驱;
-hda file
-hdb file
-hdc file
-hdd file:使用指定file作为硬盘镜像;
-cdrom file:使用指定file作为CD-ROM进行,需要注意的是-cdrom和-hdc不能同时使用:将file指定为/dev/cdrom可以直接使用物理光驱;
-drive option[,option[,option[,...]]]:定义一个硬盘设备;可用子选项有很多。
file=/path/to/somefile:硬件映像文件路径;
if=interface:指定硬盘设备所连接的接口类型,既控制器类型,如ide、scsi、sd、mtd、floppy、pflash及virtio等;
index=index:设定同一种控制器类型中不同设备的索引号,即标识号;
media=media:定义介质类型为硬盘(disk)还是光驱(cdrom);
snapshot=snapshot:指定当前硬盘设备是否支持快照功能:on或off;
cache=cache:定义如何使用物理机缓存来访问块数据,其可用值有none、writeback、unsafe和writethrough四个;
format=format:指定映像文件的格式,具体格式可参见qemu-img命令;
-boot [order=drives][,once=drives][,menu=of|off]:定义启动设备的引导次序,每种设备使用一个字符表示;不同的架构所支持的设备及其表示字符不尽相同,在x86 PC架构上,a、b表示软驱、c表示第一块硬盘,d表示第一个光驱设备,n-p表示网络适配器,默认为硬盘设备;
-boot order=dc,once=d
2.5.6.1.3 qemu-kvm的显示选项
显示选项用力啊定义虚拟机启动后的显示接口相关类型及属性等。
-nographic:默认情况下,qemu使用SDL来显示VGA输出,而此选项用于禁用图形接口,此时,qemu类似一个简单的命令行程序,其仿真串口设备将被重定向到控制台;
-curses:禁止图形接口,并使用curses/ncurses作为交互接口;
-alt-grab:使用Ctrl+Alt+Shift组合键释放鼠标;
-ctrl-grab:使用右Ctrl键释放鼠标;
-sdl:启动SDL;
-spice option[,option[,...]]:启动spice远程桌面协议,其有许多子选项,具体参照qemu-kvm的手册;
-vga type:指定要仿真的VGA接口类型,常见类型有;
cirrus:Cirrus Logic GD5446显示卡
std:带有Bochs VBI扩展的标准VGA显示卡
vmware:VMWare SVGA-II兼容的显示适配器;
qxl:QXL半虚拟化显示卡,与VGA兼容,在Guest中安装qxl驱动后能以很好的方式工作,在使用spice协议时推荐使用此类型;
none:禁用VGA卡;
vnc display[,option[,option[,...]]]:默认情况下,qemu使用SDL显示VGA输出,使用-vnc选项,可以让qemu监听在VNC上,并将VGA输出重定向至VNC会话;使用此选项时,必须使用-k选项制定键盘布局类型,其有许多子选项,具体请参照qemu-kvm的手册;
display:
(1) host:N
172.16.100.67:1,监听于172.16.100.67主的5900+N的端口上
(2) unix:/path/to/socket_file
(3) none
options:
password:连接时需要验证密码,设定密码通过monitor接口使用change
reverse: "反向"连接至某处于监听状态的vncview上;
-monitor stdio:表示在标准输入输出上显示monitor界面
-nographic:
Ctrl-a, c:在console和monitor之间切换
Ctrl-a, h:显示帮助信息
2.5.6.1.4 386平台专用选项
-no-acpi:禁用ACPI功能,GuestOS与ACPI出席兼容问题时使用此选项;
-balloon none:禁用balloon设备;
-balloon virtio[,addr=addr]:启用virtio balloon设备;
2.5.6.1.5 网络属性相关选项
网络属性相关选项用于定义网络设备接口类型其相关的各属性等信息,这里只介绍nic、tap和user三种类型网络接口的属性,其它类型请参照qemu-kvm手册。
-net nic[,vlan=n][,macaddr=mac][,model=type][,name=name][,addr=addr][,vectors=v]:创建一个新的网卡设备并连接至vlan n中;PC架构上默认的NIC为e1000,macaddr用于为其制定MAC地址,name用于指定一个在监控时显示的网上设备名称;emu可以模拟多个类型的网卡设备,如virtio、i82551、i82557b、i82559er、ne2k_isa、pcnet、rt18139、e1000、smc91c111、lance及mcf_fec等;不过,不同平台架构上,其支持的类型可能只包含前述列表的一部分,可以使用"qemu-kvm -net nic,model=?"来获取当前平台支持的类型;
注意:默认mac地址为:52:54:00:12:34:56,使用中需手动指定;
-net tap[,vlan=n][,name=name][,fd=h][,ifname=name][,script=file][,downscript=dfile]:通过物理机的TAP网络接口连接至vlan n中,使用script=file指定的脚本(默认为/etc/qemu-ifup)来配置当前网络接口,并使用downscript=file指定的脚本(默认为/tc/qemu-ifdown)来撤销接口配置;使用script=no和downscript=no可分别用来禁止执行脚本;
-net user[,option][,option][,...]:在用户模式配置网络栈,其不依赖于管理权限;有效选项有:
vlan=n:连接至vlan n,默认n=0;
name=name[/mask]:设定GuestOS可见的IP网络,掩码可选,默认为10.0.2.0/8;
host=addr[/mask]:设定GuestOS中看到的物理机的IP地址,默认为指定网络中的第二个,即x.x.x.2;
dhcpstart=addr:指定DHCP服务地址池中16个地址的起始IP,默认为第16个至第31个,即x.x.x.16-x.x.x.31;
dns=addr:指定GuestOS可见的dns服务器地址,默认为GuestOS网络中的第三个地址,即x.x.x.3;
tftp=dir:激活内置的tftp服务器,并使用指定的dir作为tftp服务器的默认根目录;
bootfile=file:BOOTP文件名称,用于实现网络引导GuestOS;如:qemu -hda linux.img -boot n -net user,tftp=/tftpserver/pub,bootfile=/pxelinux.0
# cat /etc/qemu-ifup
#!/bin/bash
#
bridge=br0
if [ -n "$1" ];then
if link set $1 up
sleep 1
brctl addif $bridge $1
[ $? -eq 0] && exit 0 || exit 1
else
echo "Error: no interface specified."
exit 1
fi
# cat /etc/qemu-ifdown
#!/bin\bash
#
bridge=br0
if [ -n "$1" ];then
brctl delif $bridge $1
ip link set $1 down
exit 0
else
echo "Error: no interface specified."
exit 1
fi
总结:
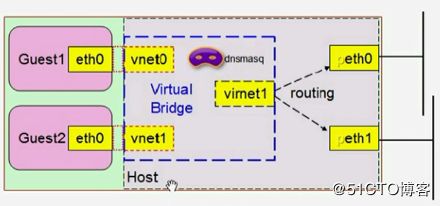
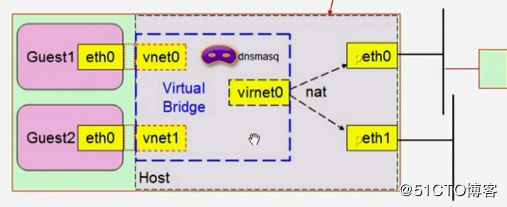
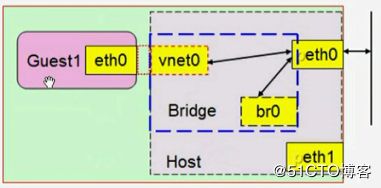
kvm的网络模型:
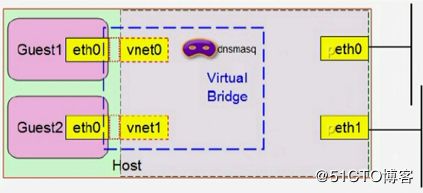
1、隔离模型:在host创建一个vswitch(bridge device),每个虚拟机的tap设备直接添加至vswitch上;
2、路由模型:
3、NAT模型:
4、桥接模型:
2.5.6.1.6 一个使用示例
下面的命令创建了一个名为rhel5.8的虚拟机,其RAM大小为512MB,有两颗CPU的SMP架构,默认引导设备为硬盘,有一个硬盘设备和一个光驱设备,网络接口类型为virtio,VGA模式为cirrus,并启用了balloon功能。
# qemu-kvm -name "rhel5.8" -m 512 \
-smp 2 -boot d \
-drive file=/VM/images/rhel5.8/hda,if=virtio,index=0,media=disk,format=qcow2 \
-drive file=/isos/rhel-5.8.iso,index=1,media=cdrom \
-net nic,model=virtio,macaddr=52:54:00:A5:41:1E \
需要注意的是,上述命令中使用的硬盘映像文件/VM/images/rhel5.8/hda需要事先使用qemu-img命令创建,其具体使用格式请见下章介绍。
在虚拟机创建并安装GuestOS完成之后,可以免去光驱设备直接启动之。命令如下所示。
# qemu-kvm -name "rhel5.8" -m 512 \
-smp 2 -boot d \
-drive file=/VM/images/rhel5.8/hda,if=virtio,index=0,media=disk,format=qcow2 \
-net nic,model=virtio,macaddr=52:54:00:A5:41:1E \
-vga cirrus -balloon virtio
2.5.6.1.7 使用qemu-img管理磁盘映像
qemu-img是qemu用来事先磁盘映像管理的工具组件,其有许多子命令,分别用于实现不同的管理功能,而每一个子命令也都有一系列不同的选项,其使用语法格式为"qemu-img subcommand [ options]",支持的子命令如下。
create:创建一个新的磁盘映像文件;
check:检查磁盘映像文件中的错误;
convert:转换磁盘映像的格式;
info:显示指定磁盘映像的信息;
snapshot:管理磁盘映像的快照;
commit:提交磁盘映像的所有改变;
rbase:基于某磁盘映像创建新的映像文件;
resize:增大或缩减磁盘映像文件的大小;
使用create子命令创建磁盘映像的命令格式为"create [ -f fmt ] [ -o options ] filename [size]",例如下面的命令创建一个格式为qcow2的120G的稀疏磁盘映像文件。
# qemu-img create -f qcow2 /VM/images/rhel5.8/hda 120G Formatting '/VM/images/rhel5.8/hda',fmt=qcow2 size=128849018880 encryption=off cluster_size=65536
更进一步使用信息请参照手册页。
KVM(2)
KVM的网络功能
qemu-kvm所提供的网络模型:
基于网桥的虚拟机网卡:-net tap
基于NAT的虚拟机网络:
Qemu内置的用户网络模式:-net user
直接分配网络设备(VT-d, SR-IOV)
-net nic:为VM添加虚拟网卡并指明虚拟网卡特性
-net user, -net tap:定义虚拟网络,并制定如何将VM的虚拟网卡连入虚拟网络
-net none:禁用vm的网络功能
-net nic -net tap, -net nic -net user
-net nic[,vlan=n][,macaddr=mac][,model=type][,name=name][,addr=addr][,vectors=v]
-net nic,model=virtio
查看本机的qemu-kvm支持网络接口类型:
# qemu-kvm -net nic,model=?
qemu: Supported NIC models: ne2k_pci,i82551,i82557b,i82559er,rt18139,e1000,pcnet,virtio
    注意:(1) 如果需要为VM添加多块网卡,则要多使用"-net nic"选项;
               (2) 需要为VM的网卡指定MAC地址,地址范围属于"52:54:00"开头的地址块;
-net tap[,vlan=n][,name=name][,fd=h][,ifname=name][,script=file][,downscript=dfile]
ifname=
script=/path/to/some_script:虚拟机启动时,tap为其创建的Nic的后半段会保留host上,在host之上通常需要将其添加至某桥上,实现虚拟网络功能;
downscript=/path/to/some_script:虚拟机关闭时,如果处理此前的启动脚本为其设置网络;
KVM常用的虚拟网络模型:
桥接模型
NAT模型
路由模型
隔离模型
nat模型网络脚本示例:
/etc/qemu-natup
#!/bin/bash
#
bridge="isbr"
net="10.0.0.0/8"
ifaddr=10.0.10.1
checkbr() {
if brctl show | grep -i "^$1"; then
return 0
else
return 1
fi
}
initbr() {
brctl addbr $bridge
ip link set $bridge up
ip addr add $ifaddr dev $bridge
}
enable_ip_forward() {
sysctl -w net.ipv4.ip_forward=1
}
setup_nat() {
checkbr $bridge
if [ $? -eq 1 ]; then
initbr
enable_ip_forward
iptables -t nat -A POSTROUTING -s $net ! -d $net -j MASQUERADE
fi
}
if [ -n "$1" ]; then
setup_nat
ip link set $1 up
brctl addif $bridge $1
exit 0
else
echo "Error: no interface specified."
exit 1
fi
/etc/qemu-natdown
#!/bin/bash
#
bridge="isbr"
remove_rule() {
iptables -t nat -F
}
isalone_bridge() {
if ! brctl show | awk "/^$bridge/{print \$4}" | grep "[^[:space:]]" &> /dev/null; then
ip link set $bridge
brctl delbr $bridge
remove_rule
fi
}
if [ -n "$1" ]; then
ip link set $1 down
brctl delif $bridge $1
isalone_bridge
exit 0
else
echo "Error: no interface specified."
exit 1
fi
手动设置接口添加至指定桥的过程:
brctl addr $BR
ip link set $IF up
ip link set $BR up
brctl addif $BR $IF
virtio半虚拟化:
HVM:虚拟化CPU
    I/O半虚拟化分为两段:
        前端驱动(virtio前半段):virtio-blk,virtio-net,virtio-pci,virtio-balloon,virtio-console
                Linux:CentOS 4.8+, 5.3+, 6.0+, 7.0+
                    Windows:
            virtio:虚拟队列,virt-ring
            transport:
后端处理程序(virt backend drivers):在QEMU中实现;virtio-balloon:
ballooning:让VM中运行的GuestOS中运行调整其内存大小;
    # qemu-kvm -balloon virtio

    手动查看GuestOS内存用量
        info balloon
            balloon N
virtio-net:
其依赖于GuestOS中的驱动,及Qemu中的后端驱动
GuestOS:virtio_net.ko
Qemu:qemu-kvm -net nic,model=?
qemu-kvm -net nic,model=virtio

    Host中的GSO,TSO
        关掉可能会提升性能:
                ethtool -K $IF gso off
                    ethtool -K $IF tso off
                    ethtool -K $IF

    vhost-net:用于取代工作于用户空间的qemu中为virtio-net实现的后端驱动以实现性能提升的驱动;

        -net tap[,vnet_hdr=on|off][,vhost=on|off]

            qemu-kvm -net tap,vnet_hdr=on,vhost=on

    virtio-blk:
        其依赖于GuestOS中的驱动,及Qemu中的后端驱动

            -drive file=/path/to/some_image_file,if=virtio

    kvm_clock:半虚拟化的时钟
        # grep -i "paravirt" /boot/config-2.6.32-504.el6.x86_64
            CONFIG_PARAVIRT_GUEST=y
            CONFIG_PARAVIRT=y
            CONFIG_PARAVIRT_CLOCK=y
VM Migration:
static migration
live migration
整体迁移时间
服务器迁移时间
对服务的性能的映像
    在待迁入主机使用
        # qemu-kvm -vnc :N -incoming tcp:0:7777
            # vncviewer :590N

    在源主机使用
        monitor接口:
                migrate tcp:DEST_IP:DEST:PORT
libvirt工具栈:
支持的虚拟化技术:KVM,XEN,LXC,VMWARE,Qemu,OpenVZ;
    libvirt中的术语:
        node:指物理节点
            hypervisor:
            domian: vm instances

    安装:
        CentOS 6 # yum install libvirt libvirt-client python-virtinst virt-manager

            CentOS 7 # yum install libvirt libvirt-client virt-manager virt-install

    libvirt和libvirtd的配置文件:
        libvirt配置文件:/etc/libvirt/libvirt.conf
            守护进行配置文件:/etc/libvirt/libvirtd.conf

      域配置文件:xml格式
                2
Hypervisor的访问路径:
本地URL:
driver[+transport]:///[path][?extral-param]
driver:驱动名称,例如qemu, xen, lxc
transport:传输方式
kvm使用qemu驱动,使用格式qemu:///system, 例如qemu:///system远程URL:
driver[+transport]://[user@][host][:port]/[path][?extral-param]
    例如:qemu://172.16.100.6/system
               qemu+ssh:\//[email protected]/system
                         qemu+tcp://172.16.100.6/system
工具使用:
(1) CLI:virt-install, virsh
(2) virt-manager
补充资料:virt-install使用文档
2.5.3.2 使用virt-install创建虚拟机并安装GuestOS
virt-install是一个命令行工具,它能够为KVM、Xen或其他支持libvirt API的hypervisor创建虚拟机并完成GuestOS安装;此外,它能够基于串行控制台、VNC或SDL支持文本或图形安装界面,安装过程可以使用本地的安装介质如CDROM,也可以通过网络方式如NFS、HTTP或FTP服务事项,对于通过网络安装的方式,virt-install可以自动加载必要的文件以启动安装过程而无须额外提供引导工具。当然,virt-install也支持PXE方式的安装过程,也能够直接使用现有的磁盘映像直接启动安装过程。
virt-install命令有许多选项,这些选项大体可分为下面几大类,同时对每类中的常用选项也做出简单说明。
一般选项:指定虚拟机的名称、内存大小、VCPU个数及特性等;
-n NAME, --name=NAME: 虚拟机名称,需全局唯一;
-r MEMORY, --ram=MEMORY: 虚拟机内存大小,单位为MB;
--vcpus=VCPUS[,maxvcpus=MAX][,sockets=#][,cores=#][,threads=#]: VCPU个数及相关配置;
安装方法:指定安装方法、GuestOS类型等;
-c CDROM, --cdrom=CDROM: 光盘安装介质
-l LOCATION, --location=LOCATION: 安装源URL,支持FTP、HTTP及NFS等,如ftp:\//172.16.0.1/pub,http:\//172.16.0.1/cobbler/ks_mirros/CentOS-7-x86_64;
--pxe: 基于PXE完成安装;
--livecd: 吧光盘当做LiveCD;
--os-type=DISTRO_TYPE: 操作系统类型,如linux、unix或windows等;
-x EXTRA, --extra-args=EXTRA: 根据--location指定的方式安装GuestOS时,用于传递给内核的额外选项,例如指定kickstart文件的位置,--extra-args "ks=http:\//172.16.0.1/class.cfg"
--boot=BOOTOPTS: 指定安装过程完成后的配置选项,如指定引导设备次序,使用指定的而非安装的kernel/initrd来引导系统启动等;例如:
--boot cdrom,hd,network: 指定引导次序;
--boot kernel=KERNEL,initrd=INITRD,kernel_args="console=/dev/ttyS0": 指定启动系统的内核及initrd文件;
存储配置:指定存储类型、位置及属性等:
--disk=DISKOPTS:指定存储设备及其属性;格式为--disk /some/storage/path,opt1=val1,opt2=val2等;常用的选项有:
device:设备类型,如cdrom、disk或floppy等,默认为disk;
bus:磁盘总线类型,其值可以为ide、scsi、usb、virtio或xen;
perms:访问选项,如rw、ro或sh(恭喜的可读写),默认为rw;
size:新建磁盘映像的大小,单位为GB;
cache:缓存模型,其值有none、writethrouth(缓存读)及writeback(缓存读写);
format:磁盘映像格式,如raw、qcow2、vmdk等;
sparse:磁盘映像使用稀疏格式,即不立即分配指定大小的空间;
--nodisks:不使用本地磁盘,在LiveCD模式中常用;
网络配置:指定网络接口的网络类型及接口属性如MAC地址、驱动模式等;
-w NETWORK,--network=NETWORK,opt1=val1,opt2=val2:将虚拟机连入宿主机的网络中,其中NETWORK可以为:
bridge=BRIDGE:连接至名为"BRIDGE"的桥设备;
network=NAME:连接至名为"NAME"的网络;
其它常用的选项还有:
model:GuestOS中看到的网络设备型号,如e1000、rt18139或virtio等;
mac:固定的MAC地址;省略此选项时将使用随机地址,但无论何种方式,对于KVM来说,其前三段必须为52:54:00:
--nonetworks:虚拟机不适用网络功能;
图形配置:定义虚拟机显示功能相关的配置,如VNC相关配置;
--grapthics TYPE,opt1=val1,opt2=val2:指定图形显示相关的配置,此选项不会配置任何显示硬件(如显卡),而是仅指定虚拟机启动后对其进行访问的接口;
TYPE:指定显示类型,可以为vnc、sdl、spice或none等,默认为vnc;
port:TYPE为vnc或spice时其监听的端口;
lisetn:TYPE为vnc或spice时所监听的IP地址,默认为127.0.0.1,可以通过修改/etc/libvirt/qemu;
conf定义新的默认值:
password:TYPE为vnc或spice时,为远程访问监听的服务指定认证密码;
--noautoconsole:禁止自动连接至虚拟机的控制台;
设备选项:指定文本控制台、声音设备、串行接口、并行接口、显示接口等;
--serial=CHAROPTS:附加一个串行设备至当前虚拟机,根据设备类型的不同,可以使用不同的选项,格式为"--serial type,opt1=val1,opt2=val2,...",例如:
--serial pty:创建伪终端;
--serial dev,path=HOSTPATH:附加主机设备至此虚拟机;
其他:
--autostart:指定虚拟机是否在物理启动后自动启动;
--print-xml:如果虚拟机不需要安装过程(--import、--boot),则显示生成的XML而不是创建此虚拟机;默认情况下,此选项仍会创建磁盘映像;
--force:禁止命令进入交互式模式,如果有需要回答yes或no选项,则自动回答为yes;
--dry-run:执行创建虚拟机的整个过程,但不真正的创建虚拟机、改变主机上的设备配置信息及将其创建的需求通知给libvirt;
-d, --debug:显示debug信息;
尽管virt-install命令有着类似上述的众多选项,但实际使用中,其必须提供选项仅包括--name、--ram、--disk(也可是--nodisks)及安装过程相关的选项,此外,有时还需要使用--connect=CONNECT选项来指定连接至一个非默认的hypervisor;
使用示例:
(1) # virt-install -n "centos6" -r 512 --vcpus=2 -l http:\//172.16.0.1/cobbler/ks_mirros/CentOS-6.6-x86_64/ -x "ks=http:\//172.16.0.1/centos6.x86_64.cfg" --disk path=/images/kvm/centos6.img,size=120,sparse --force -w bridge=br100,model=virtio
(2) 下面这个示例创建一个名为rhel5的虚拟机,其hypervisor为KVM,内存大小为512MB,磁盘为8G的映像文件/var/lib/libvirt/images/rhel5.8.img,通过boot.iso光盘镜像来引导启动安装过程。
# virt-install \
--connect qemu:///system \
--virt-type kvm \
--name rhel5 \
--ram 512 \
--disk path=/var/lib/libvirt/images/rhel5.img,size=8 \
--graphics vnc \
--cdrom /tmp/boot.iso \
--os-variant rhel5
(3) 下面的示例将创建一个名为rhel6的虚拟机,其有两个虚拟CPU,安装方法为FTP,并制定了ks文件的位置,磁盘映像文件为稀疏格式,连接至物理主机上的名为brnet0的桥接网络;
# virt-install \
--connect qemu:///system \
--virt-type kvm \
--name rhel6 \
--ram 1024 \
--vcpus 2 \
--network bridge=brnet0 \
--disk path=/VMs/images/rhel6.img,size=120,sparse \
--location ftp:\//172.16.0.1/rhel6/dvd \
--extra_args "ks=http:\//172.16.0.1/rhel6.cfg" \
--os-variant rhel6 \
--force
(4) 下面的示例将创建一个名为rhel5.8的虚拟机,磁盘映像文件为稀疏模式的格式为qcow2且总线类型为virtio,安装过程不启动图形界面(--nographics),但会启动一个串行终端将安装过程以字符形式显示在当前文本模式下,虚拟机显卡类型为cirrus;
# virt-install \
--connect qemu:///system \
--virt-type kvm \
--name rhel5.8 \
--vcpus 2,maxvcpus=4 \
--ram 512 \
--disk path=/VMs/images/rhel5.8.img,size=120,format=qcow2,bus=virtio,sparse \
--network bridge=brnet0,model=virtio
--nographics \
--location ftp:\//172.16.0.1/pub \
--extra-args "ks=http:\//172.16.0.1/class.cfg console=ttyS0 serial" \
--os-variant rhel5 \
--force \
--video=cirrus
(5) 下面的示例则利用已经存在的磁盘映像文件(已经有安装好的系统)创建一个名为rhel5.8的虚拟机;
# virt-install \
--name rhel5.8
--ram 512
--disk /VMs/rhel5.8.img
--import
virt-install -n cirros -r 128 --vcpus=1,maxvcpus=4 --disk /images/cirros/cirros-0.4.0-x86_64-disk.img --network bridge=br0,model=virtio --import --serial=pty --console=pty --nographics
^]:使用ctrl+]回到物理机终端;
注意:每个虚拟机创建后,其配置信息保存在/etc/libvirt/qemu目录中,文件名与虚拟机相同,格式为XML;
virsh的几个常用命令:
virt-install:创建虚拟机,并安装OS,也可创建虚拟机并导入Image文件;
根据xl文件创建:
create:创建并启动
define:创建但不启动
关闭domain:
destroy
shutdown
reboot
删除domain:
undefine
连接至console:
console
列出:
list
附加或拆除disk:
attach-disk
detach-disk
附加或拆除网卡:
attach-interface
detach-interface
保存状态至磁盘文件或从磁盘文件恢复:
save
restore
暂停于内存和继续运行:
suspend
resume
Host 和Hypervisor:
sysinfo, uri, connect
网络接口:
iface-list, iface-bridge
虚拟网络:
net-list
virt-manager:GUI工具
Linux内核:
namespace:名称空间
文件系统隔离:
网络隔离:主要用于实现网络资源的隔离,包括网络设备、IPv4地址或IPv6地址、IP路由表、防火墙、/proc/net、/sys/class/net以及套接字等;
IPC隔离:
用户和用户组隔离:
PID隔离:对名称空间内的PID重新标号,两个不同的名称空间可以使用相同的PID;
UTS隔离:Unix Time-sharing System,提供主机名和域名的隔离;
cgroups:控制组
用于完成资源配置,用于实现限制被各namespace隔离起来的资源,还可以为资源设置权重,计算使用量、完成各种所需的管理任务等;
Linux Network NameSpace:
注意:netns在内核实现,其控制功能由iproute所提供的netns这个OBJECT来提供;CentOS6.6提供的iproute不具有此OBJECT,需要依赖于OpenStack Icehouse的EPEL源来提供:
1、使用netns
ip netns list
ip netns add NAME
ip netns del NAME
ip netns exec NAME COMMAND
2、使用虚拟以太网卡
ip link add FRONTEND-NAME type veth peer name BACKEND-NAME
虚拟化管理工具:
http://www.linux-kvm.org/page/Management_Tools
实验环境:
操作系统:Centos7.5
IP地址:172.16.100.67
内核:2.6.32-504.el6.x86_64
我这里使用VMware Workstation实验操作,需要在虚拟机Inter VT-x/EPT或AMD-V/RVI(V);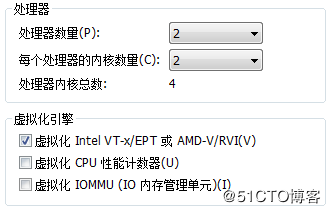
[root@kvm ~]# hostname kvm.server.com
NETWORKING=yes
[root@localhost ~]# vim /etc/hostname
kvm.server.com
[root@kvm ~]# vim /etc/hosts
127.0.0.1   localhost localhost.localdomain localhost4 localhost4.localdomain4
::1         localhost localhost.localdomain localhost6 localhost6.localdomain6
172.16.100.6    kvm kvm.server.com
查看是否支持硬件辅助虚拟化;
[root@kvm ~]#  grep -E --color=auto "(vmx|svm)" /proc/cpuinfo
flags           : fpu vme de pse tsc msr pae mce cx8 apic sep mtrr pge mca cmov pat pse36 clflush mmx fxsr sse sse2 ss ht syscall nx                                  rdtscp lm constant_tsc arch_perfmon nopl xtopology tsc_reliable nonstop_tsc pni pclmulqdq vmx ssse3 cx16 pcid sse4_1 sse4_2 x2apic                                  popcnt tsc_deadline_timer aes xsave avx f16c rdrand hypervisor lahf_lm tpr_shadow vnmi ept vpid fsgsbase tsc_adjust smep arat
flags           : fpu vme de pse tsc msr pae mce cx8 apic sep mtrr pge mca cmov pat pse36 clflush mmx fxsr sse sse2 ss ht syscall nx                                  rdtscp lm constant_tsc arch_perfmon nopl xtopology tsc_reliable nonstop_tsc pni pclmulqdq vmx ssse3 cx16 pcid sse4_1 sse4_2 x2apic                                  popcnt tsc_deadline_timer aes xsave avx f16c rdrand hypervisor lahf_lm tpr_shadow vnmi ept vpid fsgsbase tsc_adjust smep arat
flags           : fpu vme de pse tsc msr pae mce cx8 apic sep mtrr pge mca cmov pat pse36 clflush mmx fxsr sse sse2 ss ht syscall nx                                  rdtscp lm constant_tsc arch_perfmon nopl xtopology tsc_reliable nonstop_tsc pni pclmulqdq vmx ssse3 cx16 pcid sse4_1 sse4_2 x2apic                                  popcnt tsc_deadline_timer aes xsave avx f16c rdrand hypervisor lahf_lm tpr_shadow vnmi ept vpid fsgsbase tsc_adjust smep arat
flags           : fpu vme de pse tsc msr pae mce cx8 apic sep mtrr pge mca cmov pat pse36 clflush mmx fxsr sse sse2 ss ht syscall nx                                  rdtscp lm constant_tsc arch_perfmon nopl xtopology tsc_reliable nonstop_tsc pni pclmulqdq vmx ssse3 cx16 pcid sse4_1 sse4_2 x2apic                                  popcnt tsc_deadline_timer aes xsave avx f16c rdrand hypervisor lahf_lm tpr_shadow vnmi ept vpid fsgsbase tsc_adjust smep arat
加载kvm核心模块,如果CPU是intel加载相关kvm模块;
[root@kvm ~]# modprobe kvm
[root@kvm ~]# modprobe kvm-intel
[root@kvm ~]# lsmod | grep kvm
kvm_intel             174841  0
kvm                   578518  1 kvm_intel
[root@kvm ~]# ls /dev/kvm
/dev/kvm
[root@kvm ~]# yum grouplist | grep -i "virtualization"
   Virtualization
   Virtualization Client
   Virtualization Platform
   Virtualization Tools
[root@kvm ~]# yum -y install qemu-kvm
[root@kvm ~]# ln -sv /usr/libexec/qemu-kvm /usr/bin/
到http://download.cirros-cloud.net/0.4.0/ 下载cirros-0.4.0-x86_64-disk.img文件;
[root@kvm ~]# qemu-img info cirros-0.4.0-x86_64-disk.img
image: cirros-0.4.0-x86_64-disk.img
file format: qcow2
virtual size: 44M (46137344 bytes)
disk size: 12M
cluster_size: 65536
Format specific information:
    compat: 1.1
    lazy refcounts: false
[root@kvm ~]# qemu-kvm -m 128 -smp 2 -name "test" -hda cirros-0.4.0-x86_64-disk.img
VNC server running on `::1:5900'
[root@kvm ~]#  ss -tnl
State      Recv-Q Send-Q                     Local Address:Port                                    Peer Address:Port
LISTEN     0      128                                    *:22                                                 *:*
LISTEN     0      100                            127.0.0.1:25                                                 *:*
LISTEN     0      1                                    ::1:5900                                              :::*
LISTEN     0      128                                   :::22                                                :::*
LISTEN     0      100                                  ::1:25                                                :::*
[root@kvm ~]# yum -y install tigervnc
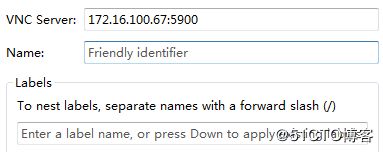
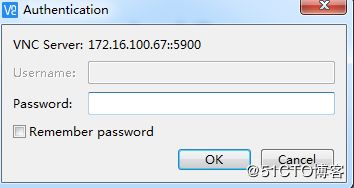
[root@kvm ~]# vncviewer :5900可以使用help查看监控命令,可以使用info查看虚拟机相关信息,切换回去使用ctrl+alt+1;;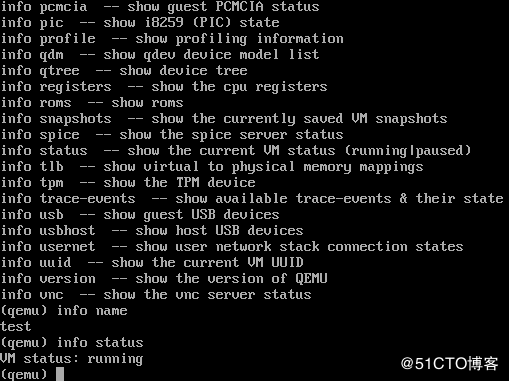
[root@kvm ~]# ps aux | grep qemu-kvm
root      14212  6.3  3.1 807032 121556 pts/0   Sl+  12:38   1:12 qemu-kvm -m 128 -smp 2 -name test -hda cirros-0.4.0-x86_64-disk.img
root      15423  0.0  0.0 112720   984 pts/2    S+   12:57   0:00 grep --color=auto qemu-kvm
[root@kvm ~]# kill -9 14212
[root@kvm ~]# qemu-kvm -m 128 -smp 2 -name "test" -hda cirros-0.4.0-x86_64-disk.img
VNC server running on `::1:5900'
[root@kvm ~]# vncviewer :5900
不指定cpu类型,cpu类型为qemu virtual cpu;
使用底层物理主机cpu;
[root@kvm ~]# qemu-kvm -m 128 -cpu host -smp 2 -name "test" -hda cirros-0.4.0-x86_64-disk.img
VNC server running on `::1:5900'
[root@kvm ~]# vncviewer :5900virtio使用半虚拟化;
[root@kvm ~]# qemu-kvm -m 128 -cpu host -smp 2 -name "test" -drive file=cirros-0.4.0-x86_64-disk.img,if=virtio,media=disk,format=qcow2,cache=writeback
VNC server running on `::1:5901'
安装windows xp:
[root@kvm ~]# mkdir -pv /images/windows
[root@kvm ~]# qemu-img create -f qcow2 /images/windows/winxp.qcow2 -o ?
Supported options:
size Virtual disk size
compat Compatibility level (0.10 or 1.1)
backing_file File name of a base image
backing_fmt Image format of the base image
encryption Encrypt the image
cluster_size qcow2 cluster size
preallocation Preallocation mode (allowed values: off, metadata, falloc, full)
lazy_refcounts Postpone refcount updates
[root@kvm ~]# qemu-img create -f qcow2 /images/windows/winxp.qcow2 -o size=20G,preallocation=metadata
[root@kvm ~]# ll -h /images/windows/winxp.qcow2
-rw-r--r--. 1 root root 21G 12月 25 11:09 /images/windows/winxp.qcow2
[root@kvm ~]# du -sh /images/windows/winxp.qcow2
4.1M /images/windows/winxp.qcow2
[root@kvm ~]# qemu-kvm -m 512 -smp 2 -cpu host -drive file=/images/windows/winxp.qcow2,media=disk -drive file=/root/winxp_ghost.iso,media=cdrom -boot order=dc,once=d
[root@kvm ~]# vncviewer :5900
启用SDL功能,默认SDL是禁用的,应该是编译qemu-kvm时候没有启用SDL功能;
[root@kvm ~]# qemu-kvm -m 128 -cpu host -smp 2 -name "test" -drive file=cirros-0.4.0-x86_64-disk.img,if=virtio,media=disk,format=qcow2,cache=writeback -sdl
SDL support is disabled
修改vnc监听端口;
[root@kvm ~]# qemu-kvm -m 128 -cpu host -smp 2 -name "test" -drive file=cirros-0.4.0-x86_64-disk.img,if=virtio,media=disk,format=qcow2,cache=writeback -vnc 172.16.100.67:0
[root@kvm ~]# ss -tnl
State      Recv-Q Send-Q           Local Address:Port                          Peer Address:Port
LISTEN     0      128                  127.0.0.1:6013                                     *:*
LISTEN     0      1                172.16.100.67:5900                                     *:*
LISTEN     0      128                          *:22                                       *:*
LISTEN     0      100                  127.0.0.1:25                                       *:*
LISTEN     0      128                  127.0.0.1:6010                                     *:*
LISTEN     0      128                        ::1:6013                                    :::*
LISTEN     0      128                         :::22                                      :::*
LISTEN     0      100                        ::1:25                                      :::*
LISTEN 0 128 ::1:6010 :::*设置vnc登录密码;[root@kvm ~]# qemu-kvm -m 128 -cpu host -smp 2 -name "test" -drive file=cirros-0.4.0-x86_64-disk.img,if=virtio,media=disk,format=qcow2,cache=writeback -vnc 172.16.100.67:0,password
直接显示monitor;
[root@kvm ~]# qemu-kvm -m 128 -cpu host -smp 2 -name "test" -drive file=cirros-0.4.0-x86_64-disk.img,if=virtio,media=disk,format=qcow2,cache=writeback -vnc 172.16.100.67:0,password -monitor stdio
QEMU 1.5.3 monitor - type 'help' for more information
(qemu) change vnc password    #设置登录密码
Password: ********    #smoke520
[root@kvm ~]# vncviewer 172.16.100.67 port 5900打开控制台;[root@kvm ~]# qemu-kvm -m 128 -cpu host -smp 2 -name "test" -drive file=cirros-0.4.0-x86_64-disk.img,if=virtio,media=disk,format=qcow2,cache=writeback -nographic -monitor stdio
使用ctl+a,c在console和monitor之间切换,如果不能切换,可以通过图形界面操作一次再进行测试;
使用vgs显示类型cirrus;[root@kvm ~]# qemu-kvm -m 128 -cpu host -smp 2 -name "test" -drive file=cirros-0.4.0-x86_64-disk.img,if=virtio,media=disk,format=qcow2,cache=writeback -nographic -vga cirrus
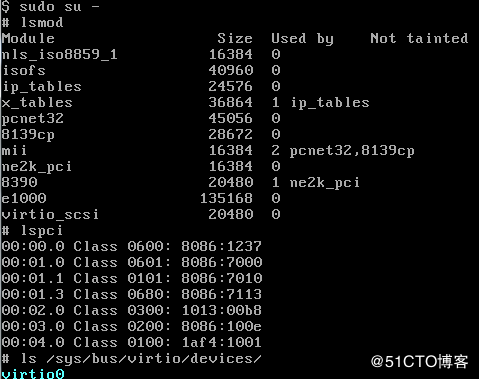
$ lspci
00:00.0 Class 0600: 8086:1237
00:01.0 Class 0601: 8086:7000
00:01.1 Class 0101: 8086:7010
00:01.3 Class 0680: 8086:7113
00:02.0 Class 0300: 1013:00b8
00:03.0 Class 0200: 8086:100e
00:04.0 Class 0100: 1af4:1001
$ ls /sys/bus
acpi          event_source  mipi-dsi      pci_express   sdio          vme
clockevents   i2c           mmc           platform      serio         workqueue
clocksource   machinecheck  nd            pnp           spi           xen
container     mdio_bus      node          rapidio       usb           xen-backend
cpu           memory        pci           scsi          virtio
$ ls /sys/bus/pci
devices             drivers_autoprobe   rescan              slots
drivers             drivers_probe       resource_alignment  uevent
$ lsmod
Module                  Size  Used by    Not tainted
nls_iso8859_1          16384  0
isofs                  40960  0
ip_tables              24576  0
x_tables               36864  1 ip_tables
pcnet32                45056  0
8139cp                 28672  0
mii                    16384  2 pcnet32,8139cp
ne2k_pci               16384  0
8390                   20480  1 ne2k_pci
e1000                 135168  0
virtio_scsi            20480  0
# poweroff
创建桥;
[root@kvm ~]# yum list all | grep -i bridge
bridge-utils.x86_64                         1.5-9.el7                  base
cockpit-bridge.x86_64                       176-4.el7.centos           extras
[root@kvm ~]# modinfo bridge
filename:       /lib/modules/3.10.0-862.el7.x86_64/kernel/net/bridge/bridge.ko.xz
alias:          rtnl-link-bridge
version:        2.3
license:        GPL
retpoline:      Y
rhelversion:    7.5
srcversion:     A0B6183F98024E85CD123C5
depends:        stp,llc
intree:         Y
vermagic:       3.10.0-862.el7.x86_64 SMP mod_unload modversions
signer:         CentOS Linux kernel signing key
sig_key:        3A:F3:CE:8A:74:69:6E:F1:BD:0F:37:E5:52:62:7B:71:09:E3:2B:96
sig_hashalgo:   sha256
[root@kvm ~]# yum -y install bridge-utils
[root@kvm ~]# brctl addbr br0
[root@kvm ~]# ifconfig br0
br0: flags=4098  mtu 1500
        ether 32:41:58:12:f2:2d  txqueuelen 1000  (Ethernet)
        RX packets 0  bytes 0 (0.0 B)
        RX errors 0  dropped 0  overruns 0  frame 0
        TX packets 0  bytes 0 (0.0 B)
        TX errors 0  dropped 0 overruns 0  carrier 0  collisions 0
[root@kvm ~]# brctl show
bridge name     bridge id               STP enabled     interfaces
br0             8000.000000000000       no
[root@kvm ~]# brctl delbr br0
[root@kvm ~]# brctl show
bridge name     bridge id               STP enabled     interfaces
[root@kvm ~]# brctl addbr br0
[root@kvm ~]# brctl show
bridge name     bridge id               STP enabled     interfaces
br0             8000.000000000000       no
[root@kvm ~]# ip link set br0 up
[root@kvm ~]# ip link show
1: lo:  mtu 65536 qdisc noqueue state UNKNOWN mode DEFAULT group default qlen 1000
    link/loopback 00:00:00:00:00:00 brd 00:00:00:00:00:00
2: ens33:  mtu 1500 qdisc pfifo_fast state UP mode DEFAULT group default qlen 0
    link/ether 00:0c:29:4d:1a:85 brd ff:ff:ff:ff:ff:ff
3: ens34:  mtu 1500 qdisc pfifo_fast state UP mode DEFAULT group default qlen 0
    link/ether 00:0c:29:4d:1a:8f brd ff:ff:ff:ff:ff:ff
5: br0:  mtu 1500 qdisc noqueue state UNKNOWN mode DEFAULT group default qlen 0
    link/ether de:0f:35:9a:40:7e brd ff:ff:ff:ff:ff:ff
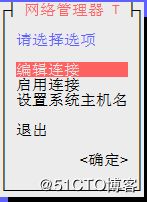
[root@kvm ~]# nmtui    #图形界面添加桥
[root@kvm ~]# nmcli #字符界面添加桥
[root@kvm ~]# qemu-kvm -net nic,model=? #查看支持的网卡接口类型
qemu: Supported NIC models: ne2k_pci,i82551,i82557b,i82559er,rtl8139,e1000,pcnet,virtio
[root@kvm ~]# qemu-kvm -m 128 -cpu host -smp 2 -name "test" -drive file=cirros-0.4.0-x86_64-disk.img,if=virtio,media=disk,format=qcow2,cache=writeback -nographic -net nic -net tap,ifname=vif0.0,script=no$ sudo su -
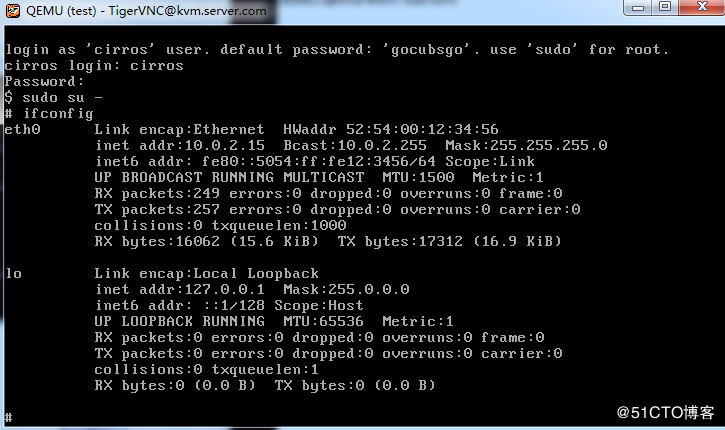
# ifconfig
eth0 Link encap:Ethernet HWaddr 52:54:00:12:34:56
inet6 addr: fe80::5054:ff:fe12:3456/64 Scope:Link
UP BROADCAST RUNNING MULTICAST MTU:1500 Metric:1
RX packets:0 errors:0 dropped:0 overruns:0 frame:0
TX packets:10 errors:0 dropped:0 overruns:0 carrier:0
collisions:0 txqueuelen:1000
RX bytes:0 (0.0 B) TX bytes:1332 (1.3 KiB)
lo Link encap:Local Loopback
inet addr:127.0.0.1 Mask:255.0.0.0
inet6 addr: ::1/128 Scope:Host
UP LOOPBACK RUNNING MTU:65536 Metric:1
RX packets:0 errors:0 dropped:0 overruns:0 frame:0
TX packets:0 errors:0 dropped:0 overruns:0 carrier:0
collisions:0 txqueuelen:1
RX bytes:0 (0.0 B) TX bytes:0 (0.0 B)
# lsmod
Module Size Used by Not tainted
nls_iso8859_1 16384 0
isofs 40960 0
ip_tables 24576 0
x_tables 36864 1 ip_tables
pcnet32 45056 0
8139cp 28672 0
mii 16384 2 pcnet32,8139cp
ne2k_pci 16384 0
8390 20480 1 ne2k_pci
e1000 135168 0
virtio_scsi 20480 0[root@kvm ~]# ifconfig -a
br0: flags=4163 mtu 1500
inet6 fe80::dc0f:35ff:fe9a:407e prefixlen 64 scopeid 0x20
ether de:0f:35:9a:40:7e txqueuelen 1000 (Ethernet)
RX packets 0 bytes 0 (0.0 B)
RX errors 0 dropped 0 overruns 0 frame 0
TX packets 8 bytes 648 (648.0 B)
TX errors 0 dropped 0 overruns 0 carrier 0 collisions 0
ens33: flags=4163 mtu 1500
inet 172.16.100.67 netmask 255.255.255.0 broadcast 172.16.100.255
inet6 fe80::b1b8:96a7:a44f:457a prefixlen 64 scopeid 0x20
ether 00:0c:29:4d:1a:85 txqueuelen 1000 (Ethernet)
RX packets 951575 bytes 1245256906 (1.1 GiB)
RX errors 0 dropped 0 overruns 0 frame 0
TX packets 164474 bytes 34905276 (33.2 MiB)
TX errors 0 dropped 0 overruns 0 carrier 0 collisions 0
ens34: flags=4163 mtu 1500
inet 192.168.190.133 netmask 255.255.255.0 broadcast 192.168.190.255
inet6 fe80::883a:9679:298f:e313 prefixlen 64 scopeid 0x20
ether 00:0c:29:4d:1a:8f txqueuelen 1000 (Ethernet)
RX packets 310638 bytes 34915775 (33.2 MiB)
RX errors 0 dropped 0 overruns 0 frame 0
TX packets 12045 bytes 1078798 (1.0 MiB)
TX errors 0 dropped 0 overruns 0 carrier 0 collisions 0
lo: flags=73 mtu 65536
inet 127.0.0.1 netmask 255.0.0.0
inet6 ::1 prefixlen 128 scopeid 0x10
loop txqueuelen 1000 (Local Loopback)
RX packets 205148 bytes 1012812935 (965.8 MiB)
RX errors 0 dropped 0 overruns 0 frame 0
TX packets 205148 bytes 1012812935 (965.8 MiB)
TX errors 0 dropped 0 overruns 0 carrier 0 collisions 0
tap0: flags=4098 mtu 1500
ether d6:60:69:3c:00:75 txqueuelen 1000 (Ethernet)
RX packets 10 bytes 1332 (1.3 KiB)
RX errors 0 dropped 0 overruns 0 frame 0
TX packets 0 bytes 0 (0.0 B)
TX errors 0 dropped 0 overruns 0 carrier 0 collisions 0
[root@kvm ~]# vim /etc/qemu-ifup
#!/bin/bash
#
bridge=br0
if [ -n "$1" ];then
ip link set $1 up
brctl addif $bridge $1
[ $? -eq 0 ] && exit 0 || exit 1
else
echo "Error: no interface specified."
exit 1
fi
[root@kvm ~]# bash -n /etc/qemu-ifup
[root@kvm ~]# chmod +x /etc/qemu-ifup # poweroff
隔离模型配置:两个虚拟机通过同一网桥进行通信;
创建虚拟机test;[root@kvm ~]# qemu-kvm -m 128 -cpu host -smp 2 -name "test" -drive file=cirros-0.4.0-x86_64-disk.img,if=virtio,media=disk,format=qcow2,cache=writeback -nographic -net nic -net tap,ifname=vif0.0,script=/etc/qemu-ifup
$ sudo su -
# ifconfig
eth0      Link encap:Ethernet  HWaddr 52:54:00:12:34:56
          inet6 addr: fe80::5054:ff:fe12:3456/64 Scope:Link
          UP BROADCAST RUNNING MULTICAST  MTU:1500  Metric:1
          RX packets:0 errors:0 dropped:0 overruns:0 frame:0
          TX packets:10 errors:0 dropped:0 overruns:0 carrier:0
          collisions:0 txqueuelen:1000
          RX bytes:0 (0.0 B)  TX bytes:1332 (1.3 KiB)

lo        Link encap:Local Loopback
          inet addr:127.0.0.1  Mask:255.0.0.0
          inet6 addr: ::1/128 Scope:Host
          UP LOOPBACK RUNNING  MTU:65536  Metric:1
          RX packets:0 errors:0 dropped:0 overruns:0 frame:0
          TX packets:0 errors:0 dropped:0 overruns:0 carrier:0
          collisions:0 txqueuelen:1
          RX bytes:0 (0.0 B)  TX bytes:0 (0.0 B)
[root@kvm ~]# ifconfig
br0: flags=4163 mtu 1500
inet6 fe80::dc0f:35ff:fe9a:407e prefixlen 64 scopeid 0x20
ether 8a:94:56:87:cc:af txqueuelen 1000 (Ethernet)
RX packets 20 bytes 2384 (2.3 KiB)
RX errors 0 dropped 0 overruns 0 frame 0
TX packets 8 bytes 648 (648.0 B)
TX errors 0 dropped 0 overruns 0 carrier 0 collisions 0
ens33: flags=4163 mtu 1500
inet 172.16.100.67 netmask 255.255.255.0 broadcast 172.16.100.255
inet6 fe80::b1b8:96a7:a44f:457a prefixlen 64 scopeid 0x20
ether 00:0c:29:4d:1a:85 txqueuelen 1000 (Ethernet)
RX packets 956162 bytes 1245673566 (1.1 GiB)
RX errors 0 dropped 0 overruns 0 frame 0
TX packets 166357 bytes 35105450 (33.4 MiB)
TX errors 0 dropped 0 overruns 0 carrier 0 collisions 0
ens34: flags=4163 mtu 1500
inet 192.168.190.133 netmask 255.255.255.0 broadcast 192.168.190.255
inet6 fe80::883a:9679:298f:e313 prefixlen 64 scopeid 0x20
ether 00:0c:29:4d:1a:8f txqueuelen 1000 (Ethernet)
RX packets 352423 bytes 37659211 (35.9 MiB)
RX errors 0 dropped 0 overruns 0 frame 0
TX packets 12923 bytes 1171612 (1.1 MiB)
TX errors 0 dropped 0 overruns 0 carrier 0 collisions 0
lo: flags=73 mtu 65536
inet 127.0.0.1 netmask 255.0.0.0
inet6 ::1 prefixlen 128 scopeid 0x10
loop txqueuelen 1000 (Local Loopback)
RX packets 205148 bytes 1012812935 (965.8 MiB)
RX errors 0 dropped 0 overruns 0 frame 0
TX packets 205148 bytes 1012812935 (965.8 MiB)
TX errors 0 dropped 0 overruns 0 carrier 0 collisions 0
vif0.0: flags=4163 mtu 1500
inet6 fe80::8894:56ff:fe87:ccaf prefixlen 64 scopeid 0x20
ether 8a:94:56:87:cc:af txqueuelen 1000 (Ethernet)
RX packets 10 bytes 1332 (1.3 KiB)
RX errors 0 dropped 0 overruns 0 frame 0
TX packets 8 bytes 648 (648.0 B)
TX errors 0 dropped 0 overruns 0 carrier 0 collisions 0
[root@kvm ~]# brctl show
bridge name bridge id STP enabled interfaces
br0 8000.8a945687ccaf no vif0.0 创建虚拟机test1,如果启动第二台虚拟机启动失败,问题在于两台虚拟机使用同一个磁盘镜像文件,存在像同一个磁盘文件同时写入数据导致,可以复制镜像文件一份启动,或者第一个虚拟机配置后使用sync同步,再启动第二台;
[root@kvm ~]# qemu-kvm -m 128 -cpu host -smp 2 -name "test1" -drive file=cirros-0.4.0-x86_64-disk.img,if=virtio,media=disk,format=qcow2,cache=writeback -nographic -net nic -net tap,ifname=vif1.0,script=/etc/qemu-ifup
[root@kvm ~]# ifconfig
br0: flags=4163  mtu 1500
        inet6 fe80::dc0f:35ff:fe9a:407e  prefixlen 64  scopeid 0x20
        ether 8a:94:56:87:cc:af  txqueuelen 1000  (Ethernet)
        RX packets 24  bytes 2672 (2.6 KiB)
        RX errors 0  dropped 0  overruns 0  frame 0
        TX packets 8  bytes 648 (648.0 B)
        TX errors 0  dropped 0 overruns 0  carrier 0  collisions 0

ens33: flags=4163  mtu 1500
        inet 172.16.100.67  netmask 255.255.255.0  broadcast 172.16.100.255
        inet6 fe80::b1b8:96a7:a44f:457a  prefixlen 64  scopeid 0x20
        ether 00:0c:29:4d:1a:85  txqueuelen 1000  (Ethernet)
        RX packets 956747  bytes 1245720743 (1.1 GiB)
        RX errors 0  dropped 0  overruns 0  frame 0
        TX packets 167094  bytes 35192944 (33.5 MiB)
        TX errors 0  dropped 0 overruns 0  carrier 0  collisions 0

ens34: flags=4163  mtu 1500
        inet 192.168.190.133  netmask 255.255.255.0  broadcast 192.168.190.255
        inet6 fe80::883a:9679:298f:e313  prefixlen 64  scopeid 0x20
        ether 00:0c:29:4d:1a:8f  txqueuelen 1000  (Ethernet)
        RX packets 352658  bytes 37675061 (35.9 MiB)
        RX errors 0  dropped 0  overruns 0  frame 0
        TX packets 12931  bytes 1172458 (1.1 MiB)
        TX errors 0  dropped 0 overruns 0  carrier 0  collisions 0

lo: flags=73  mtu 65536
        inet 127.0.0.1  netmask 255.0.0.0
        inet6 ::1  prefixlen 128  scopeid 0x10
        loop  txqueuelen 1000  (Local Loopback)
        RX packets 205148  bytes 1012812935 (965.8 MiB)
        RX errors 0  dropped 0  overruns 0  frame 0
        TX packets 205148  bytes 1012812935 (965.8 MiB)
        TX errors 0  dropped 0 overruns 0  carrier 0  collisions 0

vif0.0: flags=4163  mtu 1500
        inet6 fe80::8894:56ff:fe87:ccaf  prefixlen 64  scopeid 0x20
        ether 8a:94:56:87:cc:af  txqueuelen 1000  (Ethernet)
        RX packets 11  bytes 1418 (1.3 KiB)
        RX errors 0  dropped 0  overruns 0  frame 0
        TX packets 11  bytes 906 (906.0 B)
        TX errors 0  dropped 0 overruns 0  carrier 0  collisions 0

vif1.0: flags=4163  mtu 1500
        inet6 fe80::a4ca:aeff:feda:11d7  prefixlen 64  scopeid 0x20
        ether a6:ca:ae:da:11:d7  txqueuelen 1000  (Ethernet)
        RX packets 3  bytes 258 (258.0 B)
        RX errors 0  dropped 0  overruns 0  frame 0
        TX packets 9  bytes 734 (734.0 B)
        TX errors 0  dropped 0 overruns 0  carrier 0  collisions 0
[root@kvm ~]# brctl show
bridge name     bridge id               STP enabled     interfaces
br0             8000.8a945687ccaf       no              vif0.0
                                                        vif1.0
配置test虚拟机网卡;
$ sudo su -
# ifconfig eth0 192.168.2.1 netmask 255.255.255.0
# ifconfig
eth0      Link encap:Ethernet  HWaddr 52:54:00:12:34:56
          inet addr:192.168.2.1  Bcast:192.168.2.255  Mask:255.255.255.0
          inet6 addr: fe80::5054:ff:fe12:3456/64 Scope:Link
          UP BROADCAST RUNNING MULTICAST  MTU:1500  Metric:1
          RX packets:3 errors:0 dropped:0 overruns:0 frame:0
          TX packets:161 errors:0 dropped:0 overruns:0 carrier:0
          collisions:0 txqueuelen:1000
          RX bytes:762 (762.0 B)  TX bytes:10418 (10.1 KiB)

lo        Link encap:Local Loopback
          inet addr:127.0.0.1  Mask:255.0.0.0
          inet6 addr: ::1/128 Scope:Host
          UP LOOPBACK RUNNING  MTU:65536  Metric:1
          RX packets:220 errors:0 dropped:0 overruns:0 frame:0
          TX packets:220 errors:0 dropped:0 overruns:0 carrier:0
          collisions:0 txqueuelen:1
          RX bytes:21832 (21.3 KiB)  TX bytes:21832 (21.3 KiB)
配置test1虚拟机网卡;
$ sudo su -
# ifconfig eth0 192.168.2.2 netmask 255.255.255.0
# ifconfig
eth0      Link encap:Ethernet  HWaddr 52:54:00:12:34:56
          inet addr:192.168.2.2  Bcast:192.168.2.255  Mask:255.255.255.0
          inet6 addr: fe80::5054:ff:fe12:3456/64 Scope:Link
          UP BROADCAST RUNNING MULTICAST  MTU:1500  Metric:1
          RX packets:151 errors:0 dropped:0 overruns:0 frame:0
          TX packets:155 errors:0 dropped:0 overruns:0 carrier:0
          collisions:0 txqueuelen:1000
          RX bytes:9086 (8.8 KiB)  TX bytes:9942 (9.7 KiB)

lo        Link encap:Local Loopback
          inet addr:127.0.0.1  Mask:255.0.0.0
          inet6 addr: ::1/128 Scope:Host
          UP LOOPBACK RUNNING  MTU:65536  Metric:1
          RX packets:0 errors:0 dropped:0 overruns:0 frame:0
          TX packets:0 errors:0 dropped:0 overruns:0 carrier:0
          collisions:0 txqueuelen:1
          RX bytes:0 (0.0 B)  TX bytes:0 (0.0 B)
通过虚拟机test ping test1虚拟机,发现不通,是因为两台虚拟机MAC地址一样;
# ping 192.168.2.2
PING 192.168.2.2 (192.168.2.2): 56 data bytes关闭test2虚拟机,重新生成MAC地址;# poweroff
[root@kvm ~]# qemu-kvm -m 128 -cpu host -smp 2 -name "test1" -drive file=cirros-0.4.0-x86_64-disk.img,if=virtio,media=disk,format=qcow2,cache=writeback -nographic -net nic,macaddr=52:54:00:12:34:57 -net tap,ifname=vif1.0,script=/etc/qemu-ifup
$ sudo su -
# ifconfig eth0 192.168.2.2 netmask 255.255.255.0
# ifconfig
eth0      Link encap:Ethernet  HWaddr 52:54:00:12:34:57
          inet addr:192.168.2.2  Bcast:192.168.2.255  Mask:255.255.255.0
          inet6 addr: fe80::5054:ff:fe12:3457/64 Scope:Link
          UP BROADCAST RUNNING MULTICAST  MTU:1500  Metric:1
          RX packets:0 errors:0 dropped:0 overruns:0 frame:0
          TX packets:10 errors:0 dropped:0 overruns:0 carrier:0
          collisions:0 txqueuelen:1000
          RX bytes:0 (0.0 B)  TX bytes:1332 (1.3 KiB)

lo        Link encap:Local Loopback
          inet addr:127.0.0.1  Mask:255.0.0.0
          inet6 addr: ::1/128 Scope:Host
          UP LOOPBACK RUNNING  MTU:65536  Metric:1
          RX packets:0 errors:0 dropped:0 overruns:0 frame:0
          TX packets:0 errors:0 dropped:0 overruns:0 carrier:0
          collisions:0 txqueuelen:1
          RX bytes:0 (0.0 B)  TX bytes:0 (0.0 B)
通过虚拟机test ping test1虚拟机;
# ping 192.168.2.2
PING 192.168.2.2 (192.168.2.2): 56 data bytes
64 bytes from 192.168.2.2: seq=0 ttl=64 time=3.308 ms
64 bytes from 192.168.2.2: seq=1 ttl=64 time=1.646 ms
64 bytes from 192.168.2.2: seq=2 ttl=64 time=1.219 ms
64 bytes from 192.168.2.2: seq=3 ttl=64 time=1.774 ms
路由+NAT模式配置(一):
[root@kvm ~]# ip link add veth1.0 type veth peer veth1.1    #添加两块虚拟机网卡,并且成为一对;
[root@kvm ~]# ifconfig -a
br0: flags=4163  mtu 1500
        inet6 fe80::dc0f:35ff:fe9a:407e  prefixlen 64  scopeid 0x20
        ether 4e:b6:06:8d:06:3a  txqueuelen 1000  (Ethernet)
        RX packets 757  bytes 39882 (38.9 KiB)
        RX errors 0  dropped 0  overruns 0  frame 0
        TX packets 8  bytes 648 (648.0 B)
        TX errors 0  dropped 0 overruns 0  carrier 0  collisions 0

ens33: flags=4163  mtu 1500
        inet 172.16.100.67  netmask 255.255.255.0  broadcast 172.16.100.255
        inet6 fe80::b1b8:96a7:a44f:457a  prefixlen 64  scopeid 0x20
        ether 00:0c:29:4d:1a:85  txqueuelen 1000  (Ethernet)
        RX packets 990915  bytes 1285916651 (1.1 GiB)
        RX errors 0  dropped 0  overruns 0  frame 0
        TX packets 178398  bytes 36389257 (34.7 MiB)
        TX errors 0  dropped 0 overruns 0  carrier 0  collisions 0

ens34: flags=4163  mtu 1500
        inet 192.168.190.133  netmask 255.255.255.0  broadcast 192.168.190.255
        inet6 fe80::883a:9679:298f:e313  prefixlen 64  scopeid 0x20
        ether 00:0c:29:4d:1a:8f  txqueuelen 1000  (Ethernet)
        RX packets 354425  bytes 37791220 (36.0 MiB)
        RX errors 0  dropped 0  overruns 0  frame 0
        TX packets 12967  bytes 1175947 (1.1 MiB)
        TX errors 0  dropped 0 overruns 0  carrier 0  collisions 0

lo: flags=73  mtu 65536
        inet 127.0.0.1  netmask 255.0.0.0
        inet6 ::1  prefixlen 128  scopeid 0x10
        loop  txqueuelen 1000  (Local Loopback)
        RX packets 205256  bytes 1012825571 (965.9 MiB)
        RX errors 0  dropped 0  overruns 0  frame 0
        TX packets 205256  bytes 1012825571 (965.9 MiB)
        TX errors 0  dropped 0 overruns 0  carrier 0  collisions 0

veth0: flags=4098  mtu 1500
        ether 0a:b8:18:b9:0a:8a  txqueuelen 1000  (Ethernet)
        RX packets 0  bytes 0 (0.0 B)
        RX errors 0  dropped 0  overruns 0  frame 0
        TX packets 0  bytes 0 (0.0 B)
        TX errors 0  dropped 0 overruns 0  carrier 0  collisions 0

veth1.0: flags=4098  mtu 1500
        ether 46:ac:ce:e9:7b:ac  txqueuelen 1000  (Ethernet)
        RX packets 0  bytes 0 (0.0 B)
        RX errors 0  dropped 0  overruns 0  frame 0
        TX packets 0  bytes 0 (0.0 B)
        TX errors 0  dropped 0 overruns 0  carrier 0  collisions 0

vif0.0: flags=4163  mtu 1500
        inet6 fe80::4cb6:6ff:fe8d:63a  prefixlen 64  scopeid 0x20
        ether 4e:b6:06:8d:06:3a  txqueuelen 1000  (Ethernet)
        RX packets 17  bytes 1942 (1.8 KiB)
        RX errors 0  dropped 0  overruns 0  frame 0
        TX packets 25  bytes 2590 (2.5 KiB)
        TX errors 0  dropped 0 overruns 0  carrier 0  collisions 0

vif1.0: flags=4163  mtu 1500
        inet6 fe80::fcbd:a7ff:feaf:971b  prefixlen 64  scopeid 0x20
        ether fe:bd:a7:af:97:1b  txqueuelen 1000  (Ethernet)
        RX packets 17  bytes 1942 (1.8 KiB)
        RX errors 0  dropped 0  overruns 0  frame 0
        TX packets 15  bytes 1258 (1.2 KiB)
        TX errors 0  dropped 0 overruns 0  carrier 0  collisions 0
[root@kvm ~]# ip link set veth0 up
[root@kvm ~]# ip link set veth1.0 up
[root@kvm ~]# brctl addif br0 veth1.0
[root@kvm ~]# brctl show
bridge name     bridge id               STP enabled     interfaces
br0             8000.46accee97bac       no              veth1.0
                                                        vif0.0
                                                        vif1.0
[root@kvm ~]# ifconfig veth0 192.168.2.254 netmask 255.255.255.0
通过虚拟机test ping 192.168.2.254,并添加网关;
# ping 192.168.2.254
PING 192.168.2.254 (192.168.2.254): 56 data bytes
64 bytes from 192.168.2.254: seq=0 ttl=64 time=57.522 ms
64 bytes from 192.168.2.254: seq=1 ttl=64 time=0.612 ms
64 bytes from 192.168.2.254: seq=2 ttl=64 time=0.552 ms
64 bytes from 192.168.2.254: seq=3 ttl=64 time=0.837 ms
# route add default gw 192.168.2.254
# ping 172.16.100.67    #ping宿主机出口网卡通,是因为linux地址是属于主机而不是网卡;
PING 172.16.100.67 (172.16.100.67): 56 data bytes
64 bytes from 172.16.100.67: seq=0 ttl=64 time=0.706 ms
64 bytes from 172.16.100.67: seq=1 ttl=64 time=0.759 ms
64 bytes from 172.16.100.67: seq=2 ttl=64 time=0.631 ms
64 bytes from 172.16.100.67: seq=3 ttl=64 time=0.844 ms
# ping 172.16.100.254    #ping宿主机外面主机不通;
PING 172.16.100.254 (172.16.100.254): 56 data bytes
[root@kvm ~]# cat /proc/sys/net/ipv4/ip_forward
0
[root@kvm ~]# echo 1 > /proc/sys/net/ipv4/ip_forward# ping 172.16.100.254 #还是不通,因为报文可以出去但是回不来;
PING 172.16.100.254 (172.16.100.254): 56 data bytes
[root@kvm ~]# tcpdump -i veth0 -nn
tcpdump: verbose output suppressed, use -v or -vv for full protocol decode
listening on veth0, link-type EN10MB (Ethernet), capture size 262144 bytes
16:10:24.045633 IP 192.168.2.1 > 172.16.100.254: ICMP echo request, id 56577, seq 280, length 64
16:10:25.130140 IP 192.168.2.1 > 172.16.100.254: ICMP echo request, id 56577, seq 281, length 64
16:10:26.215759 IP 192.168.2.1 > 172.16.100.254: ICMP echo request, id 56577, seq 282, length 64
[root@kvm ~]# tcpdump -i ens33 -nn icmp
tcpdump: verbose output suppressed, use -v or -vv for full protocol decode
listening on ens33, link-type EN10MB (Ethernet), capture size 262144 bytes
16:11:52.017641 IP 192.168.2.1 > 172.16.100.254: ICMP echo request, id 56577, seq 361, length 64
16:11:53.102113 IP 192.168.2.1 > 172.16.100.254: ICMP echo request, id 56577, seq 362, length 64
16:11:54.186597 IP 192.168.2.1 > 172.16.100.254: ICMP echo request, id 56577, seq 363, length 64
[root@kvm ~]# iptables -t nat -A POSTROUTING -s 192.168.2.0/24 -j SNAT --to-source 172.16.100.67test虚拟机可以通向宿主机外部;
# ping 172.16.100.254
PING 172.16.100.254 (172.16.100.254): 56 data bytes
64 bytes from 172.16.100.254: seq=0 ttl=63 time=1.277 ms
64 bytes from 172.16.100.254: seq=1 ttl=63 time=0.964 ms
64 bytes from 172.16.100.254: seq=2 ttl=63 time=0.834 ms
[root@kvm ~]# tcpdump -i veth0 -nn icmp
tcpdump: verbose output suppressed, use -v or -vv for full protocol decode
listening on veth0, link-type EN10MB (Ethernet), capture size 262144 bytes
16:19:56.134027 IP 192.168.2.1 > 172.16.100.254: ICMP echo request, id 57345, seq 117, length 64
16:19:56.134447 IP 172.16.100.254 > 192.168.2.1: ICMP echo reply, id 57345, seq 117, length 64
16:19:57.224209 IP 192.168.2.1 > 172.16.100.254: ICMP echo request, id 57345, seq 118, length 64
16:19:57.225032 IP 172.16.100.254 > 192.168.2.1: ICMP echo reply, id 57345, seq 118, length 64路由模式+NAT配置(二):
在路由模式+NAT配置(一)基础上修改;
[root@kvm ~]#  ip link del veth1.0 type veth peer veth1.1
[root@kvm ~]# ifconfig br0 192.168.2.254 netmask 255.255.255.0
# ping 172.16.100.254
PING 172.16.100.254 (172.16.100.254): 56 data bytes
64 bytes from 172.16.100.254: seq=0 ttl=63 time=3.631 ms
64 bytes from 172.16.100.254: seq=1 ttl=63 time=1.304 ms
64 bytes from 172.16.100.254: seq=2 ttl=63 time=1.064 ms
64 bytes from 172.16.100.254: seq=3 ttl=63 time=0.972 ms[root@kvm ~]# tcpdump -i br0 -nn icmp
tcpdump: verbose output suppressed, use -v or -vv for full protocol decode
listening on br0, link-type EN10MB (Ethernet), capture size 262144 bytes
16:52:17.377937 IP 192.168.2.1 > 172.16.100.254: ICMP echo request, id 59137, seq 0, length 64
16:52:17.387164 IP 172.16.100.254 > 192.168.2.1: ICMP echo reply, id 59137, seq 0, length 64
16:52:18.474832 IP 192.168.2.1 > 172.16.100.254: ICMP echo request, id 59137, seq 1, length 64
16:52:18.475454 IP 172.16.100.254 > 192.168.2.1: ICMP echo reply, id 59137, seq 1, length 64
[root@kvm ~]# tcpdump -i ens33 -nn icmp
tcpdump: verbose output suppressed, use -v or -vv for full protocol decode
listening on ens33, link-type EN10MB (Ethernet), capture size 262144 bytes
16:53:28.050863 IP 172.16.100.67 > 172.16.100.254: ICMP echo request, id 59137, seq 65, length 64
16:53:28.051268 IP 172.16.100.254 > 172.16.100.67: ICMP echo reply, id 59137, seq 65, length 64
16:53:29.137740 IP 172.16.100.67 > 172.16.100.254: ICMP echo request, id 59137, seq 66, length 64
16:53:29.138167 IP 172.16.100.254 > 172.16.100.67: ICMP echo reply, id 59137, seq 66, length 64桥接模式配置:
在路由模式+NAT配置(二)基础上修改;
[root@kvm ~]# ip addr del 192.168.2.254/24 dev br0
[root@kvm ~]# ip addr show
1: lo:  mtu 65536 qdisc noqueue state UNKNOWN group default qlen 1000
    link/loopback 00:00:00:00:00:00 brd 00:00:00:00:00:00
    inet 127.0.0.1/8 scope host lo
       valid_lft forever preferred_lft forever
    inet6 ::1/128 scope host
       valid_lft forever preferred_lft forever
2: ens33:  mtu 1500 qdisc pfifo_fast state UP group default qlen 1000
    link/ether 00:0c:29:4d:1a:85 brd ff:ff:ff:ff:ff:ff
    inet 172.16.100.67/24 brd 172.16.100.255 scope global noprefixroute ens33
       valid_lft forever preferred_lft forever
    inet6 fe80::b1b8:96a7:a44f:457a/64 scope link noprefixroute
       valid_lft forever preferred_lft forever
3: ens34:  mtu 1500 qdisc pfifo_fast state UP group default qlen 1000
    link/ether 00:0c:29:4d:1a:8f brd ff:ff:ff:ff:ff:ff
    inet 192.168.190.133/24 brd 192.168.190.255 scope global noprefixroute dynamic ens34
       valid_lft 1143sec preferred_lft 1143sec
    inet6 fe80::883a:9679:298f:e313/64 scope link noprefixroute
       valid_lft forever preferred_lft forever
5: br0:  mtu 1500 qdisc noqueue state UP group default qlen 1000
    link/ether 4e:b6:06:8d:06:3a brd ff:ff:ff:ff:ff:ff
    inet6 fe80::dc0f:35ff:fe9a:407e/64 scope link
       valid_lft forever preferred_lft forever
21: vif0.0:  mtu 1500 qdisc pfifo_fast master br0 state UNKNOWN group default qlen 1000
    link/ether 4e:b6:06:8d:06:3a brd ff:ff:ff:ff:ff:ff
    inet6 fe80::4cb6:6ff:fe8d:63a/64 scope link
       valid_lft forever preferred_lft forever
22: vif1.0:  mtu 1500 qdisc pfifo_fast master br0 state UNKNOWN group default qlen 1000
    link/ether fe:bd:a7:af:97:1b brd ff:ff:ff:ff:ff:ff
    inet6 fe80::fcbd:a7ff:feaf:971b/64 scope link
       valid_lft forever preferred_lft forever
[root@kvm ~]# ip addr del 172.16.100.67/24 dev ens33
[root@kvm ~]# brctl addif br0 ens33
[root@kvm ~]# ip addr add 172.16.100.67/24 dev br0
[root@kvm ~]# ping 172.16.100.254    #桥网卡ping到达外部网关;
PING 172.16.100.254 (172.16.100.254) 56(84) bytes of data.
64 bytes from 172.16.100.254: icmp_seq=1 ttl=64 time=0.328 ms
64 bytes from 172.16.100.254: icmp_seq=2 ttl=64 time=0.340 ms
64 bytes from 172.16.100.254: icmp_seq=3 ttl=64 time=0.411 ms
[root@kvm ~]# brctl show
bridge name     bridge id               STP enabled     interfaces
br0             8000.000c294d1a85       no              ens33
                                                        vif0.0
                                                        vif1.0
配置test虚拟机网卡地址;
# ifconfig eth0 172.16.100.10 netmask 255.255.255.0
# ping 172.16.100.67
PING 172.16.100.67 (172.16.100.67): 56 data bytes
64 bytes from 172.16.100.67: seq=0 ttl=64 time=2.596 ms
64 bytes from 172.16.100.67: seq=1 ttl=64 time=0.592 ms
64 bytes from 172.16.100.67: seq=2 ttl=64 time=0.785 ms
# ping 172.16.100.254
PING 172.16.100.254 (172.16.100.254): 56 data bytes
64 bytes from 172.16.100.254: seq=0 ttl=64 time=8.336 ms
64 bytes from 172.16.100.254: seq=1 ttl=64 time=0.939 ms
64 bytes from 172.16.100.254: seq=2 ttl=64 time=1.112 ms
# poweroff
关闭虚拟机后vif0.0接口自动消失,因此不需要添加qemu-ifdown脚本;
[root@kvm ~]# ifconfig
br0: flags=4163  mtu 1500
        inet 172.16.100.67  netmask 255.255.255.0  broadcast 0.0.0.0
        inet6 fe80::dc0f:35ff:fe9a:407e  prefixlen 64  scopeid 0x20
        ether 00:0c:29:4d:1a:85  txqueuelen 1000  (Ethernet)
        RX packets 27843  bytes 2750292 (2.6 MiB)
        RX errors 0  dropped 0  overruns 0  frame 0
        TX packets 492  bytes 39292 (38.3 KiB)
        TX errors 0  dropped 0 overruns 0  carrier 0  collisions 0

ens33: flags=4163  mtu 1500
        inet6 fe80::b1b8:96a7:a44f:457a  prefixlen 64  scopeid 0x20
        ether 00:0c:29:4d:1a:85  txqueuelen 1000  (Ethernet)
        RX packets 1024616  bytes 1289523328 (1.2 GiB)
        RX errors 0  dropped 0  overruns 0  frame 0
        TX packets 185310  bytes 37066051 (35.3 MiB)
        TX errors 0  dropped 0 overruns 0  carrier 0  collisions 0

ens34: flags=4163  mtu 1500
        inet 192.168.190.133  netmask 255.255.255.0  broadcast 192.168.190.255
        inet6 fe80::883a:9679:298f:e313  prefixlen 64  scopeid 0x20
        ether 00:0c:29:4d:1a:8f  txqueuelen 1000  (Ethernet)
        RX packets 431403  bytes 43673526 (41.6 MiB)
        RX errors 0  dropped 0  overruns 0  frame 0
        TX packets 17607  bytes 1752393 (1.6 MiB)
        TX errors 0  dropped 0 overruns 0  carrier 0  collisions 0

lo: flags=73  mtu 65536
        inet 127.0.0.1  netmask 255.0.0.0
        inet6 ::1  prefixlen 128  scopeid 0x10
        loop  txqueuelen 1000  (Local Loopback)
        RX packets 207560  bytes 1013094467 (966.1 MiB)
        RX errors 0  dropped 0  overruns 0  frame 0
        TX packets 207560  bytes 1013094467 (966.1 MiB)
        TX errors 0  dropped 0 overruns 0  carrier 0  collisions 0

vif1.0: flags=4163  mtu 1500
        inet6 fe80::e866:47ff:fe94:bc20  prefixlen 64  scopeid 0x20
        ether ea:66:47:94:bc:20  txqueuelen 1000  (Ethernet)
        RX packets 13  bytes 1550 (1.5 KiB)
        RX errors 0  dropped 0  overruns 0  frame 0
        TX packets 460  bytes 41741 (40.7 KiB)
        TX errors 0  dropped 0 overruns 0  carrier 0  collisions 0
[root@kvm ~]# brctl show
bridge name     bridge id               STP enabled     interfaces
br0             8000.000c294d1a85       no              ens33
                                                        vif1.0
基于pxe安装虚拟机操作系统,kickstart部署见https://blog.51cto.com/smoke520/2325660;
[root@kvm ~]# mkdir /images/centos
[root@kvm ~]# qemu-img create /images/centos/centos6.img -o size=120G,preallocation=metadata -f qcow2
[root@kvm ~]# qemu-kvm -m 512 -smp 2 -name centos -drive file=/images/centos/centos6.img,media=disk,if=virtio -net nic,model=virtio,macaddr=52:54:00:55:32:19 -net tap,ifname=centos6.0,script=/etc/qemu-ifup -boot order=nc,once=n
[root@kvm ~]# vncviewer :5900
使用libvirt管理虚拟机:
[root@kvm ~]# yum -y install libvirt libvirt-client virt-manager virt-install
[root@kvm ~]# yum -y install qemu-kvm
[root@kvm ~]# systemctl start libvirtd.service
[root@kvm libvirt]# less qemu/networks/default.xml

  default
  d8dbeec5-ac1c-406b-95a9-78e848dde819


[root@kvm libvirt]# ifconfig
br0: flags=4163  mtu 1500
        inet 172.16.100.67  netmask 255.255.255.0  broadcast 0.0.0.0
        inet6 fe80::dc0f:35ff:fe9a:407e  prefixlen 64  scopeid 0x20
        ether 00:0c:29:4d:1a:85  txqueuelen 1000  (Ethernet)
        RX packets 64381  bytes 7641946 (7.2 MiB)
        RX errors 0  dropped 0  overruns 0  frame 0
        TX packets 492  bytes 39292 (38.3 KiB)
        TX errors 0  dropped 0 overruns 0  carrier 0  collisions 0

ens33: flags=4163  mtu 1500
        inet6 fe80::b1b8:96a7:a44f:457a  prefixlen 64  scopeid 0x20
        ether 00:0c:29:4d:1a:85  txqueuelen 1000  (Ethernet)
        RX packets 2932320  bytes 4087077073 (3.8 GiB)
        RX errors 0  dropped 0  overruns 0  frame 0
        TX packets 575800  bytes 62827478 (59.9 MiB)
        TX errors 0  dropped 0 overruns 0  carrier 0  collisions 0

ens34: flags=4163  mtu 1500
        inet 192.168.190.133  netmask 255.255.255.0  broadcast 192.168.190.255
        inet6 fe80::883a:9679:298f:e313  prefixlen 64  scopeid 0x20
        ether 00:0c:29:4d:1a:8f  txqueuelen 1000  (Ethernet)
        RX packets 627003  bytes 121348682 (115.7 MiB)
        RX errors 0  dropped 0  overruns 0  frame 0
        TX packets 95189  bytes 21267415 (20.2 MiB)
        TX errors 0  dropped 0 overruns 0  carrier 0  collisions 0

lo: flags=73  mtu 65536
        inet 127.0.0.1  netmask 255.0.0.0
        inet6 ::1  prefixlen 128  scopeid 0x10
        loop  txqueuelen 1000  (Local Loopback)
        RX packets 343335  bytes 1856954043 (1.7 GiB)
        RX errors 0  dropped 0  overruns 0  frame 0
        TX packets 343335  bytes 1856954043 (1.7 GiB)
        TX errors 0  dropped 0 overruns 0  carrier 0  collisions 0

virbr0: flags=4099  mtu 1500
        inet 192.168.122.1  netmask 255.255.255.0  broadcast 192.168.122.255
        ether 52:54:00:a4:87:9a  txqueuelen 1000  (Ethernet)
        RX packets 0  bytes 0 (0.0 B)
        RX errors 0  dropped 0  overruns 0  frame 0
        TX packets 0  bytes 0 (0.0 B)
        TX errors 0  dropped 0 overruns 0  carrier 0  collisions 0
[root@kvm libvirt]# virsh list
Id    名称                         状态
----------------------------------------------------
[root@kvm libvirt]# virt-manager
[root@kvm libvirt]# virsh capabilities #查看性能
[root@kvm ~]# virsh iface-bridge ens33 br0 --no-stp #将ens33添加到br0
[root@kvm ~]# brctl show
bridge name bridge id STP enabled interfaces
br0 8000.000c294d1a85 no ens33
virbr0 8000.525400a4879a yes virbr0-nic
[root@kvm ~]# virt-manager
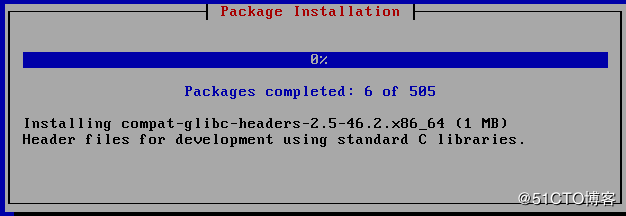
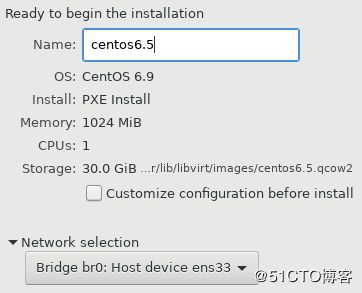
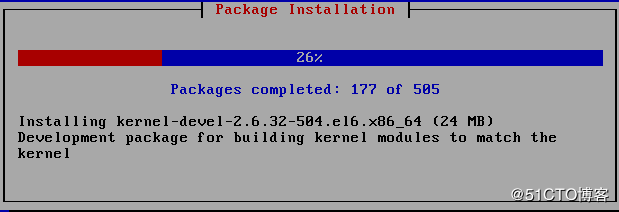
安装操作系统,选择pxe进行安装,kickstart部署见https://blog.51cto.com/smoke520/2325660;
[root@kvm libvirt]# virsh list
 Id    Name                           State
----------------------------------------------------
 5     centos6.5                      running
使用virt-install安装centos系统,选择pxe进行安装,kickstart部署见https://blog.51cto.com/smoke520/2325660;
[root@kvm ~]# mkdir /images/centos -pv
[root@kvm ~]# virt-install -n centos6.6 -r 512 --vcpus=2,maxvcpus=4 --pxe --disk /images/centos/centos6.6.qcow2,size=120,format=qcow2,bus=virtio,sparse=yes --network bridge=br0,model=virtio --force
[root@kvm ~]#
[root@kvm ~]# virsh list
 Id    名称                         状态
----------------------------------------------------
 9     centos6.6                      running
[root@kvm ~]# yum -y install virt-viewer
[root@kvm ~]# ss -tnl
State      Recv-Q Send-Q                        Local Address:Port                                       Peer Address:Port
LISTEN     0      128                               127.0.0.1:6013                                                  *:*
LISTEN     0      128                               127.0.0.1:6014                                                  *:*
LISTEN     0      128                               127.0.0.1:6015                                                  *:*
LISTEN     0      128                               127.0.0.1:5900                                                  *:*
LISTEN     0      128                                       *:111                                                   *:*
LISTEN     0      5                             192.168.122.1:53                                                    *:*
LISTEN     0      128                                       *:22                                                    *:*
LISTEN     0      128                                     ::1:6013                                                 :::*
LISTEN     0      128                                     ::1:6014                                                 :::*
LISTEN     0      128                                     ::1:6015                                                 :::*
LISTEN     0      128                                      :::111                                                  :::*
LISTEN     0      128                                      :::22                                                   :::*
[root@kvm ~]# virt-viewer 9 #使用虚拟机id或名字进行连接[root@kvm ~]# virsh create /etc/libvirt/qemu/centos6.6.xml #使用刚才创建的虚拟机xml文件创建域centos6.6
[root@kvm ~]# virsh list
Id 名称 状态
----------------------------------------------------
12 centos6.6 running
[root@kvm ~]# virt-viewer 12
[root@kvm ~]# virsh destroy 12
[root@kvm ~]# virsh undefine centos6.6 --remove-all-storage #移除域
[root@kvm ~]# virt-install -n centos6.6 -r 512 --vcpus=2,maxvcpus=4 --pxe --disk /images/centos/centos6.6.qcow2,size=120,format=qcow2,bus=virtio,sparse=yes --network bridge=br0,model=virtio --force --graphics vnc
[root@kvm ~]# mkdir /images/cirros
[root@kvm ~]# mv cirros-0.4.0-x86_64-disk.img /images/cirros/
[root@kvm ~]# virt-install -n cirros -r 128 --disk /images/cirros/cirros-0.4.0-x86_64-disk.img --import --dry-run #试跑一遍
[root@kvm ~]# virt-install -n cirros -r 128 --disk /images/cirros/cirros-0.4.0-x86_64-disk.img --import
[root@kvm ~]# virsh list
Id 名称 状态
----------------------------------------------------
16 centos6.6 running
17 cirros running
[root@kvm ~]# virsh destroy 17 #删除域
[root@kvm ~]# virsh undefine cirros #取消域定义
[root@kvm ~]# ls /images/cirros/
cirros-0.4.0-x86_64-disk.img
[root@kvm ~]# virt-install -n cirros -r 128 --vcpus=1,maxvcpus=4 --disk /images/cirros/cirros-0.4.0-x86_64-disk.img --network bridge=br0,model=virtio --import --serial=pty --console=pty --nographics[root@kvm ~]# virsh list
Id 名称 状态
----------------------------------------------------
16 centos6.6 running
18 cirros running
[root@kvm ~]# virsh console 18 #连接到虚拟机
$ sudo su -[root@kvm ~]# qemu-img create -f qcow2 -o size=20G,preallocation=metadata /images/cirros/second.qcow2
[root@kvm ~]# qemu-img info /images/cirros/second.qcow2
image: /images/cirros/second.qcow2
file format: qcow2
virtual size: 20G (21474836480 bytes)
disk size: 4.1M
cluster_size: 65536
Format specific information:
compat: 1.1
lazy refcounts: false
[root@kvm ~]# virsh attach-disk 18 /images/cirros/second.qcow2 vda --targetbus virtio #给域18添加磁盘设备vda# fdisk -l /dev/vda
Disk /dev/vda: 20 GiB, 21478375424 bytes, 41949952 sectors
Units: sectors of 1 * 512 = 512 bytes
Sector size (logical/physical): 512 bytes / 512 bytes
I/O size (minimum/optimal): 512 bytes / 512 bytes[root@kvm ~]# virsh detach-disk 18 vda #从域18拆除vda磁盘,必须要没有使用,没有分区才可以拆除;
# ifconfig
eth0      Link encap:Ethernet  HWaddr 52:54:00:5B:68:3D
          inet addr:172.16.100.55  Bcast:172.16.100.255  Mask:255.255.255.0
          inet6 addr: fe80::5054:ff:fe5b:683d/64 Scope:Link
          UP BROADCAST RUNNING MULTICAST  MTU:1500  Metric:1
          RX packets:136 errors:0 dropped:0 overruns:0 frame:0
          TX packets:12 errors:0 dropped:0 overruns:0 carrier:0
          collisions:0 txqueuelen:1000
          RX bytes:17886 (17.4 KiB)  TX bytes:1410 (1.3 KiB)

lo        Link encap:Local Loopback
          inet addr:127.0.0.1  Mask:255.0.0.0
          inet6 addr: ::1/128 Scope:Host
          UP LOOPBACK RUNNING  MTU:65536  Metric:1
          RX packets:0 errors:0 dropped:0 overruns:0 frame:0
          TX packets:0 errors:0 dropped:0 overruns:0 carrier:0
          collisions:0 txqueuelen:1
          RX bytes:0 (0.0 B)  TX bytes:0 (0.0 B)
[root@kvm ~]# brctl show
bridge name bridge id STP enabled interfaces
br0 8000.000c294d1a85 no ens33
vnet0
vnet1
virbr0 8000.525400a4879a yes virbr0-nic
[root@kvm ~]# virsh attach-interface 18 bridge virbr0 #给域18添加网卡并桥接到virbr0# ifconfig -a
eth0 Link encap:Ethernet HWaddr 52:54:00:5B:68:3D
inet addr:172.16.100.55 Bcast:172.16.100.255 Mask:255.255.255.0
inet6 addr: fe80::5054:ff:fe5b:683d/64 Scope:Link
UP BROADCAST RUNNING MULTICAST MTU:1500 Metric:1
RX packets:6288 errors:0 dropped:0 overruns:0 frame:0
TX packets:24 errors:0 dropped:0 overruns:0 carrier:0
collisions:0 txqueuelen:1000
RX bytes:859559 (839.4 KiB) TX bytes:3742 (3.6 KiB)
eth1 Link encap:Ethernet HWaddr 52:54:00:2D:88:DA
BROADCAST MULTICAST MTU:1500 Metric:1
RX packets:0 errors:0 dropped:0 overruns:0 frame:0
TX packets:0 errors:0 dropped:0 overruns:0 carrier:0
collisions:0 txqueuelen:1000
RX bytes:0 (0.0 B) TX bytes:0 (0.0 B)
lo Link encap:Local Loopback
inet addr:127.0.0.1 Mask:255.0.0.0
inet6 addr: ::1/128 Scope:Host
UP LOOPBACK RUNNING MTU:65536 Metric:1
RX packets:0 errors:0 dropped:0 overruns:0 frame:0
TX packets:0 errors:0 dropped:0 overruns:0 carrier:0
collisions:0 txqueuelen:1
RX bytes:0 (0.0 B) TX bytes:0 (0.0 B)[root@kvm ~]# virsh detach-interface 18 bridge --mac 52:54:00:2D:88:DA #移出域18mac为52:54:00:2D:88:DA网卡;
[root@kvm ~]# virsh dumpxml cirros #查看cirros配置xml信息;
[root@kvm ~]# virsh vcpucount 18 #查看域18 vcpu数量
最大值 配置 4
最大值 live 4
当前 配置 1
当前 live 1
[root@kvm ~]# virsh vcpuinfo 18 #查看域18 vcpu信息
VCPU: 0
CPU: 2
状态: running
CPU 时间: 147.1s
CPU关系: yyyy
[root@kvm ~]# virsh setvcpus 18 2 #设置域18 vcpus数量
[root@kvm ~]# virsh vcpucount 18
最大值 配置 4
最大值 live 4
当前 配置 1
当前 live 2
[root@kvm ~]# virsh domblklist 18 #列出域18 块设备
目标 源
------------------------------------------------
hda /images/cirros/cirros-0.4.0-x86_64-disk.img
[root@kvm ~]# virsh domiflist 18 #列出域18虚拟接口
接口 类型 源 型号 MAC
-------------------------------------------------------
vnet1 bridge br0 virtio 52:54:00:5b:68:3d
[root@kvm ~]# virsh dominfo 18 #查看域18信息
Id: 18
名称: cirros
UUID: 08f3e3f5-a507-4f8c-a191-de19d342f072
OS 类型: hvm
状态: running
CPU: 2
CPU 时间: 156.4s
最大内存: 131072 KiB
使用的内存: 131072 KiB
持久: 是
自动启动: 禁用
管理的保存: 否
安全性模式: selinux
安全性 DOI: 0
安全性标签: system_u:system_r:svirt_t:s0:c113,c991 (permissive)
[root@kvm ~]# virsh sysinfo #查看hypervisor信息
[root@kvm ~]# virsh nodeinfo #查看当前节点信息
CPU 型号: x86_64
CPU: 4
CPU 频率: 2494 MHz
CPU socket: 2
每个 socket 的内核数: 2
每个内核的线程数: 1
NUMA 单元: 1
内存大小: 4193716 KiB
[root@kvm ~]# virsh uri #查看当前主机访问接口
qemu:///system
[root@kvm ~]# virsh version #查看信息版本号
根据库编译:libvirt 4.5.0
使用库:libvirt 4.5.0
使用的 API: QEMU 4.5.0
运行管理程序: QEMU 1.5.3
[root@kvm ~]# virsh iface-list #查看接口列表
名称 状态 MAC 地址
---------------------------------------------------
br0 活动 00:0c:29:4d:1a:85
ens34 活动 00:0c:29:4d:1a:8f
lo 活动 00:00:00:00:00:00
[root@kvm ~]# virsh nwfilter-list #列出过滤器
UUID 名称
------------------------------------------------------------------
05eacdab-9d9b-4db7-90bb-c5fa7422d10d allow-arp
9e7df728-fab6-4c62-a49a-31bf9026811f allow-dhcp
68960c0b-97c5-46e5-97a2-73a15d1cc90b allow-dhcp-server
436cb464-9fa0-4c0c-8a87-23270e12e487 allow-incoming-ipv4
02e0ed10-5594-462e-a7b1-0d2461a7d75b allow-ipv4
eec3f69b-8181-4de2-88d7-d905c5a8eed9 clean-traffic
9ad58b65-dd60-471e-ae52-f312f57797ca clean-traffic-gateway
79b69a1c-3f4a-44ec-b40e-6e667e1f5d8a no-arp-ip-spoofing
0c915c8c-0af2-445c-b9e6-397d7bad462c no-arp-mac-spoofing
c9e4bb08-906d-43b2-be6c-c9adaea95dad no-arp-spoofing
a99f4da3-845f-4403-87bb-7f6136182663 no-ip-multicast
3076d800-5536-4a71-932f-931d952cd044 no-ip-spoofing
5791d291-c73a-4e8e-b945-61355219e31a no-mac-broadcast
c2b543ca-7376-4dc0-8669-804f04993f87 no-mac-spoofing
9274a37c-2844-453a-a959-dc2100321f46 no-other-l2-traffic
000811b7-0dc5-45e3-be9e-02179f892e9f no-other-rarp-traffic
b601d397-0829-4fb2-9752-e7e0eb4ba2ba qemu-announce-self
e61dcef3-fd94-4c8c-b8b9-cd34dce5a5bb qemu-announce-self-rarp
[root@kvm ~]# iptables -L -n
Chain INPUT (policy ACCEPT)
target prot opt source destination
ACCEPT udp -- 0.0.0.0/0 0.0.0.0/0 udp dpt:53
ACCEPT tcp -- 0.0.0.0/0 0.0.0.0/0 tcp dpt:53
ACCEPT udp -- 0.0.0.0/0 0.0.0.0/0 udp dpt:67
ACCEPT tcp -- 0.0.0.0/0 0.0.0.0/0 tcp dpt:67
Chain FORWARD (policy ACCEPT)
target prot opt source destination
ACCEPT all -- 0.0.0.0/0 192.168.122.0/24 ctstate RELATED,ESTABLISHED
ACCEPT all -- 192.168.122.0/24 0.0.0.0/0
ACCEPT all -- 0.0.0.0/0 0.0.0.0/0
REJECT all -- 0.0.0.0/0 0.0.0.0/0 reject-with icmp-port-unreachable
REJECT all -- 0.0.0.0/0 0.0.0.0/0 reject-with icmp-port-unreachable
Chain OUTPUT (policy ACCEPT)
target prot opt source destination
ACCEPT udp -- 0.0.0.0/0 0.0.0.0/0 udp dpt:68
[root@kvm ~]# virsh net-list #查看用户空间网络
名称 状态 自动开始 持久
----------------------------------------------------------
default 活动 是 是
[root@kvm ~]# ip netns help
[root@kvm ~]# ip netns list
[root@kvm ~]# ip netns add r1
[root@kvm ~]# ip netns add r2
[root@kvm ~]# ip netns list
r2
r1
[root@kvm ~]# ip netns exec r1 ifconfig -a
lo: flags=8 mtu 65536
loop txqueuelen 1000 (Local Loopback)
RX packets 0 bytes 0 (0.0 B)
RX errors 0 dropped 0 overruns 0 frame 0
TX packets 0 bytes 0 (0.0 B)
TX errors 0 dropped 0 overruns 0 carrier 0 collisions 0
[root@kvm ~]# ip netns exec r1 route -n
Kernel IP routing table
Destination Gateway Genmask Flags Metric Ref Use Iface
[root@kvm ~]# ip netns exec r1 ifconfig lo 127.0.0.1/8 up
[root@kvm ~]# ip netns exec r1 ifconfig
lo: flags=73 mtu 65536
inet 127.0.0.1 netmask 255.0.0.0
inet6 ::1 prefixlen 128 scopeid 0x10
loop txqueuelen 1000 (Local Loopback)
RX packets 0 bytes 0 (0.0 B)
RX errors 0 dropped 0 overruns 0 frame 0
TX packets 0 bytes 0 (0.0 B)
TX errors 0 dropped 0 overruns 0 carrier 0 collisions 0
[root@kvm ~]# ip netns exec r2 ifconfig
[root@kvm ~]# ip netns exec r2 ifconfig -a
lo: flags=8 mtu 65536
loop txqueuelen 1000 (Local Loopback)
RX packets 0 bytes 0 (0.0 B)
RX errors 0 dropped 0 overruns 0 frame 0
TX packets 0 bytes 0 (0.0 B)
TX errors 0 dropped 0 overruns 0 carrier 0 collisions 0
[root@kvm ~]# ip netns exec r1 iptables -L -n
Chain INPUT (policy ACCEPT)
target prot opt source destination
Chain FORWARD (policy ACCEPT)
target prot opt source destination
Chain OUTPUT (policy ACCEPT)
target prot opt source destination
[root@kvm ~]# ip netns exec r1 iptables -A FORWARD -s 127.0.0.0/8 -j ACCEPT
[root@kvm ~]# ip netns exec r1 iptables -L -n
Chain INPUT (policy ACCEPT)
target prot opt source destination
Chain FORWARD (policy ACCEPT)
target prot opt source destination
ACCEPT all -- 127.0.0.0/8 0.0.0.0/0
Chain OUTPUT (policy ACCEPT)
target prot opt source destination
[root@kvm ~]# ip netns exec r2 iptables -L -n
Chain INPUT (policy ACCEPT)
target prot opt source destination
Chain FORWARD (policy ACCEPT)
target prot opt source destination
Chain OUTPUT (policy ACCEPT)
target prot opt source destination
[root@kvm ~]# ip netns exec r1 iptables -F namespace(名称空间):
[root@kvm ~]# brctl delif br0 ens33
[root@kvm ~]# brctl delif br0 vnet0
[root@kvm ~]# brctl delif br0 vnet1
[root@kvm ~]# ip addr del 172.16.100.67/24 dev br0
[root@kvm ~]# ip link set br0 down
[root@kvm ~]# brctl delbr br0
[root@kvm ~]# brctl addbr br-ex
[root@kvm ~]# ip link set br-ex up
[root@kvm ~]# ip addr add 172.16.100.67/24 dev br-ex;brctl addif br-ex ens33
[root@kvm ~]# brctl addbr br-in
[root@kvm ~]# ip link set br-in up
[root@kvm ~]# vim /etc/sysctl.conf
net.ipv4.ip_forward = 1
[root@kvm ~]# sysctl -p
net.ipv4.ip_forward = 1
[root@kvm ~]# ip netns list
r2
r1
[root@kvm ~]# ip link add veth1.1 type veth peer name veth1.2    #创建一对网卡
[root@kvm ~]# ip link set veth1.1 netns r1
[root@kvm ~]# ip link set veth1.2 netns r2
[root@kvm ~]# ip netns exec r1 ifconfig -a
lo: flags=73  mtu 65536
        inet 127.0.0.1  netmask 255.0.0.0
        inet6 ::1  prefixlen 128  scopeid 0x10
        loop  txqueuelen 1000  (Local Loopback)
        RX packets 0  bytes 0 (0.0 B)
        RX errors 0  dropped 0  overruns 0  frame 0
        TX packets 0  bytes 0 (0.0 B)
        TX errors 0  dropped 0 overruns 0  carrier 0  collisions 0

veth1.1: flags=4098  mtu 1500
        ether 52:58:96:91:a1:08  txqueuelen 1000  (Ethernet)
        RX packets 0  bytes 0 (0.0 B)
        RX errors 0  dropped 0  overruns 0  frame 0
        TX packets 0  bytes 0 (0.0 B)
        TX errors 0  dropped 0 overruns 0  carrier 0  collisions 0
[root@kvm ~]# ip netns exec r2 ifconfig -a
lo: flags=8  mtu 65536
        loop  txqueuelen 1000  (Local Loopback)
        RX packets 0  bytes 0 (0.0 B)
        RX errors 0  dropped 0  overruns 0  frame 0
        TX packets 0  bytes 0 (0.0 B)
        TX errors 0  dropped 0 overruns 0  carrier 0  collisions 0

veth1.2: flags=4098  mtu 1500
        ether 5a:b4:fe:af:6a:3a  txqueuelen 1000  (Ethernet)
        RX packets 0  bytes 0 (0.0 B)
        RX errors 0  dropped 0  overruns 0  frame 0
        TX packets 0  bytes 0 (0.0 B)
        TX errors 0  dropped 0 overruns 0  carrier 0  collisions 0
[root@kvm ~]# ip netns exec r1 ip link set veth1.1 name eth0
[root@kvm ~]# ip netns exec r1 ip link show
1: lo:  mtu 65536 qdisc noqueue state UNKNOWN mode DEFAULT group default qlen 1000
    link/loopback 00:00:00:00:00:00 brd 00:00:00:00:00:00
56: eth0@if55:  mtu 1500 qdisc noop state DOWN mode DEFAULT group default qlen 1000
    link/ether 52:58:96:91:a1:08 brd ff:ff:ff:ff:ff:ff link-netnsid 1
[root@kvm ~]# ip netns exec r2 ip link set veth1.2 name eth0
[root@kvm ~]# ip netns exec r2 ip link show
1: lo:  mtu 65536 qdisc noop state DOWN mode DEFAULT group default qlen 1000
    link/loopback 00:00:00:00:00:00 brd 00:00:00:00:00:00
55: eth0@if56:  mtu 1500 qdisc noop state DOWN mode DEFAULT group default qlen 1000
    link/ether 5a:b4:fe:af:6a:3a brd ff:ff:ff:ff:ff:ff link-netnsid 0
[root@kvm ~]# ip netns exec r1 ifconfig eth0 10.0.1.1 netmask 255.255.255.0 up
[root@kvm ~]# ip netns exec r2 ifconfig eth0 10.0.1.2 netmask 255.255.255.0 up
[root@kvm ~]# ip netns exec r1 ping 10.0.1.2
PING 10.0.1.2 (10.0.1.2) 56(84) bytes of data.
64 bytes from 10.0.1.2: icmp_seq=1 ttl=64 time=0.124 ms
64 bytes from 10.0.1.2: icmp_seq=2 ttl=64 time=0.068 ms
64 bytes from 10.0.1.2: icmp_seq=3 ttl=64 time=0.065 ms

--- 10.0.1.2 ping statistics ---
3 packets transmitted, 3 received, 0% packet loss, time 2015ms
rtt min/avg/max/mdev = 0.065/0.085/0.124/0.029 ms
[root@kvm ~]# cd /images/cirros/
[root@kvm cirros]# cp cirros-0.4.0-x86_64-disk.img test1.qcow2
[root@kvm cirros]# cp cirros-0.4.0-x86_64-disk.img test2.qcow2
[root@kvm cirros]# vim /etc/qemu-ifup
#!/bin/bash
#
bridge=br-in

if [ -n "$1" ]; then
    ip link set $1 up
    brctl addif $bridge $1
    [ $? -eq 0 ] && exit 0 || exit 1
else
    echo "Error: no interface specified."
    exit 1
fi
[root@kvm cirros]# chmod +x /etc/qemu-ifup
[root@kvm cirros]# qemu-kvm -m 128 -smp 1 -name vm1 -drive file=/images/cirros/test1.qcow2,if=virtio,media=disk -net nic,macaddr=52:54:00:aa:bb:cc -net tap,ifname=vif1.0,script=/etc/qemu-ifup --nographic
vm1虚拟机:
$ ifconfig
eth0      Link encap:Ethernet  HWaddr 52:54:00:AA:BB:CC
          inet6 addr: fe80::5054:ff:feaa:bbcc/64 Scope:Link
          UP BROADCAST RUNNING MULTICAST  MTU:1500  Metric:1
          RX packets:0 errors:0 dropped:0 overruns:0 frame:0
          TX packets:10 errors:0 dropped:0 overruns:0 carrier:0
          collisions:0 txqueuelen:1000
          RX bytes:0 (0.0 B)  TX bytes:1332 (1.3 KiB)

lo        Link encap:Local Loopback
          inet addr:127.0.0.1  Mask:255.0.0.0
          inet6 addr: ::1/128 Scope:Host
          UP LOOPBACK RUNNING  MTU:65536  Metric:1
          RX packets:0 errors:0 dropped:0 overruns:0 frame:0
          TX packets:0 errors:0 dropped:0 overruns:0 carrier:0
          collisions:0 txqueuelen:1
          RX bytes:0 (0.0 B)  TX bytes:0 (0.0 B)
[root@kvm ~]# qemu-kvm -m 128 -smp 1 -name vm2 -drive file=/images/cirros/test2.qcow2,if=virtio,media=disk -net nic,macaddr=52:54:00:aa:bb:dd -net tap,ifname=vif2.0,script=/etc/qemu-ifup --nographic
vm2虚拟机:
$ ifconfig
eth0      Link encap:Ethernet  HWaddr 52:54:00:AA:BB:DD
          inet6 addr: fe80::5054:ff:feaa:bbdd/64 Scope:Link
          UP BROADCAST RUNNING MULTICAST  MTU:1500  Metric:1
          RX packets:0 errors:0 dropped:0 overruns:0 frame:0
          TX packets:10 errors:0 dropped:0 overruns:0 carrier:0
          collisions:0 txqueuelen:1000
          RX bytes:0 (0.0 B)  TX bytes:1332 (1.3 KiB)

lo        Link encap:Local Loopback
          inet addr:127.0.0.1  Mask:255.0.0.0
          inet6 addr: ::1/128 Scope:Host
          UP LOOPBACK RUNNING  MTU:65536  Metric:1
          RX packets:0 errors:0 dropped:0 overruns:0 frame:0
          TX packets:0 errors:0 dropped:0 overruns:0 carrier:0
          collisions:0 txqueuelen:1
          RX bytes:0 (0.0 B)  TX bytes:0 (0.0 B)
[root@kvm ~]# brctl show
bridge name bridge id STP enabled interfaces
br-ex 8000.000c294d1a85 no ens33
br-in 8000.328c89317de6 no vif1.0
vif2.0
virbr0 8000.525400a4879a yes virbr0-nic
[root@kvm ~]# ip netns delete r1
[root@kvm ~]# ip netns delete r2
[root@kvm ~]# ip netns list
[root@kvm ~]# ip netns add r1
[root@kvm ~]# ip link add rinr type veth peer name rins
[root@kvm ~]# ip link set rinr up
[root@kvm ~]# ip link set rins up
[root@kvm ~]# brctl addif br-in rins
[root@kvm ~]# brctl show
bridge name bridge id STP enabled interfaces
br-ex 8000.000c294d1a85 no ens33
br-in 8000.328c89317de6 no rins
vif1.0
vif2.0
virbr0 8000.525400a4879a yes virbr0-nic
[root@kvm ~]# ip link set rinr netns r1
[root@kvm ~]# ip netns exec r1 ifconfig -a
lo: flags=8 mtu 65536
loop txqueuelen 1000 (Local Loopback)
RX packets 0 bytes 0 (0.0 B)
RX errors 0 dropped 0 overruns 0 frame 0
TX packets 0 bytes 0 (0.0 B)
TX errors 0 dropped 0 overruns 0 carrier 0 collisions 0
rinr: flags=4098 mtu 1500
ether ce:69:a3:07:26:9c txqueuelen 1000 (Ethernet)
RX packets 8 bytes 648 (648.0 B)
RX errors 0 dropped 0 overruns 0 frame 0
TX packets 8 bytes 648 (648.0 B)
TX errors 0 dropped 0 overruns 0 carrier 0 collisions 0
[root@kvm ~]# ip netns exec r1 ip link set rinr name eth0
[root@kvm ~]# ip netns exec r1 ip link set eth0 up
[root@kvm ~]# ip netns exec r1 ip link show
1: lo: mtu 65536 qdisc noop state DOWN mode DEFAULT group default qlen 1000
link/loopback 00:00:00:00:00:00 brd 00:00:00:00:00:00
61: eth0@if60: mtu 1500 qdisc noqueue state UP mode DEFAULT group default qlen 1000
link/ether ce:69:a3:07:26:9c brd ff:ff:ff:ff:ff:ff link-netnsid 0
[root@kvm ~]# ip netns exec r1 ifconfig eth0 10.0.1.254 netmask 255.255.255.0 up
[root@kvm ~]# ip netns exec r1 ifconfig
eth0: flags=4163 mtu 1500
inet 10.0.1.254 netmask 255.255.255.0 broadcast 10.0.1.255
inet6 fe80::cc69:a3ff:fe07:269c prefixlen 64 scopeid 0x20
ether ce:69:a3:07:26:9c txqueuelen 1000 (Ethernet)
RX packets 8 bytes 648 (648.0 B)
RX errors 0 dropped 0 overruns 0 frame 0
TX packets 16 bytes 1296 (1.2 KiB)
TX errors 0 dropped 0 overruns 0 carrier 0 collisions 0 vm1虚拟机:
$ sudo su -
# ifconfig eth0 10.0.1.1 netmask 255.255.255.0 up
# ping 10.0.1.254
PING 10.0.1.254 (10.0.1.254): 56 data bytes
64 bytes from 10.0.1.254: seq=0 ttl=64 time=4.513 ms
64 bytes from 10.0.1.254: seq=1 ttl=64 time=0.650 ms
64 bytes from 10.0.1.254: seq=2 ttl=64 time=0.913 ms
^C
--- 10.0.1.254 ping statistics ---
3 packets transmitted, 3 packets received, 0% packet loss
round-trip min/avg/max = 0.650/2.025/4.513 ms
# route add default gw 10.0.1.254
vm2虚拟机:
$ sudo su -
# ifconfig eth0 10.0.1.2 netmask 255.255.255.0 up
# ping 10.0.1.254
PING 10.0.1.254 (10.0.1.254): 56 data bytes
64 bytes from 10.0.1.254: seq=0 ttl=64 time=5.052 ms
64 bytes from 10.0.1.254: seq=1 ttl=64 time=0.914 ms
64 bytes from 10.0.1.254: seq=2 ttl=64 time=0.651 ms
^C
--- 10.0.1.254 ping statistics ---
3 packets transmitted, 3 packets received, 0% packet loss
round-trip min/avg/max = 0.651/2.205/5.052 ms
# route add default gw 10.0.1.254
[root@kvm ~]# ip link add rexr type veth peer name rexs
[root@kvm ~]# brctl addif br-ex rexs
[root@kvm ~]# ip link set rexs up
[root@kvm ~]# brctl show
bridge name bridge id STP enabled interfaces
br-ex 8000.000c294d1a85 no ens33
rexs
br-in 8000.328c89317de6 no rins
vif1.0
vif2.0
virbr0 8000.525400a4879a yes virbr0-nic
[root@kvm ~]# ip netns exec r1 ip link set rexr name eth1
[root@kvm ~]# ip netns exec r1 ifconfig eth1 172.16.100.78 netmask 255.255.255.0 up
[root@kvm ~]# ip netns exec r1 ifconfig
eth0: flags=4163 mtu 1500
inet 10.0.1.254 netmask 255.255.255.0 broadcast 10.0.1.255
inet6 fe80::cc69:a3ff:fe07:269c prefixlen 64 scopeid 0x20
ether ce:69:a3:07:26:9c txqueuelen 1000 (Ethernet)
RX packets 18 bytes 1476 (1.4 KiB)
RX errors 0 dropped 0 overruns 0 frame 0
TX packets 26 bytes 2052 (2.0 KiB)
TX errors 0 dropped 0 overruns 0 carrier 0 collisions 0
eth1: flags=4163 mtu 1500
inet 172.16.100.78 netmask 255.255.255.0 broadcast 172.16.100.255
inet6 fe80::9459:cdff:fe22:c531 prefixlen 64 scopeid 0x20
ether 96:59:cd:22:c5:31 txqueuelen 1000 (Ethernet)
RX packets 8 bytes 648 (648.0 B)
RX errors 0 dropped 0 overruns 0 frame 0
TX packets 8 bytes 648 (648.0 B)
TX errors 0 dropped 0 overruns 0 carrier 0 collisions 0
[root@kvm ~]# ip netns exec r1 ping 172.16.100.254 #ping到达外网;
PING 172.16.100.254 (172.16.100.254) 56(84) bytes of data.
64 bytes from 172.16.100.254: icmp_seq=1 ttl=64 time=0.439 ms
64 bytes from 172.16.100.254: icmp_seq=2 ttl=64 time=0.332 ms
64 bytes from 172.16.100.254: icmp_seq=3 ttl=64 time=0.341 ms
--- 172.16.100.254 ping statistics ---
3 packets transmitted, 3 received, 0% packet loss, time 2002ms
rtt min/avg/max/mdev = 0.332/0.370/0.439/0.053 ms vm1虚拟机:
# ping 172.16.100.78    #ping虚拟机路由网关
PING 172.16.100.78 (172.16.100.78): 56 data bytes
64 bytes from 172.16.100.78: seq=0 ttl=64 time=1.608 ms
64 bytes from 172.16.100.78: seq=1 ttl=64 time=1.322 ms
64 bytes from 172.16.100.78: seq=2 ttl=64 time=0.719 ms
^C
--- 172.16.100.78 ping statistics ---
3 packets transmitted, 3 packets received, 0% packet loss
round-trip min/avg/max = 0.719/1.216/1.608 ms
# ping 172.16.100.254    #ping外部不可达,可以出去但是无法回来;
PING 172.16.100.254 (172.16.100.254): 56 data bytes
^C
--- 172.16.100.254 ping statistics ---
6 packets transmitted, 0 packets received, 100% packet loss
[root@kvm ~]# tcpdump -i vif1.0 -nn icmp
tcpdump: verbose output suppressed, use -v or -vv for full protocol decode
listening on vif1.0, link-type EN10MB (Ethernet), capture size 262144 bytes
15:17:25.195509 IP 10.0.1.1 > 172.16.100.254: ICMP echo request, id 47361, seq 0, length 64
15:17:26.280923 IP 10.0.1.1 > 172.16.100.254: ICMP echo request, id 47361, seq 1, length 64
15:17:27.366791 IP 10.0.1.1 > 172.16.100.254: ICMP echo request, id 47361, seq 2, length 64
15:17:28.451911 IP 10.0.1.1 > 172.16.100.254: ICMP echo request, id 47361, seq 3, length 64
4 packets captured
4 packets received by filter
0 packets dropped by kernel
[root@kvm ~]# tcpdump -i rins -nn icmp
tcpdump: verbose output suppressed, use -v or -vv for full protocol decode
listening on rins, link-type EN10MB (Ethernet), capture size 262144 bytes
15:18:28.118409 IP 10.0.1.1 > 172.16.100.254: ICMP echo request, id 47361, seq 58, length 64
15:18:29.204036 IP 10.0.1.1 > 172.16.100.254: ICMP echo request, id 47361, seq 59, length 64
15:18:30.289528 IP 10.0.1.1 > 172.16.100.254: ICMP echo request, id 47361, seq 60, length 64
15:18:31.404451 IP 10.0.1.1 > 172.16.100.254: ICMP echo request, id 47361, seq 61, length 64
4 packets captured
4 packets received by filter
0 packets dropped by kernel
[root@kvm ~]# ip netns exec r1 tcpdump -i eth0 -nn icmp
tcpdump: verbose output suppressed, use -v or -vv for full protocol decode
listening on eth0, link-type EN10MB (Ethernet), capture size 262144 bytes
15:19:18.060319 IP 10.0.1.1 > 172.16.100.254: ICMP echo request, id 47361, seq 104, length 64
15:19:19.144789 IP 10.0.1.1 > 172.16.100.254: ICMP echo request, id 47361, seq 105, length 64
15:19:20.229315 IP 10.0.1.1 > 172.16.100.254: ICMP echo request, id 47361, seq 106, length 64
15:19:21.314689 IP 10.0.1.1 > 172.16.100.254: ICMP echo request, id 47361, seq 107, length 64
4 packets captured
4 packets received by filter
0 packets dropped by kernel
[root@kvm ~]# ip netns exec r1 tcpdump -i eth1 -nn icmp
tcpdump: verbose output suppressed, use -v or -vv for full protocol decode
listening on eth1, link-type EN10MB (Ethernet), capture size 262144 bytes
15:20:01.485663 IP 10.0.1.1 > 172.16.100.254: ICMP echo request, id 47361, seq 144, length 64
15:20:02.570014 IP 10.0.1.1 > 172.16.100.254: ICMP echo request, id 47361, seq 145, length 64
15:20:03.654586 IP 10.0.1.1 > 172.16.100.254: ICMP echo request, id 47361, seq 146, length 64
15:20:04.739067 IP 10.0.1.1 > 172.16.100.254: ICMP echo request, id 47361, seq 147, length 64
4 packets captured
4 packets received by filter
0 packets dropped by kernel
[root@kvm ~]# ip netns exec r1 iptables -t nat -A POSTROUTING -s 10.0.1.0/24 ! -d 10.0.1.0/24 -j SNAT --to-source 172.16.100.78
[root@kvm ~]# ip netns exec r1 iptables -t nat -L
Chain PREROUTING (policy ACCEPT)
target prot opt source destination
Chain INPUT (policy ACCEPT)
target prot opt source destination
Chain OUTPUT (policy ACCEPT)
target prot opt source destination
Chain POSTROUTING (policy ACCEPT)
target prot opt source destination
SNAT all -- 10.0.1.0/24 !10.0.1.0/24 to:172.16.100.78vm1虚拟机:
# ping 172.16.100.254
PING 172.16.100.254 (172.16.100.254): 56 data bytes
64 bytes from 172.16.100.254: seq=0 ttl=63 time=1.043 ms
64 bytes from 172.16.100.254: seq=1 ttl=63 time=1.193 ms
64 bytes from 172.16.100.254: seq=2 ttl=63 time=0.833 ms
^C
--- 172.16.100.254 ping statistics ---
3 packets transmitted, 3 packets received, 0% packet loss
round-trip min/avg/max = 0.833/1.023/1.193 ms
[root@kvm ~]# tcpdump -i rins -nn icmp
tcpdump: verbose output suppressed, use -v or -vv for full protocol decode
listening on rins, link-type EN10MB (Ethernet), capture size 262144 bytes
15:25:06.214853 IP 10.0.1.1 > 172.16.100.254: ICMP echo request, id 47873, seq 23, length 64
15:25:06.215286 IP 172.16.100.254 > 10.0.1.1: ICMP echo reply, id 47873, seq 23, length 64
15:25:07.300593 IP 10.0.1.1 > 172.16.100.254: ICMP echo request, id 47873, seq 24, length 64
15:25:07.301030 IP 172.16.100.254 > 10.0.1.1: ICMP echo reply, id 47873, seq 24, length 64
15:25:08.386000 IP 10.0.1.1 > 172.16.100.254: ICMP echo request, id 47873, seq 25, length 64
15:25:08.386385 IP 172.16.100.254 > 10.0.1.1: ICMP echo reply, id 47873, seq 25, length 64
15:25:09.471555 IP 10.0.1.1 > 172.16.100.254: ICMP echo request, id 47873, seq 26, length 64
15:25:09.472536 IP 172.16.100.254 > 10.0.1.1: ICMP echo reply, id 47873, seq 26, length 64
8 packets captured
8 packets received by filter
0 packets dropped by kernelnamespace运行dhcp服务器:
[root@kvm ~]# yum install dnsmasq
[root@kvm ~]# ip netns exec r1 dnsmasq --dhcp-range=10.0.1.100,10.0.1.120
[root@kvm ~]# ip netns exec r1 ps aux | grep dnsmasq
nobody    72436  0.0  0.0  53856  1112 ?        S    15:42   0:00 dnsmasq --dhcp-range=10.0.1.100,10.0.1.120
root      71000  0.0  0.0 112720   980 pts/5    S+   15:44   0:00 grep --color=auto dnsmasq
nobody    73728  0.0  0.0  53852  1120 ?        S    1月02   0:02 /usr/sbin/dnsmasq --conf-file=/var/lib/libvirt/dnsmasq/default.conf --leasefile-ro --dhcp-script=/usr/libexec/libvirt_leaseshelper
root      73730  0.0  0.0  53824   584 ?        S    1月02   0:00 /usr/sbin/dnsmasq --conf-file=/var/lib/libvirt/dnsmasq/default.conf --leasefile-ro --dhcp-script=/usr/libexec/libvirt_leaseshelper
vm2虚拟机:
# udhcpc -R
# cirros-dhcpc up eth0
# ifconfig
eth0      Link encap:Ethernet  HWaddr 52:54:00:AA:BB:DD
          inet addr:10.0.1.108  Bcast:10.0.1.255  Mask:255.255.255.0
          inet6 addr: fe80::5054:ff:feaa:bbdd/64 Scope:Link
          UP BROADCAST RUNNING MULTICAST  MTU:1500  Metric:1
          RX packets:32 errors:0 dropped:0 overruns:0 frame:0
          TX packets:37 errors:0 dropped:0 overruns:0 carrier:0
          collisions:0 txqueuelen:1000
          RX bytes:6996 (6.8 KiB)  TX bytes:9556 (9.3 KiB)

lo        Link encap:Local Loopback
          inet addr:127.0.0.1  Mask:255.0.0.0
          inet6 addr: ::1/128 Scope:Host
          UP LOOPBACK RUNNING  MTU:65536  Metric:1
          RX packets:0 errors:0 dropped:0 overruns:0 frame:0
          TX packets:0 errors:0 dropped:0 overruns:0 carrier:0
          collisions:0 txqueuelen:1
          RX bytes:0 (0.0 B)  TX bytes:0 (0.0 B)
# route -n
Kernel IP routing table
Destination     Gateway         Genmask         Flags Metric Ref    Use Iface
0.0.0.0         10.0.1.254      0.0.0.0         UG    0      0        0 eth0
10.0.1.0        0.0.0.0         255.255.255.0   U     0      0        0 eth0
[root@kvm ~]# ip netns exec r1 kill 72436
[root@kvm ~]# ip netns exec r1 dnsmasq -F 10.0.1.151,10.0.1.160 --dhcp-option=option:router,10.0.1.254
[root@kvm ~]# ip netns exec r1 ps aux | grep dnsmasq
nobody 72831 0.0 0.0 53856 1124 ? S 16:09 0:00 dnsmasq -F 10.0.1.151,10.0.1.160 --dhcp-option=option:router,10.0.1.254
root 72852 0.0 0.0 112720 980 pts/2 S+ 16:09 0:00 grep --color=auto dnsmasqvm2虚拟机:
# udhcpc -R
# cirros-dhcpc up eth0
# ifconfig
eth0      Link encap:Ethernet  HWaddr 52:54:00:AA:BB:DD
          inet addr:10.0.1.159  Bcast:10.0.1.255  Mask:255.255.255.0
          inet6 addr: fe80::5054:ff:feaa:bbdd/64 Scope:Link
          UP BROADCAST RUNNING MULTICAST  MTU:1500  Metric:1
          RX packets:45 errors:0 dropped:0 overruns:0 frame:0
          TX packets:43 errors:0 dropped:0 overruns:0 carrier:0
          collisions:0 txqueuelen:1000
          RX bytes:9188 (8.9 KiB)  TX bytes:11328 (11.0 KiB)

lo        Link encap:Local Loopback
          inet addr:127.0.0.1  Mask:255.0.0.0
          inet6 addr: ::1/128 Scope:Host
          UP LOOPBACK RUNNING  MTU:65536  Metric:1
          RX packets:0 errors:0 dropped:0 overruns:0 frame:0
          TX packets:0 errors:0 dropped:0 overruns:0 carrier:0
          collisions:0 txqueuelen:1
          RX bytes:0 (0.0 B)  TX bytes:0 (0.0 B)

# route -n
Kernel IP routing table
Destination     Gateway         Genmask         Flags Metric Ref    Use Iface
0.0.0.0         10.0.1.254      0.0.0.0         UG    0      0        0 eth0
10.0.1.0        0.0.0.0         255.255.255.0   U     0      0        0 eth0
# ping 172.16.100.254
PING 172.16.100.254 (172.16.100.254): 56 data bytes
64 bytes from 172.16.100.254: seq=0 ttl=63 time=1.520 ms
64 bytes from 172.16.100.254: seq=1 ttl=63 time=1.303 ms
64 bytes from 172.16.100.254: seq=2 ttl=63 time=1.076 ms
^C
--- 172.16.100.254 ping statistics ---
3 packets transmitted, 3 packets received, 0% packet loss
round-trip min/avg/max = 1.076/1.299/1.520 ms