GlusterFS 分布式存储的安装和使用
1. GlusterFS分布式存储系统简介:
GlusterFS is a scalable network filesystem suitable for data-intensive tasks such as cloud storage and media streaming. GlusterFS is free and open source software and can utilize common off-the-shelf hardware. (glusterfs是一个可扩展的网络文件系统,适用于数据密集型任务,如云存储和媒体流。Glusterfs是免费的开源软件,可以使用通用的现有硬件)
2. 快速部署一个GlusterFS分布式存储:
部署要求:
- 3个节点服务器,每台节点的内存至少1G,每台节点服务器设置好NTP时间同步;
- 每台节点服务器设置好hosts文件;
- 每台节点服务器需要有2块物理硬盘,其中一块安装操作系统,另外一块专门用于GlusterFS的卷;
- 每天服务器的/var目录最好是单独挂载,如果没有条件单独挂载,也需要保证/var目录下面有空闲的空间;
- 建议将用于GlusterFS分布式存储的硬盘格式化为XFS文件系统;
安装步骤:
1. 格式化磁盘
[root@test111 ~]# mkfs.xfs -i size=512 /dev/vdc  #格式化硬盘
meta-data=/dev/vdc               isize=512    agcount=4, agsize=6553600 blks
         =                       sectsz=512   attr=2, projid32bit=1
         =                       crc=1        finobt=0, sparse=0
data     =                       bsize=4096   blocks=26214400, imaxpct=25
         =                       sunit=0      swidth=0 blks
naming   =version 2              bsize=4096   ascii-ci=0 ftype=1
log      =internal log           bsize=4096   blocks=12800, version=2
         =                       sectsz=512   sunit=0 blks, lazy-count=1
realtime =none                   extsz=4096   blocks=0, rtextents=0
[root@test111 ~]# mkdir -p /data/brick1   #创建挂载点
[root@test111 ~]# echo '/dev/vdc /data/brick1 xfs defaults 1 2' >> /etc/fstab
[root@test111 ~]# mount -a #挂载bricks
[root@test111 ~]# df -h
Filesystem               Size  Used Avail Use% Mounted on
/dev/mapper/centos-root   50G  2.3G   48G   5% /
devtmpfs                 3.9G     0  3.9G   0% /dev
tmpfs                    3.9G     0  3.9G   0% /dev/shm
tmpfs                    3.9G  8.4M  3.9G   1% /run
tmpfs                    3.9G     0  3.9G   0% /sys/fs/cgroup
/dev/mapper/centos-home   42G   33M   42G   1% /home
/dev/vda1                497M  138M  360M  28% /boot
tmpfs                    799M     0  799M   0% /run/user/0
/dev/vdc                 100G   33M  100G   1% /data/brick1
[root@test111 ~]#
2. 安装GlusterFS
cd /etc/yum.repos.d
[root@test111 yum.repos.d]# vim CentOS-Gluster-3.12.repo
# CentOS-Gluster-3.8.repo
#
# Please see http://wiki.centos.org/SpecialInterestGroup/Storage for more
# information

[centos-gluster312]
name=CentOS-$releasever - Gluster 3.12
baseurl=http://mirror.centos.org/centos/$releasever/storage/$basearch/gluster-3.12/
gpgcheck=0
enabled=1
gpgkey=file:///etc/pki/rpm-gpg/RPM-GPG-KEY-CentOS-SIG-Storage

[centos-gluster312-test]
name=CentOS-$releasever - Gluster 3.12 Testing
baseurl=http://buildlogs.centos.org/centos/$releasever/storage/$basearch/gluster-3.12/
gpgcheck=0
enabled=0
gpgkey=file:///etc/pki/rpm-gpg/RPM-GPG-KEY-CentOS-SIG-Storage
yum clean all && yum makecache all
yum -y install xfsprogs wget fuse fuse-libs
yum -y install glusterfs glusterfs-server gluster-fuse
systemctl enable glusterd
systemctl start glusterd
systemctl status glusterd
● glusterd.service - GlusterFS, a clustered file-system server
   Loaded: loaded (/usr/lib/systemd/system/glusterd.service; enabled; vendor preset: disabled)
   Active: active (running) since Thu 2019-03-21 08:56:11 CST; 1min 34s ago
  Process: 2097 ExecStart=/usr/sbin/glusterd -p /var/run/glusterd.pid --log-level $LOG_LEVEL $GLUSTERD_OPTIONS (code=exited, status=0/SUCCESS)
 Main PID: 2098 (glusterd)
   CGroup: /system.slice/glusterd.service
           └─2098 /usr/sbin/glusterd -p /var/run/glusterd.pid --log-level INFO

Mar 21 08:56:11 test111 systemd[1]: Starting GlusterFS, a clustered file-system server...
Mar 21 08:56:11 test111 systemd[1]: Started GlusterFS, a clustered file-system server.
3. 配置GlusterFS集群
在其中任何一个节点上面执行创建分布式存储集群的操作,我们这里选择在test111这台机器上面执行如下命令:
配置hosts文件:
echo -e "test111 10.83.32.173\nstorage2 10.83.32.143\nstorage1 10.83.32.147" >> /etc/hosts创建分布式存储集群:
[root@test111 yum.repos.d]# gluster peer probe storage2  #添加节点
peer probe: success.
[root@test111 yum.repos.d]# gluster peer probe storage1
peer probe: success.
[root@test111 yum.repos.d]# gluster peer status
Number of Peers: 2

Hostname: storage2
Uuid: f80c3f7b-7e09-4c60-a57a-a70c8739753e
State: Peer in Cluster (Connected)

Hostname: storage1
Uuid: b731025b-f9e8-4232-9a3f-44a9f692351a
State: Peer in Cluster (Connected)
[root@test111 yum.repos.d]#

创建数据存储目录前面一步已经创建成功,现在开始创建GlusterFS磁盘
[root@test111 yum.repos.d]# gluster volume create models replica 3 test111:/data/brick1 storage2:/data/brick1 storage1:/data/brick1 force
volume create: models: success: please start the volume to access data
[root@test111 yum.repos.d]# gluster volume start models
volume start: models: success
[root@test111 yum.repos.d]#
加上replica 3就是3个节点中,每个节点都要把数据存储一次,就是一个数据存储3份,每个节点一份
如果不加replica 3,就是3个节点的磁盘空间整合成一个硬盘,
4. 挂载GlusterFS存储
[root@test111 yum.repos.d]# vim CentOS-Gluster-3.12.repo
# CentOS-Gluster-3.8.repo
#
# Please see http://wiki.centos.org/SpecialInterestGroup/Storage for more
# information

[centos-gluster312]
name=CentOS-$releasever - Gluster 3.12
baseurl=http://mirror.centos.org/centos/$releasever/storage/$basearch/gluster-3.12/
gpgcheck=0
enabled=1
gpgkey=file:///etc/pki/rpm-gpg/RPM-GPG-KEY-CentOS-SIG-Storage

[centos-gluster312-test]
name=CentOS-$releasever - Gluster 3.12 Testing
baseurl=http://buildlogs.centos.org/centos/$releasever/storage/$basearch/gluster-3.12/
gpgcheck=0
enabled=0
gpgkey=file:///etc/pki/rpm-gpg/RPM-GPG-KEY-CentOS-SIG-Storage
yum clean all && yum makecache all
yum install glusterfs glusterfs-fuse
mkdir -p /mnt/models
mount -t glusterfs -o ro test111:models /mnt/models/  #以只读方式挂载
5. GlusterFS存储Volume卷类型
A volume is a logical collection of bricks where each brick is an export directory on a server in the trusted storage pool. To create a new volume in your storage environment, specify the bricks that comprise the volume. After you have created a new volume, you must start it before attempting to mount it. (volume是brick的逻辑集合,其中每个brick是可信存储池中的服务器上的export目录。要在存储环境中创建新卷,请指定组成brick的数量。创建新卷后,必须在尝试mount之前启动它。)
卷的类型包括:
-
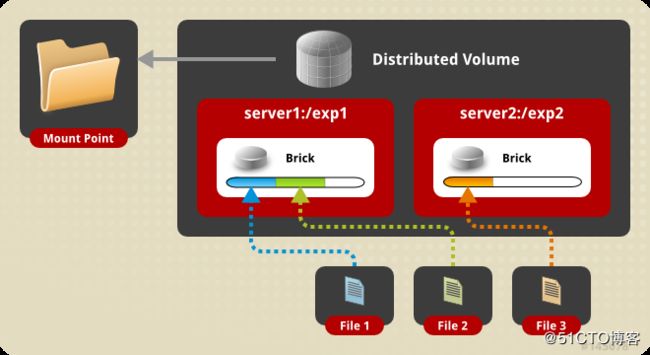
分布卷(DTH): 分发文件到所有的brick当中,特点是单个文件不进行条带话,整个文件在一个brick当中,不同的文件分布在不同的brick当中;创建命令如下:
gluster volume create models test111:/data/brick1 storage2:/data/brick1 storage1:/data/brick1 -
复制卷(AFR):类似于RAID1, 创建volume 时带 replica x 数量: 将文件复制到 replica x 个节点中,创建卷的命令如下:
gluster volume create models replica 3 test111:/data/brick1 storage2:/data/brick1 storage1:/data/brick1 force一个复制卷中的多个brick不能存在于一台主机,就是说一个节点只能包含复制卷中的一个brick
gluster volume create replica 4 server1:/brick1 server1:/brick2 server2:/brick3 server4:/brick4
以上这种情况将不能创建,因为第一个复制关系在同一个服务器上,将会产生单点故障,如果你真想这样做,请在命令最后用force选项 强制执行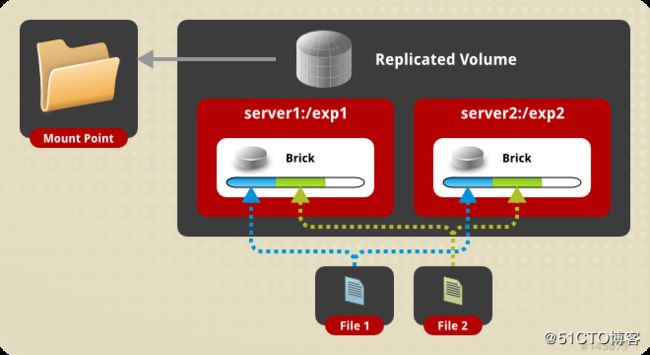
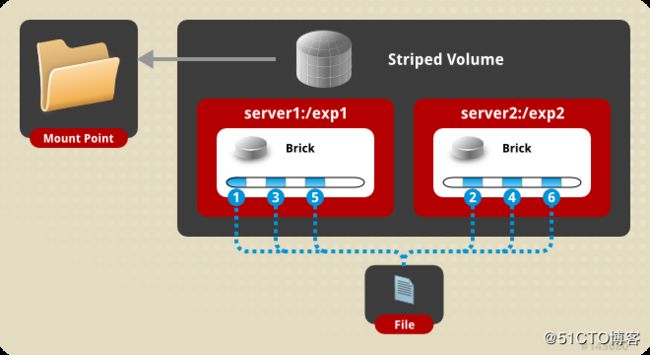
- 条带卷:类似于RAID0,单个文件被分散到多个brick中,而分布卷是整个文件在一个brick中,多个文件在不同的brick中。
gluster volume create models stripe 3 test111:/data/brick1 storage2:/data/brick1 storage1:/data/brick1stripe 后面是几,那么就必须有几个brick,stripe 3 说明单个文件被拆分到3个brick当中
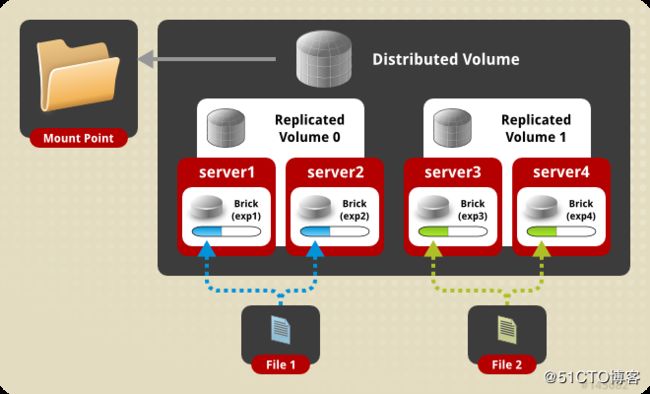
- 分布式复制卷: 及提高了可靠性又能提供不错的性能,在大多数生产环节中可用,brick的数量应该是分布式复制卷的整数倍
# gluster volume create test-volume replica 2 transport tcp server1:/exp1 server2:/exp2 server3:/exp3 server4:/exp4 Creation of test-volume has been successful Please start the volume to access data. 分布式复制卷的brick顺序决定了文件分布的位置,一般来说,先是两个brick形成一个复制关系,然后两个复制关系形成分布 - 分布式条带卷:单个文件分布于多个brick中,多个文件被分布到多个brick中
# gluster volume create test-volume stripe 4 transport tcp server1:/exp1 server2:/exp2 server3:/exp3 server4:/exp4 server5:/exp5 server6:/exp6 server7:/exp7 server8:/exp8
Creation of test-volume has been successful
Please start the volume to access data.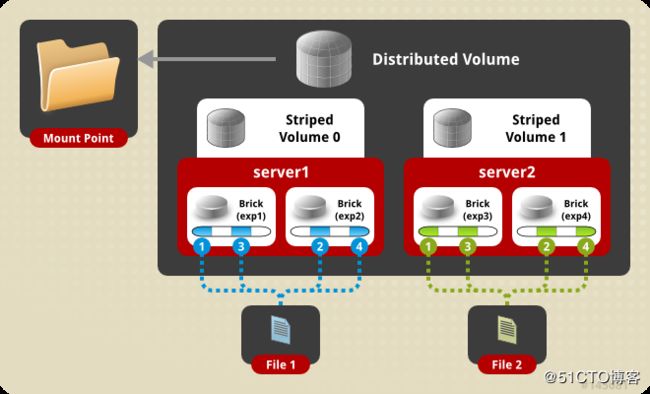
其他更多卷类型请参考GlusterFS官方文档 https://docs.gluster.org/en/latest/Administrator%20Guide/Setting%20Up%20Volumes/
6. GlusterFS存储调优参数
# 开启 指定 volume 的配额
[root@test111 yum.repos.d]# gluster volume quota models enable
volume quota : success

# 限制 指定 volume 的配额
[root@test111 yum.repos.d]# gluster volume quota models limit-usage / 95GB
volume quota : success

# 设置 cache 大小, 默认32MB
[root@test111 yum.repos.d]# gluster volume set models performance.cache-size 4GB
volume set: success

# 设置 io 线程, 太大会导致进程崩溃
[root@test111 yum.repos.d]# gluster volume set models performance.io-thread-count 16
volume set: success

# 设置 网络检测时间, 默认42s
[root@test111 yum.repos.d]# gluster volume set models network.ping-timeout 10
volume set: success

# 设置 写缓冲区的大小, 默认1M
[root@test111 yum.repos.d]# gluster volume set models performance.write-behind-window-size 1024MB
volume set: success
[root@test111 yum.repos.d]#
7. GlusterFS存储扩容
现在有3个节点组成的GlusterFS集群。如果我们需要将存储再扩容3个节点,形成6个节点的集群。操作如下:
#在新增加的节点上面配置hosts文件
vim /etc/hosts

test111 10.83.32.173
storage2 10.83.32.143
storage1 10.83.32.147
kubemaster 10.83.32.146
kubenode2 10.83.32.133
kubenode1 10.83.32.138

#在每一个新扩容的节点上面执行单独的硬盘初始化挂载bricks
[root@test111 ~]# mkfs.xfs -i size=512 /dev/vdc  #格式化硬盘
meta-data=/dev/vdc               isize=512    agcount=4, agsize=6553600 blks
         =                       sectsz=512   attr=2, projid32bit=1
         =                       crc=1        finobt=0, sparse=0
data     =                       bsize=4096   blocks=26214400, imaxpct=25
         =                       sunit=0      swidth=0 blks
naming   =version 2              bsize=4096   ascii-ci=0 ftype=1
log      =internal log           bsize=4096   blocks=12800, version=2
         =                       sectsz=512   sunit=0 blks, lazy-count=1
realtime =none                   extsz=4096   blocks=0, rtextents=0
[root@test111 ~]# mkdir -p /data2/brick1   #创建挂载点
[root@test111 ~]# echo '/dev/vdc /data2/brick1 xfs defaults 1 2' >> /etc/fstab
[root@test111 ~]# mount -a #挂载bricks
[root@test111 ~]# df -h
Filesystem               Size  Used Avail Use% Mounted on
/dev/mapper/centos-root   50G  2.3G   48G   5% /
devtmpfs                 3.9G     0  3.9G   0% /dev
tmpfs                    3.9G     0  3.9G   0% /dev/shm
tmpfs                    3.9G  8.4M  3.9G   1% /run
tmpfs                    3.9G     0  3.9G   0% /sys/fs/cgroup
/dev/mapper/centos-home   42G   33M   42G   1% /home
/dev/vda1                497M  138M  360M  28% /boot
tmpfs                    799M     0  799M   0% /run/user/0
/dev/vdc                 100G   33M  100G   1% /data/brick1
[root@test111 ~]#

# 复制yum源仓库文件到新增的三个节点
ssh-keygen -t RSA -P ""
ssh-copy-id root@kubemaster
ssh-copy-id root@kubenode1
ssh-copy-id root@kubenode2
scp -r /etc/yum.repos.d/CentOS-Gluster-3.12.repo root@kubemaster:/etc/yum.repos.d/
scp -r /etc/yum.repos.d/CentOS-Gluster-3.12.repo root@kubenode1:/etc/yum.repos.d/
scp -r /etc/yum.repos.d/CentOS-Gluster-3.12.repo root@kubenode2:/etc/yum.repos.d/

# 再新增的3个节点上面执行
yum -y install xfsprogs wget fuse fuse-libs
yum -y install glusterfs glusterfs-server gluster-fuse
systemctl enable glusterd && systemctl start glusterd && systemctl status glusterd

#在其中任何一台节点上面执行添加节点
[root@test111 ~]# gluster peer probe kubemaster
peer probe: success.
[root@test111 ~]# gluster peer probe kubenode2
peer probe: success.
[root@test111 ~]# gluster peer probe kubenode1
peer probe: success.
[root@test111 ~]#

#扩展卷的bricks
[root@test111 ~]# gluster volume add-brick models kubemaster:/data2/brick1 kubenode1:/data2/brick1 kubenode2:/data2/brick1 force
volume add-brick: success
[root@test111 ~]#

#开启数据打散设置
[root@test111 ~]# gluster volume rebalance models start
volume rebalance: models: success: Rebalance on models has been started successfully. Use rebalance status command to check status of the rebalance process.
ID: 82ac036d-5de2-42ec-830d-74e6a30dffe7

#查看数据打散状态
[root@test111 ~]# gluster volume rebalance models status
                                    Node Rebalanced-files          size       scanned      failures       skipped               status  run time in h:m:s
                               ---------      -----------   -----------   -----------   -----------   -----------         ------------     --------------
                               localhost                0        0Bytes             0             0             0            completed        0:00:00
                                storage2                0        0Bytes             0             0             0            completed        0:00:00
                                storage1                0        0Bytes             0             0             0            completed        0:00:00
                              kubemaster                0        0Bytes             0             0             0            completed        0:00:00
                               kubenode2                0        0Bytes             0             0             0            completed        0:00:00
                               kubenode1                0        0Bytes             0             0             0            completed        0:00:00
volume rebalance: models: success
[root@test111 ~]#

#查看volume状态
[root@test111 ~]# gluster volume info models

Volume Name: models
Type: Distributed-Replicate
Volume ID: d71bf7fa-7d65-4bcb-a926-8e6ef94ce068
Status: Started
Snapshot Count: 0
Number of Bricks: 2 x 3 = 6
Transport-type: tcp
Bricks:
Brick1: test111:/data/brick1
Brick2: storage2:/data/brick1
Brick3: storage1:/data/brick1
Brick4: kubemaster:/data2/brick1
Brick5: kubenode1:/data2/brick1
Brick6: kubenode2:/data2/brick1
Options Reconfigured:
performance.write-behind-window-size: 1024MB
network.ping-timeout: 10
performance.io-thread-count: 16
performance.cache-size: 4GB
features.quota-deem-statfs: on
features.inode-quota: on
features.quota: on
transport.address-family: inet
nfs.disable: on
performance.client-io-threads: off
[root@test111 ~]#
3. kubernetes集群使用GlusterFS分布式存储系统:
创建ep,地址为gluster的服务器地址
[root@kubemaster glusterfs]# cat glusterfs-endpoints.yaml
kind: Endpoints
apiVersion: v1
metadata: {name: glusterfs-cluster}
subsets:
- addresses:
  - {ip: 10.83.32.173}
  ports:
  - {port: 1}
- addresses:
  - {ip: 10.83.32.143}
  ports:
  - {port: 1}
- addresses:
  - {ip: 10.83.32.147}
  ports:
  - {port: 1}
- addresses:
  - {ip: 10.83.32.146}
  ports:
  - {port: 1}
- addresses:
  - {ip: 10.83.32.133}
  ports:
  - {port: 1}
- addresses:
  - {ip: 10.83.32.138}
  ports:
  - {port: 1}

kubectl apply -f glusterfs-endpoints.yaml

[root@kubemaster glusterfs]# kubectl get ep glusterfs-cluster
NAME                ENDPOINTS                                                  AGE
glusterfs-cluster   10.83.32.133:1,10.83.32.138:1,10.83.32.143:1 + 3 more...   2m53s
[root@kubemaster glusterfs]#

[root@kubemaster glusterfs]# kubectl describe ep glusterfs-cluster
Name:         glusterfs-cluster
Namespace:    default
Labels:
Annotations:  kubectl.kubernetes.io/last-applied-configuration:
                {"apiVersion":"v1","kind":"Endpoints","metadata":{"annotations":{},"name":"glusterfs-cluster","namespace":"default"},"subsets":[{"addresse...
Subsets:
  Addresses:          10.83.32.133,10.83.32.138,10.83.32.143,10.83.32.146,10.83.32.147,10.83.32.173
  NotReadyAddresses:
  Ports:
    Name     Port  Protocol
    ----     ----  --------
      1     TCP

Events:
[root@kubemaster glusterfs]#
创建svc,用于对接ep
[root@kubemaster glusterfs]# cat glusterfs-service.json
kind: Service
apiVersion: v1
metadata: {name: glusterfs-cluster}
spec:
  ports:
  - {port: 1}
[root@kubemaster glusterfs]#

[root@kubemaster glusterfs]# kubectl get svc glusterfs-cluster
NAME                TYPE        CLUSTER-IP     EXTERNAL-IP   PORT(S)   AGE
glusterfs-cluster   ClusterIP   10.99.135.11           1/TCP     31s
创建pv,pv里面使用glusterfs,需要配置gluster的卷名和服务名称
[root@kubemaster glusterfs]# cat glusterfs-pv.yaml
apiVersion: v1
kind: PersistentVolume
metadata:
  name: pv001
spec:
  capacity:
    storage: 10Gi
  accessModes:
    - ReadWriteMany
  glusterfs:
    endpoints: "glusterfs-cluster"
    path: "models"
    readOnly: false
[root@kubemaster glusterfs]#

[root@kubemaster glusterfs]# kubectl apply -f glusterfs-pv.yaml

创建pvc,通过容量自动关联pv
[root@kubemaster glusterfs]# cat glusterfs-pvc.yaml
apiVersion: v1
kind: PersistentVolumeClaim
metadata:
  name: pv001
spec:
  accessModes:
    - ReadWriteMany
  resources:
    requests:
      storage: 10Gi

这里遇到一个问题,开始建立的pv死活claim为空,查看pv以及pvc的配置发现并没有任何名称上的关联,
继续研究,发现纯粹是通过storage大小进行匹配的,之前因为照抄书本,一个是5G
一个是8G所以就无法匹配了,修改后成功。
创建一个pod,来挂载pvc
[root@kubemaster glusterfs]# cat glusterfs-nginx-deployment.yaml
apiVersion: apps/v1
kind: Deployment
metadata:
  name: nginx-dm
  namespace: default
spec:
  selector:
    matchLabels:
      app: nginx
  replicas: 2
  template:
    metadata:
      labels:
        app: nginx
    spec:
      containers:
      - name: nginx
        image: nginx
        ports:
        - containerPort: 80
        volumeMounts:
        - name: storage001
          mountPath: "/usr/share/nginx/html"
      volumes:
      - name: storage001
        persistentVolumeClaim:
          claimName: pvc001
[root@kubemaster glusterfs]#

#进入容器查看挂载是成功的
[root@kubemaster glusterfs]# kubectl exec -it nginx-dm-6478b6499d-q7njz -- df -h|grep nginx
10.83.32.133:models                                                                                   95G     0   95G   0% /usr/share/nginx/html
[root@kubemaster glusterfs]#