Spring高级技术应用——百战商城实现(上)
百战商城
- 一、项目介绍
- 二、前台系统
- 三、技术选型及版本
- 四、项目环境搭建
- 1. 创建数据库并导入sql 文件
- 2. 创建项目
- 父项目,pom项目, 对用到的jar做版本控制( bz_parent )
- 子模块项目
- Eureka注册中心服务端 ,父项目下的子模块
- 将Eureka 注册中心部署到Linux 环境中
- 五、开发百战商城后台系统
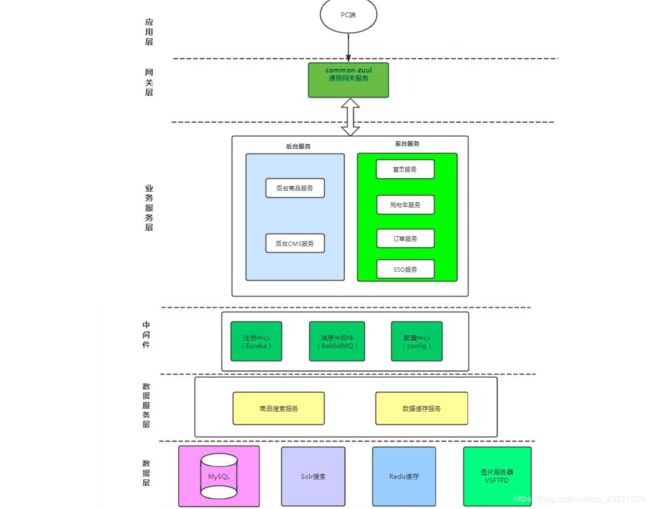
- 项目架构设计
- 项目开发
- 商品基本功能的实现
- common_item
- backend_item
- 开发商品管理接口(重要功能讲解)
- 在common_item 服务中实现分页查询商品
- 在backend_item 服务中实现分页查询商品
- 在backend_item 服务中处理图片上传
- FtpUtil 用于文件的上传下载
- IDUtils : 用于为上传的图片起名
- TX-LCN处理事务
- 搭建TX-LCN 服务端
- 搭建TX-LCN 客户端
- 下游服务的接口复用思想
- 在common_item 服务中实现删除商品
- 在backend_item 服务中实现删除商品
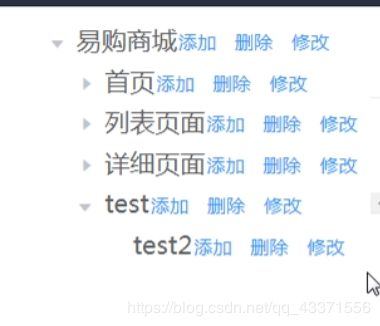
- 父子节点判断逻辑-内容分类的添加
- common-content
- backend-content
- 父子节点判断逻辑-内容分类的删除(迭代)
- common-content
- backend-content
- 迭代思想的使用
- 在common_item 服务中实现商品分类查询
- 在frontend_portal 服务中实现商品分类查询
- 六、开发百战商城前台系统
- List集合嵌套Map的实现
- 首页大广告的实现
- 利用Redis实现缓存-服务端
- 1.创建项目,添加pom文件
- 2.修改全局配置文件
- 3.Redis的配置类
- 4.接口类
- 5.配置缓存数据的key
- 6.接口实现类
- 7.controller
- 利用Redis实现缓存-客户端
- Redis缓存实现总结
一、项目介绍
-
电商行业发展
发展迅速
规模巨大
极大刺激了经济增长, 前三点想想淘宝就知道啦
规模较大电子商务平台企业纷纷开始构建生态系统, ,各大平台与平台商家之间依存越来越紧密,阿里系、腾讯系、百度系、京东系等主体均取得了显著规模效益 -
电商行业模式
B2B:企业到企业,商家到商家。代表:阿里巴巴。
B2C:商家到客户。代表:京东、淘宝商城(B2B2C)、天猫网。
C2C:客户到客户。淘宝集市、闲鱼、转转。
O2O:线上到线下。 -
百战商城介绍
百战商城项目是一个综合性的B2C 电子商务平台,功能类似于淘宝、京东。用户可以
在系统中通过搜索商品、查看商品详情、加入购物车、购买商品并生成订单完成购物操作。
百战商城共分为两部分:- 商城后台管理系统:
主要实现对商品、商品分类、规格参数、CMS 等业务的处理。 - 商城前台系统:
主要提供用户通过访问首页,完成购物流程的处理。
- 商城后台管理系统:
二、前台系统
-
安装node环境
https://nodejs.org/en/download/ (下载后直接安装,推荐c盘)
https://code.visualstudio.com/docs/editor/codebasics (官方推荐文档)命令行输入:
#提示版本信息说明安装成功 node -v npm -v -
安装taobao的npm镜像
命令行输入
npm install -g cnpm --registry=https://registry.npm.taobao.org -
Vue项目
后台系统:Vue+VueRouter+axios+element-ui
前台项目:Vue+VueRouter+axios+swiper -
前台开发工具
https://www.cnblogs.com/clwydjgs/p/10078065.html (一个大佬讲的VsCode安装与介绍的教程)
vscode:
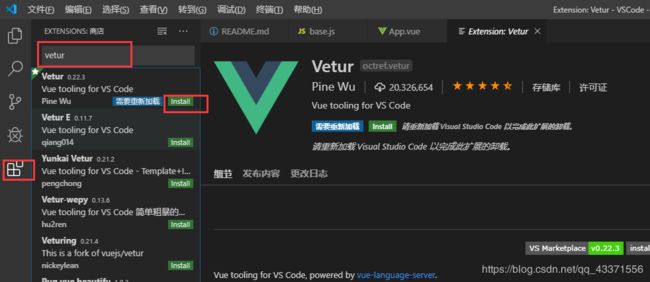
点击扩展,安装vue的插件:vetur(对.vue代码进行渲染) ; Chinese(中文插件)
打开前端项目: 选择打开文件夹, 选择前端项目所在父目录 -
安装依赖:
选择项目, 右键,在终端中打开#安装项目(一次安装,可多次使用) cnpm install #运行项目 npm run dev #解决使用npm run dev出现的错误, 然后重新运行项目即可 cnpm install -g concurrently #清屏 cls #结束项目 ctrl+c y -
修改路径和地址
修改ip和端口:重启前台系统:vue.config.js
修改路径:不需要重启(自主热更新):src/api/base.js
三、技术选型及版本
- Spring Data
1.1Spring Data Redis2.1.9.RELEASE
1.2Spring Data Solr4.0.9.RELEASE - Spring Boot 2.1.6.RELEASE
2.1Spring Boot Data Redis 2.1.6.RELEASE
2.2Spring Boot Data Solr 2.1.6.RELEASE - Spring Cloud Greenwich.SR2
3.1Spring Cloud Netflix Eureka
3.2Spring Cloud Netflix Zuul
3.3Spring Cloud Netflix Hystrix
3.4Spring Cloud OpenFeign
3.5Spring Cloud Config - TX-LCN 5.0.2.RELEASE
四、项目环境搭建
1. 创建数据库并导入sql 文件
资料见底部 1
2. 创建项目
父项目,pom项目, 对用到的jar做版本控制( bz_parent )
<project xmlns="http://maven.apache.org/POM/4.0.0"
	xmlns:xsi="http://www.w3.org/2001/XMLSchema-instance"
	xsi:schemaLocation="http://maven.apache.org/POM/4.0.0 http://maven.apache.org/xsd/maven-4.0.0.xsd">
	<modelVersion>4.0.0modelVersion>
	<groupId>ah.szxy.projectgroupId>
	<artifactId>bz_parentartifactId>
	<version>0.0.1-SNAPSHOTversion>
	<packaging>pompackaging>

	<parent>
		<groupId>org.springframework.bootgroupId>
		<artifactId>spring-boot-starter-parentartifactId>
		<version>2.1.6.RELEASEversion>
	parent>


	<properties>
		<mybatis-version>3.5.1mybatis-version>
		<mysql-connector-java-version>5.1.38mysql-connector-java-version>
		<druid-version>1.0.9druid-version>
		<pagehelper-version>1.2.10pagehelper-version>
		<logback-version>5.0logback-version>
		<spring-mybats-version>2.0.1spring-mybats-version>

		<java.version>1.8java.version>
		<spring-cloud.version>Greenwich.SR2spring-cloud.version>
		<maven-jar-plugin.version>2.6maven-jar-plugin.version>
	properties>

	<dependencyManagement>
		<dependencies>

			<dependency>
				<groupId>org.springframework.cloudgroupId>
				<artifactId>spring-cloud-dependenciesartifactId>
				<version>${spring-cloud.version}version>
				<type>pomtype>
				<scope>importscope>
			dependency>


			<dependency>
				<groupId>org.mybatisgroupId>
				<artifactId>mybatisartifactId>
				<version>${mybatis-version}version>
			dependency>

			<dependency>
				<groupId>mysqlgroupId>
				<artifactId>mysql-connector-javaartifactId>
				<version>${mysql-connector-java-version}version>
			dependency>

			<dependency>
				<groupId>com.alibabagroupId>
				<artifactId>druidartifactId>
				<version>${druid-version}version>
			dependency>

			<dependency>
				<groupId>com.github.pagehelpergroupId>
				<artifactId>pagehelper-spring-boot-starterartifactId>
				<version>${pagehelper-version}version>
			dependency>


			<dependency>
				<groupId>org.mybatis.spring.bootgroupId>
				<artifactId>mybatis-spring-boot-starterartifactId>
				<version>${spring-mybats-version}version>
			dependency>

			<dependency>
				<groupId>net.logstash.logbackgroupId>
				<artifactId>logstash-logback-encoderartifactId>
				<version>${logback-version}version>
			dependency>
		dependencies>
	dependencyManagement>

	<build>
		<pluginManagement>

			<plugins>
				<plugin>
					<groupId>org.springframework.bootgroupId>
					<artifactId>spring-boot-maven-pluginartifactId>
				plugin>
			plugins>
		pluginManagement>
	build>
	<modules>
		<module>common_mappermodule>
		<module>common_pojomodule>
		<module>common_eurekamodule>
	modules>
project>
子模块项目
创建common_mapper, 选中父项目 ,ctrl+n ,Maven module,建子模块项目,存放实体类 (common_pojo, common_mapper),common_mapper需要额外添加坐标
<dependencies>


		<dependency>
			<groupId>org.mybatisgroupId>
			<artifactId>mybatisartifactId>
		dependency>

		<dependency>
			<groupId>mysqlgroupId>
			<artifactId>mysql-connector-javaartifactId>
		dependency>

		<dependency>
			<groupId>com.alibabagroupId>
			<artifactId>druidartifactId>
		dependency>

		<dependency>
			<groupId>com.github.pagehelpergroupId>
			<artifactId>pagehelper-spring-boot-starterartifactId>
		dependency>


		<dependency>
			<groupId>org.mybatis.spring.bootgroupId>
			<artifactId>mybatis-spring-boot-starterartifactId>
		dependency>

		<dependency>
			<groupId>ah.szxy.projectgroupId>
			<artifactId>common_pojoartifactId>
			<version>0.0.1-SNAPSHOTversion>
		dependency>
	dependencies>

	<build>
		<resources>
			<resource>
				<directory>src/main/javadirectory>
				<includes>
					<include>**/*.xmlinclude>
				includes>
			resource>
			<resource>
				<directory>src/main/resourcesdirectory>
				<includes>
					<include>**/*.xmlinclude>
				includes>
			resource>
		resources>
	build>
创建common_pojo项目, 使用逆向工程 传送门
将导入的数据库表生成对应的实体类,以及Mapper生成对应的接口与映射配置文件
将生成好的实体类放入 common_pojo ,将对应的接口与映射配置文件放入 common_mapper中
Eureka注册中心服务端 ,父项目下的子模块
用于服务的注册以及发现
pom文件
<project xmlns="http://maven.apache.org/POM/4.0.0" xmlns:xsi="http://www.w3.org/2001/XMLSchema-instance" xsi:schemaLocation="http://maven.apache.org/POM/4.0.0 http://maven.apache.org/xsd/maven-4.0.0.xsd">
  <modelVersion>4.0.0modelVersion>
  <parent>
    <groupId>ah.szxy.projectgroupId>
    <artifactId>bz_parentartifactId>
    <version>0.0.1-SNAPSHOTversion>
  parent>
  <artifactId>common_eurekaartifactId>

  <dependencies>
		<dependency>
			<groupId>org.springframework.cloudgroupId>
			<artifactId>spring-cloud-starterartifactId>
		dependency>
		<dependency>
			<groupId>org.springframework.cloudgroupId>
			<artifactId>spring-cloud-starter-netflix-eureka-serverartifactId>
		dependency>

		<dependency>
			<groupId>org.springframework.bootgroupId>
			<artifactId>spring-boot-starter-testartifactId>
			<scope>testscope>
		dependency>
	dependencies>

<dependencyManagement>
		<dependencies>
			<dependency>
				<groupId>org.springframework.cloudgroupId>
				<artifactId>spring-cloud-dependenciesartifactId>
				<version>${spring-cloud.version}version>
				<type>pomtype>
				<scope>importscope>
			dependency>
		dependencies>
	dependencyManagement>

	<build>
		<plugins>
			<plugin>
				<groupId>org.springframework.bootgroupId>
				<artifactId>spring-boot-maven-pluginartifactId>
			plugin>
		plugins>
	build>
project>
配置文件 application.yml
spring:
  application:
    name: Eureka-Server
server:
  port: 8761

eureka:
  client:
    register-with-eureka: false  #是否将自己注册到 Eureka-Server 中,默认的为 true
    fetch-registry: false   #是否冲 Eureka-Server 中获取服务注册信息,默认为 true
启动类
@SpringBootApplication
@EnableEurekaServer
public class SpringCloudEurekaApplication {

	public static void main(String[] args) {
		SpringApplication.run(SpringCloudEurekaApplication.class, args);
	}

}
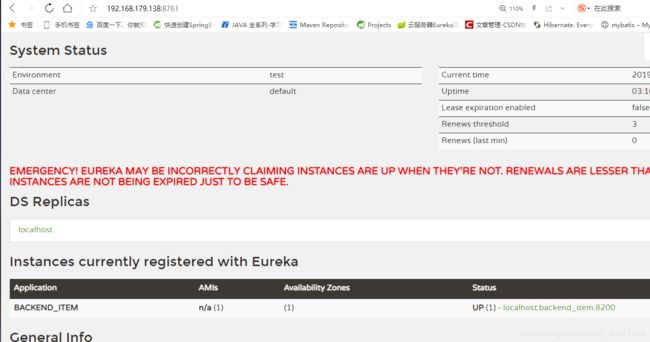
本机访问时 : http://localhost:8761/
将Eureka 注册中心部署到Linux 环境中
在虚拟机安装 lrzsz 上传下载工具,用于快速上传下载文件(需要有X shell的支持)
安装命令:yum install lrzsz -y
上传命令:rz
下载命令:sz
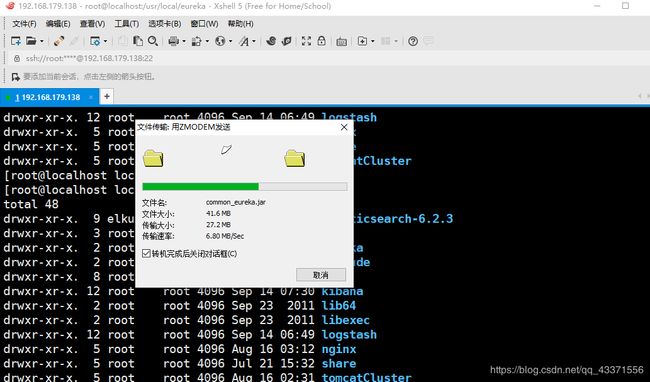
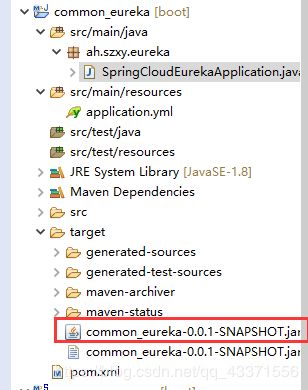
打包Eureka项目, 在使用X shell输入rz,选择该jar文件,进行上传(最好放入自己创建的新文件夹)
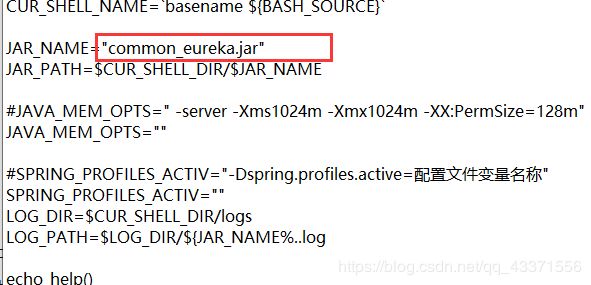
编辑本人上传的server.sh文件 ,指定项目名即可 ,通过 rz命令上传
#给server.sh授予运行的权限
chmod -R 755 server.sh

#运行,如果出错,请查看生成的日志文件
./server.sh  start
五、开发百战商城后台系统
项目架构设计
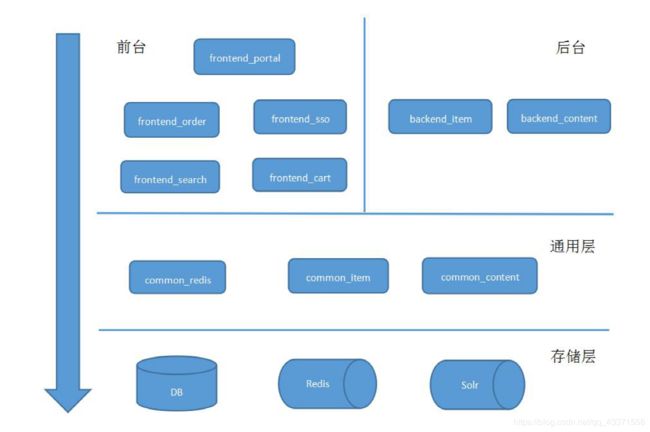
将整个项目, 分为前台和后台(区分前端和后端) :
前台用于用于浏览 , 浏览商品,购买商品 ,注册登录等
后台用于管理人员操作, 对商品列表等信息进行增删改查
前台五个微服务, 后台两个微服务
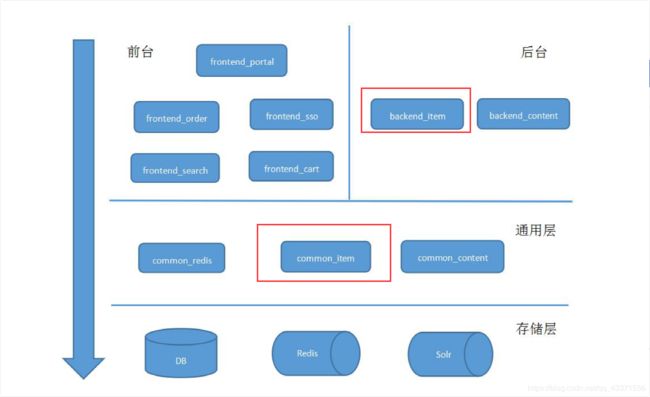
通用层: 前台服务和后台服务都需要调用,相当于服务的提供者.前台和后台服务相当于服务的消费者
存储层: 被通用层直接调用, 用于商品的crud, 用于信息的crud, 数据的缓存等
项目开发
商品基本功能的实现
以下全都都是父项目 bz_parent 下的子模块
common_item
- 创建common_item 项目,修改pom文件
注意每个坐标的意义
<modelVersion>4.0.0modelVersion>
	<parent>
		<groupId>ah.szxy.projectgroupId>
		<artifactId>bz_parentartifactId>
		<version>0.0.1-SNAPSHOTversion>
	parent>
	<artifactId>common_itemartifactId>

	<dependencies>

		<dependency>
			<groupId>org.springframework.bootgroupId>
			<artifactId>spring-boot-starter-webartifactId>
		dependency>

		<dependency>
			<groupId>org.springframework.cloudgroupId>
			<artifactId>spring-cloud-starter-netflix-eureka-clientartifactId>
		dependency>

		<dependency>
			<groupId>ah.szxy.projectgroupId>
			<artifactId>common_mapperartifactId>
			<version>0.0.1-SNAPSHOTversion>
		dependency>

		<dependency>
			<groupId>ah.szxy.projectgroupId>
			<artifactId>common_utilsartifactId>
			<version>0.0.1-SNAPSHOTversion>
		dependency>

		<dependency>
			<groupId>ah.szxy.projectgroupId>
			<artifactId>common_pojoartifactId>
			<version>0.0.1-SNAPSHOTversion>
		dependency>
	dependencies>
2.修改全局配置文件 application.yml
spring:       #配置应用名,数据库连接参数
  application:
    name: common-item
  datasource:
    driverClassName: com.mysql.jdbc.Driver
    url: jdbc:mysql://localhost:3306/bz_shop?useSSL=false
    username: root
    password: root
    type: com.alibaba.druid.pool.DruidDataSource


server:       #配置端口号
  port: 8100


eureka:       #配置Eureka服务注册中心地址
  client:
    serviceUrl:
      defaultZone: http://eureka-server:8761/eureka/
3.启动类
- @EnableEurekaClient 只支持Eureka注册中心
- @EnableDiscoveryClient 支持多种注册中心,如Eureka.Zookeeper等
/**
 * 通用服务Common_item
 *
 * @author chy
 *
 */
@SpringBootApplication
@EnableDiscoveryClient
@MapperScan("ah.szxy.mapper")  #扫描mapper所在包
public class CommonItemApplication {
	public static void main(String[] args) {
		SpringApplication.run(CommonItemApplication.class, args);
	}
}
4.修改Host 文件添加注册中心域名与IP 的映射
backend_item
1.创建项目, 修改pom文件
无需直接调用mapper项目,但是使用了声明式调用Feign,需要添加相应的坐标
	<dependencies>

		<dependency>
			<groupId>org.springframework.bootgroupId>
			<artifactId>spring-boot-starter-webartifactId>
		dependency>

		<dependency>
			<groupId>org.springframework.cloudgroupId>
			<artifactId>spring-cloud-starter-netflix-eureka-clientartifactId>
		dependency>

		<dependency>
			<groupId>org.springframework.cloudgroupId>
			<artifactId>spring-cloud-starter-openfeignartifactId>
		dependency>


		<dependency>
			<groupId>ah.szxy.projectgroupId>
			<artifactId>common_pojoartifactId>
			<version>0.0.1-SNAPSHOTversion>
		dependency>

		<dependency>
			<groupId>ah.szxy.projectgroupId>
			<artifactId>common_utilsartifactId>
			<version>0.0.1-SNAPSHOTversion>
		dependency>
2.修改全局配置文件
spring:       #配置应用名,数据库连接参数
  application:
    name: backend_item
  datasource:
    driverClassName: com.mysql.jdbc.Driver
    url: jdbc:mysql://localhost:3306/bz_shop
    username: root
    password: root
    type: com.alibaba.druid.pool.DruidDataSource


server:       #配置端口号
  port: 9011


eureka:       #配置Eureka服务注册中心地址
  client:
    serviceUrl:
      defaultZone: http://eureka-server:8761/eureka/
3.启动类
/**
 * 后台服务BackendItem启动类
 *
 * @author chy
 *
 */
@SpringBootApplication
@EnableDiscoveryClient
@EnableFeignClients
public class BackendItemApplication {
	public static void main(String[] args) {
		SpringApplication.run(BackendItemApplication.class, args);

	}
}
开发商品管理接口(重要功能讲解)
在common_item 服务中实现分页查询商品
1.创建分页模型,作用是返回指定格式的分页数据
import java.io.Serializable;
import java.util.List;
/**
 * 分页模型
 * @author chy
 *
 */
public class PageResult implements Serializable{

	private Integer pageIndex;//当前页
	private Long totalPage;//总页数
	private List result; //结果集
	public Integer getPageIndex() {
		return pageIndex;
	}
	public void setPageIndex(Integer pageIndex) {
		this.pageIndex = pageIndex;
	}
	public Long getTotalPage() {
		return totalPage;
	}
	public void setTotalPage(Long totalPage) {
		this.totalPage = totalPage;
	}
	public List getResult() {
		return result;
	}
	public void setResult(List result) {
		this.result = result;
	}
	@Override
	public String toString() {
		return "PageResult [pageIndex=" + pageIndex + ", totalPage=" + totalPage + ", result=" + result + "]";
	}


}
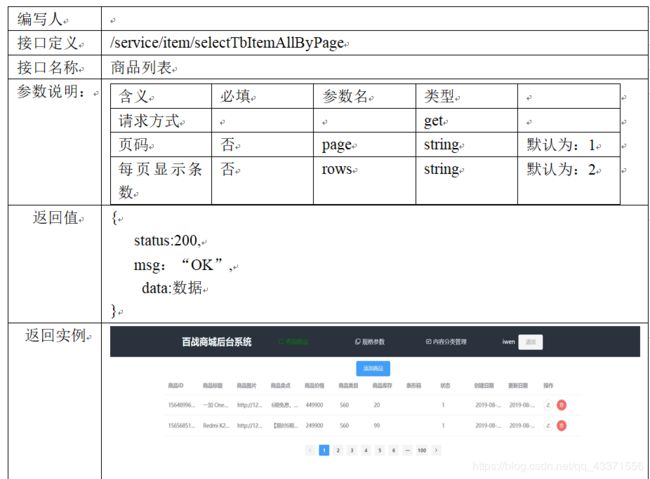
2.根据需求文档,首先编写controller 类
可以先把骨架搭好(url什么的) ,然后再填代码
本项目基于前后端分离,所以后端只需将Json格式数据发给前端即可,
所以使用的是@RestController注解,下面所有Controller使用的都是这个注解
@RestController
@RequestMapping("/service/item")
public class ItemController {

	@Autowired
	private ItemService itemService;

	/**
	 * 查询商品列表
	 * @param page
	 * @param rows
	 * @return   /service/item/selectTbItemAllByPage
	 */
	@RequestMapping(value="/selectTbItemAllByPage",method=RequestMethod.GET)//  /service/item/selectTbItemAllByPage
	public PageResult selectTbItemAllByPage(@RequestParam(defaultValue="1")Integer page
			,@RequestParam(defaultValue="2")Integer rows) {

			return this.itemService.selectTbItemAllByPage(page, rows);
	}


}
3.创建业务层接口类
public interface ItemService {
	/**
	 * 查询所有商品列表,并分页
	 * @return
	 */
	PageResult selectTbItemAllByPage(Integer page,Integer rows);


}
3.业务层实现类
分页的实现:
首先创建PageHelper对象 ,它的作用是对下面的查询语句做约束,变成我们想要的分页数据
查询数据(根据商品状态 , 1代表正常),返回list集合
将查询的 list集合对象放入 PageInfo中, 将数据传入PageInfo就可为你计算出分页模型的totalPage
创建分页模型 PageResult 对象,并为每个属性赋值 ,返回给前端
#简化思路
  1.创建pageHelper用于控制输出数据的页数和行数
  2.将查询结果放入到 PageInfo计算页面信息( 总页数 )
  3.将结果返回
@Service
public class ItemServiceImpl implements ItemService {
	@Autowired
	private TbItemMapper tbItemMapper;
	@Autowired
	private TbItemCatMapper tbItemCatMapper;

	/**
	 * 商品列表的分页查询
	 * PageHelper 需要放在查询语句前面,对查询结果起限定的作用
	 * 将数据传入PageInfo就可为你计算出totalPage
	 */
	@Override
	public PageResult selectTbItemAllByPage(Integer page, Integer rows) {

		PageHelper.startPage(page, rows);	//需要放在查询语句前面
		TbItemExample example=new TbItemExample();
		Criteria criteria = example.createCriteria();
		criteria.andStatusEqualTo((byte) 1); //'商品状态,1-正常,2-下架,3-删除
		List<TbItem>list =this.tbItemMapper.selectByExample(example);

		PageInfo<TbItem>pageInfo=new PageInfo<TbItem>(list);//将数据传入PageInfo就可为你计算出totalPage
		PageResult result = new PageResult();
		result.setPageIndex(page);
		result.setTotalPage(pageInfo.getTotal());
		result.setResult(list);
		return result;
	}


}
在backend_item 服务中实现分页查询商品
1.创建feignClient
@FeignClient(“前台项目的项目名”)
@GetMapping :用于指定Get方式的请求
@PostMapping: 用于指定Post方式的请求
使用Feign进行声明式调用 ,前台项目的Controller声明部分,请求方式必须和这里对应,
但是可以和后台项目的Controller 不对应,
例如这里使用get请求,但是后台项目的Controller可以使用Post请求,如@RequestMapping,默认为post
@RequestParam(defaultValue=“page”)Integer page,
@RequestParam(defaultValue=“rows”) ,Feign调用需要这样写,指定传入的值
@FeignClient("common-item")
public interface CommonItemFeignClient {
	//-----------------/service/Item-------------------------------
	//@RequestMapping(value="/service/item/selectTbItemAllByPage",method=RequestMethod.GET)//和下一行效果一样
	@GetMapping("/service/item/selectTbItemAllByPage")
	PageResult selectTbItemAllByPage(@RequestParam(defaultValue="page")Integer page,
			@RequestParam(defaultValue="rows")Integer rows);


}
2.创建后台项目接口类
Result 商城自定义响应模型,返回的json数据可以满足前端页面的需要
public interface ItemService {
	/**
	 * 查询所有商品,并分页
	 * Result: 商城自定义响应模型
	 * @param page
	 * @param rows
	 * @return
	 */
	Result selectTbItemAllByPage(Integer page,Integer rows);
商城自定义响应模型类
import com.fasterxml.jackson.databind.JsonNode;
import com.fasterxml.jackson.databind.ObjectMapper;
import java.io.Serializable;
import java.util.List;
/**
 * 商城自定义响应模型
 */
public class Result implements Serializable {
    // 定义jackson对象
    private static final ObjectMapper MAPPER = new ObjectMapper();

    // 响应业务状态
    private Integer status;

    // 响应消息
    private String msg;

    private static final Integer okcode=200;
    private static final Integer errorcode=500;


    // 响应中的数据
    private Object data;

    public static Result build(Integer status, String msg, Object data) {
        return new Result(status, msg, data);
    }
    public static Result error( String msg) {
        return new Result(500, msg, null);
    }

    public static Result ok(Object data) {
        return new Result(data);
    }

    public static Result ok() {
        return new Result(null);
    }

    public Result() {

    }

    public static Result build(Integer status, String msg) {
        return new Result(status, msg, null);
    }

    public Result(Integer status, String msg, Object data) {
        this.status = status;
        this.msg = msg;
        this.data = data;
    }

    public Result(Object data) {
        this.status = okcode;
        this.msg = "OK";
        this.data = data;
    }

    public Integer getStatus() {
        return status;
    }

    public void setStatus(Integer status) {
        this.status = status;
    }

    public String getMsg() {
        return msg;
    }

    public void setMsg(String msg) {
        this.msg = msg;
    }

    public Object getData() {
        return data;
    }

    public void setData(Object data) {
        this.data = data;
    }

    /**
     * 将json结果集转化为EgoResult对象
     *
     * @param jsonData json数据
     * @param clazz EgoResult中的object类型
     * @return
     */
    public static Result formatToPojo(String jsonData, Class<?> clazz) {
        try {
            if (clazz == null) {
                return MAPPER.readValue(jsonData, Result.class);
            }
            JsonNode jsonNode = MAPPER.readTree(jsonData);
            JsonNode data = jsonNode.get("data");
            Object obj = null;
            if (clazz != null) {
                if (data.isObject()) {
                    obj = MAPPER.readValue(data.traverse(), clazz);
                } else if (data.isTextual()) {
                    obj = MAPPER.readValue(data.asText(), clazz);
                }
            }
            return build(jsonNode.get("status").intValue(), jsonNode.get("msg").asText(), obj);
        } catch (Exception e) {
            return null;
        }
    }

    /**
     * 没有object对象的转化
     *
     * @param json
     * @return
     */
    public static Result format(String json) {
        try {
            return MAPPER.readValue(json, Result.class);
        } catch (Exception e) {
            e.printStackTrace();
        }
        return null;
    }

    /**
     * Object是集合转化
     *
     * @param jsonData json数据
     * @param clazz 集合中的类型
     * @return
     */
    public static Result formatToList(String jsonData, Class<?> clazz) {
        try {
            JsonNode jsonNode = MAPPER.readTree(jsonData);
            JsonNode data = jsonNode.get("data");
            Object obj = null;
            if (data.isArray() && data.size() > 0) {
                obj = MAPPER.readValue(data.traverse(),
                        MAPPER.getTypeFactory().constructCollectionType(List.class, clazz));
            }
            return build(jsonNode.get("status").intValue(), jsonNode.get("msg").asText(), obj);
        } catch (Exception e) {
            return null;
        }
    }

    /**
     * 将字符串转换为对象,不包含Result内容
     *
     * @param jsonData json数据
     * @param clazz 集合中的类型
     * @return
     */
    public static Result formatObjectToList(String jsonData, Class<?> clazz) {
        try {
            JsonNode jsonNode = MAPPER.readTree(jsonData);
            Object obj= null;
            if (jsonNode.isArray() && jsonNode.size() > 0) {
                obj = MAPPER.readValue(jsonNode.traverse(),
                        MAPPER.getTypeFactory().constructCollectionType(List.class, clazz));
            }
            return build(null,null, obj);
        } catch (Exception e) {
            return null;
        }
    }
}
3.接口实现类
处理业务逻辑 ,需要保证分页模型中的数据都不为空
pageResult!=null && pageResult.getResult()!=null && pageResult.getResult().size()
@Service
public class ItemServiceImpl implements ItemService{
	@Autowired
	private CommonItemFeignClient commonItemFeignClient;
	/**
	 * 查询商品列表
	 */
	@Override
	public Result selectTbItemAllByPage(Integer page, Integer rows) {

		 PageResult pageResult=this.commonItemFeignClient.selectTbItemAllByPage(page, rows);
		if (pageResult!=null && pageResult.getResult()!=null && pageResult.getResult().size()>0) {
			return Result.ok(pageResult);
		}

		return Result.error("查询无果");
	}

}
4.Controller
对返回结果进行异常捕获的目的是 ,能够让我及时发现在这里出现的异常,可以及时作出更改,保证代码健壮性
@RestController
@RequestMapping("/backend/item")
public class ItemController {
	@Autowired
	private ItemService itemService;
	/**
	 * 查询所有商品列表,分页
	 * @param page
	 * @param rows
	 * @return
	 */
	@RequestMapping("/selectTbItemAllByPage")  // /backend/item/selectTbItemAllByPage
	public Result selectTbItemAllByPage(@RequestParam(defaultValue="1")Integer page,
			@RequestParam(defaultValue="2")Integer rows) {

		try {
			return this.itemService.selectTbItemAllByPage(page, rows);
		} catch (Exception e) {
			e.printStackTrace();
		}
		return Result.error("查无结果");
	}

}
访问测试
运行前台后台项目
使用VsCode运行前端的后台项目 rpm run dev
使用VsCode生成的路径进行访问


页面效果如下:

在backend_item 服务中处理图片上传
2.工具类
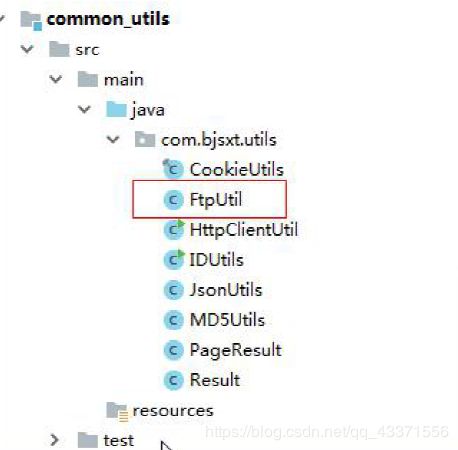
FtpUtil 用于文件的上传下载
package ah.szxy.utils;

import java.io.File;
import java.io.FileOutputStream;
import java.io.IOException;
import java.io.InputStream;
import java.io.OutputStream;

import org.apache.commons.net.ftp.FTP;
import org.apache.commons.net.ftp.FTPClient;
import org.apache.commons.net.ftp.FTPFile;
import org.apache.commons.net.ftp.FTPReply;


/**
 * ftp上传下载工具类
 */
public class FtpUtil {

	/**
	 * Description: 向FTP服务器上传文件
	 * @param host FTP服务器hostname
	 * @param port FTP服务器端口
	 * @param username FTP登录账号
	 * @param password FTP登录密码
	 * @param basePath FTP服务器基础目录
	 * @param filePath FTP服务器文件存放路径。例如分日期存放:/2018/01/01。文件的路径为basePath+filePath
	 * @param filename 上传到FTP服务器上的文件名
	 * @param input 输入流
	 * @return 成功返回true,否则返回false
	 */
public static boolean uploadFile(String host, int port, String username, String password, String basePath,
			String filePath, String filename, InputStream input) {
		boolean result = false;
		FTPClient ftp = new FTPClient();
		try {
			int reply;
			ftp.connect(host, port);// 连接FTP服务器
			// 如果采用默认端口,可以使用ftp.connect(host)的方式直接连接FTP服务器
			ftp.login(username, password);// 登录
			reply = ftp.getReplyCode();
			if (!FTPReply.isPositiveCompletion(reply)) {
				ftp.disconnect();
				return result;
			}
			//切换到上传目录
			if (!ftp.changeWorkingDirectory(basePath+filePath)) {
				//如果目录不存在创建目录
				String[] dirs = filePath.split("/");
				String tempPath = basePath;
				for (String dir : dirs) {
					if (null == dir || "".equals(dir)) continue;
					tempPath += "/" + dir;
					if (!ftp.changeWorkingDirectory(tempPath)) {
						if (!ftp.makeDirectory(tempPath)) {
							return result;
						} else {
							ftp.changeWorkingDirectory(tempPath);
						}
					}
				}
			}
			//设置上传文件的类型为二进制类型
			ftp.setFileType(FTP.BINARY_FILE_TYPE);
			//上传文件
			if (!ftp.storeFile(filename, input)) {
				return result;
			}
			input.close();
			ftp.logout();
			result = true;
		} catch (IOException e) {
			e.printStackTrace();
		} finally {
			if (ftp.isConnected()) {
				try {
					ftp.disconnect();
				} catch (IOException ioe) {
				}
			}
		}
		return result;
	}

	/**
	 * Description: 从FTP服务器下载文件
	 * @param host FTP服务器hostname
	 * @param port FTP服务器端口
	 * @param username FTP登录账号
	 * @param password FTP登录密码
	 * @param remotePath FTP服务器上的相对路径
	 * @param fileName 要下载的文件名
	 * @param localPath 下载后保存到本地的路径
	 * @return
	 */
	public static boolean downloadFile(String host, int port, String username, String password, String remotePath,
			String fileName, String localPath) {
		boolean result = false;
		FTPClient ftp = new FTPClient();
		try {
			int reply;
			ftp.connect(host, port);
			// 如果采用默认端口,可以使用ftp.connect(host)的方式直接连接FTP服务器
			ftp.login(username, password);// 登录
			reply = ftp.getReplyCode();
			if (!FTPReply.isPositiveCompletion(reply)) {
				ftp.disconnect();
				return result;
			}
			ftp.changeWorkingDirectory(remotePath);// 转移到FTP服务器目录
			FTPFile[] fs = ftp.listFiles();
			for (FTPFile ff : fs) {
				if (ff.getName().equals(fileName)) {
					File localFile = new File(localPath + "/" + ff.getName());

					OutputStream is = new FileOutputStream(localFile);
					ftp.retrieveFile(ff.getName(), is);
					is.close();
				}
			}

			ftp.logout();
			result = true;
		} catch (IOException e) {
			e.printStackTrace();
		} finally {
			if (ftp.isConnected()) {
				try {
					ftp.disconnect();
				} catch (IOException ioe) {
				}
			}
		}
		return result;
	}
}
使用FTPClient 需要添加如下坐标
		<dependency>
			<groupId>commons-netgroupId>
			<artifactId>commons-netartifactId>
			<version>3.3version>
		dependency>
IDUtils : 用于为上传的图片起名
package ah.szxy.utils;

import java.util.Random;

/**
 * 各种id生成策略
 * @version 1.0
 */
public class IDUtils {

	/**
	 * 图片名生成
	 */
	public static String genImageName() {
		// 取当前时间的长整形值包含毫秒
		long millis = System.currentTimeMillis();
		// long millis = System.nanoTime();
		// 加上三位随机数
		Random random = new Random();
		// 返回0~999的数据.
		int end3 = random.nextInt(999);
		// 如果不足三位前面补0. %d - 模拟C语言中的数学占位符.  03代表必须三位数字,不足三位使用0补齐.
		String str = millis + String.format("%03d", end3);
		return str;
	}

	/**
	 * 商品id生成
	 */
	public static long genItemId() {
		//取当前时间的长整形值包含毫秒
		long millis = System.currentTimeMillis();
		//long millis = System.nanoTime();
		//加上两位随机数
		Random random = new Random();
		int end2 = random.nextInt(99);
		//如果不足两位前面补0
		String str = millis + String.format("%02d", end2);
		long id = new Long(str);
		return id;
	}

	public static void main(String[] args) {
		for(int i=0;i< 100;i++)
		System.out.println(genItemId());
	}
}
3.在配置文件中添加FTP文件上传参数
#http://47.98.169.238:81/bzshop/2019/09/09/1567995988930343.jpg
FTP_HOST: 47.98.169.238
FTP_PORT: 21
FTP_USERNAME: ftpuser
FTP_PASSWORD: ftpuser
FTP_BASEPATH: /home/ftpuser/bzshop/
IMAGE_HTTP_PATH: http://47.98.169.238:81/bzshop/
4.定义文件上传接口
public interface FileUploadService {
	/**
	 * 上传图片功能
	 * @param file
	 * @return
	 */
	Result fileUpload(MultipartFile file);
}
接口的返回值-商城自定义响应模型Result
package ah.szxy.utils;

import com.fasterxml.jackson.databind.JsonNode;
import com.fasterxml.jackson.databind.ObjectMapper;
import java.io.Serializable;
import java.util.List;
/**
 * 商城自定义响应模型
 */
public class Result implements Serializable {
    // 定义jackson对象
    private static final ObjectMapper MAPPER = new ObjectMapper();

    // 响应业务状态
    private Integer status;

    // 响应消息
    private String msg;

    private static final Integer okcode=200;
    private static final Integer errorcode=500;


    // 响应中的数据
    private Object data;

    public static Result build(Integer status, String msg, Object data) {
        return new Result(status, msg, data);
    }
    public static Result error( String msg) {
        return new Result(500, msg, null);
    }

    public static Result ok(Object data) {
        return new Result(data);
    }

    public static Result ok() {
        return new Result(null);
    }

    public Result() {

    }

    public static Result build(Integer status, String msg) {
        return new Result(status, msg, null);
    }

    public Result(Integer status, String msg, Object data) {
        this.status = status;
        this.msg = msg;
        this.data = data;
    }

    public Result(Object data) {
        this.status = okcode;
        this.msg = "OK";
        this.data = data;
    }

    public Integer getStatus() {
        return status;
    }

    public void setStatus(Integer status) {
        this.status = status;
    }

    public String getMsg() {
        return msg;
    }

    public void setMsg(String msg) {
        this.msg = msg;
    }

    public Object getData() {
        return data;
    }

    public void setData(Object data) {
        this.data = data;
    }

    /**
     * 将json结果集转化为EgoResult对象
     *
     * @param jsonData json数据
     * @param clazz EgoResult中的object类型
     * @return
     */
    public static Result formatToPojo(String jsonData, Class<?> clazz) {
        try {
            if (clazz == null) {
                return MAPPER.readValue(jsonData, Result.class);
            }
            JsonNode jsonNode = MAPPER.readTree(jsonData);
            JsonNode data = jsonNode.get("data");
            Object obj = null;
            if (clazz != null) {
                if (data.isObject()) {
                    obj = MAPPER.readValue(data.traverse(), clazz);
                } else if (data.isTextual()) {
                    obj = MAPPER.readValue(data.asText(), clazz);
                }
            }
            return build(jsonNode.get("status").intValue(), jsonNode.get("msg").asText(), obj);
        } catch (Exception e) {
            return null;
        }
    }

    /**
     * 没有object对象的转化
     *
     * @param json
     * @return
     */
    public static Result format(String json) {
        try {
            return MAPPER.readValue(json, Result.class);
        } catch (Exception e) {
            e.printStackTrace();
        }
        return null;
    }

    /**
     * Object是集合转化
     *
     * @param jsonData json数据
     * @param clazz 集合中的类型
     * @return
     */
    public static Result formatToList(String jsonData, Class<?> clazz) {
        try {
            JsonNode jsonNode = MAPPER.readTree(jsonData);
            JsonNode data = jsonNode.get("data");
            Object obj = null;
            if (data.isArray() && data.size() > 0) {
                obj = MAPPER.readValue(data.traverse(),
                        MAPPER.getTypeFactory().constructCollectionType(List.class, clazz));
            }
            return build(jsonNode.get("status").intValue(), jsonNode.get("msg").asText(), obj);
        } catch (Exception e) {
            return null;
        }
    }

    /**
     * 将字符串转换为对象,不包含Result内容
     *
     * @param jsonData json数据
     * @param clazz 集合中的类型
     * @return
     */
    public static Result formatObjectToList(String jsonData, Class<?> clazz) {
        try {
            JsonNode jsonNode = MAPPER.readTree(jsonData);
            Object obj= null;
            if (jsonNode.isArray() && jsonNode.size() > 0) {
                obj = MAPPER.readValue(jsonNode.traverse(),
                        MAPPER.getTypeFactory().constructCollectionType(List.class, clazz));
            }
            return build(null,null, obj);
        } catch (Exception e) {
            return null;
        }
    }
}
5.定义文件实现类
package ah.szxy.backend.item.service.impl;

import java.text.SimpleDateFormat;
import java.util.Date;

import org.springframework.beans.factory.annotation.Value;
import org.springframework.stereotype.Service;
import org.springframework.web.multipart.MultipartFile;

import ah.szxy.backend.item.service.FileUploadService;
import ah.szxy.utils.FtpUtil;
import ah.szxy.utils.IDUtils;
import ah.szxy.utils.Result;

@Service
public class FileUploadServiceImpl implements FileUploadService {

	/*
	 *
	 * FTP_HOST: 47.98.169.238
		FTP_PORT: 21
		FTP_USERNAME: ftpuser
		FTP_PASSWORD: ftpuser
		FTP_BASEPATH: /home/ftpuser/bzshop/
		IMAGE_HTTP_PATH: http://47.98.169.238:81/bzshop/
	 */
	@Value("${FTP_HOST}")
	private String FTP_HOST;
	@Value("${FTP_PORT}")
	private int FTP_PORT;
	@Value("${FTP_USERNAME}")
	private String FTP_USERNAME;
	@Value("${FTP_PASSWORD}")
	private String FTP_PASSWORD;
	@Value("${FTP_BASEPATH}")
	private String FTP_BASEPATH;
	@Value("${IMAGE_HTTP_PATH}")
	private String IMAGE_HTTP_PATH;

	@Override
	public Result fileUpload(MultipartFile file) {

		try {
			// 定义上传图片的目录结构
			SimpleDateFormat sdf = new SimpleDateFormat("yyyy/MM/dd");
			String path = sdf.format(new Date());

			// 设置新的文件名
			String newFileName = IDUtils.genImageName()
					+ file.getOriginalFilename().substring(file.getOriginalFilename().lastIndexOf("."));
			FtpUtil.uploadFile(this.FTP_HOST, this.FTP_PORT, this.FTP_USERNAME, this.FTP_PASSWORD, this.FTP_BASEPATH,
					path,newFileName, file.getInputStream());

			//String imageURL = "http://" + this.FTP_HOST + path + newFileName;
			String imageURL =this.IMAGE_HTTP_PATH +path+"/"+ newFileName;
			System.out.println(imageURL);
			return Result.ok(imageURL);

		} catch (Exception e) {
			e.printStackTrace();
		}
		return Result.error("上传失败");;
	}

}
6.定义文件上传Controller
package ah.szxy.backend.item.controller;

import org.springframework.beans.factory.annotation.Autowired;
import org.springframework.stereotype.Controller;
import org.springframework.web.bind.annotation.RequestMapping;
import org.springframework.web.bind.annotation.RestController;
import org.springframework.web.multipart.MultipartFile;

import ah.szxy.backend.item.service.FileUploadService;
import ah.szxy.utils.Result;

@RestController
@RequestMapping("/file")
public class FileUploadController {
	@Autowired
	private FileUploadService fileUploadService;

	/**
	 * 图片上传
	 */
	@RequestMapping("/upload")
	public Result fileUpload(MultipartFile file) {
		try {
			return this.fileUploadService.fileUpload(file);
		} catch (Exception e) {
			e.printStackTrace();
		}
		return Result.build(500, "error");
	}

}
TX-LCN处理事务
搭建TX-LCN 服务端
修改压缩包中打包的全局配置文件 , 指定分布式服务LCN服务端发布的虚拟机的地址,然后上传到虚拟机
资料见底部1
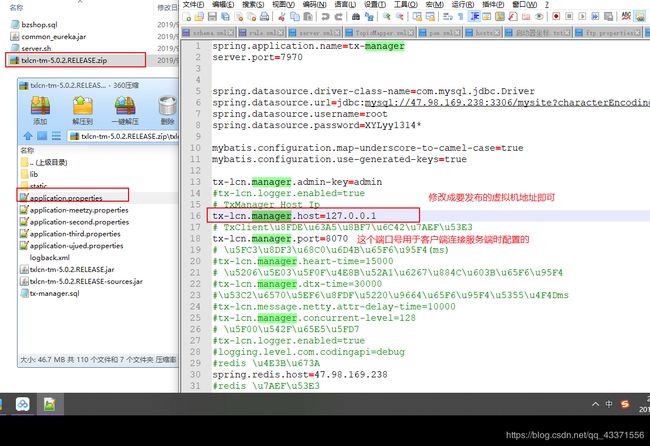
解压, 解压后如下图, 然后通过如下命令运行
#前置启动 ,启动后整个终端被占用
java -jar txlcn-tm-5.0.2.RELEASE.jar

#访问地址为,密码为 admin,在配置文件中配置好的
http://虚拟机地址:7970
搭建TX-LCN 客户端
在每个使用数据库的地方 ,无论是直接使用, 还是间接调用,都需要执行如下三步操作
1.添加坐标
2.在需要进行处理的事务(插入,更新操作)中添加 @LcnTransaction 注解
3.在启动类中添加 @EnableDistributedTransaction 注解
注意:
因为服务端使用了redis, 为了让客户端和服务端同步,最好在客户端配置文件中添加redis的参数. 因为本人没配置redis参数Fegin调用就出现405了
相关坐标
		<dependency>
			<groupId>ah.szxy.projectgroupId>
			<artifactId>common_tx_manager_clientartifactId>
			<version>0.0.1-SNAPSHOTversion>
		dependency>
		<dependency>
			<groupId>ah.szxy.projectgroupId>
			<artifactId>common_mapperartifactId>
			<version>0.0.1-SNAPSHOTversion>
		dependency>
配置redis的参数
spring
  redis:
    host: 47.98.169.238
    port: 6379
有可能需要数据库连接池
		<dependency>
			<groupId>com.alibabagroupId>
			<artifactId>druidartifactId>
		dependency>
下游服务的接口复用思想
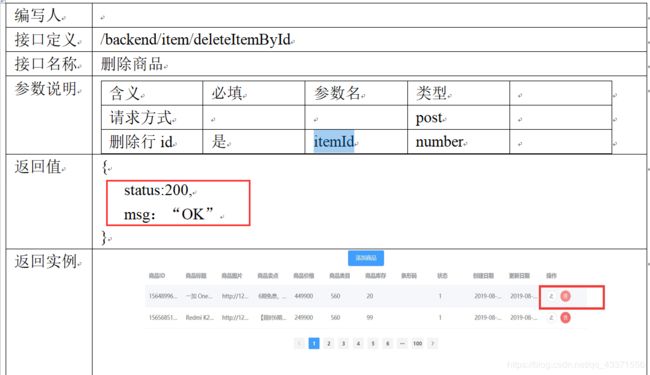
在common_item 服务中实现删除商品
1.接口方法
	/**
	 * 更新操作实现删除商品
	 * @param tbItem
	 * @return
	 */
	Integer updateItemById(TbItem tbItem);
2.接口实现类方法
注意:
a.这里只封装了查询的方法, 而没有在这里进行业务逻辑的处理 ,只需要在修改时将修改时间写上即可.至于如何操作数据应该交给业务层处理
b.下游服务封装了更新方法后,上游服务不仅删除会用到, 更改商品信息等也会用到, 提高代码的复用性
c.我们需要明白业务逻辑时是可以根据需要提升到其他层的
增删改都需要使用事务处理@LcnTransaction
/**
	 * 使用更新操作实现删除商品(逻辑删除) ,将其修改为下架
	 * 删除是更新status 字段的值,修改为3,这里是下游服务先不进行处理
	 *
	 */
	@Override
	@LcnTransaction
	public Integer updateItemById(TbItem tbItem) {
		tbItem.setUpdated(new Date());
		return this.tbItemMapper.updateByPrimaryKeySelective(tbItem);
	}
3.Controller
使用的是更新的接口,但是起名建议还是用删除起名
如果真的需要更新了,可以在这里新建一个Controller用于更新即可
这样做也方便Feign的调用 ,不易与更新搞混
/**
	 * 更新与删除商品
	 *
	 * /service/item/deleteItemById
	 */
	@RequestMapping("/deleteItemById")
	public Integer deleteItemById(@RequestBody TbItem tbItem) {
		return this.itemService.updateItemById(tbItem);
	}
在backend_item 服务中实现删除商品
1.在CommonItemFeignClient中添加下游的服务
@RequestMapping("/service/item/deleteItemById")
	public Integer deleteItemById(@RequestBody TbItem tbItem);
2.接口类
/**
	 * 删除商品
	 * @param itemId
	 * @return
	 */
	Result deleteItemById(Long itemId);
3.接口实现类
增删改都需要开启事务处理@LcnTransaction
/**
	 * 根据id删除商品(逻辑删除,状态该为3)
	 */
	@Override
	@LcnTransaction
	public Result deleteItemById(Long itemId) {


		TbItem tbItem=new TbItem();
		tbItem.setId(itemId);   //将id传给TbItem对象,然后下游项目调用更新方法进行更新
		tbItem.setStatus((byte) 3);//'商品状态,1-正常,2-下架,3-删除
		Integer result = this.commonItemFeignClient.deleteItemById(tbItem);

		if(result!=0)
			Result.ok(result);

		return Result.error("删除失败");

	}
4.Controller
异常处理的作用: 在这里出现异常了能够以及抛出并告知我们
@RequestMapping("/deleteItemById")
	public Result deleteItemById(Long itemId) {

		try {
			 this.itemService.deleteItemById(itemId);
			 return Result.ok();
		} catch (Exception e) {
			e.printStackTrace();
		}
		return Result.error("删除失败");
	}
父子节点判断逻辑-内容分类的添加
common-content
1.创建接口方法
/**
	 * 内容分类添加
	 * @param tbContentCategory
	 * @return
	 */
	Integer insertContentCategory(TbContentCategory tbContentCategory);
2.创建接口实现类
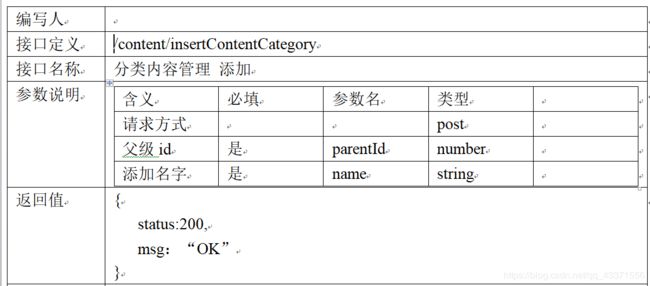
a. 执行添加操作后,不仅需要添加我们前端提交的数据,还要补齐数据
b.因为会选定一个节点添加子节点,所以需要判断这个节点是父节点还是子节点
判断是否是父子节点的逻辑一定要理清:如果是父节点无需处理,
但是如果是子节点需要将其改为父节点,这样才能在他的下面展示添加的节点
原因 : 页面会根据是否为父节点决定是否展示他的下一级目录,即使下一级有子节点 ,但是他的 isParent属性为false或0也不会展示
总的逻辑: 插入->查询父节点->判断父节点->决定是否修改父节点的isParent属性
/**
	 * 内容分类的添加
	 */
	@Override
	@LcnTransaction
	public Integer insertContentCategory(TbContentCategory tbContentCategory) {
		Date date = new Date();
		//插入的时候,补齐TBContentCategory
		tbContentCategory.setCreated(date);
		tbContentCategory.setUpdated(date);
		tbContentCategory.setIsParent(false);//查询了这个节点后,将其是否是父节点设置为false
		tbContentCategory.setSortOrder(1);
		tbContentCategory.setStatus(1);

		//插入数据
	    int result = this.tbContentCategoryMapper.insert(tbContentCategory);

	    //查询当前节点的父节点
	    TbContentCategory tbcc = this.tbContentCategoryMapper.selectByPrimaryKey(tbContentCategory.getParentId());

	    //判断父节点是否是子节点,如果是需要将其设为父节点,这样才能在他的根下添加东西
		if (!tbcc.getIsParent()) {//如果为true(是父节点),取!为false,跳过if语句;如果是叶子节点为false,取值true,进入语句内部并将其设置为父节点
			tbcc.setIsParent(true);//?
			tbcc.setUpdated(date);
		}
	    this.tbContentCategoryMapper.updateByPrimaryKey(tbcc);

		 return result;
	}
3.创建Controller
注意
1.书写的思路可以是先创建好所有的类, 将Controller的路径和方法写好,返回null
2.将Controller中的方法去掉即可作为接口方法的定义,需要去掉参数列表中的注解
3.然后可以复制(注解部分,方法声明部分,但是需要去掉访问修饰符 )
如下代码部分作为Feign的接口方法调用 ,因为接口方法不建议用public修饰
@RequestMapping("/insertContentCategory")
Integer insertContentCategory(@RequestBody TbContentCategory tbContentCategory)
/**
	 * 添加内容分类
	 * @param tbContentCategory
	 * @return
	 */
	@RequestMapping("/insertContentCategory")
	public Integer insertContentCategory(@RequestBody TbContentCategory tbContentCategory) {

		return this.contentCategoryService.insertContentCategory(tbContentCategory);
	}
backend-content
1.创建并修改feign接口类
@FeignClient("common-content")
public interface CommonContentFeignCleint {

	//------------------------------------------/service/content-----------------------------------------
	@RequestMapping("/service/content/selectContentCategoryByParentId")
    List<TbContentCategory> selectContentCategoryByParentId(@RequestParam("parentId")Long parentId);

	@RequestMapping("/service/content/insertContentCategory")
	Integer insertContentCategory(@RequestBody TbContentCategory tbContentCategory);
}
2.添加接口
/**
	 * 内容分类的添加
	 * @param parentId
	 * @param name
	 * @return
	 */
	Result insertContentCategory(Long parentId,String name);
3.添加接口实现类
/**
	 * 内容分类的添加
	 */
	@Override
	@LcnTransaction
	public Result insertContentCategory(Long parentId, String name) {

		TbContentCategory tbContentCategory=new TbContentCategory();
		tbContentCategory.setParentId(parentId);
		tbContentCategory.setName(name);
		Integer result = this.commonContentFeignCleint.insertContentCategory(tbContentCategory);

		if (result>0) {
			return Result.ok(result);
		}
		return Result.error("添加失败");
	}
4.添加Controller
/**
	 * 内容分类的查询
	 * @param parentId
	 * @param name
	 * @return
	 */
	@RequestMapping("/insertContentCategory")
	public Result insertContentCategory(Long parentId,String name) {
		try {
			return this.contentCategoryService.insertContentCategory(parentId, name);
		} catch (Exception e) {
			e.printStackTrace();
		}
		return Result.error(null);
	}
父子节点判断逻辑-内容分类的删除(迭代)
common-content
1.controller
/**
	 * 删除内容分类
	 * @param categoryId
	 * @return
	 */
	@GetMapping("/deleteContentCategoryById")
	public Integer deleteContentCategoryById(@RequestParam Long categoryId) {
		return this.contentCategoryService.deleteContentCategoryById(categoryId);
	}
2.接口
	/**
	 * 内容分类删除
	 * @param categoryId
	 * @return
	 */
	Integer deleteContentCategoryById( Long categoryId) ;
3.接口实现类
内容分类的删除操作思路
内容分类的删除-对节点进行操作思路
*查询当前节点(便于对当前节点进行操作)->
* 删除当前节点(调用删除节点的方法)->
* 删除节点方法(递归调用)思路:
* 判断当前节点->
* 当前节点如果是父节点->
* 查询所有子节点集合->
* 遍历子节点,递归调用删除子节点的方法, 并删除当前节点->
* 不是父节点 ,直接删除当前节点
* 查看当前节点的父节点->
* 查看当前节点是否有兄弟节点(通过根据父节查看,同为一个父节点的节点就是兄弟节点), 决定是否修改父节点的状态->
* 如果没有即更改父节点状态(改为非父节点)
/**
	 * 内容分类的删除-对节点进行操作思路
	 *
	 * 查询当前节点(便于对当前节点进行操作)->
	 * 删除当前节点(调用删除节点的方法)->
	 * 查看当前节点的父节点->
	 * 查看当前节点是否有兄弟节点(通过根据父节查看,同为一个父节点的节点就是兄弟节点),点决定是否修改父节点的状态->
	 * 如果没有即更改父节点状态(改为非父节点)
	 */
	@Override
	public Integer deleteContentCategoryById(Long categoryId) {
		//查询当前节点(便于对当前节点进行操作)
		TbContentCategory currentNode = this.tbContentCategoryMapper.selectByPrimaryKey(categoryId);

		//删除当前节点(调用删除节点的方法)
		this.deleteNode(currentNode);

		//查看当前节点的父节点
		TbContentCategory parentNode = this.tbContentCategoryMapper.selectByPrimaryKey(currentNode.getParentId());

		//查看当前节点是否有兄弟节点,决定是否修改父节点的状态)
		TbContentCategoryExample example=new TbContentCategoryExample();
		Criteria c = example.createCriteria();
		c.andParentIdEqualTo(parentNode.getId());//同为一个父节点的节点就是兄弟节点
		List<TbContentCategory> brotherNodeList = this.tbContentCategoryMapper.selectByExample(example);

		if(brotherNodeList.size()==0 ) {
			//如果没有即更改父节点状态
			parentNode.setIsParent(false);
			parentNode.setUpdated(new Date());
			this.tbContentCategoryMapper.updateByPrimaryKey(parentNode);
		}
		return 200;
	}

/**
	 * 删除节点方法(递归 调用)
	 *
	 * 思路(需要考虑子节点):
	 * 判断当前节点->
	 * 当前节点如果是父节点->
	 * 查询所有子节点集合->
	 * 遍历子节点,递归调用删除子节点的方法, 并删除当前节点->
	 * 不是父节点 ,直接删除当前节点
	 *
	 * @param currentCategory
	 */
	private void deleteNode(TbContentCategory currentNode) {
		//判断当前节点
		//当前节点如果是父节点
		if (currentNode.getIsParent()) {

			//查询所有子节点
			TbContentCategoryExample example=new TbContentCategoryExample();
			Criteria c = example.createCriteria();
			c.andParentIdEqualTo(currentNode.getId());
			List<TbContentCategory> childNodeList = this.tbContentCategoryMapper.selectByExample(example);

			//---遍历子节点,递归调用删除子节点的方法, 并删除  当前  节点----
			for(TbContentCategory childNode:childNodeList) {

				this.deleteNode(childNode);//递归调用
				this.tbContentCategoryMapper.deleteByPrimaryKey(currentNode.getId());
			}
		}else {//不是父节点 ,直接删除当前节点
			this.tbContentCategoryMapper.deleteByPrimaryKey(currentNode.getId());
		}
	}
backend-content
1.Feign接口
在传入单个值而不是对象时,
前端controller可以不指定@RequestParam的参数, 但这里必须指定,例如@RequestParam("categoryId") Long categoryId)
@GetMapping("/service/content/deleteContentCategoryById")
	Integer deleteContentCategoryById(@RequestParam("categoryId") Long categoryId);
	//下游服务的前端controller可以不指定@RequestParam的参数,这里必须指定
2.接口类
/**
	 * 内容分类的删除
	 * @param categoryId
	 * @return
	 */
	Result deleteContentCategoryById(Long categoryId);
3.接口实现类
根据下游服务的返回值进行判断,返回页面响应模型Result
/**
	 * 内容分类的删除
	 */
	@Override
	public Result deleteContentCategoryById(Long categoryId) {

		Integer statusCode = this.commonContentFeignCleint.deleteContentCategoryById(categoryId);
		if (statusCode==200) {
			return Result.ok();
		}
		return Result.error("删除失败");
	}
4.controller
/**
	 *内容分类节点的删除
	 * @param categoryId
	 * @return
	 */
	@RequestMapping("/deleteContentCategoryById")
	public Result deleteContentCategoryById(Long categoryId) {

		try {
			this.contentCategoryService.deleteContentCategoryById(categoryId);
			return Result.ok();
		} catch (Exception e) {
			e.printStackTrace();
		}
		return Result.error(null);
	}
迭代思想的使用
上个功能的实现也使用了迭代思想
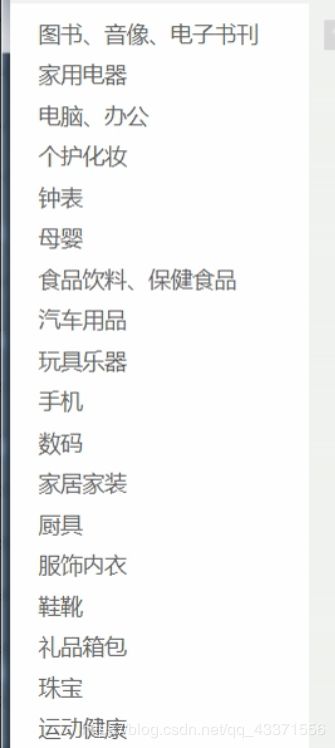
在common_item 服务中实现商品分类查询
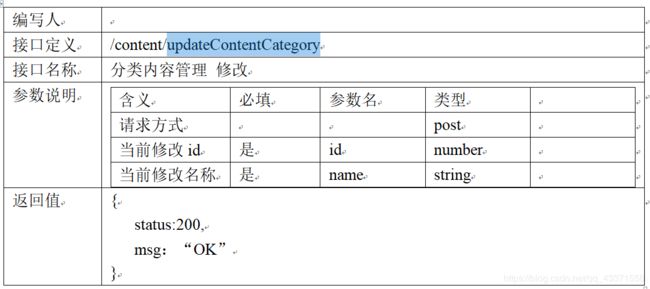
1.接口文档
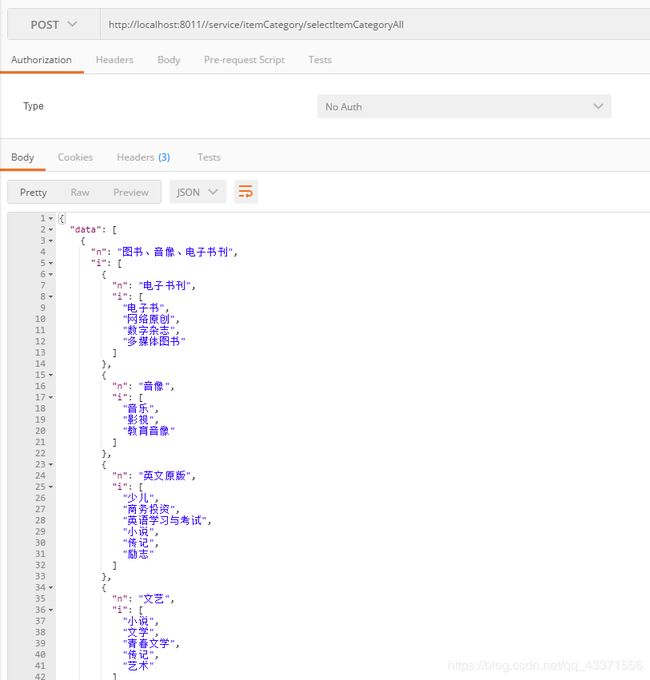
上游接口展示
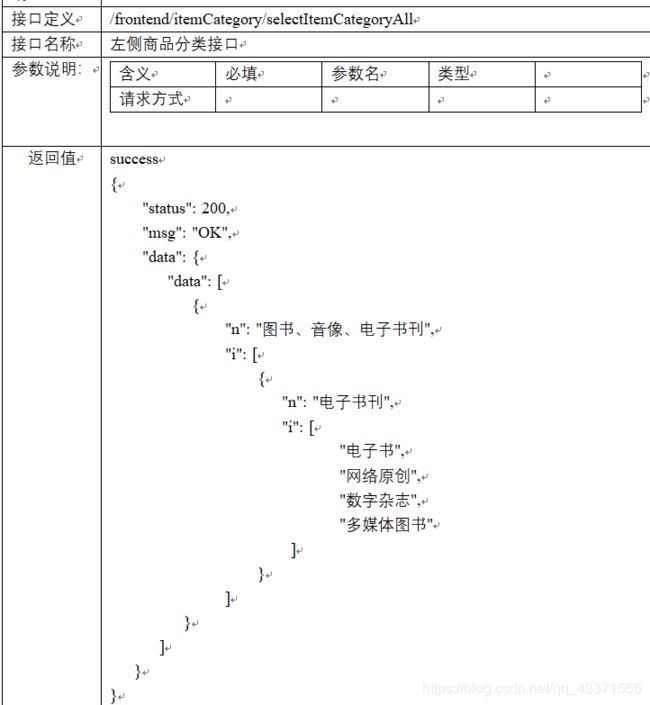
我们根据返回值,可以看出我们需要返回一个json格式的数据
需要创建对象模型类, 以他们的属性作为json数据的key ,查询到的数据为值,才能返回指定数据
2.实现所需模型类
a.创建首页商品分类json数据格式模型2, 返回json串中的第二个"data"节点
(第一个data由上游服务frontend_portal调用的Result返回 )
/**
 * 首页商品分类json数据格式模型1
 *
 * json串中的第二个"data"节点
 *
 */
public class CatResult implements Serializable {
	private List<?> data;

	public List<?> getData() {
		return data;
	}

	public void setData(List<?> data) {
		this.data = data;
	}

}
b.创建首页商品分类json数据格式模型2
作用: 用于返回 n 与 i 节点
@JsonProperty :相当于输出json串时,修改对应key的值
/**
 * 首页商品分类json数据格式模型2
 * json串中date节点下的 n节点和i节点
 *
 * @JsonProperty :相当于输出json串时,修改对应key的值
 * List  :  ?相当于占位符,不指定具体类名,因此可以为任意的实体类
 *
 */
public class CatNode implements Serializable{
	@JsonProperty("n")
	private String name;//商品分类名称
	@JsonProperty("i")
	private List<?> item;//商品分类列表,代表他或者他下的子节点
	public String getName() {
		return name;
	}
	public void setName(String name) {
		this.name = name;
	}
	public List<?> getItem() {
		return item;
	}
	public void setItem(List<?> item) {
		this.item = item;
	}


}
3.接口类
	/**
	 * 查询首页商品分类
	 * @return
	 */
	CatResult selectItemCategoryAll();
4.接口实现类
查询首页的商品分类思路 :
* 1.为第一个date属性赋值
* 2.通过调用查询商品分类下的子节点的方法
* 查询子节点->
* 创建一个resultList用于存放第二个data节点下的数据->
* 只取商品分类的前18条数据->
* 判断是否是父节点(如果是父节点,将节点的name属性与list属性给首页商品分类模型1. name:xx , item:yy)
* 判断是否是父节点(如果不是是父节点,不是父节点,将每个节点的名字放入到resultList)
* 3.返回首页商品分类json数据格式模型
	/**
	 * 查询首页的商品分类
	 *
	 * 为第一个date属性赋值
	 * 通过调用查询商品分类下的子节点的方法
	 * 返回商品模板分类模型
	 */
	@Override
	public CatResult selectItemCategoryAll() {
		CatResult catResult=new CatResult();

		//查询商品分类
		catResult.setData(getCateList(0L));//查询id为0的节点
		System.out.println(catResult.getData().size());
		return catResult;
	}
//格式模板:   success { "status": 200, "msg": "OK", "data": {
 //此处分类模型1             "data": [ { "n": "图书、音像、电子书刊",
 //此处分类模型2                       //"i": [ { "n": "电子书刊",
					   	    	  //		   "i": [ "电子书", "网络原创", "数字杂志", "多媒体图书" ] } ] } ] } }
	/**
	 * 私有方法,用于查询商品分类下的子节点的方法
	 *
	 * 查询子节点->
	 * 创建一个resultList用于存放第二个data节点下的数据->
	 * 只取商品分类的前18条数据->
	 * 判断是否是父节点(如果是父节点,将节点的name属性与list属性给首页商品分类模型2. name:xx , item:yy)
	 * 判断是否是父节点(如果不是是父节点,不是父节点,将每个节点的名字放入到resultList)
	 *
	 *
	 * @param parentId
	 * @return
	 */
	private List<?> getCateList(Long parentId) {
		//创建查询条件-查询子节点
		TbItemCatExample example=new TbItemCatExample();
		Criteria c = example.createCriteria();
		c.andParentIdEqualTo(parentId);//根据子节点的父id
		List<TbItemCat> list = this.tbItemCatMapper.selectByExample(example);

		List resultList=new ArrayList();//用于存放第二个data节点下的数据
		int count=0;//用于取前18条数据的计数
		for (TbItemCat tbItemCat : list) {
			if (tbItemCat.getIsParent()) {//判断是否是父节点,如果是父节点,设置name属性与list属性给首页商品分类模型2
				CatNode catNode=new CatNode();
				catNode.setName(tbItemCat.getName());
				catNode.setItem(getCateList(tbItemCat.getId()));//递归,将当前节点类id作为父节点查询,放入到item中
				resultList.add(catNode);
				count++;

				//只取商品分类的前18条数据
				if (count==18) {
					break;
				}
			}else {//不是父节点,将每个节点的名字放入到resultList
				resultList.add(tbItemCat.getName());
			}
		}

		return resultList;

	}
5.controller
	/**
	 * 查询首页商品分类节点
	 * @return
	 */
	@RequestMapping("/selectItemCategoryAll")
	public CatResult selectItemCategoryAll() {
		return this.itemCategoryService.selectItemCategoryAll();
	}
在frontend_portal 服务中实现商品分类查询
1.创建Feign调用的接口类,调用下游服务
@FeignClient("common-item")
public interface CommonItemFeignClient {

	//-------------------------------/service/itemCategory------------------------------------
	@RequestMapping("/service/itemCategory/selectItemCategoryAll")
	public CatResult selectItemCategoryAll();
}
2.创建接口
public interface ItemCategoryService {
	/**
	 * 查询首页左侧商品类目
	 * @return
	 */
	Result selectItemCategoryAll();
}
3.创建接口实现类方法
注入并调用 Feign中的接口服务
@Service
public class ItemCategoryServiceImpl implements ItemCategoryService {
	@Autowired
	private CommonItemFeignClient commonItemFeignClient;
	/**
	 * 查询首页左侧商品类目
	 */
	@Override
	public Result selectItemCategoryAll() {
		CatResult catResult = this.commonItemFeignClient.selectItemCategoryAll();
		if (catResult!=null ) {
			return Result.ok(catResult);
		}
		return Result.error("查询无果");
	}

}
4.创建controller方法
@RestController
@RequestMapping("/frontend/itemCategory")
public class ItemCategoryController {
	@Autowired
	private ItemCategoryService itemCategoryService;

	@RequestMapping("/selectItemCategoryAll")    ///frontend/itemCategory/selectItemCategoryAll
	public Result selectItemCategoryAll() {

		try {
			return this.itemCategoryService.selectItemCategoryAll();
		} catch (Exception e) {
			e.printStackTrace();
		}
		return Result.error(null);
	}
}
六、开发百战商城前台系统
List集合嵌套Map的实现
首页大广告的实现
1.业务层接口
public interface ItemContentService {
/**
* 首页大广告位接口
*
* 由接口文档可以看出,需要还有Map集合,但是有多个重复的元素
* 所以使用一个list集合嵌套Map集合实现
* @return
*/
List2.接口实现类
#在配置文件中定义可改变值的属性
frontend:
    AD: 89
@Service
public class ItemContentServiceImpl implements ItemContentService{
	@Autowired
	private TbContentMapper tbContentMapper;

	@Value("${frontend.AD}")
	private Long frontendBigAD;
	/**
	 * 首页大广告位查询的实现
	 */
	@Override
	public List<Map> selectFrontendContentByAD() {
		List listMap=new ArrayList();

		//查询大广告
		TbContentExample example=new TbContentExample();
		Criteria c = example.createCriteria();
		c.andCategoryIdEqualTo(frontendBigAD);
		List<TbContent>list =this.tbContentMapper.selectByExampleWithBLOBs(example);//因为不是通过主键查询

		//查询到将数据保存到Map中
		for (TbContent tbContent : list) {
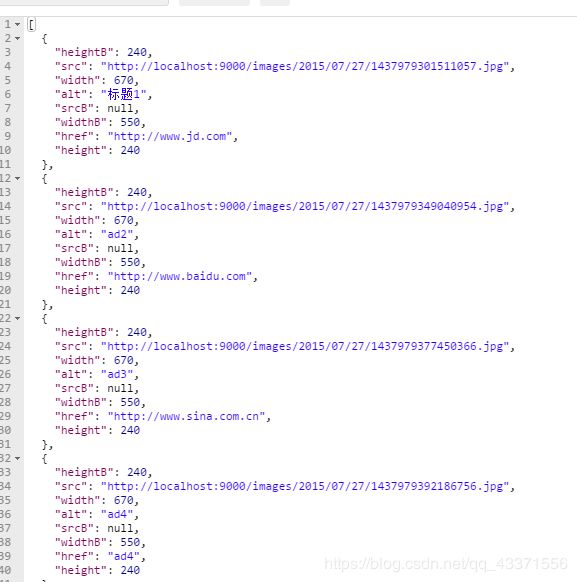
			Map map=new HashMap();//根据接口文档补齐数据
			map.put("heightB", 240);
			map.put("src", tbContent.getPic());
			map.put("width", 670);
			map.put("alt", tbContent.getSubTitle());
			map.put("srcB", null);
			map.put("widthB", 550);
			map.put("href", tbContent.getUrl());
			map.put("height", 240);
			//将数据存到List集合中,返回
			listMap.add(map);
		}

		return listMap;
	}
}
3.controller
@RestController
@RequestMapping("/service/content")
public class ItemContentController {

	@Autowired
	private ItemContentService itemContentService;

	@RequestMapping("/selectFrontendContentByAD")
	public List<Map> selectFrontendContentByAD(){
		return this.itemContentService.selectFrontendContentByAD();
	}
利用Redis实现缓存-服务端
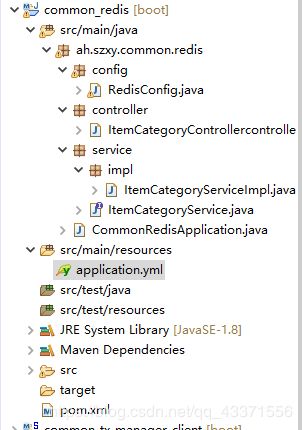
Redis服务端项目
1.创建项目,添加pom文件
<project xmlns="http://maven.apache.org/POM/4.0.0"
	xmlns:xsi="http://www.w3.org/2001/XMLSchema-instance"
	xsi:schemaLocation="http://maven.apache.org/POM/4.0.0 http://maven.apache.org/xsd/maven-4.0.0.xsd">
	<modelVersion>4.0.0modelVersion>
	<parent>
		<groupId>ah.szxy.projectgroupId>
		<artifactId>bz_parentartifactId>
		<version>0.0.1-SNAPSHOTversion>
	parent>
	<artifactId>common_redisartifactId>

	<dependencies>

		<dependency>
			<groupId>org.springframework.bootgroupId>
			<artifactId>spring-boot-starter-webartifactId>
		dependency>

		<dependency>
			<groupId>org.springframework.cloudgroupId>
			<artifactId>spring-cloud-starter-netflix-eureka-clientartifactId>
		dependency>


		<dependency>
			<groupId>org.springframework.cloudgroupId>
			<artifactId>spring-cloud-starter-openfeignartifactId>
		dependency>

		<dependency>
			<groupId>org.springframework.bootgroupId>
			<artifactId>spring-boot-starter-data-redisartifactId>
		dependency>


		<dependency>
			<groupId>ah.szxy.projectgroupId>
			<artifactId>common_pojoartifactId>
			<version>0.0.1-SNAPSHOTversion>
		dependency>
		<dependency>
			<groupId>ah.szxy.projectgroupId>
			<artifactId>common_utilsartifactId>
			<version>0.0.1-SNAPSHOTversion>
		dependency>
	dependencies>

	<build>
		<plugins>
			<plugin>
				<groupId>org.springframework.bootgroupId>
				<artifactId>spring-boot-maven-pluginartifactId>
			plugin>
		plugins>
	build>
project>
2.修改全局配置文件
spring:       #配置应用名,数据库连接参数
  application:
    name: common-redis
  redis:
    database: 1      #指定使用哪个redis数据库分库
    host: 192.168.179.131
    port: 6379
  jedis:
      pool:
      max-active: 200 #最大连接数
      max-wait: -1 #连接池最大等待时间(负数表示没有限制)
      max-idle: 10 #连接池最大空闲数
      min-idle: 0 #连接池最小空闲数
      timeout: 2000 #连接超时时间


server:       #配置端口号
  port: 9999


eureka:       #配置Eureka服务注册中心地址
  client:
    serviceUrl:
      defaultZone: http://eureka-server:8761/eureka/

#配置缓存首页商品分类的key
frontend_catresult_redis_key: frontend:catresult:redis:key
3.Redis的配置类
主要是配置序列化器以及设置String和Hash类型数据的key和value的序列化
import org.springframework.context.annotation.Bean;
import org.springframework.context.annotation.Configuration;
import org.springframework.data.redis.connection.RedisConnectionFactory;
import org.springframework.data.redis.core.RedisTemplate;
import org.springframework.data.redis.serializer.Jackson2JsonRedisSerializer;
import org.springframework.data.redis.serializer.StringRedisSerializer;

import com.fasterxml.jackson.annotation.JsonAutoDetect;
import com.fasterxml.jackson.annotation.PropertyAccessor;
import com.fasterxml.jackson.databind.ObjectMapper;

/**
 * 配置序列化器
 *
 * @author chy
 *
 */
@Configuration
public class RedisConfig {
	/**
	 * 配置RedisTemplate 序列化器
	 */
	@Bean
	public RedisTemplate<String, Object> setRedisTemplate(RedisConnectionFactory factory) {
		// 创建RedisTemplate
		RedisTemplate<String, Object> redisTemplate = new RedisTemplate<>();
		redisTemplate.setConnectionFactory(factory);

		// 设置序列化器
		// 创建Redis 中的value 的序列化器
		Jackson2JsonRedisSerializer jackson2JsonRedisSerializer = new Jackson2JsonRedisSerializer(Object.class);
		ObjectMapper objectMapper = new ObjectMapper();//json转换的核心对象
		objectMapper.setVisibility(PropertyAccessor.ALL, JsonAutoDetect.Visibility.ANY);//设置属性可见,设置json自动检测
		objectMapper.enableDefaultTyping(ObjectMapper.DefaultTyping.NON_FINAL);//开启默认的类型
		jackson2JsonRedisSerializer.setObjectMapper(objectMapper);

		// 创建Redis 中的key 的序列化器
		StringRedisSerializer stringRedisSerializer = new StringRedisSerializer();
		// 设置Redis 中的String 类型的value 的序列化器
		redisTemplate.setValueSerializer(jackson2JsonRedisSerializer);
		// 设置Redis 中的Hash 类型的value 的序列化器
		redisTemplate.setHashValueSerializer(jackson2JsonRedisSerializer);

		// 设置Redis 中的String 类型的key 的序列化器
		redisTemplate.setKeySerializer(stringRedisSerializer);
		// 设置Redis 中的Hash 类型的key 的序列化器
		redisTemplate.setKeySerializer(stringRedisSerializer);
		redisTemplate.afterPropertiesSet();//创建对象后,对其属性做设置
		return redisTemplate;
	}

}
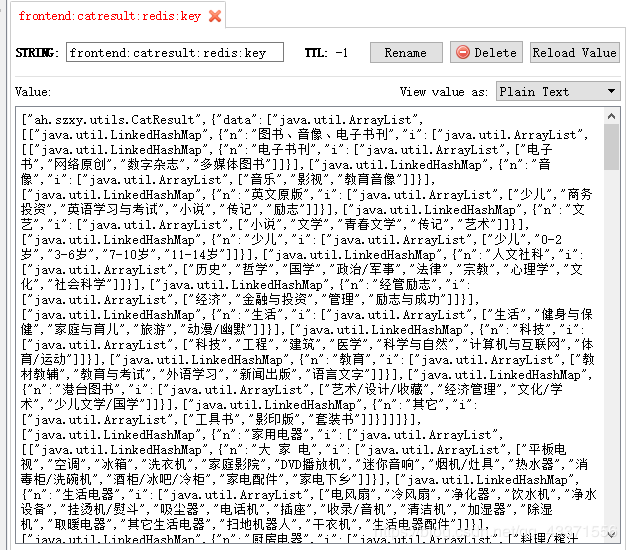
4.接口类
定义添加和查询本地缓存的两个方法
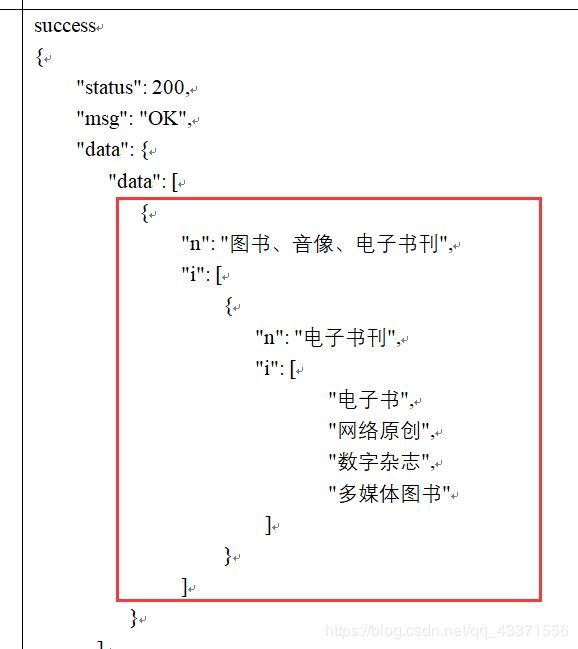
需要注意查询的返回值是商品的分类模型,代表的是红圈里面的内容
因此在套用时,需要注意返回值,同下游服务接口返回值,并创建这个返回值的对象
import ah.szxy.utils.CatResult;

public interface ItemCategoryService {
	/**
	 * 缓存首页左侧商品分类
	 * //下游接口返回值CatResult,所以参数名CatResult,并创建返回值的对象
	 *
	 * @param catResult
	 */
	void insertItemCategory(CatResult catResult);
	/**
	 * 查询首页左侧商品分类
	 * @return
	 */
	CatResult selectItemCategory();
}
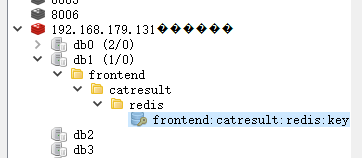
5.配置缓存数据的key
# 配置缓存首页商品分类的key
frontend_catresult_redis_key: frontend:catresult:redis:key
6.接口实现类
import org.springframework.beans.factory.annotation.Autowired;
import org.springframework.beans.factory.annotation.Value;
import org.springframework.data.redis.core.RedisTemplate;
import org.springframework.stereotype.Service;

import ah.szxy.common.redis.service.ItemCategoryService;
import ah.szxy.utils.CatResult;

@Service
public class ItemCategoryServiceImpl implements ItemCategoryService {

	@Autowired
	private RedisTemplate<String, Object>redisTemplate;

	@Value("${frontend_catresult_redis_key}")
	private String frontend_catresult_redis_key;

	/**
	 * 向缓存中添加商品分类
	 */
	@Override
	public void insertItemCategory(CatResult catResult) {

		this.redisTemplate.opsForValue().set(this.frontend_catresult_redis_key, catResult);
	}
	/**
	 * 查询本地缓存中查询商品分类信息
	 */
	@Override
	public CatResult selectItemCategory() {
		return (CatResult) this.redisTemplate.opsForValue().get(this.frontend_catresult_redis_key);
	}

}
7.controller
@RequestMapping的路径自定义,但Feign调用时需要一致
对象类型需要使用@requestBody
@RestController
@RequestMapping("/redis/itemCategory")
public class ItemCategoryControllercontroller {

	@Autowired
	private ItemCategoryService itemCategoryService;

	/**
	 * 向redis中添加缓存
	 * @param catResult
	 */
	@RequestMapping("/insertItemCategory")
	public void insertItemCategory(@RequestBody CatResult catResult) {
		this.itemCategoryService.insertItemCategory(catResult);
	}
	/**
	 * 向redis中缓存首页商品的分类
	 * @return
	 */
	@RequestMapping("/selectItemCategory")
	public CatResult selectItemCategory() {
		return this.itemCategoryService.selectItemCategory();
	}
}
利用Redis实现缓存-客户端
1.Feign调用接口类
@FeignClient("common-item")
public interface CommonItemFeignClient {

	//-------------------------------/service/itemCategory------------------------------------
	@RequestMapping("/service/itemCategory/selectItemCategoryAll")
	public CatResult selectItemCategoryAll();
}
2.接口实现类
redis缓存实现思路
a.查询缓存(此处进行异常处理防止查询出问题后影响对数据库的查询,导致页面无法显示数据),如果存在直接返回
b.查询数据库,如果查询到结果执行c
c.添加缓存(如果查询数据库得到的对象不为空,则添加缓存)
@Service
public class ItemCategoryServiceImpl implements ItemCategoryService {
	@Autowired
	private CommonItemFeignClient commonItemFeignClient;
	@Autowired
	private CommonRedisFeignClient commonRedisFeignClient;

	/**
	 * 查询首页左侧商品类目
	 */
	@Override
	public Result selectItemCategoryAll() {

		// 查询缓存(此处进行异常处理防止查询出问题后影响对数据库的查询,导致页面无法显示数据)
		try {
			CatResult catResult = this.commonRedisFeignClient.selectItemCategory();
			// 判断缓存是否命中
			if (catResult != null && catResult.getData() != null && catResult.getData().size() > 0) {
				return Result.ok(catResult);
			}
		} catch (Exception e) {
			e.printStackTrace();
		}

		// 查询数据库
		CatResult catResult = this.commonItemFeignClient.selectItemCategoryAll();

		// 添加缓存(如果查询数据库得到的对象不为空,则添加缓存)
		try {
			if (catResult != null && catResult.getData() != null && catResult.getData().size() > 0) {
				this.commonRedisFeignClient.insertItemCategory(catResult);

			}
		} catch (Exception e) {
			e.printStackTrace();
		}


		if (catResult != null && catResult.getData() != null && catResult.getData().size() > 0) {
			return Result.ok(catResult);
		}
		return Result.error("查询无果");

	}

}
注意:
在传入list集合或者是实体对象时需要在下游服务的Controller和Feign调用的接口中添加@RequestBody注解
例如: 在配置缓存首页大广告时,插入需要@RequestBody ,
因为这些数据比较多,所以需要进行封装,成为一个list集合对象
@RestController
@RequestMapping("/redis/content")
public class ItemContentController {

	@Autowired
	private ItemContentService ItemContentService;
	/**
	 * 缓存首页大广告
	 * @param list
	 */
	@RequestMapping("/insertContentAD")
	public void insertContentAD(@RequestBody List<Map> list) {

		this.ItemContentService.insertContentAD(list);
	}
	/**
	 * 查询首页大广告缓存
	 * @return
	 */
	@RequestMapping("/selectFrontendContentByAD")
	public List<Map> selectFrontendContentByAD(){
		return this.ItemContentService.selectFrontendContentByAD();
	}
}
在Feign接口调用时,也需要加上@RequestBody
	@PostMapping("/redis/content/insertContentAD")
	void insertContentAD(@RequestBody List<Map> list);

	@PostMapping("/redis/content/selectFrontendContentByAD")
	List<Map> selectFrontendContentByAD();
Redis缓存实现总结
项目环境搭建好以后, 在redis项目 / 服务端
1.创建缓存接口
2.在配置文件中创建需要缓存的内容 key(防止硬编码)
3.在接口实现类中RedisTemplate对象,和需要缓存的内容 key,添加插入和查询的方法 .
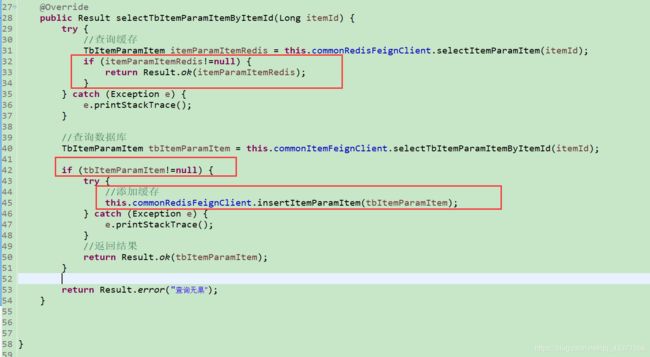
4.controller中单个参数需要加@RequestParam, 对象需要添加@RequestBody
5.在上游服务中,如果管理员修改的商品信息(商品描述,商品详情,商品参数信息等),需要调用下游服务中common_redis,通过相关操作删除reds中的缓存
注意: 如果是查询一个商品信息的时候,进行缓存一般是采用 key+商品id的形式


操作redis进行删除操作

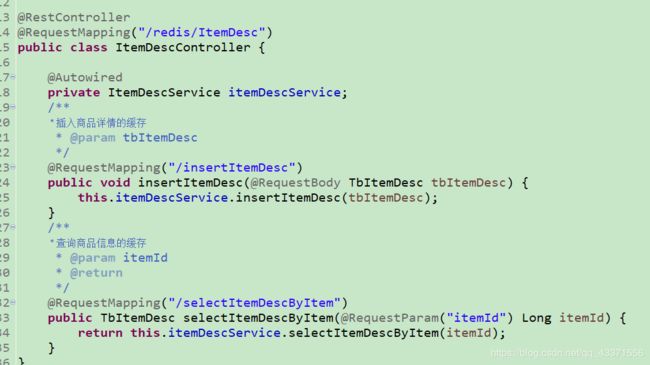
在调用Redis的项目 /客户端(在使用Feign的情况下)
1.使用Feign调用,建议使用@PostMapping或者@GetMapping指定请求方式
2.在业务层实现类(进行业务逻辑处理的地方),添加缓存缓存和实现缓存的思路
思路: 查询缓存->查询数据库->添加缓存->返回结果 . 在返回结果时,无论那个步骤一定要判空,不然页面数据会返回空白数据!!!
上半部分资料分享
链接:https://pan.baidu.com/s/1cM9-h1WaXZ1ObzEYN_3bNg
提取码:albq
复制这段内容后打开百度网盘手机App,操作更方便哦 ↩︎ ↩︎
