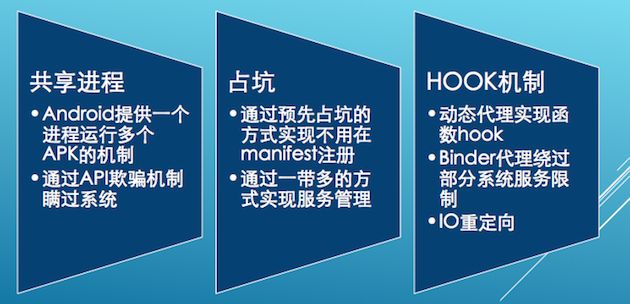
在DroidPlugin源码中,作者提供了一份关于其实现原理的PPT讲义,这里我把其中介绍基本实现原理的章节贴出来。
以下用DP代指DroidPlugin
本文主要介绍Hook机制,看下作者是如何做到“偷天换日”。
Hook机制
我认为,DP所指的“Hook”和传统意义上的Hook是有点区别的,例如在API Hook中提到这样一句话“通过hook‘接触’到需要修改的api函数入口点,改变它的地址指向新的自定义的函数”。Window上的API Hook可能会导致被hook的函数不被执行(不知道我这样理解对不对)。而DP的Hook机制,被hook的函数是会被执行的。阅读DP源码过程中我就有这样的疑问,那DP的Hook到底做了啥!
Java动态代理
再回答上面的疑问之前,我们需要了解“Java动态代理”这个玩意。关于动态代理的资料有很多,这里我就简单介绍下。
Java动态代理是Java反射提供的一个强大功能,使用动态代理,我们可以在被hook方法执行前后,做些额外操作。也可以修改被hook方法的入参,修改方法返回值。下面举个最简单的代理例子,来说明代理能做什么。
首先定义一个接口IShopping,声明一个购物的方法shopping。
package com.kisson.proxy;

public interface IShopping {
    void shopping(String money);
}
接着定义一个类GoShopping,实现IShopping的shopping方法。
package com.kisson.proxy;

public class GoShopping implements IShopping{

    @Override
    public void shopping() {
        // TODO Auto-generated method stub
        System.out.println("我去逛街咯!"+" 我有"+money+"元");
    }
}
接着我们需要利用动态代理去hook接口IShopping的shopping方法。然后定义一个IShoppingHook类并实现InvocationHandler接口
package com.kisson.proxy;

import java.lang.reflect.InvocationHandler;
import java.lang.reflect.Method;

public class IShoppingHook implements InvocationHandler {

    private Object mHookedObject;

    public IShoppingHook(Object hookedObject) {
        this.mHookedObject = hookedObject;
    }

    @Override
    public Object invoke(Object proxy, Method method, Object[] args)
            throws Throwable {
        // 方法执行前,做预处理
        beforeHook();
        //钱越多越好!!!
        args[0] = "2000000";
       //在这里就是执行shopping方法的过程,通过反射来完成
        Object result = method.invoke(mHookedObject, args);
        // 方法执行后,做收尾处理
        afterHook();
        return result;
    }

    public void beforeHook() {
        // todo:something
        System.out.println("工作都已经做完了,可以安心购物咯!");
    }

    public void afterHook() {
        // todo:something
        System.out.println("买的真开心!");
    }
}
上面的准备工作就绪,接着看如何实现。
package com.kisson.proxy;

import java.lang.reflect.Proxy;

public class ProxyTest {

    public static void main(String[] args) {
        // TODO Auto-generated method stub
        ProxyTest test = new ProxyTest();
        IShopping shopping = new GoShopping();
        test.newProxyInstance(shopping).shopping("100");;

    }

    private IShopping newProxyInstance(IShopping shopping) {
        return (IShopping) Proxy.newProxyInstance(shopping.getClass()
                .getClassLoader(), shopping.getClass().getInterfaces(),
                new IShoppingHook(shopping));
    }

}
执行结果如下:
工作都已经做完了,可以安心购物咯!
我去逛街咯! 我有2000000元
买的真开心!
以上动态代理的过程我们做了两件事:
1.在shopping方法执行前后,分别执行了beforeHook和afterHook方法。
2.改变了shopping方法的入参,本来只有100元,最终结果却得到了2000000元!
DP使用Hook机制完成了三个工作:
- 动态代理实现函数hook。
- Binder代理绕过部分系统服务限制。
- IO重定向
以后针对这三个点分别介绍下。
Binder代理绕过部分系统服务限制
原理
LocationManager lm = (LocationManager)getSystemService(Context.LOCATION_SERVICE);
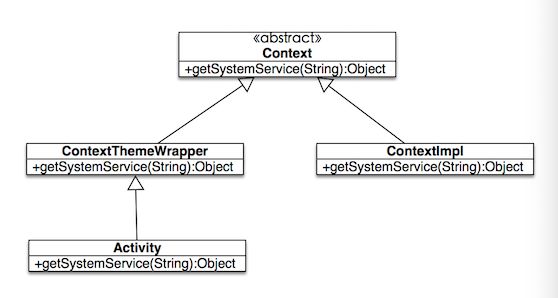
上述代码,是获取系统位置服务。如果我们需要获取类似的系统服务,都是通过Context的getSystemService方法来获取。
getSystemService方法的是在ContextImpl类中实现的。很久没看源码,看了下源码发现该方法的实现被修改了。
    @Override
    public Object getSystemService(String name) {
        return SystemServiceRegistry.getSystemService(this, name);
    }
这里出现了一个SystemServiceRegistry类,其作用是用来管理所有通过getSystemService返回的系统服务。
在类中SystemServiceRegistry类中有很大一坨静态代码块,用于注册各种系统服务。
//位置服务的注册
registerService(Context.LOCATION_SERVICE, LocationManager.class,
                new CachedServiceFetcher() {
            @Override
            public LocationManager createService(ContextImpl ctx) {
                IBinder b = ServiceManager.getService(Context.LOCATION_SERVICE);
                return new LocationManager(ctx, ILocationManager.Stub.asInterface(b));
            }});
在这里我们可以看到LocationManager的创建过程了,通过调用ServiceManager的getService方法来创建IBinder对象,作为LocationManager构造方法的参数。在ContexImpl类中有个mServiceCache对象,用于保存创建的各种XXManager对象,类似单例模式吧。
public final class ServiceManager {
    private static final String TAG = "ServiceManager";

    private static IServiceManager sServiceManager;
    private static HashMap sCache = new HashMap();

    private static IServiceManager getIServiceManager() {
        if (sServiceManager != null) {
            return sServiceManager;
        }

        // Find the service manager
        sServiceManager = ServiceManagerNative.asInterface(BinderInternal.getContextObject());
        return sServiceManager;
    }

    /**
     * Returns a reference to a service with the given name.
     *
     * @param name the name of the service to get
     * @return a reference to the service, or null if the service doesn't exist
     */
    public static IBinder getService(String name) {
        try {
            IBinder service = sCache.get(name);
            if (service != null) {
                return service;
            } else {
                return getIServiceManager().getService(name);
            }
        } catch (RemoteException e) {
            Log.e(TAG, "error in getService", e);
        }
        return null;
    }
//....省略部分代码
}
通过ServiceManager源码,可以知道:
- 使用sCache对象来保存系统中已经创建的IBinder。
- getService方法中,首先会在sCache中去查找是否有缓存,如果没有,则调用IServiceManager的getService方法创建IBinder。
DP hook系统服务的原理:
- 对ServiceManager进行操作,反射得到sCache对象,将系统已经原有的系统移除掉(Remove方法),接着再通过反射调用ServiceManager的getService方法获取新的服务(IBinder),并在此加入sCache。
- 将系统服务中(IBinder)某些有执行限制的方法,进行动态代理处理,在这些方法执行的前后进行“欺骗”操作。
总结起来就是偷天换日、欺上瞒下!
源码分析之偷天换日
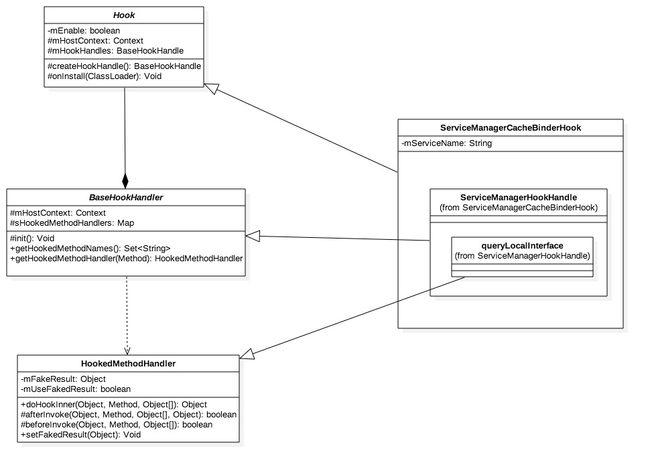
首先来看看“偷天换日”的类图。
结合类图,我们来说明下各个类的作用。
1.Hook类
import android.content.Context;

/**
 * Created by Andy Zhang([email protected]) on 2015/3/2.
 * ---------------------------------
 * Hook类是所有需要进行Hook操作类的基类,直接子类有BinderHook,
 * ServiceManagerCacheBinderHook,ProxyHook,SQLiteDatabaseHook等
 */
public abstract class Hook {
    //mEnable用于标识是否开启Hook操作,如果不开启,则走系统自由流程
    private boolean mEnable = false;
    //宿主的上下文环境
    protected Context mHostContext;

    protected BaseHookHandle mHookHandles;

    public void setEnable(boolean enable, boolean reInstallHook) {
        this.mEnable = enable;
    }

    public final void setEnable(boolean enable) {
        setEnable(enable, false);
    }

    public boolean isEnable() {
        return mEnable;
    }


    protected Hook(Context hostContext) {
        mHostContext = hostContext;
        mHookHandles = createHookHandle();
    }

    //创建BaseHookHandle对象
    protected abstract BaseHookHandle createHookHandle();

    /**
     * 子类实现onInstall方法,主要用于替换ServiceManager中sCache已经存在的系统服务。
     * 首先移除已经存在的系统服务IBinder对象,然后自己生成这些系统服务的IBinder对象,并放入sCache对象中。
     * onInstall方法可以理解为“安装Fake服务的过程”
     */
    protected abstract void onInstall(ClassLoader classLoader) throws Throwable;

    protected void onUninstall(ClassLoader classLoader) throws Throwable {

    }
}
2.BaseHookHandle
import android.content.Context;

import java.lang.reflect.Method;
import java.util.HashMap;
import java.util.Map;
import java.util.Set;

/**
 * Created by Andy Zhang([email protected]) on 2015/2/28.
 * 所有IXXXBinderHook的基类,该类的作用主要是负责HookedMethodHandler的“载入”、“读取”
 */
public abstract class BaseHookHandle {
    //宿主的上下文
    protected Context mHostContext;
    //HookedMethodHandler的对象缓存集合
    protected Map sHookedMethodHandlers = new HashMap(5);

    public BaseHookHandle(Context hostContext) {
        mHostContext = hostContext;
        init();
    }
    //将所有HookedMethodHandler对象存入到sHookedMethodHandlers中
    protected abstract void init();

    //获取sHookedMethodHandlers中所有key值
    public Set getHookedMethodNames(){
        return sHookedMethodHandlers.keySet();
    }

    //根据sHookedMethodHandlers的key值获取对应的HookedMethodHandler对象
    public HookedMethodHandler getHookedMethodHandler(Method method) {
        if (method != null) {
            return sHookedMethodHandlers.get(method.getName());
        } else {
            return null;
        }
    }
}
3.HookedMethodHandler
import android.content.Context;
import com.morgoo.helper.Log;
import java.lang.reflect.Method;

/**
 * 该类可以说整个Hook机制的核心,前面在介绍动态代理的时候,我们声明了IShoppingHook类并实现InvocationHandler接口,
 * 在其invoke方法中,通过发射机制调用被Hook的方法并在其调用前后分别调用了beforeHook和afterHook方法。
 * 那么本类的作用也是如此:在InvocationHandler的invoke方法需要调用的被Hook方法的过程,挪到doHookInner中实现。
 * 在真正调用被Hook的方法前后,做一些处理,以绕过系统限制!
 * **/
public class HookedMethodHandler {

    private static final String TAG = HookedMethodHandler.class.getSimpleName();

    protected final Context mHostContext;
    //Hook后的fake服务(IBinder对象)
    private Object mFakedResult = null;
    //是否使用fake服务
    private boolean mUseFakedResult = false;

    public HookedMethodHandler(Context hostContext) {
        this.mHostContext = hostContext;
    }


    public synchronized Object doHookInner(Object receiver, Method method, Object[] args) throws Throwable {
        long b = System.currentTimeMillis();
        try {
            mUseFakedResult = false;
            mFakedResult = null;
            boolean suc = beforeInvoke(receiver, method, args);
            Object invokeResult = null;
            if (!suc) {
                invokeResult = method.invoke(receiver, args);
            }
            afterInvoke(receiver, method, args, invokeResult);
            if (mUseFakedResult) {
                return mFakedResult;
            } else {
                return invokeResult;
            }
        } finally {
            long time = System.currentTimeMillis() - b;
            if (time > 5) {
                Log.i(TAG, "doHookInner method(%s.%s) cost %s ms", method.getDeclaringClass().getName(), method.getName(), time);
            }
        }
    }

    public void setFakedResult(Object fakedResult) {
        this.mFakedResult = fakedResult;
        mUseFakedResult = true;
    }

    /**
     * 在某个方法被调用之前执行,如果返回true,则不执行原始的方法,否则执行原始方法
     */
    protected boolean beforeInvoke(Object receiver, Method method, Object[] args) throws Throwable {
        return false;
    }

    protected void afterInvoke(Object receiver, Method method, Object[] args, Object invokeResult) throws Throwable {
    }

    public boolean isFakedResult() {
        return mUseFakedResult;
    }

    public Object getFakedResult() {
        return mFakedResult;
    }
}
4.ServiceManagerCacheBinderHook
**
 * Created by Andy Zhang([email protected]) on 2015/3/2.
 * 本类主要完成对系统ServiceManager类中的对象和方法进行hook操作。
 * 包括:1.从sCache对象中remove掉已经存在的系统服务Binder对象
 * 2.生成fake系统服务Binder对象,并加入到sCache对象中
 */
public class ServiceManagerCacheBinderHook extends Hook implements InvocationHandler {

    //系统服务名字,如ActivityManager的“activity”
    private String mServiceName;

    public ServiceManagerCacheBinderHook(Context hostContext, String servicename) {
        super(hostContext);
        mServiceName = servicename;
        setEnable(true);
    }


    @Override
    protected void onInstall(ClassLoader classLoader) throws Throwable {
        //通过反射获取sCache对象
        Object sCacheObj = FieldUtils.readStaticField(ServiceManagerCompat.Class(), "sCache");
        //判断sCacheObj类型是否是Map
        if (sCacheObj instanceof Map) {
            Map sCache = (Map) sCacheObj;
            //通过Service Name获取对应系统服务的IBinder对象
            Object Obj = sCache.get(mServiceName);
            if (Obj != null && false) {
                //FIXME 已经有了怎么处理?这里我们只是把原来的给remove掉,再添加自己的。程序下次取用的时候就变成我们hook过的了。
                //但是这样有缺陷。
                //add by me
                // 作者这个疑问是需要解决。因为系统原有的已经被替换了,等于后续其他app使用系统服务的时候都是被替换的IBinder对象
                //虽然说没有啥大影响,但是还是要做到善始善终。how to do?
                throw new RuntimeException("Can not install binder hook for " + mServiceName);
            } else {
                //移除掉mServiceName对应的系统服务IBinder对象
                sCache.remove(mServiceName);
                //这里又重新创建了对应的系统服务,注意这里不是被Hook过的,是通过反射调用ServiceManager的getService方法获取
                //到的。这里多这一步的目的,是获取由系统创建的服务,因为上一步被我们remove调用的系统服务也有可能是被Hook过的。
                IBinder mServiceIBinder = ServiceManagerCompat.getService(mServiceName);
                if (mServiceIBinder != null) {
                    /**
                     *这里出现一个MyServiceManager类,该类可以理解为类似ServiceManger的存在。
                     * 将原始的mServiceIBinder对象通过addOriginService加入到缓存中
                     * */
                    MyServiceManager.addOriginService(mServiceName, mServiceIBinder);
                    //以下使用Java动态代理来完成生成fake IBinder的过程
                    Class clazz = mServiceIBinder.getClass();
                    List> interfaces = Utils.getAllInterfaces(clazz);
                    Class[] ifs = interfaces != null && interfaces.size() > 0 ? interfaces.toArray(new Class[interfaces.size()]) : new Class[0];
                    IBinder mProxyServiceIBinder = (IBinder) MyProxy.newProxyInstance(clazz.getClassLoader(), ifs, this);
                    sCache.put(mServiceName, mProxyServiceIBinder);
                    MyServiceManager.addProxiedServiceCache(mServiceName, mProxyServiceIBinder);
                }
            }
        }
    }


    @Override
    public Object invoke(Object proxy, Method method, Object[] args) throws Throwable {
        try {
            //这里比较简单,就不说明了!
            IBinder originService = MyServiceManager.getOriginService(mServiceName);
            if (!isEnable()) {
                return method.invoke(originService, args);
            }
            HookedMethodHandler hookedMethodHandler = mHookHandles.getHookedMethodHandler(method);
            if (hookedMethodHandler != null) {
                return hookedMethodHandler.doHookInner(originService, method, args);
            } else {
                return method.invoke(originService, args);
            }
        }
        //打印各种异常!
        catch (InvocationTargetException e) {
            Throwable cause = e.getTargetException();
            if (cause != null && MyProxy.isMethodDeclaredThrowable(method, cause)) {
                throw cause;
            } else if (cause != null) {
                RuntimeException runtimeException = !TextUtils.isEmpty(cause.getMessage()) ? new RuntimeException(cause.getMessage()) : new RuntimeException();
                runtimeException.initCause(cause);
                throw runtimeException;
            } else {
                RuntimeException runtimeException = !TextUtils.isEmpty(e.getMessage()) ? new RuntimeException(e.getMessage()) : new RuntimeException();
                runtimeException.initCause(e);
                throw runtimeException;
            }
        } catch (IllegalArgumentException e) {
            try {
                StringBuilder sb = new StringBuilder();
                sb.append(" DROIDPLUGIN{");
                if (method != null) {
                    sb.append("method[").append(method.toString()).append("]");
                } else {
                    sb.append("method[").append("NULL").append("]");
                }
                if (args != null) {
                    sb.append("args[").append(Arrays.toString(args)).append("]");
                } else {
                    sb.append("args[").append("NULL").append("]");
                }
                sb.append("}");

                String message = e.getMessage() + sb.toString();
                throw new IllegalArgumentException(message, e);
            } catch (Throwable e1) {
                throw e;
            }
        } catch (Throwable e) {
            if (MyProxy.isMethodDeclaredThrowable(method, e)) {
                throw e;
            } else {
                RuntimeException runtimeException = !TextUtils.isEmpty(e.getMessage()) ? new RuntimeException(e.getMessage()) : new RuntimeException();
                runtimeException.initCause(e);
                throw runtimeException;
            }
        }
    }

    /**
     * 前面有提到过BaseHookHandle主要是用来管理HookedMethodHandler对象的。
     * 那么这里的ServiceManagerHookHandle类是handle IBinder中“queryLocalInterface”方法的hook
     * 该类中有一个queryLocalInterface内部类,继承自HookedMethodHandler,前面有提到过,HookedMethodHandler类作用
     * 主要是在调用被hook方法前后进行某些处理。例如这里就是在IBinder调用queryLocalInterface方法后进行处理:
     * 设置被hook后的系统服务。
     * queryLocalInterface返回的是IInterface对象(一定要注意IInterface和IBinder的区别,
     * 在MyServiceManager中针对这两个对象进行了不同缓存),那么在这里就是IServiceManager对象(IServiceManager继承自IInterface);
     * 花絮:DP中,作者写了一个ServiceManagerBinderHook类,其实这个类原本是用来Hook这个IServiceManager对象然后fake。
     * 估计后来发现通过IBinder的queryLocalInterface方法可以生成IServiceManager,就弃用了ServiceManagerBinderHook类,所以在DP
     * 中,这个类没有被使用过!!!
     */
    private class ServiceManagerHookHandle extends BaseHookHandle {

        private ServiceManagerHookHandle(Context context) {
            super(context);
        }

        @Override
        protected void init() {
            //创建IBinder的方法
            sHookedMethodHandlers.put("queryLocalInterface", new queryLocalInterface(mHostContext));
        }


        class queryLocalInterface extends HookedMethodHandler {
            public queryLocalInterface(Context context) {
                super(context);
            }

            //在queryLocalInterface方法调用后,调用setFakedResult方法,设置fake过的系统服务
            @Override
            protected void afterInvoke(Object receiver, Method method, Object[] args, Object invokeResult) throws Throwable {
                Object localInterface = invokeResult;
                Object proxiedObj = MyServiceManager.getProxiedObj(mServiceName);
                if (localInterface == null && proxiedObj != null) {
                    setFakedResult(proxiedObj);
                }
            }
        }
    }

    @Override
    protected BaseHookHandle createHookHandle() {
        return new ServiceManagerHookHandle(mHostContext);
    }
}
Hook、HookedMethodHandler、BinderHook这个三基类共同协作完成了偷天换日的操作。其实只要理解这个三个类的功能是什么,就很好理解DP中Hook的精髓!
小结
越深入阅读DP源码,就越佩服作者思路。虽然原理看起来很简单,但是其中所付出时间可见一斑。
这节笔记就暂时做到这里,因为版面已经很长了。希望各位不吝啬你的喜欢!


