一、安装InfluxDB
下载路径:https://portal.influxdata.com/downloads,以windows安装为例,linux可网上搜索;
1、配置influxdb.conf文件
2、启动influxdb
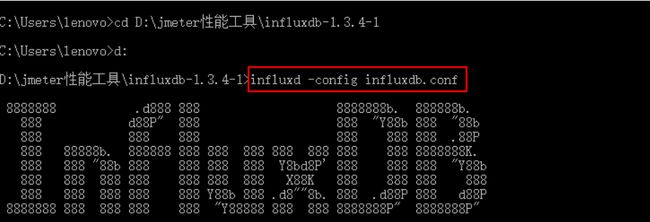
打开cmd,切换到influxdb安装目录;
启动命令:influxd -config influxdb.conf
通过http://localhost:8083/即可访问influxdb;创建jmeter数据库;
二、安装Grafana
下载路径:http://docs.grafana.org/installation/,以windows安装为例,linux可网上搜索;
1、通过bin目录下的grafana-server.exe启动grafana-server;
2、配置端口号(conf目录下的defaults.ini),如不想使用默认端口,可以拷贝一份sample.ini为custom.ini,并重新配置custom.ini的端口号;
3、通过http://localhost:8081访问grafana;(ps:默认端口是3000)
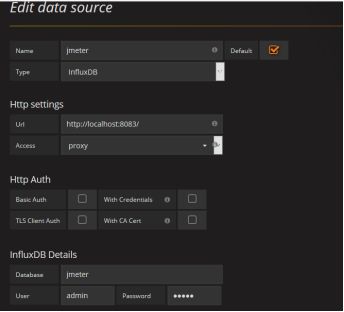
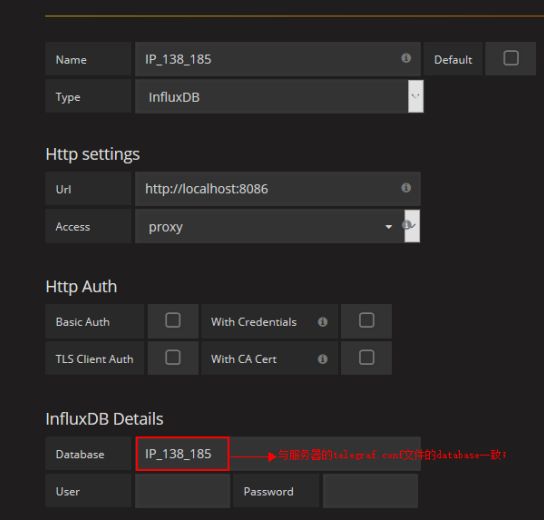
4、配置datasource,并测试连通性;
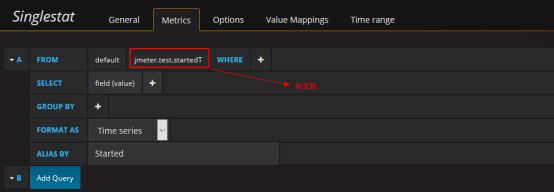
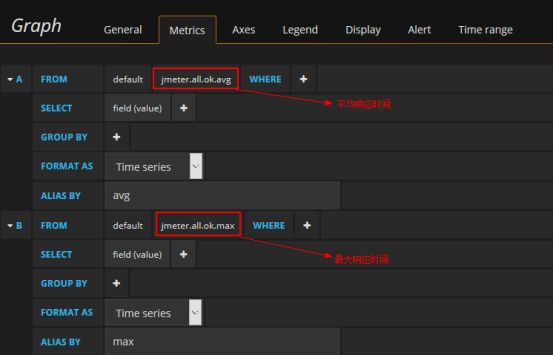
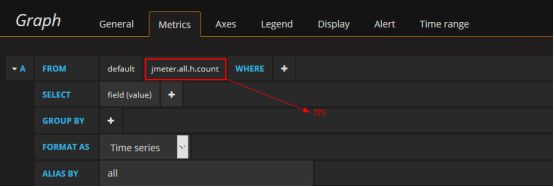
5、添加dashboard并配置相关查询条件等;
三、安装Telegraf
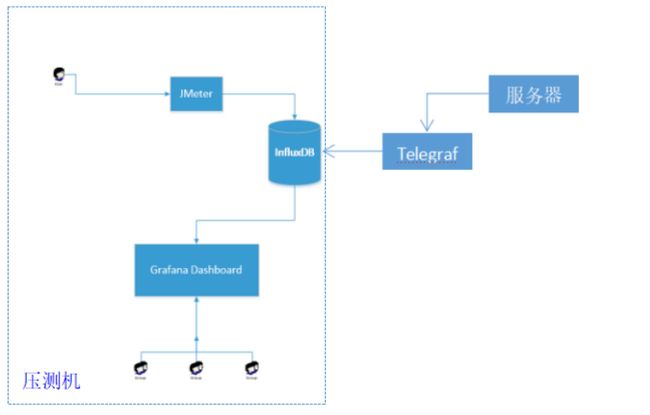
Telegraf用于监控服务器cpu、硬盘、内存等参数;
1、下载:
wgethttp://get.influxdb.org/telegraf/telegraf-0.11.1-1.x86_64.rpm
2、服务器上安装:
yum localinstall telegraf-0.11.1-1.x86_64.rpm -y
3、启动服务、添加开机启动
systemctl start telegraf.service
service telegrafstart
systemctl enable telegraf.service
4、配置文件位置:/etc/telegraf/telegraf.conf
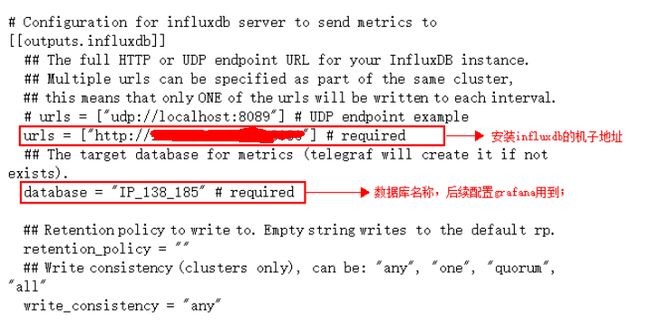
修改telegraf配置文件添加监控项
vim /etc/telegraf/telegraf.conf
5、参考资料
https://www.iyunv.com/thread-199938-1-1.html
http://www.jianshu.com/p/dfd329d30891
6、telegraf安装步骤:
1、切换root权限,切换到telegraf-1.0.1.x86_64.rpm并安装
[@HWTVM-165058 ~]$sudo su -
[root@HWTVM-165058 ~]# cd ..
[root@HWTVM-165058 /]# ls
[root@HWTVM-165058 wanglei]# yum localinstall telegraf-1.0.1.x86_64.rpm
2、切换到etc/telegraf/telegraf.conf目录,修改telegraf.conf文件的[[outputs.influxdb]]
[root@HWTVM-165058 telegraf]#vim telegraf.conf
3、切换root权限,启动服务
[root@HWTVM-165059 ~]#service telegraf start
Starting the process telegraf [ OK ]
telegraf process was started [ OK ]
杀进程:(比如某个jmeter脚本运行一直没有停止,可通过以下命令查找进程并杀掉)
[@HWTVM-138194 ~]$ps -ef|grep java
26995 26915 5 17:14 pts/5 00:01:20 java -server -XX:+HeapDumpOnOutOfMemoryError -Xms512m -Xmx512m -XX:+UseG1GC -XX:MaxGCPauseMillis=250 -XX:G1ReservePercent=20 -Djava.security.egd=file:/dev/urandom -jar /home/wanglei/apache-jmeter-3.2/bin/ApacheJMeter.jar -n -t P2P-F0300001-fronteamst-184.jmx
27451 27312 0 17:39 pts/0 00:00:00 grep java
[@HWTVM-138194 ~]$kill 26995
[@HWTVM-138194 ~]$ps -ef|grep java
27457 27312 0 17:39 pts/0 00:00:00 grep java
四、Jmeter例子示范
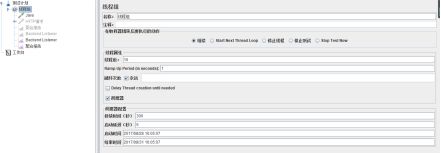
1、添加Backend Listener监听器,配置graphiteHost;
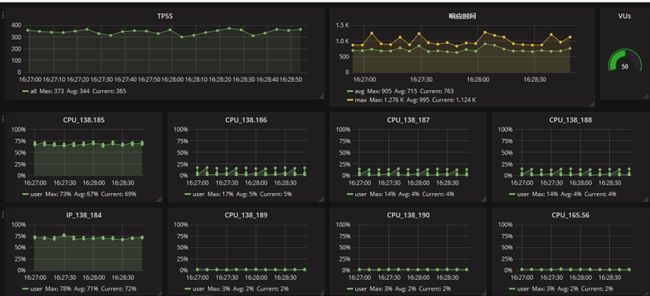
2、运行脚本,根据配置的查询条件监控测试报告;
五、Grafana报告分析
1、各类测试报告分析
2、服务器分析
CPU:
指性能测试场景运行的时间段内应用服务系统的CPU资源占用率。
判断系统处理能力及应用运行是否稳定的重要参数。
CPU使用率过高,则表示应用服务的运算需求过高。若持续较高时,需要针对运算部分进行优化。
内存:
指性能测试场景运行的时间段内应用服务系统的内存使用
判断系统处理能力及应用运行是否稳定的重要参数。
内存使用率过高,则表示应用服务器的内存中存储的数据量越大。若持续增涨,且回收不及时,则存在内存泄漏,需要针对对象回收/垃圾回收进行优化。
网络:
指性能测试场景运行的时间段内服务器的网络访问返回数据量
判断系统数据优化的重要参数。
网络占用率过高,则表示传输过程中的数据量较大。若数据量过大,则需要针对传输数据进行压缩或针对数据进行精简。
磁盘IO:
指性能测试场景运行的时间段内对主机硬盘的读取写入数据量
判断系统数据优化的重要参数。
磁盘IO过高,则表示针对磁盘的操作数据量较大。若数据量过大,则需要针对传输数据进行压缩或针对数据进行精简。
六、InfluxDB常用语句
1、打开cmd,通过命令启用influx.exe:.\influx --host localhost --port 8083
2、常用命令
select * from /.*/ limit 1---查询所有表,显示一条记录
show measurements---显示所有表
show databases ---展示所有数据库
help ---帮助命令
七、参考资料
http://www.cnblogs.com/yyhh/p/5990228.html
http://jmeter.apache.org/usermanual/realtime-results.html
http://www.testautomationguru.com/jmeter-real-time-results-influxdb-grafana/
http://www.testautomationguru.com/jmeter-influxdb-integration-how-to-troubleshoot/
https://docs.influxdata.com/influxdb/v1.3/introduction/getting_started/
http://www.jianshu.com/p/dfd329d30891--influxdb,grafana,telegraf安装
性能测试教程:
http://blog.chinaunix.net/uid-1835840-id-4032228.html
https://aimer1124.gitbooks.io/jmeter-tutorial/
http://www.51testing.com/html/18/n-3549018-2.html
九、常见问题
Note:Make sure that the system time of the Influx server is in sync with the machine which runs JMeter. This is very important. Because when you query Influxdb – by default it shows the records which has the time as <= system time. If the JMeter machine’s time is, say 4:50 PM. InfluxDB server system time is 4:45PM. When you run JMeter test, It will be able to post the records to InfluxDB. However when you query influxdb, It will not show these records. You need to wait for 5 mins to see the records inserted.
解决方法:与时间服务器同步时间;
八、插件安装
https://aimer1124.gitbooks.io/jmeter-tutorial/chapter4/%E6%89%A9%E5%B1%95%E6%8F%92%E4%BB%B6.html
