前言
前面几个章节详细介绍了Aspect Ratio、Content Hugging Priority(抗拉伸优先级)和Content Compression Resistance Priority(抗压缩优先级),
本文将综合运用这些特性,在不计算UITableViewCell高度、不使用第三方自动计算高度框架的前提下,来实现UITableViewCell自动高度.
一. UITableViewCell自动高度:
iOS8 WWDC 中推出了 self-sizing cell 的概念,旨在让 cell 自己负责自己的高度计算,
由于之前APP 需要兼容iOS7,所以很多开发者由于考虑到兼容iOS7,还是使用手动计算高度,或第三方自动计算高度框架,来计算动态UITableViewCell高度,
但随着Xcode9普及,开发工具限制了最低只能兼容到iOS8,所以我们可以好好运用这一特性了,不必在使用传统方式来处理动态UITableViewCell高度了.
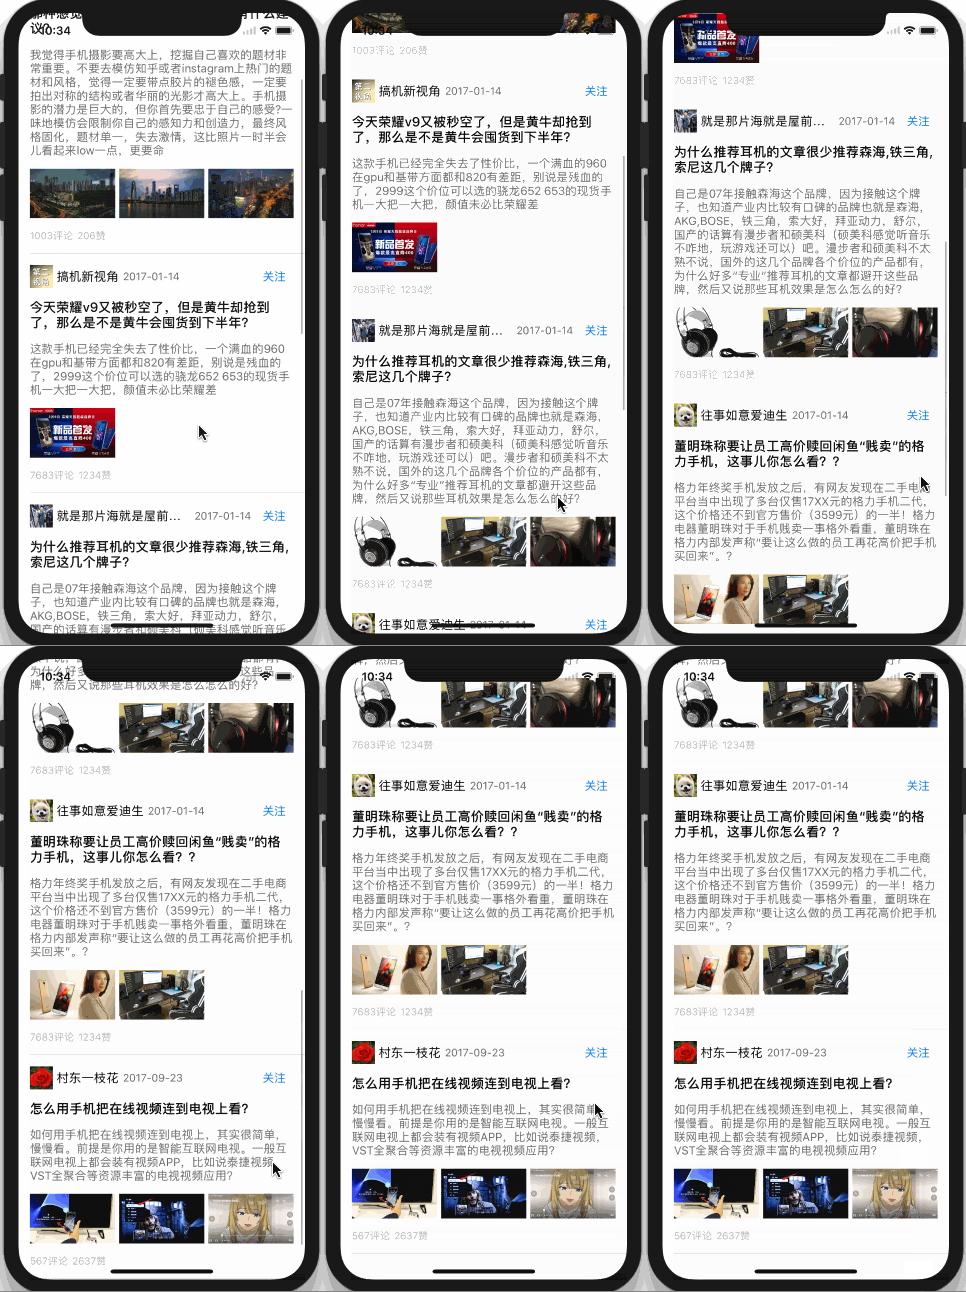
二.自动高度Demo效果(此效果模仿悟空问答某一界面)
三.实现部分
1.UITableView只需要做如下设置
- 如下:
//cell预估高度,设一个接近cell高度的值
self.tableView.estimatedRowHeight = 100;//也可以省略不设置,

//设置rowHeight为UITableViewAutomaticDimension,
self.tableView.rowHeight = UITableViewAutomaticDimension;//可以省略不设置
- 不实现UITableView返回cell高度代理方法
/**
-(CGFloat)tableView:(UITableView *)tableView heightForRowAtIndexPath:(NSIndexPath *)indexPath{
//不实现
}
*/
2. AutoLayout部分
- cell AutoLayout部分添加好各控件约束,并设置好动态高度控件的Content Hugging Priority和Content Compression Resistance Priority优先级即可
四.实际运用
下面我们一起来看下,在不计算高度的前提下,怎么实现上面悟空问答界面效果
1.代码部分
代码部分很简单,就一个简单的UITableView,自定义一个cell,如下:
#import "ViewController.h"
#import "DemoModel.h"
#import "YYModel.h"
#import "DemoCell.h"

static NSString *const id_DemoCell = @"DemoCell";

@interface ViewController ()
@property (nonatomic, strong) NSArray *dataArray;
@property (nonatomic, strong) UITableView *tableView;
@end

@implementation ViewController

- (void)viewDidLoad {
    [super viewDidLoad];
    [self.view addSubview:self.tableView];
    [self.tableView registerNib:[UINib nibWithNibName:id_DemoCell bundle:nil] forCellReuseIdentifier:id_DemoCell];
}

#pragma mark - tableView
-(NSInteger)tableView:(UITableView *)tableView numberOfRowsInSection:(NSInteger)section
{
    return self.dataArray.count;
}

-(UITableViewCell *)tableView:(UITableView *)tableView cellForRowAtIndexPath:(NSIndexPath *)indexPath
{
    DemoCell *cell = [tableView dequeueReusableCellWithIdentifier:id_DemoCell];
    if (!cell) {
        cell = [[DemoCell alloc]initWithStyle:UITableViewCellStyleDefault reuseIdentifier:id_DemoCell];
    }
    cell.selectionStyle = UITableViewCellSelectionStyleNone;
    DemoModel *model = self.dataArray[indexPath.row];
    cell.model = model;
    return cell;
}

#pragma mark - lazy
-(UITableView *)tableView{
    if(!_tableView){
        _tableView = [[UITableView alloc] initWithFrame:CGRectMake(0, 0, [UIScreen mainScreen].bounds.size.width, [UIScreen mainScreen].bounds.size.height) style:UITableViewStylePlain];
        _tableView.delegate = self;
        _tableView.dataSource = self;
        _tableView.estimatedRowHeight = 250;//预估高度
        _tableView.rowHeight = UITableViewAutomaticDimension;
    }
    return _tableView;
}

 /** 从文件加载数据 */
-(NSArray *)dataArray{
    if(!_dataArray){
        NSString *path = [[NSBundle mainBundle] pathForResource:@"demo" ofType:@"json"];
        NSDictionary *json = [NSJSONSerialization JSONObjectWithData:[NSData dataWithContentsOfFile:path] options:0 error:nil];
        _dataArray = [NSArray yy_modelArrayWithClass:[DemoModel class] json:json[@"data"]];
    }
    return _dataArray;
}

@end
2.UITableViewCell AutoLayout部分
-
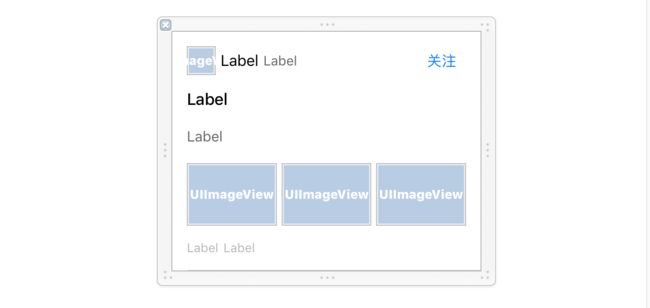
新建一个cell命名DemoCell,添加子控件如图
并脱线生成如下变量
@property (weak, nonatomic) IBOutlet UIImageView *iconView;//图像
@property (weak, nonatomic) IBOutlet UILabel *nameLab;//名字
@property (weak, nonatomic) IBOutlet UILabel *timeLab;//时间
@property (weak, nonatomic) IBOutlet UILabel *titleLab;//标题
@property (weak, nonatomic) IBOutlet UILabel *contentLab;//内容
@property (weak, nonatomic) IBOutlet UILabel *commentLab;//评论数
@property (weak, nonatomic) IBOutlet UILabel *praiseLab;//点赞数
- 并添加如下约束
图像-iconView约束:上15,左15,高30,宽高比1:1
名字-nameLab约束:上下均对其iconView,左5, 并设置横向抗压缩优先级为749即Content Compression Resistance Priority - Horizontal:749
时间-timeLab约束:上下均对齐iconView,左5, 并设置横向抗拉伸优先级为250即Content Hugging Priority - Horizontal:250
关注按钮约束:上下均对齐iconView,右15,宽度50,左5
标题-timeLab约束:左15,上15,右15,
内容-contentLab约束:左15,上15,右15,并设置并设置纵向抗拉伸优先级为250即Content Hugging Priority - Vertical:250
三张图约束:上15,左15,右15,中间间隙5,高度65,并设置三张图等宽,
评论数-commentLab约束:上15,左15,下15,
点赞数-praiseLab约束:上下对齐commentLab,左5,右边15,并设置横向抗拉伸优先级为250即Content Hugging Priority - Horizontal:250
3.UITableViewCell控件赋值部分
-(void)setModel:(DemoModel *)model{
    _model = model;

    [_iconView sd_setImageWithURL:[NSURL URLWithString:model.icon]];
    _nameLab.text = model.name;
    _timeLab.text = model.update_time;
    _contentLab.text = model.brief;
    _titleLab.text = model.title;
    _commentLab.text = [NSString stringWithFormat:@"%ld评论",model.comment];
    _praiseLab.text = [NSString stringWithFormat:@"%ld赞",model.praise];

    for (int i = 0; i<3; i++) {
        UIImageView *imgView = [self viewWithTag:10+i];
        imgView.image = nil;
    }
for (int i = 0; i- 到此,我们已经完成上图demo效果,是不是很简单,没有写任何高度计算的代码.
五.关于组头、组尾
- UITableView 的组头和组尾,也可以实现自动高度,设置方法如下:
 _tableView.sectionHeaderHeight = UITableViewAutomaticDimension;
_tableView.estimatedSectionHeaderHeight = 100;//组头预估高度

_tableView.sectionFooterHeight = UITableViewAutomaticDimension;
 _tableView.estimatedSectionFooterHeight = 100;//组尾预估高度
- 并且不实现下面两个组头,组尾高度代理方法
/**
-(CGFloat)tableView:(UITableView *)tableView heightForFooterInSection:(NSInteger)section{
    //不实现
}
 */

/**
-(CGFloat)tableView:(UITableView *)tableView heightForHeaderInSection:(NSInteger)section{
    //不实现
}
 */
六.关于动态高度,和固定高度混用
- 此场景通常出现在,一个TableView有多种样式的cell情况下,
- 例如:组0的cell是固定高度,其他组的cell是动态高度,要怎么设置呢?
- 方法如下:
-(CGFloat)tableView:(UITableView *)tableView heightForRowAtIndexPath:(NSIndexPath *)indexPath{

    if(indexPath.section==0){
        return 100;//固定高度
    }else{
        return UITableViewAutomaticDimension;//动态高度
    }
}
七.小结
- 1.UITableViewCell动态高度,代码设置部分很简单不难,主要是AutoLayout部分,要想使用起来,得心应手,开发者除了要掌握普通AutoLayout约束外,还必须熟练掌握Content Hugging Priority(抗拉伸优先级)和Content Compression Resistance Priority(抗压缩优先级)的用法.
- 2.熟练使用UITableView cell、组头、组尾自动高度,能给我开发节省大量的时间.
- 3.如对Content Hugging Priority(抗拉伸优先级)和Content Compression Resistance Priority(抗压缩优先级)的用法不熟练的同学,可以看我前面文章:AutoLayout进阶(二)、 AutoLayout进阶(三)、AutoLayout进阶(四),有详细介绍两个优先级的用法.
代码地址:https://github.com/CoderZhuXH/AutoLayout
相关阅读
iOS AutoLayout进阶(一)Aspect Ratio
iOS AutoLayout进阶(二)Content Hugging Priority
iOS AutoLayout进阶(三)Content Compression Resistance Priority
iOS AutoLayout进阶(四)Content Hugging Priority和Content Compression Resistance Priority综合运用


