接下来我们看Base文件夹下的UIKIt文件夹的内容。
1.UIColor+YYAdd
这里看了这个类,里面有许多颜色之间的转换,因此借此机会,顺便看看颜色之间的转换原理
RGB2HSL
HSL 色调饱和亮度模式 摘自文章
H色调 0~360 圆环形式 以角度表示
S 饱和度 0~1 之间的小数
L 亮度 0~1 之间的小数
什么是纯色
先来看一下windows的拾色器

最上头黑色框里面那些颜色 最最最顶端的部分。
是不是感觉他们最鲜艳 最惹眼,嗯 因为他们RGB之间的差异化最大
RGB产生颜色的原理就是RGB三个能量值产生差异化 组合。
所以我们才能看到这些花花绿绿的颜色。
纯色一个特点那就是最大值跟最小值的差是255 ,差异达到最大。
也就是说RGB一定有一个颜色是0 一个是255,否则不能称之为纯色
纯亮度表示就是只能量值没有差异 也指灰度图
纯色的计算
通过观察windows画图板拾色器 就是上面中间那个破图。我们知道 如果饱和度固定为1 亮度固定为0.5 ,那么色调即纯色 纯色即色调。纯色的定义参见上面。
从RGB值的变化规律可以看出色调的变化是连续平缓 首尾相接的 可以看成是一个360度的圆 红色是0度。他的变化规律是:
三个规律
1至始至终都有一个值是0 一个值是255。
2整个过程中同一时间总是只有一个值在变
3三个数的全排列 那么总共有6种组合
但是首先有一点要明确: 上面饼图的一块 就是60度 值是255
我们把色调分成1~360的表现形式,但是RGB是以(255,255,255)的表现形式 那么他们之间怎么对应呢?那就是60度=255
每前进一度scale+=(255*6)*(1/360)
RGB可以表达255*255*255=16581375种颜色 但是他可以表达的纯色只有255*6=1530种
所以HSL 标示的颜色能少点(所以RGB 转换成HSL 肯定是要少颜色值的)
通过上面我们知道了H的色值标示范围
接下来我们看看HLS的定义
HSL在数学上定义为在 RGB 空间中的颜色的R,G和B的坐标的变换。
从 RGB 到 HSL 的转换
设 (r,g,b) 分别是一个颜色的红、绿和蓝坐标,它们的值是在 0 到 1 之间的实数。设max等价于r,g和b中的最大者。设min等于这些值中的最小者。要找到在 HSL 空间中的 (h,s,l) 值,这里的h∈ [0, 360)是角度的色相角,而s,l∈ [0,1] 是饱和度和亮度,计算为:
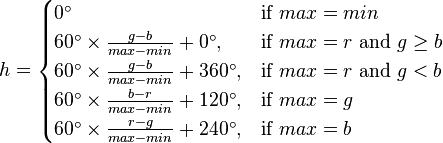

h的值通常规范化到位于 0 到 360°之间。而h= 0 用于max=min的(就是灰色)时候而不是留下h未定义。
从 RGB 到 HSV 的转换
色相和HSL 一样sv不一样而已

从 HSL 到 RGB 的转换
给定 HSL 空间中的 (h,s,l) 值定义的一个颜色,带有h在指示色相角度的值域 [0, 360)中,分别表示饱和度和亮度的s和l在值域 [0, 1] 中,相应在 RGB 空间中的 (r,g,b) 三原色,带有分别对应于红色、绿色和蓝色的r,g和b也在值域 [0, 1] 中,它们可计算为:
首先,如果s= 0,则结果的颜色是非彩色的、或灰色的。在这个特殊情况,r,g和b都等于l。注意h的值在这种情况下是未定义的。
当s≠ 0 的时候,可以使用下列过程

这里定义了好多颜色转换是c语言写的。这里不想做过多介绍
void YY_RGB2HSL(CGFloat r, CGFloat g, CGFloat b,CGFloat *h, CGFloat *s, CGFloat *l)
void YY_HSL2RGB(CGFloat h, CGFloat s, CGFloat l,CGFloat *r, CGFloat *g, CGFloat *b)
void YY_RGB2HSB(CGFloat r, CGFloat g, CGFloat b,CGFloat *h, CGFloat *s, CGFloat *v)
void YY_HSB2RGB(CGFloat h, CGFloat s, CGFloat v,CGFloat *r, CGFloat *g, CGFloat *b)
void YY_RGB2CMYK(CGFloat r, CGFloat g, CGFloat b,CGFloat *c, CGFloat *m, CGFloat *y, CGFloat *k)
void YY_CMYK2RGB(CGFloat c, CGFloat m, CGFloat y, CGFloat k,CGFloat *r, CGFloat *g, CGFloat *b)
void YY_HSB2HSL(CGFloat h, CGFloat s, CGFloat b,CGFloat *hh, CGFloat *ss, CGFloat *ll)
void YY_HSL2HSB(CGFloat h, CGFloat s, CGFloat l,CGFloat *hh, CGFloat *ss, CGFloat *bb)
颜色之间的相互转换
+ (UIColor *)colorWithHue:(CGFloat)hue saturation:(CGFloat)saturation lightness:(CGFloat)lightness alpha:(CGFloat)alpha
就是用hsL 颜色空间,由于系统默认的是rgb 将hsl 转换成了RGB
+ (UIColor *)colorWithCyan:(CGFloat)cyan magenta:(CGFloat)magenta yellow:(CGFloat)yellow black:(CGFloat)black alpha:(CGFloat)alpha
cmyk 转换成rgb
+ (UIColor *)colorWithRGB:(uint32_t)rgbValue {
return [UIColor colorWithRed:((rgbValue & 0xFF0000) >> 16) / 255.0f
green:((rgbValue & 0xFF00) >> 8) / 255.0f
blue:(rgbValue & 0xFF) / 255.0f
alpha:1];
这个传入的是一个颜色值,位操作
+ (UIColor *)colorWithRGBA:(uint32_t)rgbaValue {
return [UIColor colorWithRed:((rgbaValue & 0xFF000000) >> 24) / 255.0f
green:((rgbaValue & 0xFF0000) >> 16) / 255.0f
blue:((rgbaValue & 0xFF00) >> 8) / 255.0f
alpha:(rgbaValue & 0xFF) / 255.0f];
}
带有alpha 通道的RGBA
+ (UIColor *)colorWithRGB:(uint32_t)rgbValue alpha:(CGFloat)alpha {
return [UIColor colorWithRed:((rgbValue & 0xFF0000) >> 16) / 255.0f
green:((rgbValue & 0xFF00) >> 8) / 255.0f
blue:(rgbValue & 0xFF) / 255.0f
alpha:alpha];
}
RGBA 传入参数不一致而已
- (uint32_t)rgbValue {
CGFloat r = 0, g = 0, b = 0, a = 0;
[self getRed:&r green:&g blue:&b alpha:&a];
int8_t red = r * 255;
uint8_t green = g * 255;
uint8_t blue = b * 255;
return (red << 16) + (green << 8) + blue;
}
获取rgb值,不带a通道
- (uint32_t)rgbaValue {
CGFloat r = 0, g = 0, b = 0, a = 0;
[self getRed:&r green:&g blue:&b alpha:&a];
int8_t red = r * 255;
uint8_t green = g * 255;
uint8_t blue = b * 255;
uint8_t alpha = a * 255;
return (red << 24) + (green << 16) + (blue << 8) + alpha;
}
获取rgba
static inline NSUInteger hexStrToInt(NSString *str) {
uint32_t result = 0;
sscanf([str UTF8String], "%X", &result);
return result;
}
内敛函数, 这个将str 转换成 int值
static BOOL hexStrToRGBA(NSString *str,
CGFloat *r, CGFloat *g, CGFloat *b, CGFloat *a)
str = [[str stringByTrim] uppercaseString];
if ([str hasPrefix:@"#"]) {
str = [str substringFromIndex:1];
} else if ([str hasPrefix:@"0X"]) {
str = [str substringFromIndex:2];
}
NSUInteger length = [str length];
// RGB RGBA RRGGBB RRGGBBAA
if (length != 3 && length != 4 && length != 6 && length != 8) {
return NO;
}
//RGB,RGBA,RRGGBB,RRGGBBAA
if (length < 5) {
*r = hexStrToInt([str substringWithRange:NSMakeRange(0, 1)]) / 255.0f;
*g = hexStrToInt([str substringWithRange:NSMakeRange(1, 1)]) / 255.0f;
*b = hexStrToInt([str substringWithRange:NSMakeRange(2, 1)]) / 255.0f;
if (length == 4) *a = hexStrToInt([str substringWithRange:NSMakeRange(3, 1)]) / 255.0f;
else *a = 1;
} else {
*r = hexStrToInt([str substringWithRange:NSMakeRange(0, 2)]) / 255.0f;
*g = hexStrToInt([str substringWithRange:NSMakeRange(2, 2)]) / 255.0f;
*b = hexStrToInt([str substringWithRange:NSMakeRange(4, 2)]) / 255.0f;
if (length == 8) *a = hexStrToInt([str substringWithRange:NSMakeRange(6, 2)]) / 255.0f;
else *a = 1;
}
return YES;
}
适配了各种书写形式RGB,RGBA,RRGGBB,RRGGBBAA 带# 或者0X 或者不带都可以
+ (instancetype)colorWithHexString:(NSString *)hexStr
- (NSString *)hexString
- (NSString *)hexStringWithAlpha
基础不做介绍
- (NSString *)hexStringWithAlpha:(BOOL)withAlpha {
CGColorRef color = self.CGColor;
size_t count = CGColorGetNumberOfComponents(color);
const CGFloat *components = CGColorGetComponents(color);
static NSString *stringFormat = @"%02x%02x%02x";
NSString *hex = nil;
if (count == 2) {
NSUInteger white = (NSUInteger)(components[0] * 255.0f);
hex = [NSString stringWithFormat:stringFormat, white, white, white];
} else if (count == 4) {
hex = [NSString stringWithFormat:stringFormat,
(NSUInteger)(components[0] * 255.0f),
(NSUInteger)(components[1] * 255.0f),
(NSUInteger)(components[2] * 255.0f)];
}
if (hex && withAlpha) {
hex = [hex stringByAppendingFormat:@"%02lx",
(unsigned long)(self.alpha * 255.0 + 0.5)];
}
return hex;
}
这里分为 count=2 和count = 4 黑白形式count=2(CGColorCreateGenericGray) 普通形式count=4
- (UIColor *)colorByAddColor:(UIColor *)add blendMode:(CGBlendMode)blendMode {
CGColorSpaceRef colorSpace = CGColorSpaceCreateDeviceRGB();
CGBitmapInfo bitmapInfo = kCGImageAlphaPremultipliedLast | kCGBitmapByteOrder32Big;
uint8_t pixel[4] = { 0 };
CGContextRef context = CGBitmapContextCreate(&pixel, 1, 1, 8, 4, colorSpace, bitmapInfo);
CGContextSetFillColorWithColor(context, self.CGColor);
CGContextFillRect(context, CGRectMake(0, 0, 1, 1));
CGContextSetBlendMode(context, blendMode);
CGContextSetFillColorWithColor(context, add.CGColor);
CGContextFillRect(context, CGRectMake(0, 0, 1, 1));
CGContextRelease(context);
CGColorSpaceRelease(colorSpace);
return [UIColor colorWithRed:pixel[0] / 255.0f green:pixel[1] / 255.0f blue:pixel[2] / 255.0f alpha:pixel[3] / 255.0f];
}
kCGImageAlphaPremultipliedLast 是颜色编排采用RGBA模式
kCGBitmapByteOrder32Big 才有32 大字节序
大端字节(Big-endian):
----------------->>>>>>>>内存地址增大方向
short变量地址
0x1000 0x1001
_____________________________
| |
| 0x31 | 0x32
|________________ | ________________
高位字节在低位字节的前面,也就是高位在内存地址低的一端.可以这样记住(大端->高位->在前->正常的逻辑顺序)
小端字节(little-endian):
----------------->>>>>>>>内存地址增大方向
short变量地址
0x1000 0x1001
_____________________________
| |
| 0x32 | 0x31
|________________ | ________________
低位字节在高位字节的前面,也就是低位在内存地址低的一端.可以这样记住(小端->低位->在前->与正常逻辑顺序相反)
就是规定bitmap 的采用RGBA 32位 在内存中
这里函数就是颜色之间的融合,根据CGBlendMode模式
什么是CGBlendMode模式呢
Overview
These blend mode constants represent the Porter-Duff blend modes. The symbols in the equations for these blend modes are:
R is the premultiplied result
S is the source color, and includes alpha
D is the destination color, and includes alpha
Ra, Sa, and Da are the alpha components of R, S, and D
You can find more information on blend modes, including examples of images produced using them, and many mathematical descriptions of the modes, inPDF Reference, Fourth Edition, Version 1.5, Adobe Systems, Inc. If you are a former QuickDraw developer, it may be helpful for you to think of blend modes as an alternative to transfer modes
那我们就看看什么是Porter-Duff。这里有篇博客做介绍
R 是结果
S是source 带有alpha
D 是目标颜色 带有alpha
Ra Sa,Da 是代表R S D 的透明度
说白了就是两种颜色融合的模式。
- (UIColor *)colorByChangeHue:(CGFloat)h saturation:(CGFloat)s brightness:(CGFloat)b alpha:(CGFloat)a
增加HSL 的颜色
- (BOOL)getHue:(CGFloat *)hue saturation:(CGFloat *)saturation lightness:(CGFloat *)lightness alpha:(CGFloat *)alpha
- (BOOL)getCyan:(CGFloat *)cyan magenta:(CGFloat *)magenta yellow:(CGFloat *)yellow
black:(CGFloat *)black alpha:(CGFloat *)alpha
- (CGFloat)red
- (CGFloat)green
- (CGFloat)blue
- (CGFloat)alpha
- (CGFloat)hue
- (CGFloat)saturation
- (CGFloat)brightness
- (CGColorSpaceModel)colorSpaceModel
- (NSString *)colorSpaceString
简单不做介绍
2.UIImage+YYAdd
这个类好长啊。慢慢看吧
+ (UIImage *)imageWithSmallGIFData:(NSData *)data scale:(CGFloat)scale
获取gif 图片
这个函数分段看
CGImageSourceRef source = CGImageSourceCreateWithData((__bridge CFTypeRef)(data), NULL);
if (!source) return nil;
size_t count = CGImageSourceGetCount(source);
if (count <= 1) {
CFRelease(source);
return [self.class imageWithData:data scale:scale];
}
1将gif NSData 转换成source ,这个source 包含了gif图的一些基本信息。
2 检查gif 动图的图片数量。要是小于或者等于一张,就直接生成图片就行了。
NSUInteger frames[count];
double oneFrameTime = 1 / 50.0; // 50 fps
NSTimeInterval totalTime = 0;
NSUInteger totalFrame = 0;
NSUInteger gcdFrame = 0;
for (size_t i = 0; i < count; i++) {
NSTimeInterval delay = _yy_CGImageSourceGetGIFFrameDelayAtIndex(source, i);
totalTime += delay;
NSInteger frame = lrint(delay / oneFrameTime);
if (frame < 1) frame = 1;
frames[i] = frame;
totalFrame += frames[i];
if (i == 0) gcdFrame = frames[i];
else {
NSUInteger frame = frames[i], tmp;
if (frame < gcdFrame) {
tmp = frame; frame = gcdFrame; gcdFrame = tmp;
}
while (true) {
tmp = frame % gcdFrame;
if (tmp == 0) break;
frame = gcdFrame;
gcdFrame = tmp;
}
}
}
1定义变量,从命名可以看出是干啥用的。
2.这里主要看for循环,
NSTimeInterval delay = _yy_CGImageSourceGetGIFFrameDelayAtIndex(source, i);
static NSTimeInterval _yy_CGImageSourceGetGIFFrameDelayAtIndex(CGImageSourceRef source, size_t index) {
NSTimeInterval delay = 0;
CFDictionaryRef dic = CGImageSourceCopyPropertiesAtIndex(source, index, NULL);
if (dic) {
CFDictionaryRef dicGIF = CFDictionaryGetValue(dic, kCGImagePropertyGIFDictionary);
if (dicGIF) {
NSNumber *num = CFDictionaryGetValue(dicGIF, kCGImagePropertyGIFUnclampedDelayTime);
if (num.doubleValue <= __FLT_EPSILON__) {
num = CFDictionaryGetValue(dicGIF, kCGImagePropertyGIFDelayTime);
}
delay = num.doubleValue;
}
CFRelease(dic);
}
// http://nullsleep.tumblr.com/post/16524517190/animated-gif-minimum-frame-delay-browser-compatibility
if (delay < 0.02) delay = 0.1;
return delay;
}
这个c函数干啥了呢
1.获取gif 没一张图片的属性保存在dic中
2.如果有属性dic ,那么获取kCGImagePropertyGIFDictionary 字典的值
3.如果获取到了gif 字典,获取delay时间。
4.要是delay 时间小于0.02 那么设置为0.1
关于这个0.1秒。看这里 掘金也可以
不过所有人的设置大小是0.011s 。yykit这里设置的是0.02 秒。没查到相关技术指标。不做评论
返回for循环接着看
3.将图片间隔时间累加到totaltime变量上
rint, rintf, rintl, lrint, lrintf, lrintl, llrint, llrintf, llrintl
定义于头文件
floatrintf(floatarg);(1)(C99 起)
doublerint(doublearg);(2)(C99 起)
longdoublerintl(longdoublearg);(3)(C99 起)
定义于头文件
#define rint( arg )(4)(C99 起)
定义于头文件
longlrintf(floatarg);(5)(C99 起)
longlrint(doublearg);(6)(C99 起)
longlrintl(longdoublearg);(7)(C99 起)
定义于头文件
#define lrint( arg )(8)(C99 起)
定义于头文件
longlongllrintf(floatarg);(9)(C99 起)
longlongllrint(doublearg);(10)(C99 起)
longlongllrintl(longdoublearg);(11)(C99 起)
定义于头文件
#define llrint( arg )(12)(C99 起)
1-3)用当前舍入模式,舍入浮点参数arg为整数值(以浮点格式)。
5-7, 9-11)用当前舍入模式,舍入浮点参数arg为整数值。
4,8,12)泛型宏:若arg拥有longdouble类型,,则调用rintl、lrintl、llrintl。否则若arg拥有整数或double类型,则调用rint、lrint、llrint。否则分别调用rintf、lrintf、llrintf。
lrint 函数用法
4 保存frame 。累加totalFrame
5.gcdFrame 保存第一次的frame
6.检查后面的frame ,要是比gcdFrame 小,就gcdFrame 保存最小的frame
7.获取最小公约数?
NSMutableArray *array = [NSMutableArray new];
8.生成一个数组
for (size_t i = 0; i < count; i++) {
CGImageRef imageRef = CGImageSourceCreateImageAtIndex(source, i, NULL);
if (!imageRef) {
CFRelease(source);
return nil;
}
size_t width = CGImageGetWidth(imageRef);
size_t height = CGImageGetHeight(imageRef);
if (width == 0 || height == 0) {
CFRelease(source);
CFRelease(imageRef);
return nil;
}
CGImageAlphaInfo alphaInfo = CGImageGetAlphaInfo(imageRef) & kCGBitmapAlphaInfoMask;
BOOL hasAlpha = NO;
if (alphaInfo == kCGImageAlphaPremultipliedLast ||
alphaInfo == kCGImageAlphaPremultipliedFirst ||
alphaInfo == kCGImageAlphaLast ||
alphaInfo == kCGImageAlphaFirst) {
hasAlpha = YES;
}
// BGRA8888 (premultiplied) or BGRX8888
// same as UIGraphicsBeginImageContext() and -[UIView drawRect:]
CGBitmapInfo bitmapInfo = kCGBitmapByteOrder32Host;
bitmapInfo |= hasAlpha ? kCGImageAlphaPremultipliedFirst : kCGImageAlphaNoneSkipFirst;
CGColorSpaceRef space = CGColorSpaceCreateDeviceRGB();
CGContextRef context = CGBitmapContextCreate(NULL, width, height, 8, 0, space, bitmapInfo);
CGColorSpaceRelease(space);
if (!context) {
CFRelease(source);
CFRelease(imageRef);
return nil;
}
CGContextDrawImage(context, CGRectMake(0, 0, width, height), imageRef); // decode
CGImageRef decoded = CGBitmapContextCreateImage(context);
CFRelease(context);
if (!decoded) {
CFRelease(source);
CFRelease(imageRef);
return nil;
}
UIImage *image = [UIImage imageWithCGImage:decoded scale:scale orientation:UIImageOrientationUp];
CGImageRelease(imageRef);
CGImageRelease(decoded);
if (!image) {
CFRelease(source);
return nil;
}
for (size_t j = 0, max = frames[i] / gcdFrame; j < max; j++) {
[array addObject:image];
}
}
9 进入for循环
10 通过source 获取image ,要是没有image 那么就返回了nil
11.获取没张image的长度宽度 还有alpha
kCGBitmapAlphaInfoMask 这里出现这个东西,干啥的,看了半天没懂啥意思。
不经意间看见了这个东西
typedef CF_ENUM(uint32_t, CGImageByteOrderInfo) {
kCGImageByteOrderMask = 0x7000,
kCGImageByteOrder16Little = (1 << 12),
kCGImageByteOrder32Little = (2 << 12),
kCGImageByteOrder16Big = (3 << 12),
kCGImageByteOrder32Big = (4 << 12)
}
这里也出现了mask 。kCGImageByteOrderMask = 0x7000,
二进制是00000111000000000000
kCGImageByteOrder16Little 是00000001000000000000
写到这里应该很明显了。kCGImageByteOrderMask 就是规定CGImageByteOrderInfo 用的哪些位置的值。将其他位置的值给过滤掉
这里出现了好多alpha通道的枚举
alpha的两种类型,直通和预乘:
带alpha的图片有两种计算方法,一种叫做直通alpha(straightalpha),一种叫做预乘alpha(premultipliedalpha)。这两种类型在AE软件里是市场可以看到的,当你导入一张带通道的图片,比如说TGA,AE就会问你,这张图的alpha是怎么来的,是直通类型还是预乘类型。
这两种类型的唯一区别在于,直通alpha图片保留最原本的RGB数值;而预乘alpha,是原本的RGB信息乘以alpha的数值以后得到的结果(预乘意思就是预先乘以alpha)。
Premultiplied 明白这个意思就够了。
kCGImageAlphaPremultipliedLast 预乘 alpha 通道在最后面RGBA
kCGImageAlphaPremultipliedFirst 预乘 alpha 通道在最前面 ARGB
kCGImageAlphaLast 普通的RGBA ,没有预乘
kCGImageAlphaFirst 普通的ARGB,没有预乘
还有几种形式
kCGImageAlphaNoneSkipLast, /* For example, RBGX. */没有a通道
kCGImageAlphaNoneSkipFirst, /* For example, XRGB. */
kCGImageAlphaOnly /* No color data, alpha data only */
12.CGBitmapInfo 采用的是kCGImageAlphaPremultipliedFirst 预乘 ARGB,颜色空间是rgb
13.获取bitmap的context
14 draw image
15.获取image
16 保存image 到数组中。
17 生成gif image
这个函数讲解完毕了,总结下
1.这个函数主要是将gif 图片转换成可以识别的image动图格式
2.根据每个动图的间隔时间计算出最小间隔时间间隔,两张图片的时间间隔用最小间隔时间*次数标示,动画数组中添加次数个image图片
3.将gif 图片转换成bitmap图片。
4.这里用的数学方式找最大公约数
+ (BOOL)isAnimatedGIFData:(NSData *)data
大神在这个里面提供了一个网址https://www.w3.org/Graphics/GIF/spec-gif89a.txt
这里判断gif的方式是
UInt32 magic = *(UInt32 *)data.bytes;
// http://www.w3.org/Graphics/GIF/spec-gif89a.txt
if ((magic & 0xFFFFFF) != '\0FIG') return NO;
这里注意,UInt32 是和data数据方向相反的
gif数据的前三位是 474946
而UInt32 magic = *(UInt32 *)data.bytes; magic 的值是0xXX464947 ,这是因为读取数据都是从头按照字节读取的,先读取47 放入magic的最低位,再读取49放入第二位,最后46放入第三位
接下来判断是否能转换成source 并且gif 是否只有一张图
没有souce或者count不大于1都默认为不是gif
+ (BOOL)isAnimatedGIFFile:(NSString *)path
文件读取是不是gif 不过这里没有判断,count和source 是否含有而只是通过FiLE指针获取特定位置,这样也是节省开支效率吧
+ (UIImage *)imageWithPDF:(id)dataOrPath
+ (UIImage *)imageWithPDF:(id)dataOrPath size:(CGSize)size
+ (UIImage *)_yy_imageWithPDF:(id)dataOrPath resize:(BOOL)resize size:(CGSize)size
{
CGPDFDocumentRef pdf = NULL;
if ([dataOrPath isKindOfClass:[NSData class]]) {
CGDataProviderRef provider = CGDataProviderCreateWithCFData((__bridge CFDataRef)dataOrPath);
pdf = CGPDFDocumentCreateWithProvider(provider);
CGDataProviderRelease(provider);
} else if ([dataOrPath isKindOfClass:[NSString class]]) {
pdf = CGPDFDocumentCreateWithURL((__bridge CFURLRef)[NSURL fileURLWithPath:dataOrPath]);
}
if (!pdf) return nil;
CGPDFPageRef page = CGPDFDocumentGetPage(pdf, 1);
if (!page) {
CGPDFDocumentRelease(pdf);
return nil;
}
CGRect pdfRect = CGPDFPageGetBoxRect(page, kCGPDFCropBox);
CGSize pdfSize = resize ? size : pdfRect.size;
CGFloat scale = [UIScreen mainScreen].scale;
CGColorSpaceRef colorSpace = CGColorSpaceCreateDeviceRGB();
CGContextRef ctx = CGBitmapContextCreate(NULL, pdfSize.width * scale, pdfSize.height * scale, 8, 0, colorSpace, kCGBitmapByteOrderDefault | kCGImageAlphaPremultipliedFirst);
if (!ctx) {
CGColorSpaceRelease(colorSpace);
CGPDFDocumentRelease(pdf);
return nil;
}
CGContextScaleCTM(ctx, scale, scale);
CGContextTranslateCTM(ctx, -pdfRect.origin.x, -pdfRect.origin.y);
CGContextDrawPDFPage(ctx, page);
CGPDFDocumentRelease(pdf);
CGImageRef image = CGBitmapContextCreateImage(ctx);
UIImage *pdfImage = [[UIImage alloc] initWithCGImage:image scale:scale orientation:UIImageOrientationUp];
CGImageRelease(image);
CGContextRelease(ctx);
CGColorSpaceRelease(colorSpace);
return pdfImage;
}
放在一起看,最后都是调用最后这个函数
1.生成CGPDFDocumentRef 对象
2.获取pdf 页数
3.获取每页的大小
4.检查是否需要重新设置大小
5创建bitmap context
6 下面就是context 的矩阵转换了
7将 page 花在context上
8从bitmap context 获取 image
没什么难点。简单介绍
就是讲pdf 转换成image
+ (UIImage *)imageWithEmoji:(NSString *)emoji size:(CGFloat)size {
if (emoji.length == 0) return nil;
if (size < 1) return nil;
CGFloat scale = [UIScreen mainScreen].scale;
CTFontRef font = CTFontCreateWithName(CFSTR("AppleColorEmoji"), size * scale, NULL);
if (!font) return nil;
NSAttributedString *str = [[NSAttributedString alloc] initWithString:emoji attributes:@{ (__bridge id)kCTFontAttributeName:(__bridge id)font, (__bridge id)kCTForegroundColorAttributeName:(__bridge id)[UIColor whiteColor].CGColor }];
CGColorSpaceRef colorSpace = CGColorSpaceCreateDeviceRGB();
CGContextRef ctx = CGBitmapContextCreate(NULL, size * scale, size * scale, 8, 0, colorSpace, kCGBitmapByteOrderDefault | kCGImageAlphaPremultipliedFirst);
CGContextSetInterpolationQuality(ctx, kCGInterpolationHigh);
CTLineRef line = CTLineCreateWithAttributedString((__bridge CFTypeRef)str);
CGRect bounds = CTLineGetBoundsWithOptions(line, kCTLineBoundsUseGlyphPathBounds);
CGContextSetTextPosition(ctx, 0, -bounds.origin.y);
CTLineDraw(line, ctx);
CGImageRef imageRef = CGBitmapContextCreateImage(ctx);
UIImage *image = [[UIImage alloc] initWithCGImage:imageRef scale:scale orientation:UIImageOrientationUp];
CFRelease(font);
CGColorSpaceRelease(colorSpace);
CGContextRelease(ctx);
if (line)CFRelease(line);
if (imageRef) CFRelease(imageRef);
return image;
}
将emoji 转换成图片
苹果的emoji表情字体 名字是AppleColorEmoji
1.根据屏幕创建字体
2创建属性字符串
3.创建bitmap图片
4通过处理获取emoji图片大小 kCTLineBoundsUseGlyphPathBounds
1.字符(Character)和字形(Glyphs)
排版系统中文本显示的一个重要的过程就是字符到字形的转换,字符是信息本身的元素,而字形是字符的图形表征,字符还会有其它表征比如发音。 字符在计算机中其实就是一个编码,某个字符集中的编码,比如Unicode字符集,就囊括了大都数存在的字符。 而字形则是图形,一般都存储在字体文件中,字形也有它的编码,也就是它在字体中的索引。 一个字符可以对应多个字形
这里获取的是字形
5.获取image
+ (UIImage *)imageWithColor:(UIColor *)color
+ (UIImage *)imageWithColor:(UIColor *)color size:(CGSize)size
通过color 获取image 老生常谈的问题了。不做说明
+ (UIImage *)imageWithSize:(CGSize)size drawBlock:(void (^)(CGContextRef context))drawBlock {
if (!drawBlock) return nil;
UIGraphicsBeginImageContextWithOptions(size, NO, 0);
CGContextRef context = UIGraphicsGetCurrentContext();
if (!context) return nil;
drawBlock(context);
UIImage *image = UIGraphicsGetImageFromCurrentImageContext();
UIGraphicsEndImageContext();
return image;
}
这里主要是回调一个context 可以自定义绘制内容
- (BOOL)hasAlphaChannel
是否有alpha通道
- (void)drawInRect:(CGRect)rect withContentMode:(UIViewContentMode)contentMode clipsToBounds:(BOOL)clips
看这个函数我们先看看
1根据contentMode 获取rect
2根据是否clip 进行drawInRect
- (UIImage *)imageByResizeToSize:(CGSize)size
重新设置image 大小
- (UIImage *)imageByResizeToSize:(CGSize)size contentMode:(UIViewContentMode)contentMode
重设大小 根据模式
- (UIImage *)imageByCropToRect:(CGRect)rect
设置修剪图片的到rect
这里有个函数是CGImageCreateWithImageInRect 。
If W and H are the width and height of image, respectively, then the
point (0,0) corresponds to the first pixel of the image data; the point
(W-1, 0) is the last pixel of the first row of the image data; (0, H-1)
is the first pixel of the last row of the image data; and (W-1, H-1) is
the last pixel of the last row of the image data.
这个是按照像素一行一行的在rect排列的。把一行超出去的都舍弃掉。相当于裁剪图片。
- (UIImage *)imageByInsetEdge:(UIEdgeInsets)insets withColor:(UIColor *)color
这个函数就是给image增加一个UIEdgeInsets 边缘,图片压缩,边框边缘颜色是传入的颜色。
这里有个CGContextEOFillPath 填充规则。网上很多。自己查阅
- (UIImage *)imageByRoundCornerRadius:(CGFloat)radius
- (UIImage *)imageByRoundCornerRadius:(CGFloat)radius borderWidth:(CGFloat)borderWidth borderColor:(UIColor *)borderColor
- (UIImage *)imageByRoundCornerRadius:(CGFloat)radius corners:(UIRectCorner)corners borderWidth:(CGFloat)borderWidth borderColor:(UIColor *)borderColor borderLineJoin:(CGLineJoin)borderLineJoin
这里有个枚举UIRectCorner 枚举 。枚举的是矩形的四个角
这个方法就是采用UIBezierPath 进行rect绘制。将图片放入其中
UIBezierPath *path = [UIBezierPath bezierPathWithRoundedRect:CGRectInset(rect, borderWidth, borderWidth) byRoundingCorners:corners cornerRadii:CGSizeMake(radius, borderWidth)];
可以自定义绘制圆角的位置。
这里内容不难理解。只是要自己绘制效果看看即可。
- (UIImage *)imageByRotate:(CGFloat)radians fitSize:(BOOL)fitSize
- (UIImage *)_yy_flipHorizontal:(BOOL)horizontal vertical:(BOOL)vertical
这个函数vImageVerticalReflect_ARGB8888 这个是垂直翻转像素,相当于倒立
vImageHorizontalReflect_ARGB8888 水平翻转像素。相当于照镜子
这个函数就是是否设置图像翻转,上下翻转或者左右翻转
- (UIImage *)imageByRotateLeft90
左旋转90度
- (UIImage *)imageByRotateRight90
右旋转90度
- (UIImage *)imageByRotate180
旋转180
- (UIImage *)imageByFlipVertical
- (UIImage *)imageByFlipHorizontal
垂直或者水平旋转
- (UIImage *)imageByTintColor:(UIColor *)color
填充颜色
- (UIImage *)imageByGrayscale
- (UIImage *)imageByBlurSoft
- (UIImage *)imageByBlurLight
- (UIImage *)imageByBlurExtraLigh
- (UIImage *)imageByBlurDark
- (UIImage *)imageByBlurWithTint:(UIColor *)tintColor
这几个函数都是调用
- (UIImage *)imageByBlurRadius:(CGFloat)blurRadius tintColor:(UIColor *)tintColor tintMode:(CGBlendMode)tintBlendMode saturation:(CGFloat)saturation maskImage:(UIImage *)maskImage
这个函数有150行,有点长,我们分开看
1。参数校验,self 和maskImage 必须有CGImage,blueRadius 或者Saturation 必须设置。
2 判断是否有vImageBuffer_InitWithCGImage 函数。 将imageRef 以format形式书写到effect中。而scratch 以effect的内从初始化(effect 相当于bitmap图,effect 相当于画布,大小和bitmap大小相同)。这里不想过多介绍这个函数。简单明白就行了
从来没看过vImage.Framework 框架,看这个函数比较困难,暂时放过去。后期研究这个
- (UIImage *)_yy_mergeImageRef:(CGImageRef)effectCGImage
tintColor:(UIColor *)tintColor
tintBlendMode:(CGBlendMode)tintBlendMode
maskImage:(UIImage *)maskImage
opaque:(BOOL)opaque
这个函数等以后在看。
3.UIControl+YYAdd
- (void)setTarget:(id)target action:(SEL)action forControlEvents:(UIControlEvents)controlEvents {
if (!target || !action || !controlEvents) return;
NSSet *targets = [self allTargets];
for (id currentTarget in targets) {
NSArray *actions = [self actionsForTarget:currentTarget forControlEvent:controlEvents];
for (NSString *currentAction in actions) {
[self removeTarget:currentTarget action:NSSelectorFromString(currentAction)
forControlEvents:controlEvents];
}
}
[self addTarget:target action:action forControlEvents:controlEvents];
}
就是讲target 关联的controlevents 的action 替换掉
- (void)addBlockForControlEvents:(UIControlEvents)controlEvents
block:(void (^)(id sender))block
我认为这个方法还是很关键的,给uicontrol 增加block的回调形式
看了很多yykit大神写的block回调,其实都是中间增加一个中间target 。给self 分类增加一个关联引用数组,用这个数组保存这个target
这个方法同样适用
1生成中间对象target.让target 保存block对象
2.给UIControl 增加action 目标对象是target
3.将target 保存在数组里
这样UIControl 触发时间,会调用target 的 action 。action 执行block事件就ok了
- (void)removeAllBlocksForControlEvents:(UIControlEvents)controlEvents
这个就是add 的逆向写法 不做介绍了
- (void)setBlockForControlEvents:(UIControlEvents)controlEvents
block:(void (^)(id sender))block
1removeBlock
2增加block
这里有个枚举UIControlEventAllEvents 。值是0xFFFFFFFF ,相当于mask 。所有事件&UIControlEventAllEvents 都是true。
4.UIBarButtonItem+YYAdd
- (void)setActionBlock:(void (^)(id sender))block
增加UIBarButtonItem 的block形式。封装和UIControl 一样。不做介绍
5.UIGestureRecognizer+YYAdd
- (void)addActionBlock:(void (^)(id sender))block
这个UIGestureRecognizer 也是单纯的增加了block回调的形式。封装和UIControl一样的手法。不做介绍
6.UIView+YYAdd
- (UIImage *)snapshotImage
截图UIView
- (UIImage *)snapshotImageAfterScreenUpdates:(BOOL)afterUpdates
这个方法是对- (BOOL)drawViewHierarchyInRect:(CGRect)rect afterScreenUpdates:(BOOL)afterUpdates 方法的封装
afterUpdates
A Boolean value that indicates whether the snapshot should be rendered after recent changes have been incorporated. Specify the valueNOif you want to render a snapshot in the view hierarchy’s current state, which might not include recent changes.
这里发现一篇文章,讲述截图的。地址。没仔细看,后期写完回去再看看这里的具体实现细节。
- (NSData *)snapshotPDF
渲染成pdf
- (void)setLayerShadow:(UIColor*)color offset:(CGSize)offset radius:(CGFloat)radius
layer 阴影设置
shadowOpacity 阴影的透明度,默认是0 范围 0-1 越大越不透明
shouldRasterize设成true时,layer被渲染成一个bitmap,并缓存起来,等下次使用时不会再重新去渲染了。
shouldRasterize
实现组透明的效果,如果它被设置为YES,在应用透明度之前,图层及其子图层都会被整合成一个整体的图片,这样就没有透明度混合的问题了;
为了启用shouldRasterize属性,我们设置了图层的rasterizationScale属性。默认情况下,所有图层拉伸都是1.0, 所以如果你使用了shouldRasterize属性,你就要确保你设置了rasterizationScale属性去匹配屏幕,以防止出现Retina屏幕像素化的问题。
这里知识点挺多的,与性能有关系。没有仔细看的文章地址 地址2
- (void)removeAllSubviews
删除subview
- (UIViewController *)viewController {
for (UIView *view = self; view; view = view.superview) {
UIResponder *nextResponder = [view nextResponder];
if ([nextResponder isKindOfClass:[UIViewController class]]) {
return (UIViewController *)nextResponder;
}
}
return nil;
}
查找view 的顶层控制器。 为啥这么写,其实我们要了解响应链。
事件响应链:当用户点击一个UIView时,系统会产生一个事件,并将其放入UIApplication的事件队列中。然后该事件会顺着这条链传递到用户点击的那个UIView:UIApplication->UIWindow->RootView->...->Subview。然后开始处理这个事件,若Subview不处理,事件将会传递给其�视图控制器,若没有控制器则传给其superView,最后传给UIWindow,UIApplication。若UIApplication还是没处理则将事件传给nil。
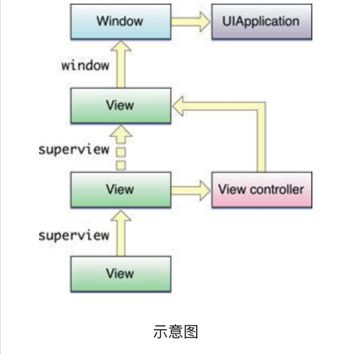
UIResponder具有nextResponder属性,也就是其SuperView或是UIViewConterller等。UIView是UIResponder的子类,所以UIView及其子类都能使用此属性。
- (CGFloat)visibleAlpha
可视透明度。UIView 遍历到最后的根都是UIWindow
这里用了透明度的累积
- (CGPoint)convertPoint:(CGPoint)point toViewOrWindow:(UIView *)view
- (CGPoint)convertPoint:(CGPoint)point fromViewOrWindow:(UIView *)view
- (CGRect)convertRect:(CGRect)rect toViewOrWindow:(UIView *)view
- (CGRect)convertRect:(CGRect)rect fromViewOrWindow:(UIView *)view
坐标转换 。
- (CGFloat)left
- (void)setLeft:(CGFloat)x
- (CGFloat)top
- (void)setTop:(CGFloat)y
- (CGFloat)right
- (void)setRight:(CGFloat)right
- (CGFloat)bottom
- (void)setBottom:(CGFloat)bottom
- (CGFloat)width
- (void)setWidth:(CGFloat)width
- (CGFloat)height
- (void)setHeight:(CGFloat)height
- (CGFloat)centerX
- (void)setCenterX:(CGFloat)centerX
- (CGFloat)centerY
- (void)setCenterY:(CGFloat)centerY
- (CGPoint)origin
- (void)setOrigin:(CGPoint)origin
- (CGSize)size
- (void)setSize:(CGSize)size
7.UIScrollView+YYAdd
- (void)scrollToTop
- (void)scrollToBottom
- (void)scrollToLeft
- (void)scrollToRight
简单的封装。
8.UITableView+YYAdd
- (void)updateWithBlock:(void (^)(UITableView *tableView))block
更新tableview
- (void)scrollToRow:(NSUInteger)row inSection:(NSUInteger)section atScrollPosition:(UITableViewScrollPosition)scrollPosition animated:(BOOL)animated
滚动到row
- (void)insertRowAtIndexPath:(NSIndexPath *)indexPath withRowAnimation:(UITableViewRowAnimation)animation
增加row
- (void)insertRow:(NSUInteger)row inSection:(NSUInteger)section withRowAnimation:(UITableViewRowAnimation)animation
同上
- (void)reloadRowAtIndexPath:(NSIndexPath *)indexPath withRowAnimation:(UITableViewRowAnimation)animation
刷新row
- (void)reloadRow:(NSUInteger)row inSection:(NSUInteger)section withRowAnimation:(UITableViewRowAnimation)animation
同上
- (void)deleteRowAtIndexPath:(NSIndexPath *)indexPath withRowAnimation:(UITableViewRowAnimation)animation
删除row
- (void)deleteRow:(NSUInteger)row inSection:(NSUInteger)section withRowAnimation:(UITableViewRowAnimation)animation
同上
- (void)insertSection:(NSUInteger)section withRowAnimation:(UITableViewRowAnimation)animation
- (void)deleteSection:(NSUInteger)section withRowAnimation:(UITableViewRowAnimation)animation
- (void)reloadSection:(NSUInteger)section withRowAnimation:(UITableViewRowAnimation)animation
对section 的增删 更新
- (void)clearSelectedRowsAnimated:(BOOL)animated
清除选中的row
9.UITextField+YYAdd
- (void)selectAllText
选中所有文本
- (void)setSelectedRange:(NSRange)range
选中特定范围文本
10.UIScreen+YYAdd
+ (CGFloat)screenScale
获取screen scale
- (CGRect)currentBounds
获取screen bound 竖屏的bounds
- (CGRect)boundsForOrientation:(UIInterfaceOrientation)orientation
返回竖屏的bounds
- (CGSize)sizeInPixel
获取屏幕像素点大小
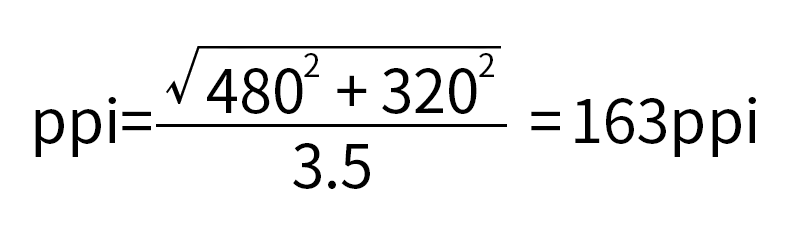
- (CGFloat)pixelsPerInch
获取单位长度的像素点
这里了解ppi 公式是
以iphone3gs分辨率为480*320为例
可以看看这个博客。这样的博客很多,可以自行查阅
11.UIDevice+YYAdd
+ (double)systemVersion
获取系统版本
- (BOOL)isPad
判断是否是ipad
- (BOOL)isJailbroken
检查是否越狱,由于没有想过经历,不做深究。
- (BOOL)canMakePhoneCalls
是否能打电话
- (NSString *)ipAddressWithIfaName:(NSString *)name
getifaddrs 获取本机地址
判断ifaName 的ip地址字符串
.把ip地址转化为用于网络传输的二进制数值
int inet_aton(const char *cp, struct in_addr *inp);
inet_aton() 转换网络主机地址ip(如192.168.1.10)为二进制数值,并存储在struct in_addr结构中,即第二个参数*inp,函数返回非0表示cp主机有地有效,返回0表示主机地址无效。(这个转换完后不能用于网络传输,还需要调用htons或htonl函数才能将主机字节顺序转化为网络字节顺序)
in_addr_t inet_addr(const char *cp);
inet_addr函数转换网络主机地址(如192.168.1.10)为网络字节序二进制值,如果参数char *cp无效,函数返回-1(INADDR_NONE),这个函数在处理地址为255.255.255.255时也返回-1,255.255.255.255是一个有效的地址,不过inet_addr无法处理;
- (NSString *)ipAddressWIFI
检查ip地址是否是wifi
- (NSString *)ipAddressCell
检查ip地址是否是蜂窝
- (uint64_t)getNetworkTrafficBytes:(YYNetworkTrafficType)types
这里先看自定义的YYNetworkTrafficType
typedef NS_OPTIONS(NSUInteger, YYNetworkTrafficType) {
YYNetworkTrafficTypeWWANSent = 1 << 0,
YYNetworkTrafficTypeWWANReceived = 1 << 1,
YYNetworkTrafficTypeWIFISent = 1 << 2,
YYNetworkTrafficTypeWIFIReceived = 1 << 3,
YYNetworkTrafficTypeAWDLSent = 1 << 4,
YYNetworkTrafficTypeAWDLReceived = 1 << 5,
YYNetworkTrafficTypeWWAN = YYNetworkTrafficTypeWWANSent | YYNetworkTrafficTypeWWANReceived,
YYNetworkTrafficTypeWIFI = YYNetworkTrafficTypeWIFISent | YYNetworkTrafficTypeWIFIReceived,
YYNetworkTrafficTypeAWDL = YYNetworkTrafficTypeAWDLSent | YYNetworkTrafficTypeAWDLReceived,
YYNetworkTrafficTypeALL = YYNetworkTrafficTypeWWAN |
YYNetworkTrafficTypeWIFI |
YYNetworkTrafficTypeAWDL,
};
/**
Network traffic type:
WWAN: Wireless Wide Area Network.
For example: 3G/4G.
WIFI: Wi-Fi.
AWDL: Apple Wireless Direct Link (peer-to-peer connection).
For exmaple: AirDrop, AirPlay, GameKit.
*/
这是yykit大神自己的解释
针对wwan wifi awdl 分别定义了send 和recevice
接下来看
static yy_net_interface_counter yy_get_net_interface_counter() c函数
static yy_net_interface_counter yy_get_net_interface_counter() {
static dispatch_semaphore_t lock;
static NSMutableDictionary *sharedInCounters;
static NSMutableDictionary *sharedOutCounters;
static dispatch_once_t onceToken;
dispatch_once(&onceToken, ^{
sharedInCounters = [NSMutableDictionary new];
sharedOutCounters = [NSMutableDictionary new];
lock = dispatch_semaphore_create(1);
});
yy_net_interface_counter counter = {0};
struct ifaddrs *addrs;
const struct ifaddrs *cursor;
if (getifaddrs(&addrs) == 0) {
cursor = addrs;
dispatch_semaphore_wait(lock, DISPATCH_TIME_FOREVER);
while (cursor) {
if (cursor->ifa_addr->sa_family == AF_LINK) {
const struct if_data *data = cursor->ifa_data;
NSString *name = cursor->ifa_name ? [NSString stringWithUTF8String:cursor->ifa_name] : nil;
if (name) {
uint64_t counter_in = ((NSNumber *)sharedInCounters[name]).unsignedLongLongValue;
counter_in = yy_net_counter_add(counter_in, data->ifi_ibytes);
sharedInCounters[name] = @(counter_in);
uint64_t counter_out = ((NSNumber *)sharedOutCounters[name]).unsignedLongLongValue;
counter_out = yy_net_counter_add(counter_out, data->ifi_obytes);
sharedOutCounters[name] = @(counter_out);
if ([name hasPrefix:@"en"]) {
counter.en_in += counter_in;
counter.en_out += counter_out;
} else if ([name hasPrefix:@"awdl"]) {
counter.awdl_in += counter_in;
counter.awdl_out += counter_out;
} else if ([name hasPrefix:@"pdp_ip"]) {
counter.pdp_ip_in += counter_in;
counter.pdp_ip_out += counter_out;
}
}
}
cursor = cursor->ifa_next;
}
dispatch_semaphore_signal(lock);
freeifaddrs(addrs);
}
return counter;
}
1.创建一个信号量锁dispatch_semaphore_t 初始化一些变量
2.初始化yy_net_interface_counter 结构体
typedef struct {
uint64_t en_in;
uint64_t en_out;
uint64_t pdp_ip_in;
uint64_t pdp_ip_out;
uint64_t awdl_in;
uint64_t awdl_out;
} yy_net_interface_counter;
en 代表ip地址
pdp 代表我们使用的cell
awdl代表 Apple Wireless Direct Link
3.循环读取ip地址
这里代表AF_LINK 链路层接口
我用模拟器打印了这个函数的返回的部分信息
NSString *name = cursor->ifa_name ? [NSString stringWithUTF8String:cursor->ifa_name] : @"nil";
NSLog(@"%d name:%@",cursor->ifa_addr->sa_family,name);
2017-12-20 11:12:16.218952+0800 YYKitDemo[25918:11075457] 18 name:lo0
2017-12-20 11:12:16.219145+0800 YYKitDemo[25918:11075457] 2 name:lo0
2017-12-20 11:12:16.219377+0800 YYKitDemo[25918:11075457] 30 name:lo0
2017-12-20 11:12:16.219560+0800 YYKitDemo[25918:11075457] 30 name:lo0
2017-12-20 11:12:16.219693+0800 YYKitDemo[25918:11075457] 18 name:gif0
2017-12-20 11:12:16.219798+0800 YYKitDemo[25918:11075457] 18 name:stf0
2017-12-20 11:12:16.220025+0800 YYKitDemo[25918:11075457] 18 name:XHC20
2017-12-20 11:12:16.220134+0800 YYKitDemo[25918:11075457] 18 name:en0
2017-12-20 11:12:16.220254+0800 YYKitDemo[25918:11075457] 30 name:en0
2017-12-20 11:12:16.220356+0800 YYKitDemo[25918:11075457] 2 name:en0
2017-12-20 11:12:16.220689+0800 YYKitDemo[25918:11075457] 18 name:p2p0
2017-12-20 11:12:16.220869+0800 YYKitDemo[25918:11075457] 18 name:awdl0
2017-12-20 11:12:16.221108+0800 YYKitDemo[25918:11075457] 30 name:awdl0
2017-12-20 11:12:16.221408+0800 YYKitDemo[25918:11075457] 18 name:en1
2017-12-20 11:12:16.221628+0800 YYKitDemo[25918:11075457] 18 name:en2
2017-12-20 11:12:16.221955+0800 YYKitDemo[25918:11075457] 18 name:bridge0
2017-12-20 11:12:16.222193+0800 YYKitDemo[25918:11075457] 18 name:utun0
2017-12-20 11:12:16.222497+0800 YYKitDemo[25918:11075457] 30 name:utun0
#define AF_LINK 18 #define AF_INET 2 #define AF_INET6 30
可以看出来,AF_lINK 包含了 AF_INET AF_INET6 是所有连接的都会返回来
这里调用c函数
static uint64_t yy_net_counter_add(uint64_t counter, uint64_t bytes) {
if (bytes < (counter % 0xFFFFFFFF)) {
counter += 0xFFFFFFFF - (counter % 0xFFFFFFFF);
counter += bytes;
} else {
counter = bytes;
}
return counter;
}
如果bytes 比counter 取模小 ,那么我就将counter 的前面32 位置0,而高位加1,再加上bytes。(没看懂)
要是比counter取模大,直接赋值。
4用counter 记录结果
5 获取网络字节数
- (NSString *)machineModel
获取设备model
还有一种方法
struct utsname systemInfo;
uname(&systemInfo);
NSString *deviceString = [NSString stringWithCString:systemInfo.machine encoding:NSUTF8StringEncoding];
不知道这两种获取方式有啥不同
- (NSString *)machineModelName
获取设备model 字符串
- (NSDate *)systemUptime
系统开机时间
- (int64_t)diskSpace
磁盘空间
- (int64_t)diskSpaceFree
磁盘剩余空间
- (int64_t)diskSpaceUsed
用户使用空间
- (int64_t)memoryTotal
内存大小
- (int64_t)memoryUsed
使用的内存大小
- (int64_t)memoryFree
剩余内存大小
- (int64_t)memoryActive
激活内存大小
- (int64_t)memoryInactive
未激活内存大小
- (int64_t)memoryWired
- (int64_t)memoryPurgable
- (NSUInteger)cpuCount
cpu数量
- (float)cpuUsage
cpu 使用的比例
- (NSArray *)cpuUsagePerProcessor
每个processor中cpu的使用比例
这部分内存获取查阅资料很少,暂时不做深究。
12.UIApplication+YYAdd
- (NSURL *)documentsURL
- (NSString *)documentsPath
获取document 文件路径或者url
- (NSURL *)cachesURL
- (NSString *)cachesPath
获取caches 文件路径或者url
- (NSURL *)libraryURL
- (NSString *)libraryPath
获取library文件路径或者url
- (BOOL)isPirated
检查是否是盗版的
- (BOOL)_yy_fileExistInMainBundle:(NSString *)name
检查文件是否存在
- (NSString *)appBundleName
获取bundleName
- (NSString *)appBundleID
获取bundleId
- (NSString *)appVersion
获取app版本
- (NSString *)appBuildVersion
build版本
- (BOOL)isBeingDebugged
是否是debug模式
- (int64_t)memoryUsage
- (float)cpuUsage
- (void)incrementNetworkActivityCount
- (void)decrementNetworkActivityCount
+ (BOOL)isAppExtension
是否是app的extension
+ (UIApplication *)sharedExtensionApplication
13.UIFont+YYAdd
- (BOOL)isBold
粗体
- (BOOL)isItalic
斜体
- (BOOL)isMonoSpace
MonoSpace
- (BOOL)isColorGlyphs
- (CGFloat)fontWeight
字体大小
- (UIFont *)fontWithBold
转换成粗体
- (UIFont *)fontWithItalic
转换成斜体
- (UIFont *)fontWithBoldItalic
转换成粗斜体
- (UIFont *)fontWithNormal
正常字体
+ (UIFont *)fontWithCTFont:(CTFontRef)CTFont
将CT转换成UIFont
+ (UIFont *)fontWithCGFont:(CGFontRef)CGFont size:(CGFloat)size
将cgFont 转换成UIFont
- (CTFontRef)CTFontRef CF_RETURNS_RETAINED
转换成CTFont
CF_RETURNS_NOT_RETAINED 让编译器帮助我们管理内存
- (CGFontRef)CGFontRef CF_RETURNS_RETAINED
转换成CGFont
+ (BOOL)loadFontFromPath:(NSString *)path
加载字体路径
+ (void)unloadFontFromPath:(NSString *)path
自定义字体卸载
这里只介绍了自己的加载和卸载。具体自定义字体详查资料
+ (UIFont *)loadFontFromData:(NSData *)data
获取自定义字体
+ (BOOL)unloadFontFromData:(UIFont *)font
卸载字体
+ (NSData *)dataFromFont:(UIFont *)font
将字体转换成data
14.UIBezierPath+YYAdd
+ (UIBezierPath *)bezierPathWithText:(NSString *)text font:(UIFont *)font
获取字体的bezierPath
1就是将text 换着NSAttributedString
2获取CTLine
3 再获取CTRun
4 再从CTRun中获取每个字的path
这个文件夹的东西都是功能类。大多数不难,过于简单的不做介绍了。