公司的项目里有拉取H.264视频流进行解码播放的功能,本来是采用FFMpeg多媒体库,用CPU做视频的编码和解码,就是大家常说的软编软解。但是软解存在太占用CPU,解码效率低等缺点,所以我们一合计干脆用硬解码代替原来的方案。当然硬件解码使用的当然就是苹果大名鼎鼎的Video ToolBox框架,众所周知,苹果在iOS8开始才可以在iOS系统中调用该框架中的API。
Video ToolBox H.264解码
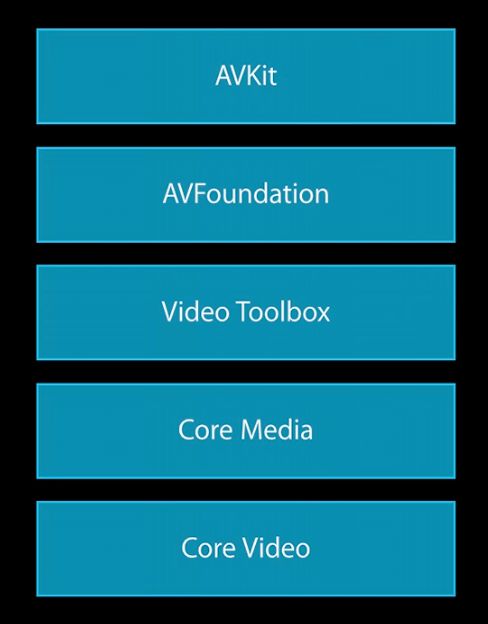 iOS媒体接口结构.png
AVFoundation:
- 解压视频后直接播放
- 直接将视频压缩成文件
Video Toolbox:
- 将视频解压成 CVPixelBuffer
- 直接将视频压缩成CMSampleBuffer
Video ToolBox 数据结构
- CVPixelBuffer:
typealias CVPixelBuffer = CVImageBuffer,CVImageBuffer是一种保存图像数据的抽象类型,表示未经编码或解码后的图像数据结构。

- CVPixelBufferPool:存放和管理
CVPixelBuffer的数据结构(具有回收循环利用的妙处)。

- pixelBufferAttributes - CFDictionary对象,一般包含了视频的宽高,像素格式类型(
32RGBA, YCbCr420),是否兼容OpenGL ES,Core Animation等相关信息

- CTime:分子是
64-bit的时间值,分母是32-bit的时标(time scale)。

CMVideoFormatDescription:视频宽高,格式
(kCMPixelFormat_32RGBA, kCMVideoCodecType_H264), 其他诸如颜色空间等信息的扩展。CMBlockBuffer:
CMBlockBuffer是一个CFType对象,表示数据偏移量的连续范围。用来存放编码后的数据。CMSampleBuffer:对于编码后的数据,包含了
CMTime,CMVideoFormatDesc和CMBlockBuffer;对于解码后的数据,则包含了CMTime,CMVideoFormatDesc和CMPixelBuffer。
 图1.1
图1.1
- CMClock - 封装了时间源,其中
CMClockGetHostTimeClock()封装了mach_absolute_time()。 - CMTimebase - CMClock上的控制视图。提供了时间的映射:
CMTimebaseSetTime(timebase, kCMTimeZero);速率控制:CMTimebaseSetRate(timebase, 1.0)。

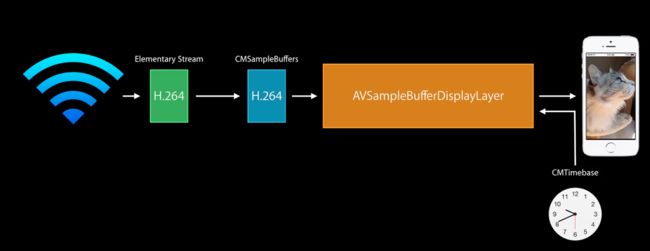
图2.1展示的是通过AVSampleBufferDisplaylayer播放网络上获取的H.264码流。
 图2.1.png
但并不是说AVSampleBufferDisplaylayer能直接播放H.264码流,需要将H.264码流包装成SampleBuffer传给给AVSampleBufferDisplaylayer解码播放。
 图2.2.png
再来看一下H.264码流的构成,H.264码流由一系列的NAL单元组成。
NAL单元一般包含:
- 视频帧(或视频帧片)
- H.264参数集
-序列参数集(Sequence Parameter Set(SPS))
-图像参数集(Picture Parameter Set(PPS))

所以如果要将H.264解码播放就需要将H.264码流包装成CMSampleBuffer。由图1.1可得CMSampleBuffer = CMTime + CMVideoFormatDesc + CMBlockBuffer。
解码步骤:
1.从网络获取的码流中获取SPS和PPS生成CMVideoFormatDesc。
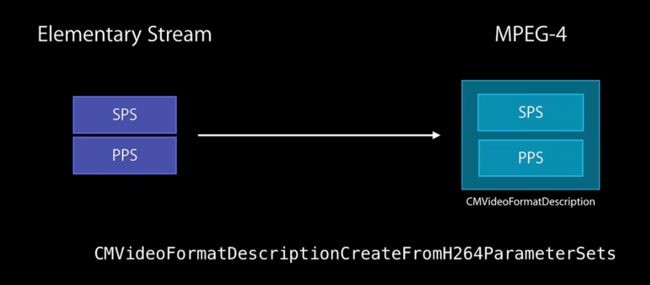
(1)H.264 NALU单元的Start Code 是"0x 00 00 01" 或"0x 00 01",按照Start Code定位NALU。
(2)通过类型信息找到SPS和PPS并提取,开始码后第一个byte的第5位,7代表SPS,8代表PPS。

(3)使用CMVideoFormatDescriptionCreateFromH264ParameterSets函数来构建CMVideoFormatDescription。
// 设置H264Parameter
    uint8_t*  parameterSetPointers[2] = {sps, pps};
    size_t parameterSetSizes[2] = {_spsSize-4, _ppsSize-4};
    status = CMVideoFormatDescriptionCreateFromH264ParameterSets(kCFAllocatorDefault, 2,
                                                                 (const uint8_t *const*)parameterSetPointers,
                                                                 parameterSetSizes, 4,
                                                                 &_formatDesc);

2.提取视频图像数据生成CMBlockBuffer。
(1)按照Start Code定位NALU。
(2)CMBlockBuffer数据需要的头部码为4个字节的长度,为:0x 00 80 00,所以需要将H.264的header给替换掉。
//找到偏移量,或者SPS和PPS NALUs结束IDR帧NALU开始
        int offset = (int)(_spsSize + _ppsSize);
        blockLength = frameSize - offset;
        data = malloc(blockLength);
        data = memcpy(data, &frame[offset], blockLength);

        //替换该NALU相应长度start code头(AVCC format需要这样)
        // htonl 将数据类型转换为unsigned int
        uint32_t dataLength32 = htonl (blockLength - 4);
        memcpy (data, &dataLength32, sizeof (uint32_t));
(3)CMBlockBufferCreateWithMemoryBlock接口构造CMBlockBufferRef。
status = CMBlockBufferCreateWithMemoryBlock(NULL, data,
                                                    blockLength,
                                                    kCFAllocatorNull, NULL,
                                                    0,
                                                    blockLength,
                                                    0, &blockBuffer);
3.根据自己的需要设置CMTime
我的项目中的拉取的实时流需要实时播放,不需要设置时间间隔,所以不用设置CMTime。
4.根据上述得到CMVideoFormatDescriptionRef、CMBlockBufferRef和可选的时间信息,使用CMSampleBufferCreate接口得到CMSampleBuffer数据这个待解码的原始的数据。

5.用AVSampleBufferDisplayLayer处理得到sampleBuffer来显示图像。
[_displayLayer enqueueSampleBuffer:sampleBuffer];
至此成功用Video Toolbox硬件解码H.264码流,并在设备上播放视频。
可是,如果我们要拿到每一帧图像进行处理呢,那该怎么得到?
那么我们还需要用VTDecompressionSession解码成CVPixelBuffer,通过UIImageView或者OpenGL ES上显示。
(1)创建VTDecompressionSession,需要以下参数:
-
CMVideoFormatDescription(见上面的第(3)步) - 对所输出数据的需求——
pixelBufferAttributes - 解码结果回调函数
VTDecompressionSessionOutputCallback
-(void) createDecompressionSession
{
//创建VTDecompressionSession
    _decompressionSession = NULL;
    VTDecompressionOutputCallbackRecord callBackRecord;
    callBackRecord.decompressionOutputCallback = decompressionSessionDecodeFrameCallback;

    callBackRecord.decompressionOutputRefCon = (__bridge void *)self;

    NSDictionary* destinationPixelBufferAttributes = @{
                                                       (id)kCVPixelBufferPixelFormatTypeKey : [NSNumber numberWithInt:kCVPixelFormatType_420YpCbCr8BiPlanarVideoRange],
                                                       //硬解必须是 kCVPixelFormatType_420YpCbCr8BiPlanarVideoRange
                                                       //                                                           或者是kCVPixelFormatType_420YpCbCr8Planar
                                                       //因为iOS是  nv12  其他是nv21
                                                       (id)kCVPixelBufferWidthKey : [NSNumber numberWithInt:h264outputHeight*2],
                                                       (id)kCVPixelBufferHeightKey : [NSNumber numberWithInt:h264outputWidth*2],
                                                       //这里宽高和编码反的
                                                       (id)kCVPixelBufferOpenGLCompatibilityKey : [NSNumber numberWithBool:YES]
                                                       };
    OSStatus status = VTDecompressionSessionCreate(kCFAllocatorDefault,
                                          _formatDesc,
                                          NULL,
                                          (__bridge CFDictionaryRef)destinationPixelBufferAttributes,
                                          &callBackRecord,
                                          &_decompressionSession);

    if (status == noErr) {
        NSLog(@"Video Decompression Session 创建成功!");
    }else{
        NSLog(@"Video Decompression Session 创建失败,错误码: %d",(int)status);
    }
}
(2)调用VTDecompresSessionDecodeFrame接口进行解码。
 VTDecodeFrameFlags flags = kVTDecodeFrame_EnableAsynchronousDecompression;
    VTDecodeInfoFlags flagOut;
    NSDate* currentTime = [NSDate date];
    VTDecompressionSessionDecodeFrame(_decompressionSession, sampleBuffer, flags,
                                      (void*)CFBridgingRetain(currentTime), &flagOut);

    CFRelease(sampleBuffer);
(3)VTDecompressionSessionOutputCallback回调函数中可以得到解码后的结果CVPixelBuffer,可以将CVPixelBuffer转换成UIImage图像显示在ImageView上或者用OpenGL ES渲染图像。
void decompressionSessionDecodeFrameCallback(void *decompressionOutputRefCon,
                                             void *sourceFrameRefCon,
                                             OSStatus status,
                                             VTDecodeInfoFlags infoFlags,
                                             CVImageBufferRef imageBuffer,
                                             CMTime presentationTimeStamp,
                                             CMTime presentationDuration)
{

    if (status != noErr)
    {
        NSError *error = [NSError errorWithDomain:NSOSStatusErrorDomain code:status userInfo:nil];
        NSLog(@"解码错误: %@", error);
    }
    else
    {
        NSLog(@"解码成功");

        CVPixelBufferRef *outputPixelBuffer = (CVPixelBufferRef *)sourceFrameRefCon;
        H264HWDecoder *decoder = (__bridge H264HWDecoder *)decompressionOutputRefCon;
        if (decoder.delegate!=nil)
        {
            [decoder.delegate displayImageBuffer:imageBuffer];
        }
    }
}