本文主要讲解实现中间凸起的圆形TabBar控制器,使用咸鱼App进行例子参考

之前在讲解完基本的控件的使用后,一直想讲解下Tabbar的使用,刚好有个机会可以结合凸起的圆形TabBar来讲解下TabBar的基本使用过程,首先我们在讲解TabBar之前,我们先介绍下UITabBarController:
UITabBarController
UITabBarController就是一个类似于上面咸鱼显示的视图控制器页面,其可以添加多个控制器进行切换显示;还提供了一个UITabBar类来允许用户进行控制器视图的切换。
首先我们来基本使用下UITabBarController去构建一个视图页面
using System;
using UIKit;

namespace TabbedApplication {
        public class TabController : UITabBarController {

                UIViewController tab1, tab2, tab3;

                public TabController ()
                {
                        tab1 = new UIViewController();
                        tab1.Title = "Green";
                        tab1.View.BackgroundColor = UIColor.Green;

                        tab2 = new UIViewController();
                        tab2.Title = "Orange";
                        tab2.View.BackgroundColor = UIColor.Orange;

                        tab3 = new UIViewController();
                        tab3.Title = "Red";
                        tab3.View.BackgroundColor = UIColor.Red;

                        var tabs = new UIViewController[] {
                                tab1, tab2, tab3
                        };

                        ViewControllers = tabs;
                }
        }
}
其中ViewControllers就是设置UITabBarController 里面的多个视图控制器,设置其的ViewControllers数组,即在底部显示多少个相应的tabbaritem。

同样我们可以自定义相应的UITabBarItem的样式,已达到相应的业务要求
tab1.TabBarItem = new UITabBarItem (UITabBarSystemItem.Favorites, 0);

tab2 = new UIViewController ();
tab2.TabBarItem = new UITabBarItem ();
tab2.TabBarItem.Image = UIImage.FromFile ("second.png");
tab2.TabBarItem.Title = "Second";
tab2.View.BackgroundColor = UIColor.Orange;

tab3.TabBarItem.BadgeValue = "Hi";
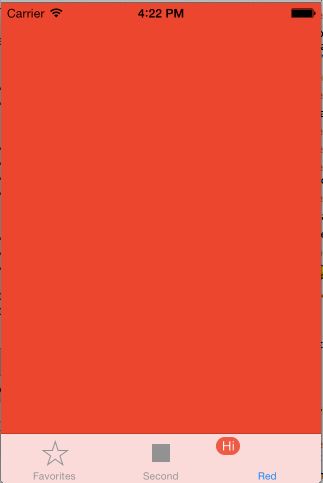
这就是基本的UITabBarController的使用,我们可以添加多个控制器,自定义相应的TabBarItem的显示样式,去丰富我们的界面显示元素。
MYTabBar
根据了上边的UITabBarController的简单使用介绍,我们发现对于单单使用UITabBarController去实现咸鱼那样凸起的圆形TabBar其实是无法直接实现的,这里我们需要去自定义我们的TabBar试图。
首先我们先自定义TabBarItem,这里我们称为MYTabBarItem,其本质是一个按钮,我们去重新设置他的图片和文字的显示位置即可
public enum LLTabBarItemType
    {
        Normal = 0,
        Rise,
    }

    public class MYTabBarItem : UIButton
    {
        static public string kLLTabBarItemAttributeType = "MYTabBarItemAttributeType";
        static public string kLLTabBarItemAttributeTitle = "MYTabBarItemAttributeTitle";
        static public string kLLTabBarItemAttributeNormalImageName = "LLTabBarItemAttributeNormalImageName";
        static public string kLLTabBarItemAttributeSelectedImageName = "LLTabBarItemAttributeSelectedImageName";

        public LLTabBarItemType tabBarItemType{get;set;}

        public MYTabBarItem(CGRect frame) : base(frame)
        {
            if(this != null)
                config();
        }

        public MYTabBarItem()
        {
            if (this != null)
                config();
        }

        private void config()
        {
            this.AdjustsImageWhenHighlighted = true;
            this.ImageView.ContentMode = UIViewContentMode.ScaleAspectFit;
        }
public override void LayoutSubviews()
        {
            base.LayoutSubviews();
            this.TitleLabel.SizeToFit();
            CGSize titleSize = this.TitleLabel.Frame.Size;
            UIImage image = this.ImageForState(UIControlState.Normal);
            CGSize imageSize;
            if (image == null)
            {
                imageSize = new CGSize(0,0);
            }
            else
            {
                imageSize = this.ImageForState(UIControlState.Normal).Size;
            }

            if (imageSize.Width != 0 && imageSize.Height != 0)
            {
                nfloat imageViewCenterY = this.Frame.Height - 3 - titleSize.Height - imageSize.Height / 2 - 5;
                this.ImageView.Center = new CGPoint(this.Frame.Width / 2, imageViewCenterY);
            }
            else
            {
                CGPoint imageViewCenter = this.ImageView.Center;
                imageViewCenter.X = this.Frame.Width / 2;
                imageViewCenter.Y = (this.Frame.Height - titleSize.Height) / 2;
                this.ImageView.Center = imageViewCenter;
            }

            CGPoint labelCenter = new CGPoint(this.Frame.Width / 2 ,this.Frame.Height -3 - titleSize.Height/2 );
            this.TitleLabel.Center = labelCenter;

            //Console.WriteLine(this.ImageView.Frame);

        }
这里我们需要在LayoutSubviews方法里面对按钮的label和image位置进行重新布局,调整label显示在图片的上边。这里我们需要自定义一个属性去区分是否为中间圆形TabBarItem。
注意事项:
1、当我们重写LayoutSubviews方法时候,我们千万不能忘记base.LayoutSubviews();如果不添加此行代码无法显示成功。
2、LayoutSubviews在什么时候调用?1)直接调用[self setNeedsLayout];2)addSubview的时候;3)当view的size发生改变的时候;4)滑动UIScrollView的时候;5)旋转Screen会触发父UIView上的layoutSubviews事件.
接着我们就可以自定义UITabBar了,这里我们称为MYTabBar
public class MYTabBar : UIView
    {
        private List tabBarItems ;
        public List> tabBarItemAttributes
        {
            get
            {
                return _tabBarItemAttributes;
            }
            set
            {
                _tabBarItemAttributes = value;
                nfloat normalItemWidth = (UIScreen.MainScreen.Bounds.Width * 3 / 4) / (_tabBarItemAttributes.Count - 1);
                nfloat tabBarHeight = this.Frame.Height;
                nfloat publishItemWidth = (UIScreen.MainScreen.Bounds.Width / 4);

                int itemTag = 0;
                bool passedRiseItem = false;
                tabBarItems = new List();

                foreach (var item in _tabBarItemAttributes)
                {
                    if (item is Dictionary)
                    {
                        Dictionary itemDic = (Dictionary)item;
                        var type = (object)itemDic[MYTabBarItem.kLLTabBarItemAttributeType];
                        CGRect frame = new CGRect(itemTag * normalItemWidth + (passedRiseItem ? publishItemWidth : 0), 0, (type == (object)LLTabBarItemType.Rise ? publishItemWidth : normalItemWidth), tabBarHeight);

                        MYTabBarItem tabBarItem = tabbarItemWithProperty(frame,
                                                                         itemDic[MYTabBarItem.kLLTabBarItemAttributeTitle].ToString(),
                                                                         itemDic[MYTabBarItem.kLLTabBarItemAttributeNormalImageName].ToString(),
                                                                         itemDic[MYTabBarItem.kLLTabBarItemAttributeSelectedImageName].ToString(),
                                                                         (LLTabBarItemType)type);

                        if (itemTag == 0)
                        {
                            tabBarItem.Selected = true;
                        }

                        tabBarItem.TouchUpInside += (object sender, EventArgs e) =>
                        {
                            if (((MYTabBarItem)sender).tabBarItemType != LLTabBarItemType.Rise)
                            {
                                setSelectedIndex((int)((MYTabBarItem)sender).Tag);
                            }
                            else
                            {

                            }
                        };
                        if (tabBarItem.tabBarItemType != LLTabBarItemType.Rise)
                        {
                            tabBarItem.Tag = itemTag;
                            itemTag++;
                        }
                        else {
                            passedRiseItem = true;
                        }
                        tabBarItems.Add(tabBarItem);
                        this.AddSubview(tabBarItem);

                    }
                }
            }
        }

        private List> _tabBarItemAttributes;
        public MYTabBar()
        {
        }

        public MYTabBar(CGRect frame) : base(frame)
        {

        }

        private MYTabBarItem tabbarItemWithProperty(CGRect frame ,string title,string normalImageName,string selectedImageName,LLTabBarItemType tabBarItemType)
        {
            MYTabBarItem item = new MYTabBarItem(frame);
            item.SetTitle(title, UIControlState.Normal);
            item.SetTitle(title, UIControlState.Selected);
            item.TitleLabel.Font = UIFont.SystemFontOfSize(8);
            UIImage normalImage = UIImage.FromBundle(normalImageName);
            UIImage selectedImage = UIImage.FromBundle(selectedImageName);
            item.SetImage(normalImage , UIControlState.Normal);
            item.SetImage(selectedImage , UIControlState.Selected);
            item.SetTitleColor(UIColor.FromWhiteAlpha(51/255,1), UIControlState.Normal);
            item.SetTitleColor(UIColor.FromWhiteAlpha(51 / 255, 1), UIControlState.Selected);
            item.tabBarItemType = tabBarItemType;
            return item;
        }

        private void setSelectedIndex(int index)
        {
            foreach(MYTabBarItem item in tabBarItems)
            {
                if (item.Tag == index)
                {
                    item.Selected = true;
                }
                else {
                    item.Selected = false;
                }
            }

            UIWindow keyWindow = UIApplication.SharedApplication.Delegate.GetWindow();
            UITabBarController tabBarController = (UITabBarController)keyWindow.RootViewController;
            if (tabBarController!=null)
            {
                tabBarController.SelectedIndex = index;
            }
        }

    }
在这里我们需要根据输入的字典数组去设置每个MYTabBarItem的属性,然后根据其类型去设置相应的frame,而且绑定不同的事件。
接着我们去AppDelegate文件中去设置根控制器
Window = new UIWindow(UIScreen.MainScreen.Bounds);
            Window.BackgroundColor = UIColor.White;


            UICollectionViewFlowLayout layout = new UICollectionViewFlowLayout();
            layout.ItemSize = new CGSize(UIScreen.MainScreen.Bounds.Width, UIScreen.MainScreen.Bounds.Height);
            layout.MinimumLineSpacing = 0;
            layout.ScrollDirection = UICollectionViewScrollDirection.Horizontal;
            UICollectionViewController guideVC = new ViewController(layout);

            MyViewController vc = new MyViewController();
            Slide sc = new Slide();

            UITabBarController tabbar = new UITabBarController();
            tabbar.ViewControllers = new UIViewController[] {vc, sc,guideVC,vc,sc};
            UITabBar.Appearance.BackgroundImage = new UIImage();
            UITabBar.Appearance.ShadowImage = new UIImage();

            MYTabBar tab = new MYTabBar(tabbar.TabBar.Bounds);
            if (MYTabBarItem.kLLTabBarItemAttributeTitle != null)
            {
                var key1 = MYTabBarItem.kLLTabBarItemAttributeTitle;
                var key2 = MYTabBarItem.kLLTabBarItemAttributeType;
                var key3 = MYTabBarItem.kLLTabBarItemAttributeNormalImageName;
                var key4 = MYTabBarItem.kLLTabBarItemAttributeSelectedImageName;

                var value2 = LLTabBarItemType.Normal;
                var value1 = LLTabBarItemType.Rise;

                var dict1 = new Dictionary();
                dict1.Add(key1,"首页");
                dict1.Add(key2, value2);
                dict1.Add(key3, "home_normal");
                dict1.Add(key4, "home_highlight");

                var dict2 = new Dictionary();
                dict2.Add(key1, "同城");
                dict2.Add(key2, value2);
                dict2.Add(key3, "mycity_normal");
                dict2.Add(key4, "mycity_highlight");

                var dict3 = new Dictionary();
                dict3.Add(key1, "发布");
                dict3.Add(key2, value1);
                dict3.Add(key3, "post_normal");
                dict3.Add(key4, "post_highlight");

                var dict4 = new Dictionary();
                dict4.Add(key1, "消息");
                dict4.Add(key2, value2);
                dict4.Add(key3, "message_normal");
                dict4.Add(key4, "message_highlight");

                var dict5 = new Dictionary();
                dict5.Add(key1, "我的");
                dict5.Add(key2, value2);
                dict5.Add(key3, "account_normal");
                dict5.Add(key4, "account_highlight");

                tab.tabBarItemAttributes = new List>() {dict1,dict2,dict3,dict4,dict5 } ;
            }

            tabbar.TabBar.AddSubview(tab);
            Window.RootViewController = tabbar;
            Window.MakeKeyAndVisible();
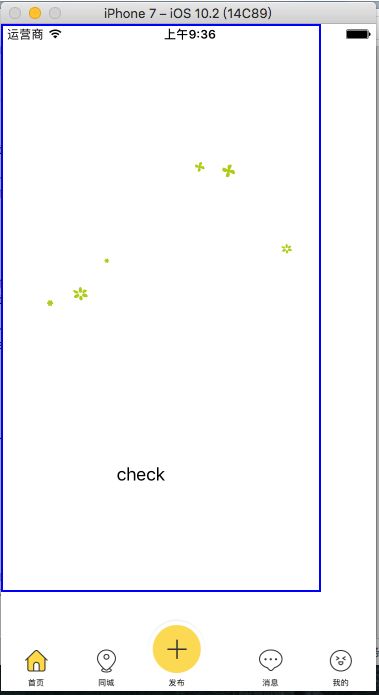
最后这个自定义的TabBar就这样完成了,项目实例源码在github上。
到这里Xamarin.iOS中实现中间凸起圆形TabBar的介绍就完成了,希望能对您有所帮助。
——End 有问题可以加我微信,大家一起讨论