安全加密C语言库OpenSSL,在Android中服务器和客户端之间的签名验证和数据加密通信等。
OpenSSL系列文章:
一、Android CMake轻松实现基于OpenSSL的HmacSHA1签名
二、Android CMake轻松实现基于OpenSSL的SHA(1-512)签名
三、Android CMake轻松实现基于OpenSSL的MD5信息摘要&异或加解密
四、Android CMake轻松实现基于OpenSSL的AES加解密
五、Android CMake轻松实现基于OpenSSL的RSA加解密
六、Android CMake轻松实现基于OpenSSL的RSA签名和验证
七、在Retrofit的基础上结合OpenSSL实现服务器和客户端之间数据加密通信
最近有这么一个需求,要对接口进行签名验证以防止被刷。开始想到了在Java中实现HmacSHA1签名,但由于Java代码较容易反编译直接获取秘钥,而否定了这个方案。为了解决这个问题,把实现签名的逻辑代码用C/C++来编写,编译成xxx.so库,大大提高了反编译的门槛,从而降低了被反编译的风险。
在C/C++中要实现HmacSHA1签名,只有依赖一个很出名的C语言中常用的加解密库OpenSSL。什么是OpenSSL请自行百度,随便搜都是一大堆。难点在于在Android中进行Jni开发,在C/C++文件中要调用第三方OpenSSL的xxx.so库,那怎样才能把OpenSSL的xxx.so库引入我们的C/C++文件中呢?换句话说就是最终我们的C/C++文件会被编译成一个.so库,就叫libsignature.so吧!而这个库又引用了第三方xxx.so库。不过不用担心,自从Android支持CMake后,一切都变得简单了。网络上也有很多博客,也有很多代码片段,但是对于初学者来说,根本不知道那是什么玩意儿!所以我想写细一点。
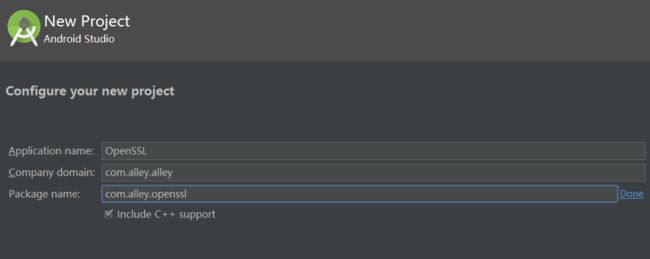
一:新建项目
如下图勾选include C++ support,然后一路next,直到finish。
二:编译OpenSSL源码得到.so库
OpenSSL源码:github上搜索关键字【OpenSSL for Android】下载并编译,拷贝所有.so到app/alley/lib/目录下,拷贝OpenSSL所有头文件到app/alley/include/openssl/目录下。
三:gradle配置
#app目录下build.gradle
apply plugin: 'com.android.application'

android {
    compileSdkVersion 25
    buildToolsVersion "25.0.2"
    defaultConfig {
        applicationId "com.alley.openssl"
        minSdkVersion 15
        targetSdkVersion 25
        versionCode 1
        versionName "1.0"
        testInstrumentationRunner "android.support.test.runner.AndroidJUnitRunner"
        externalNativeBuild {
            cmake {
                cppFlags "-std=c++11 -frtti -fexceptions"
                //目标平台,若需要更多平台的请自行配置
                abiFilters 'armeabi'
            }
        }
    }
    buildTypes {
        release {
            minifyEnabled false
            proguardFiles getDefaultProguardFile('proguard-android.txt'), 'proguard-rules.pro'
        }
    }
    sourceSets {
        main {
            //第三方.so库路径
            jniLibs.srcDirs = ['E:\\AndroidSpace\\OpenSSL\\app\\alley\\lib']
        }
    }
    externalNativeBuild {
        cmake {
            path "CMakeLists.txt"
        }
    }
}

dependencies {
    compile fileTree(dir: 'libs', include: ['*.jar'])
    androidTestCompile('com.android.support.test.espresso:espresso-core:2.2.2', {
        exclude group: 'com.android.support', module: 'support-annotations'
    })
    compile 'com.android.support:appcompat-v7:25.3.1'
    compile 'com.android.support.constraint:constraint-layout:1.0.0-alpha8'
    testCompile 'junit:junit:4.12'
}
四:CMakeLists脚本
CMakeLists脚本语法请自行查阅
# For more information about using CMake with Android Studio, read the
# documentation: https://d.android.com/studio/projects/add-native-code.html

# Sets the minimum version of CMake required to build the native library.

cmake_minimum_required(VERSION 3.4.1)
#C++编译
set(CMAKE_CXX_FLAGS "${CMAKE_CXX_FLAGS} -std=gnu++11")

#配置加载头文件
include_directories(E:/AndroidSpace/OpenSSL/app/alley/include)

#动态方式加载
add_library(openssl SHARED IMPORTED )
add_library(ssl SHARED IMPORTED )
#引入第三方.so库
set_target_properties(openssl PROPERTIES IMPORTED_LOCATION E:/AndroidSpace/OpenSSL/app/alley/lib/${ANDROID_ABI}/libcrypto.so)
set_target_properties(ssl PROPERTIES IMPORTED_LOCATION E:/AndroidSpace/OpenSSL/app/alley/lib/${ANDROID_ABI}/libssl.so)

# Creates and names a library, sets it as either STATIC
# or SHARED, and provides the relative paths to its source code.
# You can define multiple libraries, and CMake builds them for you.
# Gradle automatically packages shared libraries with your APK.

add_library( # Sets the name of the library.
             signature

             # Sets the library as a shared library.
             SHARED

             # Provides a relative path to your source file(s).
             src/main/cpp/signature.cpp )

# Searches for a specified prebuilt library and stores the path as a
# variable. Because CMake includes system libraries in the search path by
# default, you only need to specify the name of the public NDK library
# you want to add. CMake verifies that the library exists before
# completing its build.

find_library( # Sets the name of the path variable.
              log-lib

              # Specifies the name of the NDK library that
              # you want CMake to locate.
              log )

# Specifies libraries CMake should link to your target library. You
# can link multiple libraries, such as libraries you define in this
# build script, prebuilt third-party libraries, or system libraries.

target_link_libraries( # Specifies the target library.
                       signature
                       openssl
                       ssl
                       android

                       # Links the target library to the log library
                       # included in the NDK.
                       ${log-lib} )
五:加解密
HmacSHA1算法得到签名结果为十六进制数。在本项目中对其进行Base64编码,发现编码结果为28位的,这和用Java代码实现的完全不同(Java实现的是56位),在线base64编码测试结果也为56位。原因是什么呢?
待编码数据是按照** %02x 格式输出的值,然后用这个值再次进行base64编码。在这里解释一下 %02x:按照十六进制进行数据输出,不足两位,则在之前补0,否则按实际数据输出。 所以用到了sprintf(char *, const char *, ...)和strcat(char , const char )函数,这才是重点啊,不太容易发现。在开发过程中注意C++函数名与native方法的关系。将最后编译生成的libsignature.so拷贝你的项目中就可以使用了。秘钥自己设定,注意不要泄露了。更多详情请阅读源码。
#include
#include
#include
#include


#define TAG "JNI"
#define LOGI(...) __android_log_print(ANDROID_LOG_INFO, TAG, __VA_ARGS__)
#define LOGD(...) __android_log_print(ANDROID_LOG_DEBUG, TAG, __VA_ARGS__)
#define LOGE(...) __android_log_print(ANDROID_LOG_ERROR, TAG, __VA_ARGS__)

extern "C"
JNIEXPORT jbyteArray JNICALL
Java_com_alley_openssl_util_JniUtils_getSignature(JNIEnv *env, jobject instance, jbyteArray value_) {
    const char *key = "5fd6s4gs8f7s1dfv23sdf4ag65rg4arhb4fb1f54bgf5gbvf1534as";
    LOGI("HmacSHA1->准备获取待加密数据");
    jbyte *value = env->GetByteArrayElements(value_, NULL);
    LOGI("HmacSHA1->准备计算待加密数据长度");
    size_t value_Len = env->GetArrayLength(value_);

    unsigned int result_len;
    unsigned char result[EVP_MAX_MD_SIZE];
    char buff[EVP_MAX_MD_SIZE];
    char hex[EVP_MAX_MD_SIZE];

    LOGI("HmacSHA1->准备进行加密计算");
    HMAC(EVP_sha1(), key, strlen(key), (unsigned char *) value, value_Len, result, &result_len);
    LOGI("HmacSHA1->加密计算结束");

    strcpy(hex, "");
    for (int i = 0; i != result_len; i++) {
        sprintf(buff, "%02x", result[i]);
        strcat(hex, buff);
    }
    LOGI("HmacSHA1->");
    LOGI("%s", hex);

    env->ReleaseByteArrayElements(value_, value, 0);
    LOGI("HmacSHA1->jni释放数据结束");
    jbyteArray signature = env->NewByteArray(strlen(hex));
    env->SetByteArrayRegion(signature, 0, strlen(hex), (jbyte *) hex);
    LOGI("HmacSHA1->准备以ByteArray格式返回数据");
    return signature;
}
六:测试
待签名数据:Android CMake轻松实现基于OpenSSL的HmacSHA1签名
秘钥:5fd6s4gs8f7s1dfv23sdf4ag65rg4arhb4fb1f54bgf5gbvf1534as
在线签名校验:http://tool.oschina.net/encrypt?type=2,经测试代码签名和在线签名结果相同。
下载代码运行,在控制台中输入“body”,将看到所有调试信息。欢迎star,fork,转载。
源码:https://github.com/GitPhoenix/OpenSSL

