Retrofit 2 源码分析
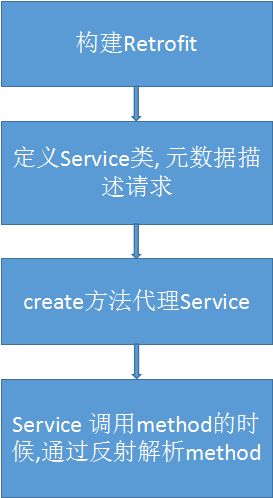
惯例从一个例子入手
//使用Builder模式创建Retrofit对象
Retrofit retrofit = new Retrofit.Builder()
    .baseUrl("https://api.github.com/")
    .addConverterFactory(GsonConverterFactory.create())
    .build();

//创建Service对象, 这里统称为Service, 其实是一个接口的描述
GitHubService service = retrofit.create(GitHubService.class);

//发起请求调用
Call> repos = service.listRepos("octocat");
定义Service接口
其实就是用元数据很清晰的描述一个HTTP请求以及参数等等
public interface GitHubService {
  @GET("users/{user}/repos")
  Call> listRepos(@Path("user") String user);
}
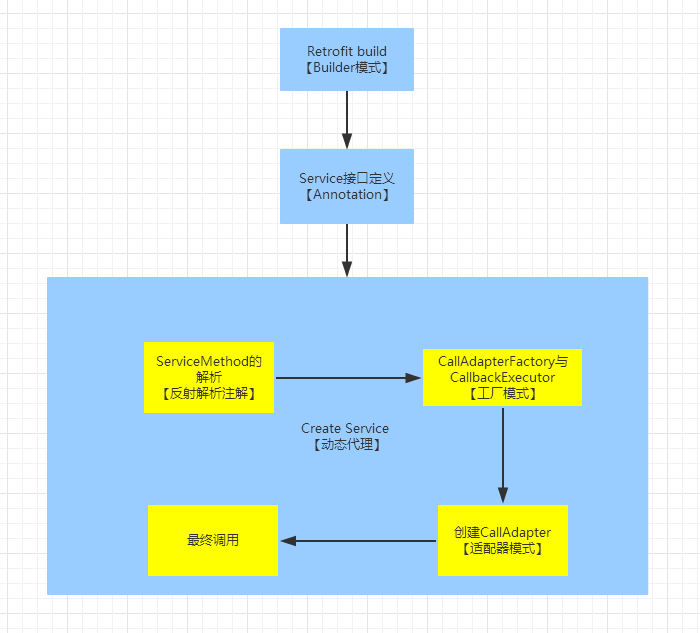
使用Builder模式创建Retrofit对象
这里有两个点比较有趣, 为一些属性做了default处理, 一个是保护性拷贝
public static final class Builder {
    private final Platform platform;
    private okhttp3.Call.Factory callFactory;
    private HttpUrl baseUrl;
    private final List converterFactories = new ArrayList<>();
    private final List adapterFactories = new ArrayList<>();
    private Executor callbackExecutor;
    private boolean validateEagerly;


    ...

     public Retrofit build() {
      if (baseUrl == null) {
        throw new IllegalStateException("Base URL required.");
      }

      okhttp3.Call.Factory callFactory = this.callFactory;
      if (callFactory == null) {
        callFactory = new OkHttpClient();
      }

      Executor callbackExecutor = this.callbackExecutor;
      if (callbackExecutor == null) {
        callbackExecutor = platform.defaultCallbackExecutor();
      }

      //注意看这里, 这里用了个保护性拷贝创建两个list 比较有趣。
      // Make a defensive copy of the adapters and add the default Call adapter.
      List adapterFactories = new ArrayList<>(this.adapterFactories);

      //这里后续会看到他添加了默认的CallAdapterFactory
      adapterFactories.add(platform.defaultCallAdapterFactory(callbackExecutor));

      // Make a defensive copy of the converters.
      List converterFactories = new ArrayList<>(this.converterFactories);

      return new Retrofit(callFactory, baseUrl, converterFactories, adapterFactories,
          callbackExecutor, validateEagerly);
    }
创建Service的对象, 动态代理模式
如果说前面的GitHub 接口是对一个请求的描述, 那么create方法就是要生成这个被描述请求的对象。
通过create 方法, 动态代理GitHub这个接口, 解析Annotation, 生成调用对象等
public T create(final Class service) {
//验证service 是interface 并且, 不能继承其他接口
Utils.validateServiceInterface(service);
//是否急切的先执行loadServiceMethod
if (validateEagerly) {
eagerlyValidateMethods(service);
}
return (T) Proxy.newProxyInstance(service.getClassLoader(), new Class[] { service },
new InvocationHandler() {
private final Platform platform = Platform.get();
@Override public Object invoke(Object proxy, Method method, Object... args)
throws Throwable {
// 如果调用者的class对象是Object, 则执行默认的method 调用
if (method.getDeclaringClass() == Object.class) {
return method.invoke(this, args);
}
if (platform.isDefaultMethod(method)) {
return platform.invokeDefaultMethod(method, service, proxy, args);
}
//这里可以认为是解析调用方法参数等, 生成serviceMethod对象
ServiceMethod serviceMethod =
(ServiceMethod) loadServiceMethod(method);
//根据serviceMethod 最终实例化OkHttpCall 对象
OkHttpCall 缓存ServiceMethod, 假设这个Service(比如Github)被解析过了会缓存起来
看看这个loadServiceMethod, 首先检查serviceMethodCache, 这个cache是个ConcurrentHashMap,
如果缓存不存在, 则利用 ServiceMethod.Builder生成一个ServiceMethod
  ServiceMethod loadServiceMethod(Method method) {
    ServiceMethod result = serviceMethodCache.get(method);
    if (result != null) return result;

    synchronized (serviceMethodCache) {
      result = serviceMethodCache.get(method);
      if (result == null) {
        result = new ServiceMethod.Builder<>(this, method).build();
        serviceMethodCache.put(method, result);
      }
    }
    return result;
  }
总结上面的流程:
ServiceMethod 是怎么解析Method
首先通过SeviceMethod.Builder 构建ServiceMethod
  Builder(Retrofit retrofit, Method method) {
      this.retrofit = retrofit;
      this.method = method;

      //这里利用反射的方法获取方法的Annotation, 参数类型, 参数的Annotation
      this.methodAnnotations = method.getAnnotations();
      this.parameterTypes = method.getGenericParameterTypes();
      this.parameterAnnotationsArray = method.getParameterAnnotations();
    }


 public ServiceMethod build() {
  //创建CallAdatper
  callAdapter = createCallAdapter();
  responseType = callAdapter.responseType();
  if (responseType == Response.class || responseType == okhttp3.Response.class) {
    throw methodError("'"
        + Utils.getRawType(responseType).getName()
        + "' is not a valid response body type. Did you mean ResponseBody?");
  }
  //创建Response数据处理器
  responseConverter = createResponseConverter();
      ...
创建CallAdapter, 首先通过反射获取method返回的类型
    private CallAdapter createCallAdapter() {
      Type returnType = method.getGenericReturnType();
      if (Utils.hasUnresolvableType(returnType)) {
        throw methodError(
            "Method return type must not include a type variable or wildcard: %s", returnType);
      }
      if (returnType == void.class) {
        throw methodError("Service methods cannot return void.");
      }
      Annotation[] annotations = method.getAnnotations();
      try {
        //noinspection unchecked
        return (CallAdapter) retrofit.callAdapter(returnType, annotations);
      } catch (RuntimeException e) { // Wide exception range because factories are user code.
        throw methodError(e, "Unable to create call adapter for %s", returnType);
      }
    }
retrofit.callAdapter其实是遍历adapterFactories,调用adapterFactor.get()创建CallAdapter
  public CallAdapter nextCallAdapter(CallAdapter.Factory skipPast, Type returnType,
      Annotation[] annotations) {
    checkNotNull(returnType, "returnType == null");
    checkNotNull(annotations, "annotations == null");

    int start = adapterFactories.indexOf(skipPast) + 1;
    for (int i = start, count = adapterFactories.size(); i < count; i++) {
      CallAdapter adapter = adapterFactories.get(i).get(returnType, annotations, this);
      if (adapter != null) {
        return adapter;
      }
    }
默认的CallAdapterFactory与CallbackExecutor
如果最开始初始化Retrofit时没有传adapterFactories, 则使用默认的CallAdapterFactory 和默认CallbackExecutor , 从下面代码可以看出, 默认的CallbackExecutor 是在主线程执行。
  static class Android extends Platform {
    @Override public Executor defaultCallbackExecutor() {
      return new MainThreadExecutor();
    }

    @Override CallAdapter.Factory defaultCallAdapterFactory(Executor callbackExecutor) {
      return new ExecutorCallAdapterFactory(callbackExecutor);
    }

    static class MainThreadExecutor implements Executor {
      private final Handler handler = new Handler(Looper.getMainLooper());

      @Override public void execute(Runnable r) {
        handler.post(r);
      }
    }
  }
创建CallAdapter
CallAdapter是由CallAdapterFactory生产的
再来看下默认的CallAdapterFactory的实现
get方法, 生成一个实现了CallAdapter接口的对象
然后adapt又生成了Call对象
简单点说就是CallAdapterFactory(制造CallAdapter对象)创建一个CallAdapter(适配Call的对象),传入callbackExecutor(怎么去执行, 比如在主线程执行), Factory 你可以自定义, CallAdapter也可以自定义, Executor也可以自定义, 非常灵活
@Override
public CallAdapter get(Type returnType, Annotation[] annotations, Retrofit retrofit) {
if (getRawType(returnType) != Call.class) {
return null;
}
final Type responseType = Utils.getCallResponseType(returnType);
return new CallAdapter>() {
@Override public Type responseType() {
return responseType;
}
//调用adapt 方法, 实例化Call对象, 传入callbackExecutor
@Override public Call CallAdapter 适配器模式
CallAdapter是一个接口,他定义了
  //response body 转换为 java 对象时使用, 告诉Converter 转为什么类型
  Type responseType();
  //如何生成call
  T adapt(Call call);
Call也是个接口
  //异步调用
  void enqueue(Callback callback);

  boolean isExecuted();

  //取消调用
  void cancel();

  boolean isCanceled();

  //原始的http请求
  Request request();
再来看下默认的Call实现:
  static final class ExecutorCallbackCall implements Call {
    final Executor callbackExecutor;
    final Call delegate;

    ExecutorCallbackCall(Executor callbackExecutor, Call delegate) {
      this.callbackExecutor = callbackExecutor;
      this.delegate = delegate;
    }

    @Override public void enqueue(final Callback callback) {
      if (callback == null) throw new NullPointerException("callback == null");
      //调用委托来异步请求, 这个委托就是就是最上面讲到的传入的OkhttpCall对象
      delegate.enqueue(new Callback() {
        @Override public void onResponse(Call call, final Response response) {
          //这里的callbackExecutor 就是开始看到的默认的callbackExecutor
          //解释下, 当请求完成后, 调用callbackExecutor来执行逻辑
          //这里callbackExecutor 上面说过到的默认Execute, 即在主线程的handler里面处理响应结果
          callbackExecutor.execute(new Runnable() {
            @Override public void run() {
              if (delegate.isCanceled()) {
                // Emulate OkHttp's behavior of throwing/delivering an IOException on cancellation.
                callback.onFailure(ExecutorCallbackCall.this, new IOException("Canceled"));
              } else {
                callback.onResponse(ExecutorCallbackCall.this, response);
              }
            }
          });
        }

        @Override public void onFailure(Call call, final Throwable t) {
          callbackExecutor.execute(new Runnable() {
            @Override public void run() {
              callback.onFailure(ExecutorCallbackCall.this, t);
            }
          });
        }
      });
    }
  }
所以说, 你可以自己实现一个CallApdater来实现处理调用的逻辑, 以及调用之后处理结果的逻辑
很简单, 看下默认的ExecutorCallAdapterFactory 的实现就明白了
首先
final class ExecutorCallAdapterFactory extends CallAdapter.Factory
然后 重写get方法
@Override
public CallAdapter get(Type returnType, Annotation[] annotations, Retrofit retrofit) {
if (getRawType(returnType) != Call.class) {
return null;
}
final Type responseType = Utils.getCallResponseType(returnType);
return new CallAdapter>() {
@Override public Type responseType() {
return responseType;
}
@Override public Call adapt里面 实例化一个Call 对象, Call对象的实现如下
实现Call
  static final class ExecutorCallbackCall implements Call
      @Override public void enqueue(final Callback callback) {
整个流程基本上已经剖析完成, 总结下
一些有趣的小点:
比如使用unmodifiableList 做保护性copy, 说白了就是让他list不可变
    this.converterFactories = unmodifiableList(converterFactories); // Defensive copy at call site.
    this.adapterFactories = unmodifiableList(adapterFactories); // Defensive copy at call site.
涉及到的反射API:
method.getDeclaringClass()          //获取该方法调用者的class对象
method.getAnnotations()             //获取该方法所有的Annotation
method.getDeclaringClass()          //获取该方法调用者的class对象
method.getGenericParameterTypes();  //获取参数类型
method.getParameterAnnotations();   //或者参数的Annotation