在MoveIt编程时最常用到的一个接口类是MoveGroupInterface
提供了对于控制机器人的常用基本操作:
- 设置关节角度或机器人姿态目标
- 运动规划
- 移动机器人
- 添加物体到环境里/从环境移除
- 将物体绑定到机器人上/从机器人上解绑
MoveGroupInterface通过ROS的话题topics、服务services和动作actions和MoveGroup节点通讯。
这里通过Panda机械臂的案例看一下怎么玩。
运行程序
启动panda机械臂MoveIt主程序
roslaunch panda_moveit_config demo.launch
运行MoveGroupInterface教程
roslaunch moveit_tutorials move_group_interface_tutorial.launch
RVizVisualToolsGui
通过RVizVisualToolsGui面板来逐步操作教程中的步骤。
在Panels菜单中,选择RvizVisualToolsGui。
加载完后如下
结果
教程中,对机械臂进行了以下几种控制:
-
- 手臂运动到前方的目标姿态
-
- 手臂运动到两侧的目标姿态
-
- 手臂运动到一个新的目标姿态但维持末端执行器不动
-
- 手臂按照一个给定的轨迹运动
-
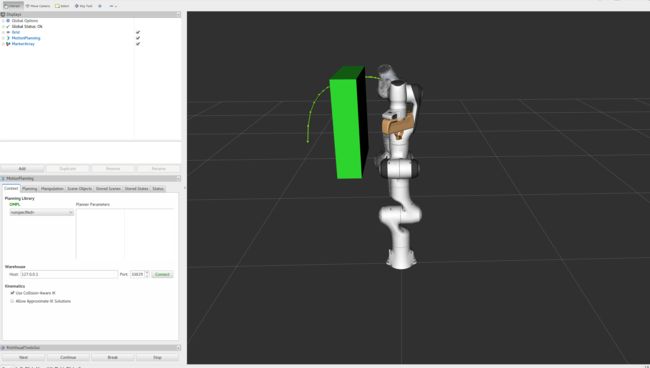
- 一个长方体物体添加到环境里
-
- 手臂绕过物体到达新的目标姿态
-
- 把物体固定到手臂上
-
- 把物体从手臂上移除
-
- 把物体从环境中移除
代码分析
教程的完整代码https://github.com/ros-planning/moveit_tutorials/blob/kinetic-devel/doc/move_group_interface/src/move_group_interface_tutorial.cpp
下面我们分析一下代码块:
Setup
MoveIt中的控制是对规划组planning groups进行的,通过创建MoveGroupInterface对象后会把planning group保存到JointModelGroup对象。在MoveIt编程中通常会把planning group叫做joint model group。
- 通过SRDF中定义的planning group的名称来创建接口对象。
static const std::string PLANNING_GROUP = "panda_arm";
moveit::planning_interface::MoveGroupInterface move_group(PLANNING_GROUP);
- 创建一个PlanningSceneInterface 类的对象,用于添加和移除物体。
moveit::planning_interface::PlanningSceneInterface planning_scene_interface;
- 构建一个指针指向JointModelGroup对象,有些情况下会直接对joint model group进行操作。
const robot_state::JointModelGroup* joint_model_group =
    move_group.getCurrentState()->getJointModelGroup(PLANNING_GROUP);
Visualization
MoveItVisualTools 是一个提供可视化的包,包括物体、机器人、轨迹以及调试信息的可视化。
  // Visualization
  // ^^^^^^^^^^^^^
  //
  // The package MoveItVisualTools provides many capabilties for visualizing objects, robots,
  // and trajectories in RViz as well as debugging tools such as step-by-step introspection of a script
  namespace rvt = rviz_visual_tools;
  moveit_visual_tools::MoveItVisualTools visual_tools("panda_link0");
  visual_tools.deleteAllMarkers();

  // Remote control is an introspection tool that allows users to step through a high level script
  // via buttons and keyboard shortcuts in RViz
  visual_tools.loadRemoteControl();

  // RViz provides many types of markers, in this demo we will use text, cylinders, and spheres
  Eigen::Isometry3d text_pose = Eigen::Isometry3d::Identity();
  text_pose.translation().z() = 1.75;
  visual_tools.publishText(text_pose, "MoveGroupInterface Demo", rvt::WHITE, rvt::XLARGE);

  // Batch publishing is used to reduce the number of messages being sent to RViz for large visualizations
  visual_tools.trigger();
Getting Basic Information
打印一些基本的信息
  // Getting Basic Information
  // ^^^^^^^^^^^^^^^^^^^^^^^^^
  //
  // We can print the name of the reference frame for this robot.
  ROS_INFO_NAMED("tutorial", "Planning frame: %s", move_group.getPlanningFrame().c_str());

  // We can also print the name of the end-effector link for this group.
  ROS_INFO_NAMED("tutorial", "End effector link: %s", move_group.getEndEffectorLink().c_str());

  // We can get a list of all the groups in the robot:
  ROS_INFO_NAMED("tutorial", "Available Planning Groups:");
  std::copy(move_group.getJointModelGroupNames().begin(), move_group.getJointModelGroupNames().end(),
            std::ostream_iterator(std::cout, ", "));
Start the demo
调用visual_tools的prompt提示开始。
visual_tools.prompt("Press 'next' in the RvizVisualToolsGui window to start the demo");
Planning to a Pose goal
指定一个末端执行器的目标姿态,调用规划运动。
- 先创建一个目标姿态
geometry_msgs::Pose target_pose1;
target_pose1.orientation.w = 1.0;
target_pose1.position.x = 0.28;
target_pose1.position.y = -0.2;
target_pose1.position.z = 0.5;
move_group.setPoseTarget(target_pose1);
- 调用接口进行规划 (这里只是规划,还没有具体控制运动)
moveit::planning_interface::MoveGroupInterface::Plan my_plan;

bool success = (move_group.plan(my_plan) == moveit::planning_interface::MoveItErrorCode::SUCCESS);

ROS_INFO_NAMED("tutorial", "Visualizing plan 1 (pose goal) %s", success ? "" : "FAILED");
Visualizing plans
把规划在rviz中显示
ROS_INFO_NAMED("tutorial", "Visualizing plan 1 as trajectory line");
visual_tools.publishAxisLabeled(target_pose1, "pose1");
visual_tools.publishText(text_pose, "Pose Goal", rvt::WHITE, rvt::XLARGE);
visual_tools.publishTrajectoryLine(my_plan.trajectory_, joint_model_group);
visual_tools.trigger();
visual_tools.prompt("Press 'next' in the RvizVisualToolsGui window to continue the demo");
Moving to a pose goal
调用move()执行运动
/* Uncomment below line when working with a real robot */
/* move_group.move(); */
这里注释掉因为是模拟,没有真正的硬件,调用的话会阻塞。
Planning to a joint-space goal
通过在关节空间定义一个目标的方式进行控制。旧的目标会被覆盖。
- 选构建一个指针指向RobotState对象,RobotState记录了规划组中各个关节的信息:位置position/速度velocity/加速度acceleration
moveit::core::RobotStatePtr current_state = move_group.getCurrentState();
- 获取当前关节的位置
std::vector joint_group_positions;
current_state->copyJointGroupPositions(joint_model_group, joint_group_positions);
- 改变第一个值作为目标状态,调用规划。这里用了setJointValueTarget()
joint_group_positions[0] = -1.0;  // radians
move_group.setJointValueTarget(joint_group_positions);

success = (move_group.plan(my_plan) == moveit::planning_interface::MoveItErrorCode::SUCCESS);
ROS_INFO_NAMED("tutorial", "Visualizing plan 2 (joint space goal) %s", success ? "" : "FAILED");
- 在rviz中显示
visual_tools.deleteAllMarkers();
visual_tools.publishText(text_pose, "Joint Space Goal", rvt::WHITE, rvt::XLARGE);
visual_tools.publishTrajectoryLine(my_plan.trajectory_, joint_model_group);
visual_tools.trigger();
visual_tools.prompt("Press 'next' in the RvizVisualToolsGui window to continue the demo");
Planning with Path Constraints
可以规定路径规划的一些约束条件
- 先定义一些约束
moveit_msgs::OrientationConstraint ocm;
ocm.link_name = "panda_link7";
ocm.header.frame_id = "panda_link0";
ocm.orientation.w = 1.0;
ocm.absolute_x_axis_tolerance = 0.1;
ocm.absolute_y_axis_tolerance = 0.1;
ocm.absolute_z_axis_tolerance = 0.1;
ocm.weight = 1.0;
- 添加到指定规划组
moveit_msgs::Constraints test_constraints;
test_constraints.orientation_constraints.push_back(ocm);
move_group.setPathConstraints(test_constraints);
- 下一步进行规划,我们这里再次使用之前定义的目标姿态target_pose1。给定一个新的起始姿态。
robot_state::RobotState start_state(*move_group.getCurrentState());
geometry_msgs::Pose start_pose2;
start_pose2.orientation.w = 1.0;
start_pose2.position.x = 0.55;
start_pose2.position.y = -0.05;
start_pose2.position.z = 0.8;
start_state.setFromIK(joint_model_group, start_pose2);
move_group.setStartState(start_state);
- 设置目标姿态
move_group.setPoseTarget(target_pose1);
- 加入约束条件后规划会比较耗时,因为每次采样都需要调用逆运动求解。这里把规划时间增加到10秒,保证有足够的时间规划成功。
move_group.setPlanningTime(10.0);

success = (move_group.plan(my_plan) == moveit::planning_interface::MoveItErrorCode::SUCCESS);
ROS_INFO_NAMED("tutorial", "Visualizing plan 3 (constraints) %s", success ? "" : "FAILED");
- 在rviz中显示
visual_tools.deleteAllMarkers();
visual_tools.publishAxisLabeled(start_pose2, "start");
visual_tools.publishAxisLabeled(target_pose1, "goal");
visual_tools.publishText(text_pose, "Constrained Goal", rvt::WHITE, rvt::XLARGE);
visual_tools.publishTrajectoryLine(my_plan.trajectory_, joint_model_group);
visual_tools.trigger();
visual_tools.prompt("next step");
- 清除约束条件
move_group.clearPathConstraints();
Cartesian Paths
可以通过给定一系列路径点来让末端执行器经过一个特定的路径。
- 创建一个pose的vector,当前的机器人位置是在start_pose2,起始点不是必须加进数组里,(这里加进去是为了可以在rviz中显示)
std::vector waypoints;
waypoints.push_back(start_pose2);

geometry_msgs::Pose target_pose3 = start_pose2;

target_pose3.position.z -= 0.2;
waypoints.push_back(target_pose3);  // down

target_pose3.position.y -= 0.2;
waypoints.push_back(target_pose3);  // right

target_pose3.position.z += 0.2;
target_pose3.position.y += 0.2;
target_pose3.position.x -= 0.2;
waypoints.push_back(target_pose3);  // up and left
- 调节了一下速度比例(关节最大速度)
move_group.setMaxVelocityScalingFactor(0.1);
- 调用computeCartesianPath(..)按一定步长插补得到一个plan。这里的步长eef_step设置为0.01,路径的分辨率就是1cm。跳动阈值jump_threshold设置为0.0将其禁用(控制真实机械臂时会有问题)。返回值是0.0~1.0之间的一个数值,表示成功规划了给定路径点的多少(1.0表示都能成功经过)。
moveit_msgs::RobotTrajectory trajectory;
const double jump_threshold = 0.0;
const double eef_step = 0.01;
double fraction = move_group.computeCartesianPath(waypoints, eef_step, jump_threshold, trajectory);
ROS_INFO_NAMED("tutorial", "Visualizing plan 4 (Cartesian path) (%.2f%% acheived)", fraction * 100.0);
- 在rviz中显示规划的plan
visual_tools.deleteAllMarkers();
visual_tools.publishText(text_pose, "Cartesian Path", rvt::WHITE, rvt::XLARGE);
visual_tools.publishPath(waypoints, rvt::LIME_GREEN, rvt::SMALL);
for (std::size_t i = 0; i < waypoints.size(); ++i)
  visual_tools.publishAxisLabeled(waypoints[i], "pt" + std::to_string(i), rvt::SMALL);
visual_tools.trigger();
visual_tools.prompt("Press 'next' in the RvizVisualToolsGui window to continue the demo");
Adding/Removing Objects and Attaching/Detaching Objects
添加/移除物体和绑定/解绑物体
- 利用moveit_msgs::CollisionObject定义一个物体
moveit_msgs::CollisionObject collision_object;
collision_object.header.frame_id = move_group.getPlanningFrame();
- 设置一个id
collision_object.id = "box1";
- 定义一个立方体
shape_msgs::SolidPrimitive primitive;
primitive.type = primitive.BOX;
primitive.dimensions.resize(3);
primitive.dimensions[0] = 0.4;
primitive.dimensions[1] = 0.1;
primitive.dimensions[2] = 0.4;
- 设置立方体的姿态(相对于frame_id)
geometry_msgs::Pose box_pose;
box_pose.orientation.w = 1.0;
box_pose.position.x = 0.4;
box_pose.position.y = -0.2;
box_pose.position.z = 1.0;

collision_object.primitives.push_back(primitive);
collision_object.primitive_poses.push_back(box_pose);
collision_object.operation = collision_object.ADD;

std::vector collision_objects;
collision_objects.push_back(collision_object);
- 添加到环境
ROS_INFO_NAMED("tutorial", "Add an object into the world");
planning_scene_interface.addCollisionObjects(collision_objects);
- rivz显示结果并提示下一步操作
visual_tools.publishText(text_pose, "Add object", rvt::WHITE, rvt::XLARGE);
visual_tools.trigger();
visual_tools.prompt("Press 'next' in the RvizVisualToolsGui window to once the collision object appears in RViz");
- 现在我们如果规划一个运动,其路径会避开这个物体
move_group.setStartState(*move_group.getCurrentState());
geometry_msgs::Pose another_pose;
another_pose.orientation.w = 1.0;
another_pose.position.x = 0.4;
another_pose.position.y = -0.4;
another_pose.position.z = 0.9;
move_group.setPoseTarget(another_pose);

success = (move_group.plan(my_plan) == moveit::planning_interface::MoveItErrorCode::SUCCESS);
ROS_INFO_NAMED("tutorial", "Visualizing plan 5 (pose goal move around cuboid) %s", success ? "" : "FAILED");
- rivz显示结果并提示下一步操作
visual_tools.deleteAllMarkers();
visual_tools.publishText(text_pose, "Obstacle Goal", rvt::WHITE, rvt::XLARGE);
visual_tools.publishTrajectoryLine(my_plan.trajectory_, joint_model_group);
visual_tools.trigger();
visual_tools.prompt("next step");
- 把上面定义的立方体绑定到机器人上
ROS_INFO_NAMED("tutorial", "Attach the object to the robot");
move_group.attachObject(collision_object.id);
- rivz显示结果并提示下一步操作
visual_tools.publishText(text_pose, "Object attached to robot", rvt::WHITE, rvt::XLARGE);
visual_tools.trigger();

/* Wait for MoveGroup to recieve and process the attached collision object message */
visual_tools.prompt("Press 'next' in the RvizVisualToolsGui window to once the collision object attaches to the "
                    "robot");
- 解绑物体
ROS_INFO_NAMED("tutorial", "Detach the object from the robot");
move_group.detachObject(collision_object.id);
- rivz显示结果并提示下一步操作
visual_tools.publishText(text_pose, "Object dettached from robot", rvt::WHITE, rvt::XLARGE);
visual_tools.trigger();

/* Wait for MoveGroup to recieve and process the attached collision object message */
visual_tools.prompt("Press 'next' in the RvizVisualToolsGui window to once the collision object detaches to the "
                    "robot");
- 将立方体从环境移除
ROS_INFO_NAMED("tutorial", "Remove the object from the world");
std::vector object_ids;
object_ids.push_back(collision_object.id);
planning_scene_interface.removeCollisionObjects(object_ids);
- rivz显示结果并提示下一步操作
visual_tools.publishText(text_pose, "Object removed", rvt::WHITE, rvt::XLARGE);
visual_tools.trigger();

/* Wait for MoveGroup to recieve and process the attached collision object message */
visual_tools.prompt("Press 'next' in the RvizVisualToolsGui window to once the collision object disapears");