redis安全设置
编辑/etc/redisc.conf配置文件
#设置监听ip
bind 127.0.0.1 2.2.2.2   #可以是多个ip,使用空格分隔
#设置监听端口
prot 63634
#配置文件中设置登录密码,设置后使用redis-cli -a 'password' 指定密码来登录redis、
requitepass  newpasswd
#将config命令改名为其他字符
rename-command CONFIG linux
#禁用config命令,找到配置行将其命令的参数改为空,如:
rename-command CONFIG ""
redis慢查询日志
编辑配置文件/etc/redis.conf
针对慢查询日志,可以设置两个参数。一个是执行时长,另一个参数是记录慢日志长度,当一个新的命令被写入日志是,最老的一条命令会从命令日志队列中被移除
慢日志配置项:
slowlog-log-slower-then 10000     #单位ms(毫秒),表示慢于10000ms的执行时间则记录日志
slowlog-max-len 128                     #定义日志长度,表示最多存储128条日志
redis的慢日志是存储在内存当中的,要查看慢日志必须要登入redis的命令终端来使用命令来查看慢日志记录
slowlog get                                    #列出所有慢查询日志
slowlog get 2                                 #只列出两条查询日志
slowlog len                                    #查看慢查询日志条数
在php中安装redis模块
首先在下载好php的redis模块,需要解压并编译到php当中
下载redis模块可以在google或者redis支持中查找(自行寻找)
这里可以在php官网找到github上的下载地址,下载下来的包为zip压缩格式
将下载后的包解压
[root@nfs1 src]# unzip phpredis.zip
Archive: phpredis.zip
837b1ae51fb2e79849f35cc21f373a4c3187f828
   creating: phpredis-develop/
  inflating: phpredis-develop/.gitignore
--------------------省略
进入到解压目录下,使用phpize来生成编译文件,并执行./configure编译安装模块
[root@nfs1 src]# cd phpredis-develop/
[root@nfs1 phpredis-develop]# /usr/local/php-fpm/bin/phpize
Configuring for:
PHP Api Version: 20160303
Zend Module Api No: 20160303
Zend Extension Api No: 320160303
[root@nfs1 phpredis-develop]# ./configure --with-php-config=/usr/local/php-fpm/bin/php-config
checking for grep that handles long lines and -e... /usr/bin/grep
checking for egrep... /usr/bin/grep -E
-----------------------省略
[root@nfs1 phpredis-develop]# make
-----------------------省略
Build complete.
Don't forget to run 'make test'.

[root@nfs1 phpredis-develop]# make install
Installing shared extensions: /usr/local/php-fpm/lib/php/extensions/no-debug-non-zts-20160303/
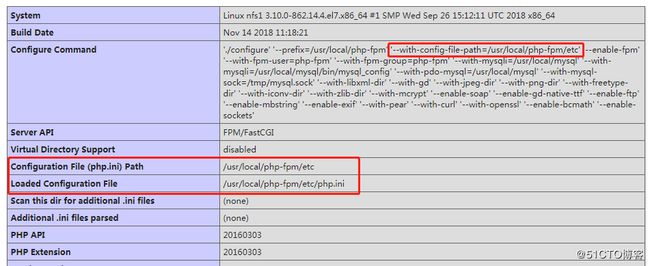
php需要注意一个地方,在安装php服务时,使用的编译参数中指定的php.ini路径不能错误,否则在修改php.ini添加模块时,模块不会被加载上。造成编译好模块也不会被php加载使用
图中是php的配置文件php.ini的路径,这个路径是在php编译时指定的
编辑php.ini文件,在配置文件中增加redis的模块配置项
[root@nfs1 phpredis-develop]# vim /usr/local/php-fpm/etc/php.ini
----------------------省略配置文件内容
extension=redis.so
重启php-fpm,然后执行php -m查看所有模块,并过滤显示出redis模块
[root@nfs1 phpredis-develop]# /usr/local/php-fpm/bin/php -m |grep redis
redis
redis存储session
修改/usr/local/php-fpm/etc/php-fpm.conf配置文件,在配置文件中指定redis的服务地址及端口,如:
[root@nfs1 etc]# cat php-fpm.conf
[global]
pid = /usr/local/php-fpm/var/run/php-fpm.pid
error_log = /usr/local/php-fpm/var/log/php-fpm.log
[www]
listen = 192.168.1.234:9000
listen.mode = 666
user = php-fpm
group = php-fpm
pm = dynamic
pm.max_children = 50
pm.start_servers = 20
pm.min_spare_servers = 5
pm.max_spare_servers = 35
pm.max_requests = 500
rlimit_files = 1024
php_value[session.save_handler] = redis
php_value[session.save_path] = "tcp://127.0.0.1:6379"测试php使用redis存储session数据
在nginx虚拟主机指定的网站页面路径下创建一个测试页面,这里创建的名称为index.php,能够直接访问域名就能得出测试session信息
[root@nfs1 aaa.com]# cat index.php               查看测试页的语句

";
print $_SESSION['TEST3'];
print "

";
print session_id();
?>
[root@nfs1 b.com]# curl localhost/1.php
1542173659

1542173659

1t8v3k3io2j707ah15qr1hskse
[root@nfs1 b.com]# curl localhost/1.php
1542173661

1542173661

iprg7uugki44g78dfh2kvpcsk0
[root@nfs1 b.com]# curl localhost/1.php
1542173662

1542173662

o5tgkueq5o2h5j0egj8sia14jt
[root@nfs1 b.com]# curl localhost/1.php
1542173667

1542173667

uq0cq2n6ab2sks5bphs4cse0un
登入redis查看存储的session数据
[root@nfs1 b.com]# redis-cli
127.0.0.1:6379> keys *
1) "PHPREDIS_SESSION:iprg7uugki44g78dfh2kvpcsk0"
2) "PHPREDIS_SESSION:uq0cq2n6ab2sks5bphs4cse0un"
3) "PHPREDIS_SESSION:o5tgkueq5o2h5j0egj8sia14jt"
4) "PHPREDIS_SESSION:1t8v3k3io2j707ah15qr1hskse"
配置php-fpm.conf需要注意在配置redis服务ip的时候,要以"tcp://ip+prot"的格式。否则在测试写入session是不成功的,redis存储不了session数据的
redis主从配置
这里我在两台机器上安装了redis,其中192.168.1.234为主redis,192.168.1.200为从redis。
我需要在主redis上开启监听本机可与其他主机通信的监听ip。根据需要,可以在主redis上设置redis的登入密码,确保redis安全
修改redis的配置文件,让其监听两个ip,其中127.0.0.1我在php中配置了session数据写入,监听localhost的ip暂不更改
监听多个ip使用空格来分割。配置如下:
[root@nfs1 b.com]# vim /etc/init.d/redis.conf
----------------------省略
bind 127.0.0.1 192.168.1.234
找到bind配置监听ip并保存退出
kill掉redis服务。然后重新启动redis
[root@nfs1 b.com]# killall redis-server
[root@nfs1 b.com]# /usr/local/bin/redis-server /etc/init.d/redis.conf
查看redis服务新的监听信息
[root@nfs1 b.com]# netstat -ntlp |grep 6379
tcp        0      0 192.168.1.234:6379      0.0.0.0:*               LISTEN      91823/redis-server
tcp        0      0 127.0.0.1:6379          0.0.0.0:*               LISTEN      91823/redis-server
接下来在从上操作
指定主的redis监听ip和端口信息,同样编辑redis.conf配置文件
如果是在一台服务器上安装两个redis,则需要修改其port、dir、pidfile和logfile的信息和文件存储路径
在配置文件中找到slaveof这行(新版本的redis在配置文件中则是replicaof的配置项),配置文件说明如下:
# +------------------+ +---------------+
# | Master | ---> | Replica |
# | (receive writes) | | (exact copy) |
# +------------------+ +---------------+
#
# 1) Redis replication is asynchronous, but you can configure a master to
# stop accepting writes if it appears to be not connected with at least
# a given number of replicas.
# 2) Redis replicas are able to perform a partial resynchronization with the
# master if the replication link is lost for a relatively small amount of
# time. You may want to configure the replication backlog size (see the next
# sections of this file) with a sensible value depending on your needs.
# 3) Replication is automatic and does not need user intervention. After a
# network partition replicas automatically try to reconnect to masters
# and resynchronize with them.
#
# replicaof
添加一行master端监听的ip和端口配置
replicaof 192.168.1.234 6379
# If the master is password protected (using the "requirepass" configuration
# directive below) it is possible to tell the replica to authenticate before
# starting the replication synchronization process, otherwise the master will
# refuse the replica request.
#
# masterauth
配置密码:如果主redis存在登入密码。那么就需要在这里设定master上的登入密码,如:
masterauth 123456
# Note: read only replicas are not designed to be exposed to untrusted clients
# on the internet. It's just a protection layer against misuse of the instance.
# Still a read only replica exports by default all the administrative commands
# such as CONFIG, DEBUG, and so forth. To a limited extent you can improve
# security of read only replicas using 'rename-command' to shadow all the
# administrative / dangerous commands.
replica-read-only yes
配置从是否为只读,开启后从则不能写入数据,旧版本配置项则是:slave-read-only yes
在slave端重启redis,并在从redis查看是否有数据同步过来
在主上创建新的key,并且切换到从上查看是否同步
[root@nfs1 b.com]# redis-cli
127.0.0.1:6379> zadd zset1 1 abc
(integer) 1
127.0.0.1:6379> zadd linux1 1 123
(integer) 1
127.0.0.1:6379> zadd centos 1 123
(integer) 1
127.0.0.1:6379> keys *
1) "linux1"
2) "centos"
3) "zset1"
在从redis上查看这些数据是否存在
[root@localhost data]# redis-cli
127.0.0.1:6379> keys *
1) "centos"
2) "linux1"
3) "zset1"
开启只读后,从redis是无法写入的,比如如下操作
127.0.0.1:6379> set ksy10 123
(error) READONLY You can't write against a read only replica.
操作的结果不太好区分,但以上操作都是通过验证过的,没有出现不能同步问题,redis是自己实现自动同步数据的,只需要指定master的监听ip即可,可以在从服务器上使用redis-cli -h ip -p port 来登录主redis验证连通的可用性
文笔不佳,请多指教