0. Thanks To
Retrofit使用详解(一)
Android Retrofit 2.0 的详细 使用攻略(含实例讲解)
Android Retrofit网络请求Service,@Path、@Query、@QueryMap、@Map...
1.目录
- 简介
- 依赖
- GET
- POST
2.简介
可以说,Retrofit是当下最快,效率最高的Http请求框架,他有如下的特点:
Retrofit 是一个 RESTful 的 HTTP 网络请求框架的封装。(RESTful??可以百度百度这里不作讨论)
Retrofit 其实是一个高度封装的框架,其底层用的是Okhttp
其工作流程大致如下:

- Retrofit 所做的,紧紧是把我们的一些接口参数,请求方法组装,然后交给Okhttp去执行。
3.依赖
楼主写这篇文章的时候:(2018年1月21日18:15:57),最新的版本如下:
因为解析数据是JSON,这里还添加了Gson简析工厂
compile 'com.squareup.retrofit2:retrofit:2.3.0'
compile 'com.squareup.retrofit2:converter-gson:2.3.0'
4.GET
Retrofit 通过注解形式,去声明参数,和请求方法。我们先看看该怎么正确地根据API去声明一个借口。
假如API是:
http://abc.cn:8080/Market/getAppList?pageIndex=0&pageSize=8,抽离服务器项目地址:http://abc.cn:8080/Market/后,有两个参数,那么你应该这样声明接口:
public interface GetAppList {
    @GET("getAppList")
    Call get(@Query("pageIndex") int pageIndex, @Query("pageSize") int pageSize);
}
使用的是@Query注解声明参数,@GET("getAppList")声明的是相对地址。
- 假如API是:
http://abc.cn:8080/Market/{userId}/getAppList
变化的是API中的一部分,如:
http://abc.cn:8080/Market/123/getAppList
http://abc.cn:8080/Market/246/getAppList
http://abc.cn:8080/Market/468/getAppList
同样,抽离服务器项目地址:http://abc.cn:8080/Market/,声明接口:
public interface GetAppList {
    @GET("{userId}/getAppList")
    Call get(@Path("userId") int userId);
}
使用@Path声明替换API的Path路径。
- 有了接口,就可以请求数据:
//拼装接口
Retrofit retrofit = new Retrofit.Builder()
        //设置网络请求的 Base Url地址
        .baseUrl("http://abc.cn:8080/Market/")
        //设置数据解析器
        .addConverterFactory(GsonConverterFactory.create())
        .build();
// 创建 网络请求接口 的实例
GetAppList request = retrofit.create(GetAppList.class);
//创建请求,传入参数
Call call = request.get(1,8);
//异步请求
call.enqueue(new Callback() {
    @Override
    public void onResponse(Call call, Response response) {

    }
    @Override
    public void onFailure(Call call, Throwable t) {
    }
});
抽离的服务器项目地址http://abc.cn:8080/Market/应该在创建请求的的时候通过Retrofit.Builder().baseUrl传入。注意的是,baseUrl必须以/结尾,不然抛异常。
上面返回的JSON,Mapping后的Bean是AppListBean,直接使用插件生成即可。
-
Call是具体的请求实例,泛型是请求回来的数据Bean。
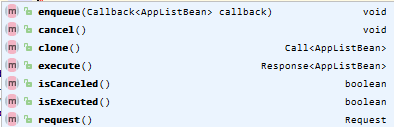 2.png
2.png enqueue,执行请求,有异步的和同步的。
cancel,取消执行。
clone,深复制。
-
Response是结果体
 3.jpg
3.jpg message,请求返回的结果信息。
isSuccessful,是否成功。
code,请求的结果码,200是成功。
body,就是泛型
T的实体,注意判空。
再列举其他的情况:
- newsId参数一个,type参数个数不确定
http://api.stay4it.com/News?newsId=1&type=类型1…
http://api.stay4it.com/News?newsId={资讯id}&type={类型1}&type={类型2}…
这样:
@GET("News")
Call getItem(@QueryMap Map map);
或者:
@GET("News")
Call getItem(
             @Query("newsId") String newsId,
             @QueryMap Map map);
5.POST
上面叙述了GET和其他一些基础的东西。POST就来更直接的。
- POST 一个字段
@POST("mobile/register")
Call registerDevice(@Field("id") String registerid);
@Field声明字段的key
- POST 两个及两个以上的字段
http://xxx/api/Comments
@FormUrlEncoded
@POST("Comments/{newsId}")
Call reportComment(
        @Path("newsId") String commentId,
        @Field("reason") String reason);
@FormUrlEncoded表示请求发送编码表单数据,每个键值对需要使用@Field注解
- POST URL不完整,需要补全,使用
@Path
http://xxx/api/Comments/1?access_token=1234123
http://xxx/api/Comments/{newsId}?access_token={access_token}
@FormUrlEncoded
@POST("Comments/{newsId}")
Call reportComment(
        @Path("newsId") String commentId,
        @Query("access_token") String access_token,
        @Field("reason") String reason);
这个API还需要拼接一个newsId及一个Token,分别使用@Path和@Query声明
- POST 对象(JSON)
 @POST("mobile/register")
    Call register1(@Body RegisterPost post);
@Body声明对象,Retrofit会自动序列化成JSON,序列化使用的库,通过:
.addConverterFactory(GsonConverterFactory.create())声明。
- POST 文件(图片,MP3,等等)
public interface FileUploadService {
 @Multipart
 @POST("upload")
 Call upload(@Part("description") RequestBody description,
                          @Part MultipartBody.Part file);
}
而他的请求写法也有点不一样:
// 创建 RequestBody,用于封装构建RequestBody
RequestBody requestFile = RequestBody.create(MediaType.parse("multipart/form-data"), file);
// MultipartBody.Part  和后端约定好Key,这里的partName是用image
MultipartBody.Part body = MultipartBody.Part.createFormData("image", file.getName(), requestFile);
// 添加描述
String descriptionString = "hello, 这是文件描述";
RequestBody description = RequestBody.create(MediaType.parse("multipart/form-data"), descriptionString);
// 执行请求
Call call = service.upload(description, body);
call.enqueue(new Callback() {
    @Override
    public void onResponse(Call call,
                           Response response) {
        Log.v("Upload", "success");
    }

    @Override
    public void onFailure(Call call, Throwable t) {
        Log.e("Upload error:", t.getMessage());
      }
    });
}