iOS 和 Xcode 升级之后,UI AutoMonkey不能用了,恩,那就得想新办法了~
大概搜索了一下,选用SwiftMonkey进行尝试
千言万语不如看源码及其例子:https://github.com/zalando/SwiftMonkey
但如果想快速了解,那就将就着看下面的简略步骤吧
一、SwiftMonkey简单介绍
SwiftMonkey是基于xcode的XCTest框架进行二次开发的随机UI点击测试的框架,可用于app的性能测试
二、在项目中的集成步骤
1、下载SwiftMonkey(https://github.com/zalando/SwiftMonkey)
2、将 SwiftMonkey 和 SwiftMonkeyPaws 文件夹目录copy到待测试的项目目录中
3、将SwiftMonkey 和 SwiftMonkeyPaws的 xcodeproj 拖到xcode界面显示项目中去

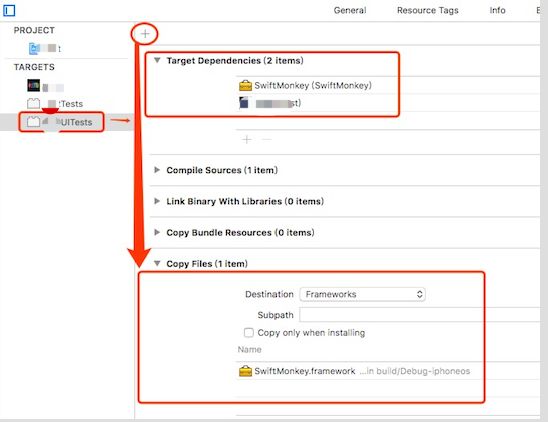
4、将 SwiftMonkey.framework 添加为 test target 的依赖。然后 build phase 那里添加 Copy Files。如图:
5、将 SwiftMonkeyPaws放到 app 的 target 里去,在 Embedded Binaries 添加即可,如图:

6、在app的appdelegate.swifty集成 SwiftMonkeyPaws进行初始化,如图所示
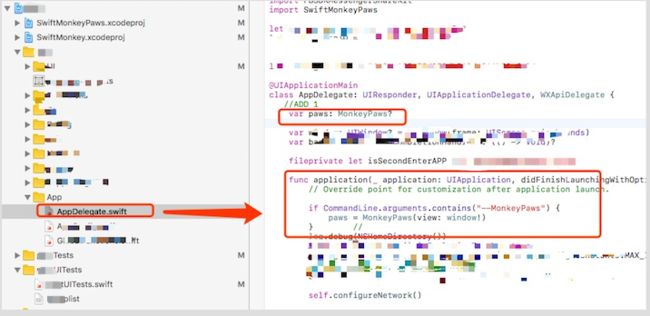
具体集成代码为:
import SwiftMonkeyPaws
var paws: MonkeyPaws?
func application(_ application: UIApplication,didFinishLaunchingWithOptions launchOptions:[UIApplicationLaunchOptionsKey: Any]?)-> Bool {
if CommandLine.arguments.contains("--MonkeyPaws"){
paws = MonkeyPaws(view: window!)
}
return true
}
7、在app的UItest中增加testcase,如图

具体代码如下:
import XCTest
import SwiftMonkey
class postUITests: XCTestCase {
override func setUp() {
super.setUp()
// Put setup code here. This method is called before the invocation of each test method in the class.
// In UI tests it is usually best to stop immediately when a failure occurs.
continueAfterFailure = false
// UI tests must launch the application that they test. Doing this in setup will make sure it happens for each test method.
XCUIApplication().launch()
// In UI tests it’s important to set the initial state - such as interface orientation - required for your tests before they run. The setUp method is a good place to do this.
}
override func tearDown() {
// Put teardown code here. This method is called after the invocation of each test method in the class.
super.tearDown()
}
func testMonkey() {
let application = XCUIApplication()
// Workaround for bug in Xcode 7.3. Snapshots are not properly updated
// when you initially call app.frame, resulting in a zero-sized rect.
// Doing a random query seems to update everything properly.
// TODO: Remove this when the Xcode bug is fixed!
_ = application.descendants(matching: .any).element(boundBy: 0).frame
// Initialise the monkey tester with the current device
// frame. Giving an explicit seed will make it generate
// the same sequence of events on each run, and leaving it
// out will generate a new sequence on each run.
let monkey = Monkey(frame: application.frame)
//let monkey = Monkey(seed: 123, frame: application.frame)
// Add actions for the monkey to perform. We just use a
// default set of actions for this, which is usually enough.
// Use either one of these but maybe not both.
// XCTest private actions seem to work better at the moment.
// UIAutomation actions seem to work only on the simulator.
monkey.addDefaultXCTestPrivateActions()
//monkey.addDefaultUIAutomationActions()
// Occasionally, use the regular XCTest functionality
// to check if an alert is shown, and click a random
// button on it.
monkey.addXCTestTapAlertAction(interval: 100, application: application)
// Run the monkey test indefinitely.
// 如果指定次数,请调用这个函数
//monkey.monkeyAround(iterations: 1024)
// 如果不指定次数,将一直运行测试
monkey.monkeyAround()
}
}
8、点击菜单栏的product—test进行运行
三、踩过的坑
1、运行遇到以下错误
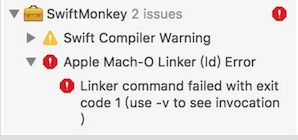
需要把build setting里面的 enable bitcode 设置成no