大概快一年没有上了,很惊喜的发现居然有两位“没有留下痕迹的读者”分别打赏了两块钱,心里真的万分感动,趁着还有余温,写一篇文章来聊聊Google Protocol Buffer。
移动应用客户端与服务器之间的通信协议,目前比较主流的有Facebook的Thrift,腾讯的JCE,以及Google的Protocol Buffer(以下简称protobuf),本文主要介绍protobuf基本概念,协议解析,以及在Android中的应用实践。
一、Protocol Buffer 基本概念
Protobuf是一种灵活高效的,用于序列化结构化数据的机制,类似于XML,但比XML更小,更快,更简单。Protobuf序列化为二进制数据,不依赖于平台和语言,同时具备很好的兼容性。Protobuf基本使用方式如下:
1 . 编写proto文件(applog.proto),定义数据结构
syntax = "proto3";

package com.sohu.proto.rawlog;
option java_multiple_files = true;

message LogTime{
    optional int32 submit = 1;
    optional int32 create = 2;
    optional int32 test = 16;
}
其中,optional代表该字段是否为可选的,int32代表数据类型,不同的类型对应不同的编码方式(wire_type),submit为字段名,1表示field_number。
2 . 使用代码生成工具protoc,生成指定语言代码
  --cpp_out=OUT_DIR           Generate C++ header and source.
  --csharp_out=OUT_DIR        Generate C# source file.
  --java_out=OUT_DIR          Generate Java source file.
  --javanano_out=OUT_DIR      Generate Java Nano source file.
  --js_out=OUT_DIR            Generate JavaScript source.
  --objc_out=OUT_DIR          Generate Objective C header and source.
  --python_out=OUT_DIR        Generate Python source file.
  --ruby_out=OUT_DIR          Generate Ruby source file.
protoc -I=$SRC_DIR --java_out=$DST_DIR $SRC_DIR/applog.proto
3 . 调用Protobuf API,序列化及反序列化
ByteArrayOutputStream byteArrayOutputStream = new ByteArrayOutputStream();
log.writeDelimitedTo(byteArrayOutputStream);
ByteArrayInputStream byteArrayInputStream = new ByteArrayInputStream(byteArrayOutputStream.toByteArray());
Log log = Log.parseDelimitedFrom(byteArrayInputStream);
二、Protocol Buffer 编码机制
1. Base 128 Varints
所谓序列化,即是将结构化数据按一定的编码规范转换为指定格式的过程,protobuf使用的是Base 128 Varints的编码方式。Varints是一种使用可变字节序列化整型的方法,越小的整数占用越小的字节数,它的基本规则如下:
1 . 每个Byte的最高位(msb)是标志位,如果该位为1,表示该Byte后面还有其它Byte,如果该位为0,表示该Byte是最后一个Byte
2 . 每个Byte的低7位是用来存数值的位
3 . Varints方法用Litte-Endian(小端)字节序
一个多位整数按照其存储地址的最低或最高字节进行排列,如果最低有效位在最高有效位的前面,则称小端序;反之则称大端序。
假设变量x类型为int,位于地址0x1001处,它的十六进制为0x01234567,地址范围为0x1001~0x1004字节,其内部排列顺序依赖于机器的类型。
大端序:0x1001: 01,0x1002: 23,0x1003: 45,0x1004: 67
小端序:0x1001: 67,0x1002: 45,0x1003: 23,0x1004: 01
比如,300使用Varints序列化后的结果为1010 1100 0000 0010,其运算过程如下:
- 300转化为二进制 : 1 0010 1100
- Byte低7位存储数值 :000 0010 010 1100
- Litte-Endian字节序 : 010 1100 000 0010
- 添加MSB标志位 :1010 1100 0000 0010
2. 消息结构
protobuf每条消息都是由一系列的key-value键值对组成的,key和value分别采用不同的编码方式。

key的具体值为(field_number << 3) | wire_type,也就是说,Byte第一位作为标志位,最后三位用于存储wire type(编码数据类型),其他位用于存储field_number值。
可用的wire types如下 :
| Type | Meaning | Used For |
|---|---|---|
| 0 | Varint | int32, int64, uint32, uint64, sint32, sint64, bool, enum |
| 1 | 64-bit | fixed64, sfixed64, double |
| 2 | Length-delimited | string, bytes, embedded messages, packed repeated fields |
| 3 | Start group | groups (deprecated) |
| 4 | End group | groups (deprecated) |
| 5 | 32-bit | fixed32, sfixed32, float |
这六种wire type,其中Start group 和 End group 已经弃用,下面重点介绍Varint,64-bit,Length-delimited和32-bit。
Varint
varint是可变字节编码类型,例如:logTime.submit = 4; logTime.create = 5; logTime.test = 6,则序列化后的数据有7个字节,如下:
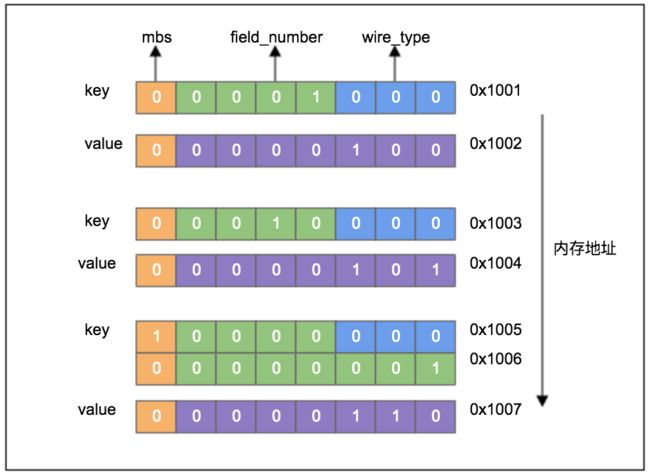
wire_type总共只有六种类型,因此用3bit足以表示,在一个Byte里,去掉mbs,以及3bit的wire_type,只剩下4bit来表示field_number,因此,一个Byte里,field_number只能表达0-15,如果超过15,则需要两个或多个Byte来表示。
64-bit / 32-bit
varint适用于表达较小的整数(0-127),因为mbs的存在,每个字节实际能用于表达数据的,只有7bit,当数字很大的时候,protobuf定义了64-bit和32-bit两种定长编码类型,比如2的28次方,两种方式表达如下:

varint编码还有个问题在于不利于表达负数,我们知道,计算机中的负数是以其补码(原码取反+1)形式存在的,比如-1,二进制表示为:11111111 11111111 11111111 11111111,如果我们采用varint表示,则需要5个字节,因为protbuf在编码格式上兼容int64,所以实际上表示-1需要用到10个字节。
为了解决这个问题,Protobuf提供了sint32和sint64两种数据类型。如果某个消息的某个字段出现负数值的可能性比较大,那么应该使用sint32或sint64。这两种数据类型在编码时,会先使用ZigZig编码将负数映射成正数,然后再使用Varint编码。
Zigzig 算法如下:
(n << 1) ^ (n >> 31)    // sint32
(n << 1) ^ (n >> 63)    // sint64
| Signed Original | Encoded As |
|---|---|
| 0 | 0 |
| -1 | 1 |
| 1 | 2 |
| -2 | 3 |
| 2147483647 | 4294967294 |
| -2147483648 | 4294967295 |
Zigzag 编码用无符号数来表示有符号数,正数和负数交错,无论正负都可以采用较少的 Byte 来表示。
Length-delimited
Length-delimited编码格式则会将数据的length也编码进最终数据,使用Length-delimited编码格式的数据类型包括string,bytes和自定义消息。
message Test2 {
  required string b = 2;
}
设置b的值为"testing",则编码之后为:
12 07 74 65 73 74 69 6e 67

repeated / packed
optional类型是序列化单个字段,而repeated类型是把每个字段依次进行序列化,key相同,value不同,但如果repeated的字段较多,每次都带上相同的key则会浪费空间,因此,protobuf提供了packed选项,当repeated字段设置了packed选项,则会使用Length-delimited格式来编码字段值。
三、Protocol Buffer 应用实践
protobuf主要用于客户端与服务器之间的数据传递,比如日志上报,长连接等,在实际使用过程中,主要遇到以下三个问题:
1. 65535 method limit
protobuf的标准实现会生成大量的方法数,其依赖库以及自动生成的Java代码,所包含的方法数在一万以上,因此很容易导致Android客户端达到65535的方法数限制。
为了解决这个问题,我们在生成java代码的时候,可以选择生成protobuf 3.0 精简版(Nano):
protoc -I=$SRC_DIR --javanano_out=$DST_DIR $SRC_DIR/applog.proto
精简版使用常量代替枚举,使用public代替private,省略了get/set方法,以及builder模式,很大程度上减少了自动生成的Java代码的方法数。当然,方法数的大头还是集中在protobuf的依赖库文件,当我们生成nano版本的java代码时,还需要找到其对应的库文件,很遗憾的是,Google官方并没有提供protobuf 3.0 nano 版本的依赖库,以下是jcenter查询到的文件:
protobuf-java-3.0.0-javadoc.jar
protobuf-java-3.0.0-javadoc.jar.asc
protobuf-java-3.0.0-sources.jar
protobuf-java-3.0.0-sources.jar.asc
protobuf-java-3.0.0.jar
protobuf-java-3.0.0.jar.asc
protobuf-java-3.0.0.pom
protobuf-java-3.0.0.pom.asc
为了解决依赖库的问题,查看protobuf源码,找到了javanano的源文件,然后编译成jar包,其依赖文件如下:
至此,解决了protobuf方法数问题,使其能够很好的用于Android客户端与服务器数据交换。
2. Message Delimited
protobuf转换成的二进制数据可以直接用于网络传输,当传输一条消息的时候,没有任何问题,但当一次传输多条消息的时候,该如何界定数据的边界呢?
为了解决多条数据传输的问题,我们在每条消息的头部加上数据长度,那么在解析的时候,就可以通过这个长度来解析对应的二进制数据。具体实现如下:
public static final int DEFAULT_BUFFER_SIZE = 4096;

static int computePreferredBufferSize(int dataLength) {
    if (dataLength > DEFAULT_BUFFER_SIZE) {
        return DEFAULT_BUFFER_SIZE;
    }
    return dataLength;
}

public static int computeUInt32SizeNoTag(final int value) {
    if ((value & (~0 <<  7)) == 0) {
        return 1;
    }
    if ((value & (~0 << 14)) == 0) {
        return 2;
    }
    if ((value & (~0 << 21)) == 0) {
        return 3;
    }
    if ((value & (~0 << 28)) == 0) {
        return 4;
    }
    return 5;
}

public static byte[] writeDelimitedTo(MessageNano log) throws IOException {
    final int serialized = log.getSerializedSize();
    final int bufferSize = computePreferredBufferSize(
                computeUInt32SizeNoTag(serialized) + serialized);
    byte[] data = new byte[bufferSize];
    com.google.protobuf.nano.CodedOutputByteBufferNano codedOutputByteBufferNano = CodedOutputByteBufferNano.newInstance(data);
    codedOutputByteBufferNano.writeRawVarint32(serialized);
    log.writeTo(codedOutputByteBufferNano);
    return data;
}
其核心思想在于,通过消息内容每个字段的tag,type以及value,计算出整个内容所占的字节数,然后再计算出为了表示内容长度所需要用到的字节数,这样就得到了整体需要的bufferSize,最后在写入数据的时候,先写入消息内容的长度,再写入消息本身的内容。
基于此,我们在每条消息的头部写入该消息长度,实现了一次传输多条消息。
3. 长连接protobuf编码解码器
目前比较主流的长连接框架有Netty和mina,为了解决数据传递过程中粘包和拆包的问题,Netty提供了很多Encoder和Decoder,其中也包括了对protobuf的支持,比如一个典型的通信管道如下:
ServerBootstrap b = new ServerBootstrap();
            b.group(bossGroup, workerGroup);
            b.channel(NioServerSocketChannel.class);
            b.childHandler(new ChannelInitializer() {
                @Override
                protected void initChannel(SocketChannel ch) throws Exception {
                    // Decoder
                    ch.pipeline().addLast(new ProtobufVarint32FrameDecoder());
                    ch.pipeline().addLast(new ProtobufDecoder(Log.newBuilder().getDefaultInstanceForType()));
                    // Encoder
                    ch.pipeline().addLast(new ProtobufVarint32LengthFieldPrepender());
                    ch.pipeline().addLast(new ProtobufEncoder());
                    // Register handler
                    ch.pipeline().addLast(new ServerHandler());
                }
            });
遗憾的是,Netty只提供了标准支持,对于Android客户端所使用的Nano版本并没有支持,因此在客户端,得自己实现一套基于Nano的编码解码器。为了解决这个问题,我写了以下几个类:
ProtobufNanoDecoder
ProtobufNanoEncoder
ProtobufNanoUtil
ProtobufNanoVarint32FrameDecoder
ProtobufNanoVarint32LengthFieldPrepender
所幸的是,深入理解了protobuf的编码机制,自己写编码解码器也并不困难,以ProtobufNanoVarint32LengthFieldPrepender为例:
@Sharable
public class ProtobufNanoVarint32LengthFieldPrepender extends MessageToByteEncoder {

    @Override
    protected void encode(ChannelHandlerContext ctx, ByteBuf msg, ByteBuf out) throws Exception {

        int bodyLen = msg.readableBytes();
        int bufferSize = ProtobufNanoUtil.computePreferredBufferSize(
                ProtobufNanoUtil.computeUInt32SizeNoTag(bodyLen) + bodyLen);
        out.ensureWritable(bufferSize);

        byte[] data = new byte[bufferSize];
        CodedOutputByteBufferNano codedOutputByteBufferNano = CodedOutputByteBufferNano.newInstance(data);
        codedOutputByteBufferNano.writeRawVarint32(bodyLen);
        codedOutputByteBufferNano.writeRawBytes(msg.array(), 0, bodyLen);

        out.writeBytes(data);
        out.writeBytes(msg, msg.readerIndex(), bodyLen);
    }
}
写到这里,关于protobuf也就闲聊完了,用一个比较霸气的词结尾:以上。