iOS学习之深入理解程序编译过程
https://juejin.im/post/5a352bb0f265da433562d5e3
常用的clang命令
clang -rewrite-objc main.m 将obj文件重写为 c, c++文件
clang -Xclang -ast-dump -fsyntax-only main.m 生成文件生成树
clang -Xclang -dump-tokens main.m 这里会把代码切成一个个 Token,比如大小括号,等于号还有字符串等
根据一个简单的例子来观察是如何进行编译的
#import
#define DEFINEEight 8
int main(){
@autoreleasepool {
int eight = DEFINEEight;
int six = 6;
NSString* site = [[NSString alloc] initWithUTF8String:"starming"];
int rank = eight + six;
NSLog(@"%@ rank %d", site, rank);
}
return 0;
}
编译流程
在命令行编译
xcrun -sdk iphoneos clang -arch armv7 -F Foundation -fobjc-arc -c main.m -o main.oxcrun -sdk iphoneos clang main.o -arch armv7 -fobjc-arc -framework Foundation -o main# 这样还没法看清clang的全部过程,可以通过-E查看clang在预处理处理这步做了什么。clang -E main.m# 执行完后可以看到文件#1"/System/Library/Frameworks/Foundation.framework/Headers/FoundationLegacySwiftCompatibility.h"1 3#185"/System/Library/Frameworks/Foundation.framework/Headers/Foundation.h"2 3#2"main.m"2int main(){ @autoreleasepool { int eight = 8; int six = 6; NSString* site = [[NSString alloc] initWithUTF8String:"starming"]; int rank = eight + six; NSLog(@"%@ rank %d", site, rank); } return 0;}#这个过程的处理包括宏的替换,头文件的导入,以及类似#if的处理。预处理完成后就会进行词法分析,这里会把代码切成一个个 Token,比如大小括号,等于号还有字符串等。clang -fmodules -fsyntax-only -Xclang -dump-tokens main.m# 然后是语法分析,验证语法是否正确,然后将所有节点组成抽象语法树 AST 。clang -fmodules -fsyntax-only -Xclang -ast-dump main.m# 完成这些步骤后就可以开始IR中间代码的生成了,CodeGen 会负责将语法树自顶向下遍历逐步翻译成 LLVM IR,IR 是编译过程的前端的输出后端的输入。clang -S -fobjc-arc -emit-llvm main.m -o main.ll# 这里 LLVM 会去做些优化工作,在 Xcode 的编译设置里也可以设置优化级别-01,-03,-0s,还可以写些自己的 Pass。# Pass 是 LLVM 优化工作的一个节点,一个节点做些事,一起加起来就构成了 LLVM 完整的优化和转化。# 如果开启了 bitcode 苹果会做进一步的优化,有新的后端架构还是可以用这份优化过的 bitcode 去生成。clang -emit-llvm -c main.m -o main.bc# 生成汇编clang -S -fobjc-arc main.m -o main.s# 生成目标文件clang -fmodules -c main.m -o main.o# 生成可执行文件,这样就能够执行看到输出结果clang main.o -o main# 执行./main# 输出starming rank 14
下面是完整步骤
编译信息写入辅助文件,创建文件架构 .app 文件
处理文件打包信息
执行 CocoaPod 编译前脚本,checkPods Manifest.lock
编译.m文件,使用 CompileC 和 clang 命令
链接需要的 Framework
编译 xib
拷贝 xib ,资源文件
编译 ImageAssets
处理 info.plist
执行 CocoaPod 脚本
拷贝标准库
创建 .app 文件和签名
在 Xcode 中查看 clang 编译 .m 文件的过程
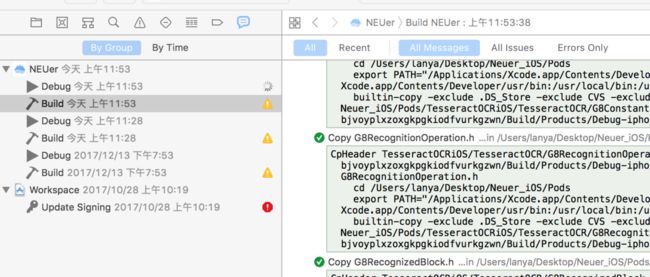
在 Xcode 编译过后,可以通过 Show the report navigator 里对应 target 的 build 中查看每个 .m 文件的 clang 编译信息。可以直接在 help 中搜索 “ Show the report navigator ” 就会出现
使用编译 Masonry 框架的 MASCompositeConstraint.m 为例, 首先对任务进行描述
CompileC /Users/lanya/Library/Developer/Xcode/DerivedData/NEUer-bjvoyplxzoxgkpgkiodfvurkgzwn/Build/Intermediates.noindex/Pods.build/Debug-iphonesimulator/Masonry.build/Objects-normal/x86_64/MASCompositeConstraint.o
Masonry/Masonry/MASCompositeConstraint.m normal x86_64 objective-c com.apple.compilers.llvm.clang.1_0.compiler
更新工作路径,同时设置 PATH
cd /Users/lanya/Desktop/Neuer_iOS/Pods
export LANG=en_US.US-ASCII
export PATH="/Applications/Xcode.app/Contents/Developer/Platforms/iPhoneSimulator.platform/Developer/usr/bin:/Applications/Xcode.app/Contents/Developer/usr/bin:/usr/local/bin:/usr/bin:/bin:/usr/sbin:/sbin"
接下来是实际的编译命令
先介绍一下 clang 的命令参数,再看的编译命令会更容易理解
clang 命令参数
-x 编译语言比如objective-c
-arch 编译的架构,比如arm7
-f 以-f开头的。
-W 以-W开头的,可以通过这些定制编译警告
-D 以-D开头的,指的是预编译宏,通过这些宏可以实现条件编译
-iPhoneSimulator11.1.sdk 编译采用的iOS SDK版本
-I 把编译信息写入指定的辅助文件
-F 需要的Framework
-c 标识符指明需要运行预处理器,语法分析,类型检查,LLVM生成优化以及汇编代码生成.o文件
-o 编译结果
具体的编译过程
/Applications/Xcode.app/Contents/Developer/Toolchains/XcodeDefault.xctoolchain/usr/bin/clang -x objective-c -arch x86_64 -fmessage-length=0 -fdiagnostics-show-note-include-stack -fmacro-backtrace-limit=0 -std=gnu11 -fobjc-arc -fmodules -gmodules -fmodules-cache-path=/Users/lanya/Library/Developer/Xcode/DerivedData/ModuleCache -fmodules-prune-interval=86400 -fmodules-prune-after=345600 -fbuild-session-file=/Users/lanya/Library/Developer/Xcode/DerivedData/ModuleCache/Session.modulevalidation -fmodules-validate-once-per-build-session -Wnon-modular-include-in-framework-module -Werror=non-modular-include-in-framework-module -fmodule-name=Masonry -fapplication-extension -Wno-trigraphs -fpascal-strings -O0 -fno-common -Wno-missing-field-initializers -Wno-missing-prototypes -Werror=return-type -Wdocumentation -Wunreachable-code -Wno-implicit-atomic-properties -Werror=deprecated-objc-isa-usage -Werror=objc-root-class -Wno-arc-repeated-use-of-weak -Wduplicate-method-match -Wno-missing-braces -Wparentheses -Wswitch -Wunused-function -Wno-unused-label -Wno-unused-parameter -Wunused-variable -Wunused-value -Wempty-body -Wuninitialized -Wconditional-uninitialized -Wno-unknown-pragmas -Wno-shadow -Wno-four-char-constants -Wno-conversion -Wconstant-conversion -Wint-conversion -Wbool-conversion -Wenum-conversion -Wno-float-conversion -Wnon-literal-null-conversion -Wobjc-literal-conversion -Wshorten-64-to-32 -Wpointer-sign -Wno-newline-eof -Wno-selector -Wno-strict-selector-match -Wundeclared-selector -Wno-deprecated-implementations -DPOD_CONFIGURATION_DEBUG=1 -DDEBUG=1 -DCOCOAPODS=1 -DOBJC_OLD_DISPATCH_PROTOTYPES=0 -isysroot /Applications/Xcode.app/Contents/Developer/Platforms/iPhoneSimulator.platform/Developer/SDKs/iPhoneSimulator11.2.sdk -fasm-blocks -fstrict-aliasing -Wprotocol -Wdeprecated-declarations -mios-simulator-version-min=8.0 -g -Wno-sign-conversion -Winfinite-recursion -Wcomma -Wblock-capture-autoreleasing -Wstrict-prototypes -Wunguarded-availability -fobjc-abi-version=2 -fobjc-legacy-dispatch -index-store-path /Users/lanya/Library/Developer/Xcode/DerivedData/NEUer-bjvoyplxzoxgkpgkiodfvurkgzwn/Index/DataStore -iquote /Users/lanya/Library/Developer/Xcode/DerivedData/NEUer-bjvoyplxzoxgkpgkiodfvurkgzwn/Build/Intermediates.noindex/Pods.build/Debug-iphonesimulator/Masonry.build/Masonry-generated-files.hmap -I/Users/lanya/Library/Developer/Xcode/DerivedData/NEUer-bjvoyplxzoxgkpgkiodfvurkgzwn/Build/Intermediates.noindex/Pods.build/Debug-iphonesimulator/Masonry.build/Masonry-own-target-headers.hmap -I/Users/lanya/Library/Developer/Xcode/DerivedData/NEUer-bjvoyplxzoxgkpgkiodfvurkgzwn/Build/Intermediates.noindex/Pods.build/Debug-iphonesimulator/Masonry.build/Masonry-all-non-framework-target-headers.hmap -ivfsoverlay /Users/lanya/Library/Developer/Xcode/DerivedData/NEUer-bjvoyplxzoxgkpgkiodfvurkgzwn/Build/Intermediates.noindex/Pods.build/all-product-headers.yaml -iquote /Users/lanya/Library/Developer/Xcode/DerivedData/NEUer-bjvoyplxzoxgkpgkiodfvurkgzwn/Build/Intermediates.noindex/Pods.build/Debug-iphonesimulator/Masonry.build/Masonry-project-headers.hmap -I/Users/lanya/Library/Developer/Xcode/DerivedData/NEUer-bjvoyplxzoxgkpgkiodfvurkgzwn/Build/Products/Debug-iphonesimulator/Masonry/include -I/Users/lanya/Desktop/Neuer_iOS/Pods/Headers/Private -I/Users/lanya/Desktop/Neuer_iOS/Pods/Headers/Public -I/Users/lanya/Desktop/Neuer_iOS/Pods/Headers/Public/PgyUpdate -I/Users/lanya/Desktop/Neuer_iOS/Pods/Headers/Public/Pgyer -I/Users/lanya/Library/Developer/Xcode/DerivedData/NEUer-bjvoyplxzoxgkpgkiodfvurkgzwn/Build/Intermediates.noindex/Pods.build/Debug-iphonesimulator/Masonry.build/DerivedSources/x86_64 -I/Users/lanya/Library/Developer/Xcode/DerivedData/NEUer-bjvoyplxzoxgkpgkiodfvurkgzwn/Build/Intermediates.noindex/Pods.build/Debug-iphonesimulator/Masonry.build/DerivedSources -F/Users/lanya/Library/Developer/Xcode/DerivedData/NEUer-bjvoyplxzoxgkpgkiodfvurkgzwn/Build/Products/Debug-iphonesimulator/Masonry -include /Users/lanya/Desktop/Neuer_iOS/Pods/Target\ Support\ Files/Masonry/Masonry-prefix.pch -MMD -MT dependencies -MF /Users/lanya/Library/Developer/Xcode/DerivedData/NEUer-bjvoyplxzoxgkpgkiodfvurkgzwn/Build/Intermediates.noindex/Pods.build/Debug-iphonesimulator/Masonry.build/Objects-normal/x86_64/MASCompositeConstraint.d --serialize-diagnostics /Users/lanya/Library/Developer/Xcode/DerivedData/NEUer-bjvoyplxzoxgkpgkiodfvurkgzwn/Build/Intermediates.noindex/Pods.build/Debug-iphonesimulator/Masonry.build/Objects-normal/x86_64/MASCompositeConstraint.dia -c /Users/lanya/Desktop/Neuer_iOS/Pods/Masonry/Masonry/MASCompositeConstraint.m -o /Users/lanya/Library/Developer/Xcode/DerivedData/NEUer-bjvoyplxzoxgkpgkiodfvurkgzwn/Build/Intermediates.noindex/Pods.build/Debug-iphonesimulator/Masonry.build/Objects-normal/x86_64/MASCompositeConstraint.o
编译完第三方库后会进行构建我们程序的 target
Create product structure
Process product packaging
Run custom shell script 'Check Pods Manifest.lock'
Compile ... 各个项目中的.m文件
Link /Users/... 路径
Copy ... 静态文件
Compile asset catalogs
Compile Storyboard file ...
Process info.plist
Link Storyboards
Run custom shell script 'Embed Pods Frameworks'
Run custom shell script 'Copy Pods Resources'
...
Touch NEUer.app
Sign NEUer.app
Target 在 Build 过程的控制
在 Xcode 的 Project editor 中的 Build Setting,Build Phases 和 Build Rules 能够控制编译的过程。
Build Phases
构建可执行文件的规则。指定 target 的依赖项目,在 target build 之前需要先 build 的依赖。在 Compile Source 中指定所有必须编译的文件,这些文件会根据 Build Setting 和 Build Rules 里的设置来处理。
在 Link Binary With Libraries 里会列出所有的静态库和动态库,它们会和编译生成的目标文件进行链接。
build phase 还会把静态资源拷贝到 bundle 里。
可以通过在 build phases 里添加自定义脚本来做些事情,比如像 CocoaPods 所做的那样。
Bulid Rules
指定不同文件类型如何编译。每条 build rule 指定了该类型如何处理以及输出在哪。可以增加一条新规则对特定文件类型添加处理方法。
Bulid Settings
在 build 的过程中各个阶段的选项的设置。
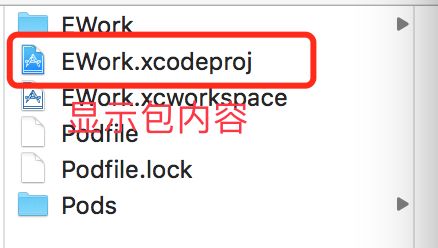
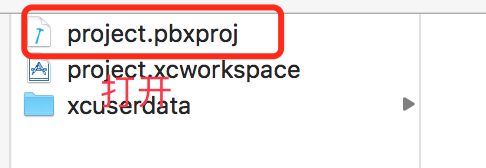
pbxproj 工程文件
* build 过程控制的这些设置都会被保存在工程文件 .pbxproj 里。在这个文件中可以找 rootObject 的 ID 值
* 然后根据这个 ID 找到 main 工程的定义。
```objective-c
/* Begin PBXProject section */
2EC5E1AA1E7814B200BAB0EF /* Project object */ = {
isa = PBXProject;
......
/* End PBXProject section */
```
* 在 targets 里会指向各个 taget 的定义
```objective-c
targets = (
2EC5E1B11E7814B200BAB0EF /* EWork */,
);
// 根据 2EC5E1B11E7814B200BAB0EF 可以找到具体各个的定义
/**
这个里面又有更多的 ID 可以得到更多的定义,其中 buildConfigurationList 指向了可用的配置项,包含 Debug 和 Release。可以看到还有 buildPhases,buildRules 和 dependencies 都能够通过这里索引找到更详细的定义。
*/
/* Begin PBXNativeTarget section */
2EC5E1B11E7814B200BAB0EF /* EWork */ = {
isa = PBXNativeTarget;
buildConfigurationList = 2EC5E1CC1E7814B200BAB0EF /* Build configuration list for PBXNativeTarget "EWork" */;
buildPhases = (
73F5AAE2AEC5EE766978C0E2 /* [CP] Check Pods Manifest.lock */,
2EC5E1AE1E7814B200BAB0EF /* Sources */,
2EC5E1AF1E7814B200BAB0EF /* Frameworks */,
2EC5E1B01E7814B200BAB0EF /* Resources */,
B42D03564A9A71BAD7183E61 /* [CP] Embed Pods Frameworks */,
4672989246AFA7B2776DFA56 /* [CP] Copy Pods Resources */,
);
buildRules = (
);
dependencies = (
);
name = EWork;
productName = EWork;
productReference = 2EC5E1B21E7814B200BAB0EF /* EWork.app */;
productType = "com.apple.product-type.application";
};
/* End PBXNativeTarget section */
// 比如 XCConfigurationList
/* Begin XCConfigurationList section */
2EC5E1AD1E7814B200BAB0EF /* Build configuration list for PBXProject "EWork" */ = {
isa = XCConfigurationList;
buildConfigurations = (
2EC5E1CA1E7814B200BAB0EF /* Debug */,
2EC5E1CB1E7814B200BAB0EF /* Release */,
);
defaultConfigurationIsVisible = 0;
defaultConfigurationName = Release;
};
2EC5E1CC1E7814B200BAB0EF /* Build configuration list for PBXNativeTarget "EWork" */ = {
isa = XCConfigurationList;
buildConfigurations = (
2EC5E1CD1E7814B200BAB0EF /* Debug */,
2EC5E1CE1E7814B200BAB0EF /* Release */,
);
defaultConfigurationIsVisible = 0;
defaultConfigurationName = Release;
};
/* End XCConfigurationList section */
```
编译后生成的二进制内容 Link Map File
应用沙盒路径的获取
LinkMapFile
首先来说一说什么是 LinkMap
在iOS开发领域,LinkMap的输出是一个纯文本格式的文件,里面包含重要的编译信息及报错信息,这也是Apple用来分析你的应用的主要方式,通过这种方式可以发现应用中是否使用了私有库等不符合Apple提交应用规范的内容,但对于我们开发人员,LinkMap却是一个用于分析源码及查看Crash的有效途径
为什么要使用 LinkMap
当一个中大型iOS项目在不断迭代更新的过程中,代码量日渐壮大,需要重构和review的代码也越来越多,可一旦代码达到一定程度后变得不是那么可控,为了使得项目还可以持续可集成稳健的开发下去,缩小iOS安装包大小是必须要做的事情,通常会从压缩图片和音频文件开始,使用开发工具查找冗余不用的资源文件,这一阶段之后只能通过对代码的重构来达到可执行文件整体瘦身的效果。当从事参与的一个项目在不断迭代过程中,App的安装包在不断变大,通过自己的shell脚本分析,多达几十万行,这时候非常有瘦身的必要,这其中包括了.h.m.mm.cpp.rss格式文件。观察项目中引入的Pods文件及相关第三方库,多达上百个库,这时候这样一个中大型App就涉及到应用瘦身的问题,如何才能有效解决代码不可控的问题,如何能提高项目中底层基础架构的稳定性及健壮性,相信LinkMap能给予我们一些答案。
LinkMap 的构成
App的编译路径(#Path)
# Path: /Users/lanya/Library/Developer/Xcode/DerivedData/littleTest-fcueraakmygtmodagachcreqjbjw/Build/Products/Debug/littleTest
App对应的架构(#Arch)
# Arch: x86_64
App的完整的目标文件列表(#Object files)
App的段表(#Section)
App中具体目标文件在对应的section中的位置和大小(#Symbols)
LinkMap服务的开启方式及文件目录
在 Build Settings 里设置 Write Link Map File 为 Yes 后每次编译都会在指定目录生成这样一个文件。Xcode->Project->Build Settings-> Search map -> 设置 Write Link Map Files 选项为YES(这里需要注意的是不是设置Pods.xcodeproj的LinkMap而是xxx-xxxxx.xcodeproj,其他项目也要去设置主工程的对应编译选项,以此类推
文件位于指定的路径,默认是在~/Library/Developer/Xcode/DerivedData/xxx-xxx-fwtuexpkzxsfkjaootcqwizogrhf/Build/Intermediates/xx-xxx.build/Debug-iphonesimulator/xxx-xxx.build/xxx-xxx-LinkMap-normal-x86_64.txt
例如:我的一个项目 LitteleTest:/Users/lanya/Library/Developer/Xcode/DerivedData/littleTest-fcueraakmygtmodagachcreqjbjw/Build/Intermediates.noindex/littleTest.build/Debug/littleTest.build/littleTest-LinkMap-normal-x86_64.txt
现在来说一说 LinkMap 各部分的作用
App的完整的目标文件列表(#Object files): 这个部分的内容都是 .m 文件编译后的 .o 和需要 link 的 .a 文件。前面是文件编号,后面是文件路径。
# Object files:[ 0] linker synthesized [ 1] /Users/lanya/Library/Developer/Xcode/DerivedData/littleTest-fcueraakmygtmodagachcreqjbjw/Build/Intermediates.noindex/littleTest.build/Debug/littleTest.build/Objects-normal/x86_64/main.o [ 2] /Users/lanya/Library/Developer/Xcode/DerivedData/littleTest-fcueraakmygtmodagachcreqjbjw/Build/Intermediates.noindex/littleTest.build/Debug/littleTest.build/Objects-normal/x86_64/Test.o [ 3] /Applications/Xcode.app/Contents/Developer/Platforms/MacOSX.platform/Developer/SDKs/MacOSX10.13.sdk/System/Library/Frameworks//Foundation.framework/Foundation.tbd [ 4] /Applications/Xcode.app/Contents/Developer/Platforms/MacOSX.platform/Developer/SDKs/MacOSX10.13.sdk/usr/lib/libobjc.tbd
App的段表(#Section):这里描述的是每个 Section 在可执行文件中的位置和大小。每个 Section 的 Segment 的类型分为 __TEXT 代码段和 __DATA 数据段两种。
# Sections:# AddressSize SegmentSection 0x100000B100x000002D9__TEXT__text 0x100000DEA0x00000054__TEXT__stubs 0x100000E400x0000009C__TEXT__stub_helper 0x100000EDC0x0000006E__TEXT__objc_methname 0x100000F4A0x0000003B__TEXT__cstring 0x100000F850x00000007__TEXT__objc_classname 0x100000F8C0x0000001D__TEXT__objc_methtype 0x100000FAC0x00000048__TEXT__unwind_info 0x1000010000x00000010__DATA__nl_symbol_ptr 0x1000010100x00000070__DATA__la_symbol_ptr 0x1000010800x00000060__DATA__cfstring 0x1000010E00x00000008__DATA__objc_classlist 0x1000010E80x00000008__DATA__objc_imageinfo 0x1000010F00x00000170__DATA__objc_const 0x1000012600x00000020__DATA__objc_selrefs 0x1000012800x00000008__DATA__objc_classrefs 0x1000012880x00000008__DATA__objc_superrefs 0x1000012900x00000010__DATA__objc_ivar 0x1000012A00x00000050__DATA__objc_data
App中具体目标文件在对应的section中的位置和大小(#Symbols):Symbols 是对 Sections 进行了再划分。这里会描述所有的 methods,ivar 和字符串,及它们对应的地址,大小,文件编号信息。
# Symbols:# AddressSize File Name 0x100000B100x00000106[ 1] _main 0x100000C200x000000A0[ 2] -[Test init] 0x100000CC00x00000060[ 2] -[Test setObject:] 0x100000D200x00000040[ 2] -[Test obj] 0x100000D600x00000040[ 2] -[Test setObj:] 0x100000DA00x00000049[ 2] -[Test .cxx_destruct] 0x100000DEA0x00000006[ 3] _NSHomeDirectory 0x100000DF00x00000006[ 3] _NSLog 0x100000DF60x00000006[ 4] _objc_autoreleasePoolPop 0x100000DFC0x00000006[ 4] _objc_autoreleasePoolPush 0x100000E020x00000006[ 4] _objc_autoreleaseReturnValue 0x100000E080x00000006[ 4] _objc_destroyWeak 0x100000E0E0x00000006[ 4] _objc_loadWeakRetained 0x100000E140x00000006[ 4] _objc_msgSend 0x100000E1A0x00000006[ 4] _objc_msgSendSuper2 0x100000E200x00000006[ 4] _objc_release 0x100000E260x00000006[ 4] _objc_retain 0x100000E2C0x00000006[ 4] _objc_retainAutoreleasedReturnValue 0x100000E320x00000006[ 4] _objc_storeStrong 0x100000E380x00000006[ 4] _objc_storeWeak 0x100000E400x00000010[ 0] helper helper 0x100000E500x0000000A[ 3] _NSHomeDirectory 0x100000E5A0x0000000A[ 3] _NSLog 0x100000E640x0000000A[ 4] _objc_autoreleasePoolPop 0x100000E6E0x0000000A[ 4] _objc_autoreleasePoolPush 0x100000E780x0000000A[ 4] _objc_autoreleaseReturnValue 0x100000E820x0000000A[ 4] _objc_destroyWeak 0x100000E8C0x0000000A[ 4] _objc_loadWeakRetained 0x100000E960x0000000A[ 4] _objc_msgSend 0x100000EA00x0000000A[ 4] _objc_msgSendSuper2 0x100000EAA0x0000000A[ 4] _objc_release 0x100000EB40x0000000A[ 4] _objc_retain 0x100000EBE0x0000000A[ 4] _objc_retainAutoreleasedReturnValue 0x100000EC80x0000000A[ 4] _objc_storeStrong 0x100000ED20x0000000A[ 4] _objc_storeWeak 0x100000EDC0x00000006[ 1] literal string: alloc 0x100000EE20x00000014[ 1] literal string: initWithUTF8String: 0x100000EF60x00000020[ 1] literal string: stringByAppendingPathComponent: 0x100000F160x00000005[ 2] literal string: init 0x100000F1B0x0000000B[ 2] literal string: setObject: 0x100000F260x0000000E[ 2] literal string: .cxx_destruct 0x100000F340x00000004[ 2] literal string: obj 0x100000F380x00000008[ 2] literal string: setObj: 0x100000F400x00000005[ 2] literal string: obj_ 0x100000F450x00000005[ 2] literal string: _obj 0x100000F4A0x00000009[ 1] literal string: starming 0x100000F530x0000000B[ 1] literal string: %@ rank %d 0x100000F5E0x00000013[ 1] literal string: Documents/neuer.db 0x100000F710x00000003[ 1] literal string: %@ 0x100000F740x00000004[ 2] literal string: obj 0x100000F780x0000000D[ 2] literal string: T@,W,N,V_obj 0x100000F850x00000005[ 2] literal string: Test 0x100000F8A0x00000002[ 2] literal string: 0x100000F8C0x00000008[ 2] literal string: @16@0:8 0x100000F940x0000000B[ 2] literal string: v24@0:8@16 0x100000F9F0x00000008[ 2] literal string: v16@0:8 0x100000FA70x00000002[ 2] literal string: @ 0x100000FAC0x00000048[ 0] compact unwind info 0x1000010000x00000008[ 0] non-lazy-pointer-to-local: dyld_stub_binder 0x1000010080x00000008[ 0] non-lazy-pointer 0x1000010100x00000008[ 3] _NSHomeDirectory 0x1000010180x00000008[ 3] _NSLog 0x1000010200x00000008[ 4] _objc_autoreleasePoolPop 0x1000010280x00000008[ 4] _objc_autoreleasePoolPush 0x1000010300x00000008[ 4] _objc_autoreleaseReturnValue 0x1000010380x00000008[ 4] _objc_destroyWeak 0x1000010400x00000008[ 4] _objc_loadWeakRetained 0x1000010480x00000008[ 4] _objc_msgSend 0x1000010500x00000008[ 4] _objc_msgSendSuper2 0x1000010580x00000008[ 4] _objc_release 0x1000010600x00000008[ 4] _objc_retain 0x1000010680x00000008[ 4] _objc_retainAutoreleasedReturnValue 0x1000010700x00000008[ 4] _objc_storeStrong 0x1000010780x00000008[ 4] _objc_storeWeak 0x1000010800x00000020[ 1] CFString 0x1000010A00x00000020[ 1] CFString 0x1000010C00x00000020[ 1] CFString 0x1000010E00x00000008[ 2] anon 0x1000010E80x00000008[ 0] objc image info 0x1000010F00x00000048[ 2] l_OBJC_METACLASS_RO_$_Test 0x1000011380x00000080[ 2] l_OBJC_$_INSTANCE_METHODS_Test 0x1000011B80x00000048[ 2] l_OBJC_$_INSTANCE_VARIABLES_Test 0x1000012000x00000018[ 2] l_OBJC_$_PROP_LIST_Test 0x1000012180x00000048[ 2] l_OBJC_CLASS_RO_$_Test 0x1000012600x00000008[ 1] pointer-to-literal-cstring 0x1000012680x00000008[ 1] pointer-to-literal-cstring 0x1000012700x00000008[ 1] pointer-to-literal-cstring 0x1000012780x00000008[ 2] pointer-to-literal-cstring 0x1000012800x00000008[ 1] objc-class-ref 0x1000012880x00000008[ 2] anon 0x1000012900x00000008[ 2] _OBJC_IVAR_$_Test.obj_ 0x1000012980x00000008[ 2] _OBJC_IVAR_$_Test._obj 0x1000012A00x00000028[ 2] _OBJC_CLASS_$_Test 0x1000012C80x00000028[ 2] _OBJC_METACLASS_$_Test
dSYM
定义:在每次编译后都会生成一个 dSYM 文件,程序在执行中通过地址来调用方法函数,而 dSYM 文件里存储了函数地址映射,这样调用栈里的地址可以通过 dSYM 这个映射表能够获得具体函数的位置。一般都会用来处理 crash 时获取到的调用栈 .crash 文件将其符号化。
作用: 当release的版本 crash的时候,会有一个日志文件,包含出错的内存地址, 使用symbolicatecrash工具能够把日志和dSYM文件转换成可以阅读的log信息,也就是将内存地址,转换成程序里的函数或变量和所属于的 文件名.(如何设置 release 版本? Product -> scheme -> EditScheme)
如何找到:/Users/用户名/Library/Developer/Xcode/DerivedData/littleTest-fcueraakmygtmodagachcreqjbjw/Build/Products/Release
dSYM崩溃日志的错误定位:需要使用 symbolicatecrash 这个 Xcode 自带的工具进行错误转换。 找到 symbolicatecrash : find /Applications/Xcode.app -name symbolicatecrash -type f
找到位置为: /Applications/Xcode.app/Contents/Developer/Platforms/iPhoneSimulator.platform/Developer/Library/PrivateFrameworks/DVTFoundation.framework/symbolicatecrash
之后将 symbolicatecrash, crash, dSYM 文件放在同一个目录下
具体操作请看这篇:总结的很好
Mach-O 文件
首先来看看胖二进制的含义:以上是维基百科的解释,但是主要来说,胖二进制是比普通二进制文件的内容要多的二进制文件,因为其中包含了需要支持不同CPU架构的iOS设备的兼容信息。
含义:Mach-O,是Mach object文件格式的缩写,是一种可执行文件、目标代码、共享程序库、动态加载代码和核心DUMP。是a.out格式的一种替代。Mach-O 提供更多的可扩展性和更快的符号表信息存取。Mach-O应用在基于Mach核心的系统上,目前NeXTSTEP、Darwin、Mac OS X(iPhone)都是使用这种可执行文件格式。
记录编译后的可执行文件,对象代码,共享库,动态加载代码和内存转储的文件格式。不同于 xml 这样的文件,它只是二进制字节流,里面有不同的包含元信息的数据块,比如字节顺序,cpu 类型,块大小等。文件内容是不可以修改的,因为在 .app 目录中有个 _CodeSignature 的目录,里面包含了程序代码的签名,这个签名的作用就是保证签名后 .app 里的文件,包括资源文件,Mach-O 文件都不能够更改。
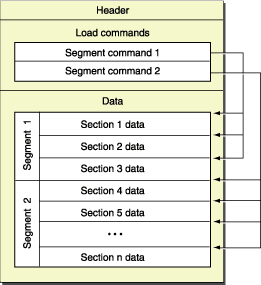
Mach-O 的内容:
Mach-O Header:包含字节顺序,magic,cpu 类型,加载指令的数量等
Load Commands:包含很多内容的表,包括区域的位置,符号表,动态符号表等。每个加载指令包含一个元信息,比如指令类型,名称,在二进制中的位置等。
原始段数据(Raw segment data):可以拥有多个段(segment),每个段可以拥有零个或多个区域(section)。每一个段(segment)都拥有一段虚拟地址映射到进程的地址空间。
先看看描述这个文件的结构体
structmach_header{uint32_tmagic;cpu_type_tcputype;cpu_subtype_tcpusubtype;uint32_tfiletype;uint32_tncmds;uint32_tsizeofcmds;uint32_tflags;};structsegment_command{uint32_tcmd;uint32_tcmdsize;charsegname[16];uint32_tvmaddr;uint32_tvmsize;uint32_tfileoff;uint32_tfilesize;vm_prot_tmaxprot;vm_prot_tinitprot;uint32_tnsects;uint32_tflags;};
根据这个结构体,需要先取出 magic,然后根据偏移量取出其它的信息。遍历 ncmds 能够获得所有的 segment。cputype 包含了 CPU_TYPE_I386,CPU_TYPE_X86_64,CPU_TYPE_ARM,CPU_TYPE_ARM64 等多种 CPU 的类型。
Mach-O 文件参考文章
Mach-O 具体定义
趣谈 Mach-O加载过程
dyld动态链接
生成可执行文件后就是在启动时进行动态链接了,进行符号和地址的绑定。首先会加载所依赖的 dylibs,修正地址偏移,因为 iOS 会用 ASLR 来做地址偏移避免攻击,确定 Non-Lazy Pointer 地址进行符号地址绑定,加载所有类,最后执行 load 方法和 clang attribute 的 constructor 修饰函数。


