Opencv中的Mat类使用方法总结
今天在看Opencv的SIFT源码,至于有关于SIFT算法的博客还没有写完,等着我把源码看完再一起写完吧。
之前用Opencv编过不少的程序了,没想道OpenCV 2.0版本里最基础的Mat类用法还是有些不清楚,这里就总结一下
一、Mat类的综述
1、Mat类存储图像
Mat类是OpenCV里使用广泛的一个类,其中我认为最重要的一个作用就是作为存储图像的数据结构。那么Mat类如何存储的图像呢?
我们都知道图像分为彩色图像和灰度图像,这里我有一个误区,一直认为彩色图像是一种三维矩阵,就是立方体的那种结构,一个图像分为三层。
但是这种理解是错误的,是错误的,是错误的!
其实在存储的图像不管是彩色的还是灰度图像,都是二维的矩阵,具体的存储格式如下
(1)灰度图像的格式:
(2)彩色图像的格式:
看到了吗,虽然彩色图像由BGR三个通道,但是是存储在同一个平面内的,只不过OpenCV在这里把三列才当作一列,因此有img.cols等于图像的列数。
一般我们用Opencv读取的灰度图像的数据类型为uchar类型的,而彩色图像的一个像素的数据类型为类型的,灰度图一个像素占用1个字节,而彩色图像一个像素3个字节。
接下来就引出了我们如何按像素读取图像呢?
2、Mat按像素读取图像内容
这里主要介绍两种方法,一种非常简单,易于编程,但是效率会比较低;另外一种效率高,但是不太好记。下面依次看代码:
(1)易于编程的
对于灰度图像进行操作:
#include
#include
#include
#include

using namespace std;
using namespace cv;

int main()
{
	Mat img = imread("1.jpg");
	resize(img, img, Size(375, 500));//resize为500*375的图像
	cvtColor(img, img, CV_RGB2GRAY);//转为灰度图
	imshow("gray_ori", img);
	for (int i = 0; i < img.rows; i++)
	{
		for (int j = 0; j < img.cols; j++)
		{
			//at<类型>(i,j)进行操作,对于灰度图
			img.at(i, j) = i+j;
		}
	}
	imshow("gray_result", img);
	waitKey(0);
	return 0;
}
可以看出,使用at的操作很容易定位,就跟操作一个普通的二维数组一样,那么对于彩色图像呢,方法很简单,只需要把at<类型>中的类型改变为Vec3b即可,代码如下:
#include
#include
#include
#include

using namespace std;
using namespace cv;

int main()
{
	Mat img = imread("1.jpg");
	resize(img, img, Size(375, 500));//resize为500*375的图像
	imshow("ori", img);
	for (int i = 0; i < img.rows; i++)
	{
		for (int j = 0; j < img.cols; j++)
		{
			//at<类型>(i,j)进行操作,对于灰度图
			img.at(i, j)[0] = 255;//对于蓝色通道进行操作
			//img.at(i, j)[1] = 255;//对于绿色通道进行操作
			//img.at(i, j)[2] = 255;//对于红色通道进行操作
		}
	}
	imshow("result", img);
	waitKey(0);
	return 0;
}
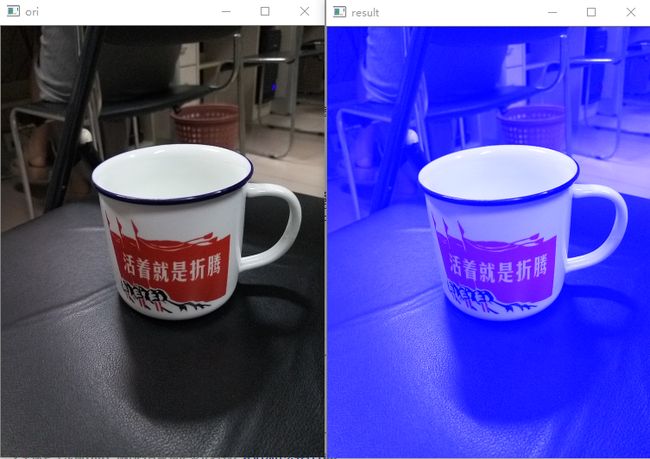
效果图如下:
(2)采用指针对图像进行访问
这里直接写对于彩色图像的操作:
#include
#include
#include
#include

using namespace cv;
using namespace std;
int main()
{
    Mat img = imread("1.jpg");
	int rows = img.rows;
	int cols = img.cols * img.channels();
	if(img.isContinuous())//判断是否在内存中连续
	{
		cols = cols * rows;
		rows = 1;
	}
	imshow("ori",img);
	for(int i = 0;i(i);

		for(int j = 0;j
这里需要注意的是j += 3是因为我们按照一个像素点进行操作,而一个像素点在这里面又被分成三份,因此需要j += 3,如果是灰度图像则直接j++即可
这种操作方式虽然复杂一些,但是执行效率会比上面的算法高很多。
下面是执行的结果:
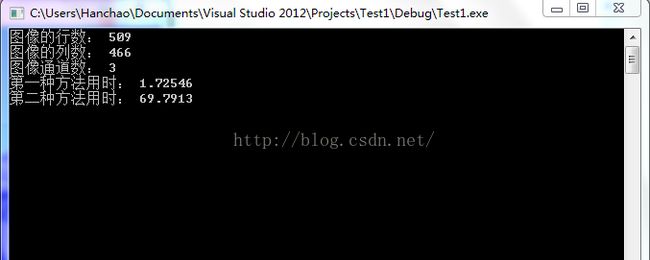
下面我们给出这两种方式进行同一操作的时间对比图():
测试代码如下:
#include
#include
#include
#include
#include

using namespace cv;
using namespace std;
int main()
{
    Mat img = imread("1.jpg");
	Mat img2;
	img.copyTo(img2);

	cout<<"图像的行数: "<(i);

		for(int j = 0;j(i,j)进行操作,对于灰度图
			img2.at(i, j)[0] = 255;//对于蓝色通道进行操作
			//img.at(i, j)[1] = 255;//对于绿色通道进行操作
			//img.at(i, j)[2] = 255;//对于红色通道进行操作
		}
	}
	time2 = 1000 * ((double)getTickCount() - time2)/getTickFrequency();
	cout<<"第二种方法用时: "<
2、Mat类中的变量参数
Mat类中包含了很多的变量,比如用的比较多的rows,cols等,这些我在这里就不总结了。
这里总结的是Mat类中用的比较少的几个变量和函数,step1(),step[],size,elemSize和elemSize1。
step1(i)表示的是Mat中的每一维的通道数;
step[i]表示的是Mat中的每一维的大小,以字节为单位;
size[i]表示的是Mat中元素的个数;
elemSize()表示的是每个元素的大小
,以字节为单位;
elemSize1()表示的一个元素中每个通道的大小,以字节为单位。
这么说恐怕不好理解,我们用代码进行测试:
#include
#include
#include
#include
#include

using namespace cv;
using namespace std;
int main()
{
    Mat img = imread("1.jpg");
	cout<<"img.rows: "<
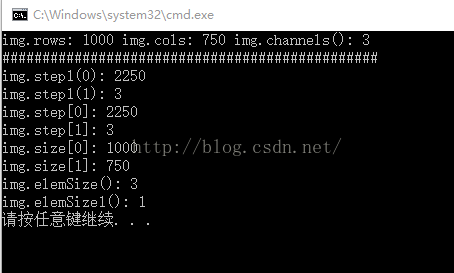
接着分析结果,img.step1(1)表示的是一个点的通道数,我们知道彩色图像的一个像素,通道数为3(BGR),因此img.step1(1) = 3,而img.step1(0)是一行的像素的通道数,因此为750*3 = 2250
而step[i]表示的是每一维中的大小,以字节计数,在彩色图像中一个像素分为三块,每一块为一个字节,因此step[0] = 2250 ,step[1] = 3
size表示的是每一维元素的大小,注意这里是元素,即像素,size[0]表示rows,size[1]表示cols
elemSize表示的是每个元素的大小,以字节计,一个元素分为三块,一块是1字节,因此为3(彩色图像)
elemSize1表示的是一个元素的每个通道的大小,因此为1


