windows系统如何配置Redis集群环境
需要工具:Redis、Ruby环境、Redis的Ruby驱动redis.gem以及创建Redis集群的工具redis-trib.rb。
使用redis-trib.rb工具来创建Redis集群,由于该文件是用ruby语言写的,所以需要安装Ruby开发环境,以及驱动redis.gem。
(1)下载Redis安装文件:http://download.redis.io/releases/,我们下载zip格式Redis-x64-3.2.1版本。

(2)下载Ruby安装文件:http://dl.bintray.com/oneclick/rubyinstaller/rubyinstaller-2.2.4-x64.exe
(3)下载Ruby环境下Redis的驱动:https://rubygems.org/gems/redis/versions/3.2.2,考虑到兼容性,这里下载的是3.2.2版本。
下载:https://rubygems.org/downloads/redis-3.2.2.gem

(4)下载Redis官方提供的创建Redis集群的ruby脚本文件redis-trib.rb;路径如下:https://raw.githubusercontent.com/MSOpenTech/redis/3.0/src/redis-trib.rb,自己本地新建一个redis-trib.rb把内容放在文件里面。
解压你的redis压缩包
把压缩包用7-zip解压随便放在你的某个英文路径的文件夹中。然后再redis的根目录下面新建一个Logs文件夹。

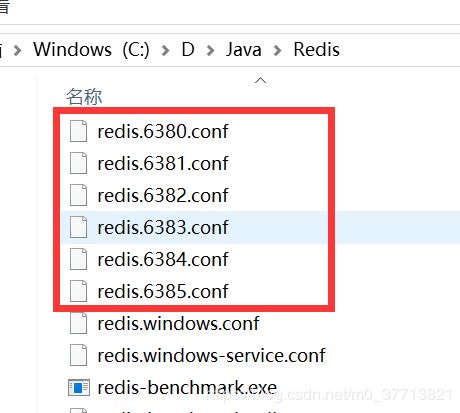
然后再在根目录下面新建6个文件,redis.6380.conf、redis.6381.conf、redis.6382.conf、redis.6383.conf、redis.6384.conf、redis.6385.conf,创建编码格式为utf-8的配置文件。
这六个文件内容分别如下:
6380文件
bind 127.0.0.1
port 6380
loglevel notice
logfile "C:/D/Java/Redis/Logs/redis6380_log.txt"
appendonly yes
appendfilename "appendonly.6380.aof"
cluster-enabled yes
cluster-config-file nodes.6380.conf
cluster-node-timeout 15000
cluster-slave-validity-factor 10
cluster-migration-barrier 1
cluster-require-full-coverage yes
6381文件
bind 127.0.0.1
port 6381
loglevel notice
logfile "C:/D/Java/Redis/Logs/redis6381_log.txt"
appendonly yes
appendfilename "appendonly.6381.aof"
cluster-enabled yes
cluster-config-file nodes.6381.conf
cluster-node-timeout 15000
cluster-slave-validity-factor 10
cluster-migration-barrier 1
cluster-require-full-coverage yes
6382文件
bind 127.0.0.1
port 6382
loglevel notice
logfile "C:/D/Java/Redis/Logs/redis6382_log.txt"
appendonly yes
appendfilename "appendonly.6382.aof"
cluster-enabled yes
cluster-config-file nodes.6382.conf
cluster-node-timeout 15000
cluster-slave-validity-factor 10
cluster-migration-barrier 1
cluster-require-full-coverage yes
6383文件
bind 127.0.0.1
port 6383
loglevel notice
logfile "C:/D/Java/Redis/Logs/redis6383_log.txt"
appendonly yes
appendfilename "appendonly.6383.aof"
cluster-enabled yes
cluster-config-file nodes.6383.conf
cluster-node-timeout 15000
cluster-slave-validity-factor 10
cluster-migration-barrier 1
cluster-require-full-coverage yes
6384文件
bind 127.0.0.1
port 6384
loglevel notice
logfile "C:/D/Java/Redis/Logs/redis6384_log.txt"
appendonly yes
appendfilename "appendonly.6384.aof"
cluster-enabled yes
cluster-config-file nodes.6384.conf
cluster-node-timeout 15000
cluster-slave-validity-factor 10
cluster-migration-barrier 1
cluster-require-full-coverage yes
6385文件
bind 127.0.0.1
port 6385
loglevel notice
logfile "C:/D/Java/Redis/Logs/redis6385_log.txt"
appendonly yes
appendfilename "appendonly.6385.aof"
cluster-enabled yes
cluster-config-file nodes.6385.conf
cluster-node-timeout 15000
cluster-slave-validity-factor 10
cluster-migration-barrier 1
cluster-require-full-coverage yes
我们开始安装6个redis服务,就是上面6个配置文件,在redis根目录下面新建一个install.cmd文件。

install.cmd文件内容如下:
C:/D/Java/Redis/redis-server.exe --service-install C:/D/Java/Redis/redis.6380.conf --service-name redis6380
C:/D/Java/Redis/redis-server.exe --service-install C:/D/Java/Redis/redis.6381.conf --service-name redis6381
C:/D/Java/Redis/redis-server.exe --service-install C:/D/Java/Redis/redis.6382.conf --service-name redis6382
C:/D/Java/Redis/redis-server.exe --service-install C:/D/Java/Redis/redis.6383.conf --service-name redis6383
C:/D/Java/Redis/redis-server.exe --service-install C:/D/Java/Redis/redis.6384.conf --service-name redis6384
C:/D/Java/Redis/redis-server.exe --service-install C:/D/Java/Redis/redis.6385.conf --service-name redis6385
右键管理员运行install.cmd,之后可以看见在服务中生成6个对于服务。

生成之后开始启动,可以自己手动一个一个启动,或者去根目录下面新建一个start.cmd文件,然后右键管理员启动打开所有服务。内容如下:
C:/D/Java/Redis/redis-server.exe --service-start --service-name redis6380
C:/D/Java/Redis/redis-server.exe --service-start --service-name redis6381
C:/D/Java/Redis/redis-server.exe --service-start --service-name redis6382
C:/D/Java/Redis/redis-server.exe --service-start --service-name redis6383
C:/D/Java/Redis/redis-server.exe --service-start --service-name redis6384
C:/D/Java/Redis/redis-server.exe --service-start --service-name redis6385
卸载服务可以新建一个uninstall.cmd文件,内容如下:
C:/D/Java/Redis/redis-server.exe --service-uninstall C:/D/Java/Redis/redis.6380.conf --service-name redis6380
C:/D/Java/Redis/redis-server.exe --service-uninstall C:/D/Java/Redis/redis.6381.conf --service-name redis6381
C:/D/Java/Redis/redis-server.exe --service-uninstall C:/D/Java/Redis/redis.6382.conf --service-name redis6382
C:/D/Java/Redis/redis-server.exe --service-uninstall C:/D/Java/Redis/redis.6383.conf --service-name redis6383
C:/D/Java/Redis/redis-server.exe --service-uninstall C:/D/Java/Redis/redis.6384.conf --service-name redis6384
C:/D/Java/Redis/redis-server.exe --service-uninstall C:/D/Java/Redis/redis.6385.conf --service-name redis6385
当我启动完所有的服务时如下:

安装Ruby
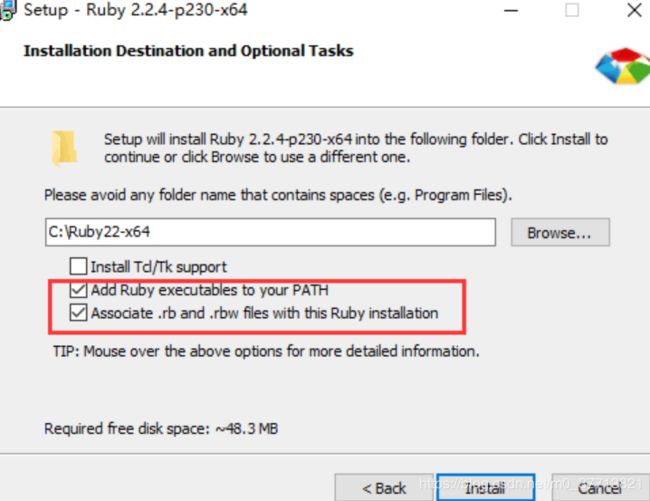
(1)Ruby环境安装。
双击下载好的rubyinstaller.exe文件即可,安装时这里选中后两个选项,勾上去就行了。
(2)安装Ruby环境下Redis的驱动
将下载的"Ruby环境下Redis的驱动文件(redis-3.2.2.gem)"拷贝到Ruby安装根目录下。

因为安装的时候帮我们自动配置了环境变量,现在我们再Ruby根目录下面直接执行安装命令即可:
gem install --local redis-3.3.2.gem
创建Redis集群
(1)将我们前面创建的redis-trib.rb文件拷贝到Redis安装根目录下,

(2)使用redis-trib.rb来创建Redis集群,在redis根目录下面执行命令:
redis-trib.rb create --replicas 1 127.0.0.1:6380 127.0.0.1:6381 127.0.0.1:6382 127.0.0.1:6383 127.0.0.1:6384 127.0.0.1:6385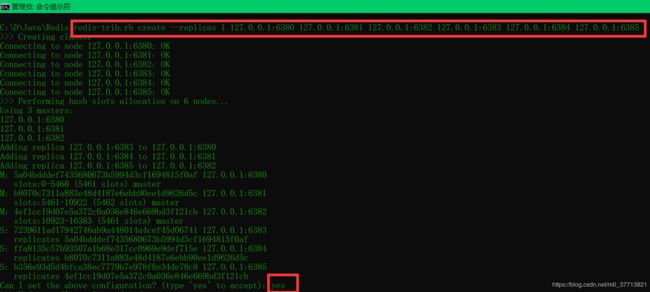
之后输入yes继续执行。打印的结果如下:
C:\D\Java\Redis>redis-trib.rb create --replicas 1 127.0.0.1:6380 127.0.0.1:6381 127.0.0.1:6382 127.0.0.1:6383 127.0.0.1:6384 127.0.0.1:6385
>>> Creating cluster
Connecting to node 127.0.0.1:6380: OK
Connecting to node 127.0.0.1:6381: OK
Connecting to node 127.0.0.1:6382: OK
Connecting to node 127.0.0.1:6383: OK
Connecting to node 127.0.0.1:6384: OK
Connecting to node 127.0.0.1:6385: OK
>>> Performing hash slots allocation on 6 nodes...
Using 3 masters:
127.0.0.1:6380
127.0.0.1:6381
127.0.0.1:6382
Adding replica 127.0.0.1:6383 to 127.0.0.1:6380
Adding replica 127.0.0.1:6384 to 127.0.0.1:6381
Adding replica 127.0.0.1:6385 to 127.0.0.1:6382
M: 5a04bdddef7435680673b5994d3cf1694815f0af 127.0.0.1:6380
   slots:0-5460 (5461 slots) master
M: b8070c7311a883e48d4187e6ebb90ee1d9626d5c 127.0.0.1:6381
   slots:5461-10922 (5462 slots) master
M: 4ef1cc19d07e5a372c0a036e846e669bd3f121cb 127.0.0.1:6382
   slots:10923-16383 (5461 slots) master
S: 7239611ad17942746ab9a448014a4cef45d06741 127.0.0.1:6383
   replicates 5a04bdddef7435680673b5994d3cf1694815f0af
S: ffa8135c57b93507a1b68e317cc0969e9def715e 127.0.0.1:6384
   replicates b8070c7311a883e48d4187e6ebb90ee1d9626d5c
S: b356e93d5d4bfca38ec7779b7e978f8e34de78c8 127.0.0.1:6385
   replicates 4ef1cc19d07e5a372c0a036e846e669bd3f121cb
Can I set the above configuration? (type 'yes' to accept): yes
>>> Nodes configuration updated
>>> Assign a different config epoch to each node
>>> Sending CLUSTER MEET messages to join the cluster
Waiting for the cluster to join.....
>>> Performing Cluster Check (using node 127.0.0.1:6380)
M: 5a04bdddef7435680673b5994d3cf1694815f0af 127.0.0.1:6380
   slots:0-5460 (5461 slots) master
M: b8070c7311a883e48d4187e6ebb90ee1d9626d5c 127.0.0.1:6381
   slots:5461-10922 (5462 slots) master
M: 4ef1cc19d07e5a372c0a036e846e669bd3f121cb 127.0.0.1:6382
   slots:10923-16383 (5461 slots) master
M: 7239611ad17942746ab9a448014a4cef45d06741 127.0.0.1:6383
   slots: (0 slots) master
   replicates 5a04bdddef7435680673b5994d3cf1694815f0af
M: ffa8135c57b93507a1b68e317cc0969e9def715e 127.0.0.1:6384
   slots: (0 slots) master
   replicates b8070c7311a883e48d4187e6ebb90ee1d9626d5c
M: b356e93d5d4bfca38ec7779b7e978f8e34de78c8 127.0.0.1:6385
   slots: (0 slots) master
   replicates 4ef1cc19d07e5a372c0a036e846e669bd3f121cb
[OK] All nodes agree about slots configuration.
>>> Check for open slots...
>>> Check slots coverage...
[OK] All 16384 slots covered.
等打印结束之后,接着输入命令检查是否成功:
redis-trib.rb check 127.0.0.1:6380C:\D\Java\Redis>redis-trib.rb check 127.0.0.1:6380
Connecting to node 127.0.0.1:6380: OK
Connecting to node 127.0.0.1:6381: OK
Connecting to node 127.0.0.1:6382: OK
Connecting to node 127.0.0.1:6384: OK
Connecting to node 127.0.0.1:6385: OK
Connecting to node 127.0.0.1:6383: OK
>>> Performing Cluster Check (using node 127.0.0.1:6380)
M: 5a04bdddef7435680673b5994d3cf1694815f0af 127.0.0.1:6380
slots:0-5460 (5461 slots) master
1 additional replica(s)
M: b8070c7311a883e48d4187e6ebb90ee1d9626d5c 127.0.0.1:6381
slots:5461-10922 (5462 slots) master
1 additional replica(s)
M: 4ef1cc19d07e5a372c0a036e846e669bd3f121cb 127.0.0.1:6382
slots:10923-16383 (5461 slots) master
1 additional replica(s)
S: ffa8135c57b93507a1b68e317cc0969e9def715e 127.0.0.1:6384
slots: (0 slots) slave
replicates b8070c7311a883e48d4187e6ebb90ee1d9626d5c
S: b356e93d5d4bfca38ec7779b7e978f8e34de78c8 127.0.0.1:6385
slots: (0 slots) slave
replicates 4ef1cc19d07e5a372c0a036e846e669bd3f121cb
S: 7239611ad17942746ab9a448014a4cef45d06741 127.0.0.1:6383
slots: (0 slots) slave
replicates 5a04bdddef7435680673b5994d3cf1694815f0af
[OK] All nodes agree about slots configuration.
>>> Check for open slots...
>>> Check slots coverage...
[OK] All 16384 slots covered.使用Redis客户端Redis-cli.exe来查看数据记录数,以及集群相关信息。首先打开redis的服务,然后再使用redis-cli命令。
redis-cli.exe -h 127.0.0.1 -p 6380