Springboot2整合swagger2实现在线接口文档
简介
上篇文章主要讲解了swagger2 的常用注解以及注解里的常用参数。本篇文章就着重实战,使用Springboot与swagger2整合的例子介绍一下用法。
相关版本
- Springboot版本:2.0.1.RELEASE
- swagger2版本:2.8.0
- maven版本:3.2.5
- JDK版本:8
- IDEA版本:2017.2.6
依赖
	io.springfox
	springfox-swagger2
	2.8.0


	io.springfox
	springfox-swagger-ui
	2.8.0


	org.projectlombok
	lombok
	1.16.20
配置类
Swagger2Config 配置类
@Configuration
@EnableSwagger2
@Profile({"dev", "test"})// 设置 dev test 环境开启 prod 环境就关闭了
public class Swagger2Config {
    @Bean
    public Docket createRestApi() {
        return new Docket(DocumentationType.SWAGGER_2)
                .apiInfo(apiInfo())
                .select()
                .apis(RequestHandlerSelectors.basePackage("com.czq.online.controller"))
                .paths(PathSelectors.any())
                .build();
    }

    private ApiInfo apiInfo() {
        return new ApiInfoBuilder()
                .title("springboot利用swagger构建api文档")
                .description("简单优雅的restfun风格")
//                .termsOfServiceUrl("http:/xxx/xxx")
                .contact("chenzhiq")
                .version("1.0")
                .build();
    }
}
WebMvcConfig 配置类
@Configuration
public class WebMvcConfig extends WebMvcConfigurationSupport {
    @Override
    protected void addResourceHandlers(ResourceHandlerRegistry registry) {
        registry.addResourceHandler("swagger-ui.html")
                .addResourceLocations("classpath:/META-INF/resources/");
        registry.addResourceHandler("/webjars/**")
                .addResourceLocations("classpath:/META-INF/resources/webjars/");
    }
}
其余代码
User 用户实体类
@Data
@AllArgsConstructor
@NoArgsConstructor
@ApiModel(description="用户的实体对象")
public class User {

    /**
     *id
     */
    @ApiModelProperty(value="用户id",name="id",required=true)
    private String id;

    /**
     *名字
     */
    @ApiModelProperty(value="用户名",name="name",required=true)
    private String name;

    /**
     *年龄
     */
    private Integer age;

}
UserController用户接口
// (不要深究实现的意义,只是为了演示不同的情况)

@RestController
@RequestMapping(value = "/user", produces =  MediaType.APPLICATION_JSON_VALUE)
@Api(value="用户controller",tags={"用户操作接口"})
// 下面注释的也可以使用,下面这个是为了演示 tags 可以写多个参数
//@Api(tags = {"UserController用户接口","UserController部门用户接口"},description = "用户基本信息操作")
public class UserController {

    private static Map userMap = Collections.synchronizedMap(new HashMap());

    /**
     * 获取用户列表
     * @return 用户列表
     */
    @ApiOperation(value="获取用户列表", notes="获取用户列表")
    @RequestMapping(value = "/list", method = RequestMethod.GET)
    public List getUsers(){
        return new ArrayList<>(userMap.values());
    }

    /**
     * 新增一个用户
     * @param user 用户对象
     */
    @ApiOperation(value="创建用户" ,notes="创建用户时的注意事项")
    @ApiImplicitParam(name = "user", value = "用户详细实体user", required = true, paramType = "body", dataType = "User")
    @RequestMapping(value = "/add", method = RequestMethod.POST)
    public void addUser(@RequestBody User user){
        // 也可以用@ModelAttribute绑定参数,还可以通过@RequestParam从页面中传递参数
        userMap.put(user.getId(),user);
    }

    /**
     * 更新用户
     * @param userId 用户id
     * @param user 修改的用户对象
     */
    @ApiOperation(value="修改用户" ,notes="修改用户细信息")
    @ApiImplicitParams({
            @ApiImplicitParam(name = "userId", value = "用户id", required = true, paramType = "path", dataType = "String"),
            @ApiImplicitParam(name = "user", value = "用户详细实体user", required = true, paramType = "body", dataType = "User")
    })
    @RequestMapping(value = "/update/{userId}", method = RequestMethod.PUT)
    public void updateUser(@PathVariable String userId , User user){
        // 也可以用@ModelAttribute绑定参数,还可以通过@RequestParam从页面中传递参数
        userMap.remove(userId);
        userMap.put(user.getId(),user);
    }

    /**
     * 根据姓名查询用户
     * @param name 用户姓名
     * @return 用户对象
     */
    @ApiOperation(value = "根据姓名查询用户", notes = "根据姓名查询用户信息")
    // 下面两种写法都可以
    //    @ApiParam(value = "name",name = "用户的名字",defaultValue = "zhangsan")
    @ApiImplicitParam(name = "name", value = "用户的名字", paramType = "query", dataType = "String")
    @RequestMapping(value = "/getUser", method = RequestMethod.GET, produces = MediaType.APPLICATION_JSON_VALUE)
    public User getUser(@RequestParam(value = "name",required = false) String name){
        // 不要深究实现的内容,主要为了演示测试
        User user = new User();
        user.setId("1000");
        if(name != null) {
            user.setName(name);
        }else {
            user.setName("zhangsan");
        }
        user.setAge(26);
        return user;
    }

    /**
     * 添加用户
     * @param user 用户对象
     * @return 用户对象
     */
    @ApiIgnore() // 添加这个注解将不会显示在UI界面上
    @ApiOperation(value = "添加用户", notes = "添加一个用户")
    @RequestMapping(value = "addUser", method = RequestMethod.POST, consumes = MediaType.APPLICATION_JSON_VALUE)
    public User addUser2(@RequestBody User user){
        return user;
    }

}
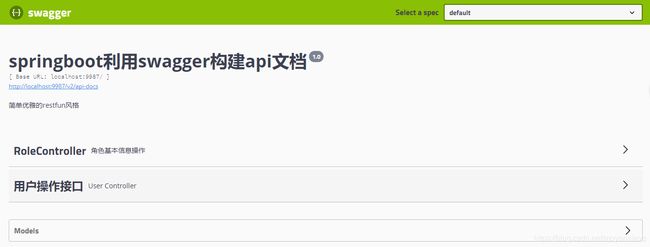
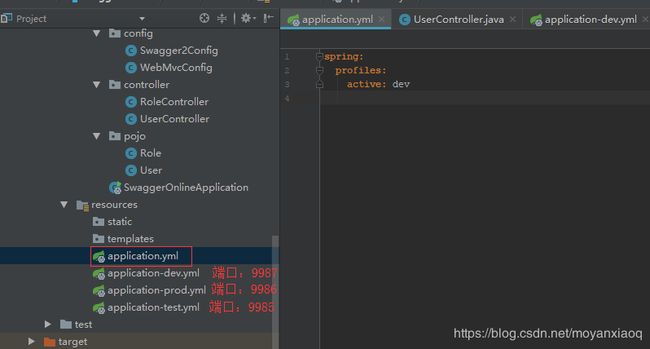
以上就是使用swagger2注解的实例代码,现在启动SwaggerOnlineApplication启动类,然后访问:http://localhost:9987/swagger-ui.html 就可也看到ui接口界面了(注意:application.yml配置的只有事dev和test环境才可以有UI接口界面prod环境是没有的)


测试
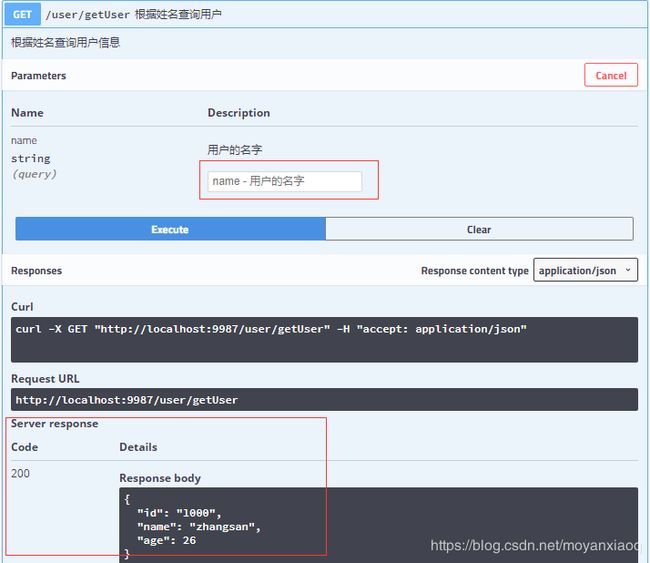
这个请求是根据名字查询用户,名字可以不填,默认返回张三用户信息。

其余的接口就不一一演示了,基本用到的注解情况都在代码里写了例子。如果想下载源码可以去原文地址获取代码git地址,导入到自己的开发工具就可以运行。
插播
 如有需要Springboot2最新视频教程的可以关注下方公众号,回复关键字:boot2
更多资源欢迎关注 V❤ 公众号:快乐学习与分享
