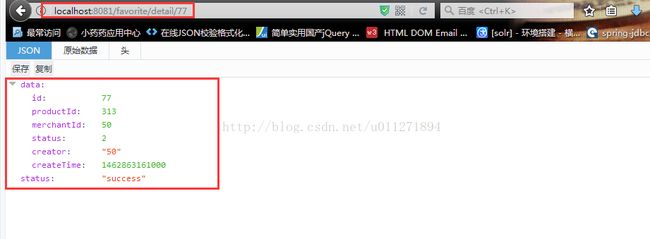
spring boot整合mybatis
咳咳,之前的目录结构还在吧?不在了?那你自己的创建吧,继续spring boot整合mybatis!
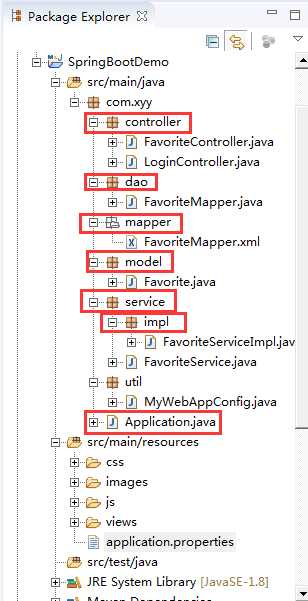
按照一般SSM标准项目,项目结构如下,比较正规的项目,可能还会将实体和业务层接口独立出来作为一个服务jar包,此处省略,效果是一样的,有不懂的可以私聊我
数据库怎么创建我就不教了,此处省略数据库(Mysql)安装,链接
SQL语句:
CREATE TABLE `tb_favorite` (
  `id` bigint(16) unsigned NOT NULL AUTO_INCREMENT COMMENT '主键',
  `product_id` bigint(16) unsigned DEFAULT NULL COMMENT '商品编号',
  `merchant_id` int(16) unsigned DEFAULT NULL COMMENT '商户编号',
  `status` int(1) DEFAULT NULL COMMENT '状态:1-收藏,2-取消收藏',
  `creator` varchar(32) DEFAULT NULL COMMENT '创建人',
  `create_time` datetime DEFAULT NULL COMMENT '创建时间',
  PRIMARY KEY (`id`),
  UNIQUE KEY `merchant_id` (`merchant_id`,`product_id`)
) ENGINE=InnoDB AUTO_INCREMENT=46714 DEFAULT CHARSET=utf8 COMMENT='个人收藏';
model:实体
package com.xyy.model;

import java.io.Serializable;
import java.util.Date;

public class Favorite implements Serializable {
    private static final long serialVersionUID = 1L;

    /** 主键 */
    private Long id;

    /** 商品编号 */
    private Long productId;

    /** 商户编号 */
    private Integer merchantId;

    /** 状态:1-收藏,2-取消收藏 */
    private Integer status;

    /** 创建人 */
    private String creator;

    /** 创建时间 */
    private Date createTime;

    /**
     *
     * @return 返回数据库表tb_favorite的id字段值
     */
    public Long getId() {
        return id;
    }

    /**
     * @param id 对应数据库表tb_favorite的id字段
     */
    public void setId(Long id) {
        this.id = id;
    }

    /**
     *
     * @return 返回数据库表tb_favorite的product_id字段值
     */
    public Long getProductId() {
        return productId;
    }

    /**
     * @param productId 对应数据库表tb_favorite的product_id字段
     */
    public void setProductId(Long productId) {
        this.productId = productId;
    }

    /**
     *
     * @return 返回数据库表tb_favorite的merchant_id字段值
     */
    public Integer getMerchantId() {
        return merchantId;
    }

    /**
     * @param merchantId 对应数据库表tb_favorite的merchant_id字段
     */
    public void setMerchantId(Integer merchantId) {
        this.merchantId = merchantId;
    }

    /**
     *
     * @return 返回数据库表tb_favorite的status字段值
     */
    public Integer getStatus() {
        return status;
    }

    /**
     * @param status 对应数据库表tb_favorite的status字段
     */
    public void setStatus(Integer status) {
        this.status = status;
    }

    /**
     *
     * @return 返回数据库表tb_favorite的creator字段值
     */
    public String getCreator() {
        return creator;
    }

    /**
     * @param creator 对应数据库表tb_favorite的creator字段
     */
    public void setCreator(String creator) {
        this.creator = creator;
    }

    /**
     *
     * @return 返回数据库表tb_favorite的create_time字段值
     */
    public Date getCreateTime() {
        return createTime;
    }

    /**
     * @param createTime 对应数据库表tb_favorite的create_time字段
     */
    public void setCreateTime(Date createTime) {
        this.createTime = createTime;
    }
}
dao:持久化层接口
package com.xyy.dao;

import org.apache.ibatis.annotations.Mapper;

import com.xyy.model.Favorite;

/**
 * Favorite持久化层接口
 * @ClassName: FavoriteMapper
 * @author wujing
 * @date 2017-07-13 15:09:50
 */
@Mapper
public interface FavoriteMapper{
	Favorite selectByPrimaryKey(Long id);
}
mapper:持久化层映射文件
id, product_id, merchant_id, status, creator, create_time
f.id, f.product_id, f.merchant_id, f.status, f.creator, f.create_time
insert into tb_favorite
product_id,
merchant_id,
status,
creator,
create_time,
#{productId,jdbcType=BIGINT},
#{merchantId,jdbcType=INTEGER},
#{status,jdbcType=INTEGER},
#{creator,jdbcType=VARCHAR},
#{createTime,jdbcType=TIMESTAMP},
delete from tb_favorite
where id = #{id,jdbcType=BIGINT}
delete from tb_favorite
where id in
#{id}
update tb_favorite
product_id = #{productId,jdbcType=BIGINT},
merchant_id = #{merchantId,jdbcType=INTEGER},
status = #{status,jdbcType=INTEGER},
creator = #{creator,jdbcType=VARCHAR},
create_time = #{createTime,jdbcType=TIMESTAMP},
where id = #{id,jdbcType=BIGINT}
service:业务层接口
package com.xyy.service;

import com.xyy.model.Favorite;

/**
 * Favorite业务层接口
 * @ClassName: FavoriteService
 * @author wujing
 * @date 2017-07-13 15:09:50
 */
public interface FavoriteService{
	Favorite selectByPrimaryKey(Long id);
}
impl:业务层接口实现类
package com.xyy.service.impl;

import org.springframework.beans.factory.annotation.Autowired;
import org.springframework.stereotype.Service;
import org.springframework.transaction.annotation.Transactional;

import com.xyy.dao.FavoriteMapper;
import com.xyy.model.Favorite;
import com.xyy.service.FavoriteService;

/**
 * Favorite业务层实现类
 * @ClassName: FavoriteServiceImpl
 * @author wujing
 * @date 2017-07-13 15:09:50
 */
@Transactional
@Service("favoriteService")
public class FavoriteServiceImpl implements FavoriteService {
	@Autowired
    private FavoriteMapper favoriteMapper;

	public Favorite selectByPrimaryKey(Long id) {
		return favoriteMapper.selectByPrimaryKey(id);
	}
}
controller:控制层
package com.xyy.controller;

import java.util.HashMap;
import java.util.Map;

import org.slf4j.Logger;
import org.slf4j.LoggerFactory;
import org.springframework.beans.factory.annotation.Autowired;
import org.springframework.ui.ModelMap;
import org.springframework.web.bind.annotation.PathVariable;
import org.springframework.web.bind.annotation.RequestMapping;
import org.springframework.web.bind.annotation.RestController;
import org.springframework.web.servlet.ModelAndView;

import com.xyy.model.Favorite;
import com.xyy.service.FavoriteService;

/**
 * Favorite控制层
 * @ClassName: FavoriteController
 * @author wujing
 * @date 2017-07-13 15:09:50
 */
@RestController
@RequestMapping("/favorite")
public class FavoriteController{
	private static final Logger LOGGER = LoggerFactory.getLogger(FavoriteController.class);

	@Autowired
	private FavoriteService favoriteService;

	/**
     * Favorite编辑
     * @Title: update
     * @param favorite 修改对象
     * @return Object
     * @author wujing
     * @date 2017-07-13 15:09:50
     */
	@RequestMapping("/detail/{id}")
	public Object detail(@PathVariable Long id,ModelMap modelMap) {
		Map resultMap = new HashMap();
		try {
			Favorite tempFavorite = favoriteService.selectByPrimaryKey(id);
			resultMap.put("status", "success");
			resultMap.put("data", tempFavorite);
		} catch (Exception e) {
			resultMap.put("status", "error");
			resultMap.put("errorMsg", "系统异常");
			LOGGER.error("Favorite添加异常", e);
		}
		return resultMap;
	}
}
每个代码的具体实现和普通的spring项目代码没有区别,唯一的区别
1:pom.xml文件,需要加入依赖,具体如下:
			org.mybatis.spring.boot
			mybatis-spring-boot-starter
			1.1.1


            mysql
            mysql-connector-java
mysql-connector-java:数据库驱动
2:src/main/resources/application.properties需要加入数据库以及mybatis相关的配置,我比较中意key-value的方式,符合我们之前的习惯,yml的方式,就此忽略掉了,有需要了解的另行百度
注:一下配置根据自行情况更改,如跟着我做的,只需要更改datasource相关即可
#数据库配置文件
spring.datasource.url=jdbc:mysql://localhost:3306/xyy_v2?useUnicode=true&characterEncoding=utf8&allowMultiQueries=true
spring.datasource.username=admin
spring.datasource.password=admin
spring.datasource.driver-class-name=com.mysql.jdbc.Driver
#mybatis配置文件
mybatis.mapperLocations=classpath:com/xyy/mapper/*Mapper.xml
mybatis.type-aliases-package=com.xyy.model自此第三节结束,第四节:spring boot整合freemark

