几种网络LeNet、VGG Net、ResNet原理及PyTorch实现
LeNet比较经典,就从LeNet开始,其PyTorch实现比较简单,通过LeNet为基础引出下面的VGG-Net和ResNet。
LeNet
LeNet比较经典的一张图如下图
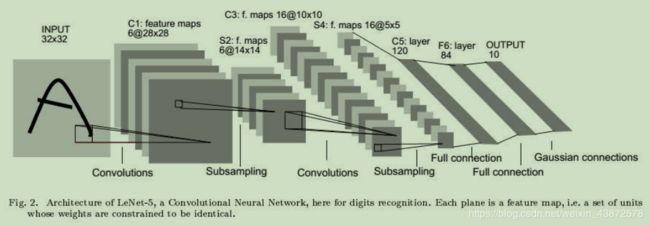
LeNet-5共有7层,不包含输入,每层都包含可训练参数;每个层有多个Feature Map,每个FeatureMap通过一种卷积滤波器提取输入的一种特征,然后每个FeatureMap有多个神经元。
- INPUT层-输入层
输入图像的尺寸统一归一化为: 32 x 32。 - C1层 卷积层
输入图片:32 x 32
卷积核大小:5 x 5
卷积核种类:6
输出featuremap大小:28 x 28 (32-5+1)=28
神经元数量:28 x 28 x 6
可训练参数:(5 x 5+1) x 6(每个滤波器5 x 5=25个unit参数和一个bias参数,一共6个滤波器)
连接数:(5 x 5+1) x 6 x 28 x 28=122304 - S2层 池化层(下采样层)
输入:28 x 28
采样区域:2 x 2
采样方式:4个输入相加,乘以一个可训练参数,再加上一个可训练偏置。结果通过sigmoid
采样种类:6
输出featureMap大小:14 x14(28/2)
神经元数量:14 x 14 x 6
可训练参数:2 x 6(和的权+偏置)
连接数:(2 x 2+1) x 6 x 14 x 14
S2中每个特征图的大小是C1中特征图大小的1/4。 - C3层 卷积层
- S4层 池化层(下采样层)
- C5层 卷积层
- F6层 全连接层
输入:c5 120维向量
计算方式:计算输入向量和权重向量之间的点积,再加上一个偏置,结果通过sigmoid函数输出。
可训练参数:84 x (120+1)=10164 - output层 全连接层
Output层也是全连接层,共有10个节点,分别代表数字0到9,且如果节点i的值为0,则网络识别的结果是数字i。采用的是径向基函数(RBF)的网络连接方式。假设x是上一层的输入,y是RBF的输出,则RBF输出的计算方式是:

上式w_ij 的值由i的比特图编码确定,i从0到9,j取值从0到7 x 12-1。RBF输出的值越接近于0,则越接近于i,即越接近于i的ASCII编码图,表示当前网络输入的识别结果是字符i。该层有84x10=840个参数和连接。
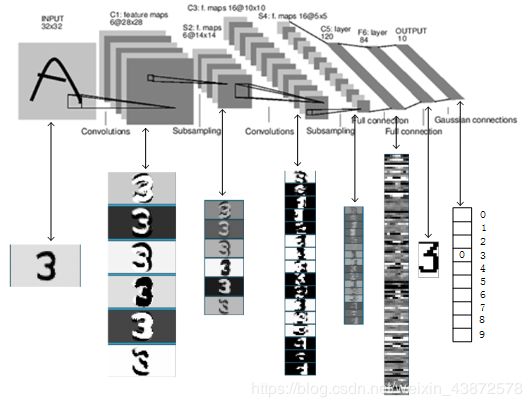
下面基于PyTorch实现LeNet
#coding=utf-8
import torch
import torch.nn as nn
import torch.nn.functional as F
from torch.autograd import Variable

class Net(nn.Module):
    #定义Net的初始化函数,这个函数定义了该神经网络的基本结构
    def __init__(self):
        super(Net, self).__init__()
		#复制并使用Net的父类的初始化方法,即先运行nn.Module的初始化函数
        self.conv1 = nn.Conv2d(1, 6, 5)
		# 定义conv1函数的是图像卷积函数:输入为图像(1个频道,即灰度图),输出为 6张特征图, 卷积核为5x5正方形
        self.conv2 = nn.Conv2d(6, 16, 5)
		# 定义conv2函数的是图像卷积函数:输入为6张特征图,输出为16张特征图, 卷积核为5x5正方形
        self.fc1   = nn.Linear(16*5*5, 120)
		# 定义fc1(fullconnect)全连接函数1为线性函数:y = Wx + b,并将16*5*5个节点连接到120个节点上。
        self.fc2   = nn.Linear(120, 84)
		#定义fc2(fullconnect)全连接函数2为线性函数:y = Wx + b,并将120个节点连接到84个节点上。
        self.fc3   = nn.Linear(84, 10)
		#定义fc3(fullconnect)全连接函数3为线性函数:y = Wx + b,并将84个节点连接到10个节点上。

    #定义该神经网络的向前传播函数,该函数必须定义,一旦定义成功,向后传播函数也会自动生成(autograd)
    def forward(self, x):
        x = F.max_pool2d(F.relu(self.conv1(x)), (2, 2))
		#输入x经过卷积conv1之后,经过激活函数ReLU,使用2x2的窗口进行最大池化Max pooling,然后更新到x。
        x = F.max_pool2d(F.relu(self.conv2(x)), 2)
		#输入x经过卷积conv2之后,经过激活函数ReLU,使用2x2的窗口进行最大池化Max pooling,然后更新到x。
        x = x.view(-1, self.num_flat_features(x))
		#view函数将张量x变形成一维的向量形式,总特征数并不改变,为接下来的全连接作准备。
        x = F.relu(self.fc1(x))
		#输入x经过全连接1,再经过ReLU激活函数,然后更新x
        x = F.relu(self.fc2(x))
		#输入x经过全连接2,再经过ReLU激活函数,然后更新x
        x = self.fc3(x)
		#输入x经过全连接3,然后更新x
        return x

    #使用num_flat_features函数计算张量x的总特征量(把每个数字都看出是一个特征,即特征总量),比如x是4*2*2的张量,那么它的特征总量就是16。
    def num_flat_features(self, x):
        size = x.size()[1:]
		# 这里为什么要使用[1:],是因为pytorch只接受批输入,也就是说一次性输入好几张图片,那么输入数据张量的维度自然上升到了4维。【1:】让我们把注意力放在后3维上面
        num_features = 1
        for s in size:
            num_features *= s
        return num_features


net = Net()
net

# 以下代码是为了看一下我们需要训练的参数的数量
print net
params = list(net.parameters())

k=0
for i in params:
    l =1
    print "该层的结构:"+str(list(i.size()))
    for j in i.size():
        l *= j
    print "参数和:"+str(l)
    k = k+l

print "总参数和:"+ str(k)
VGG
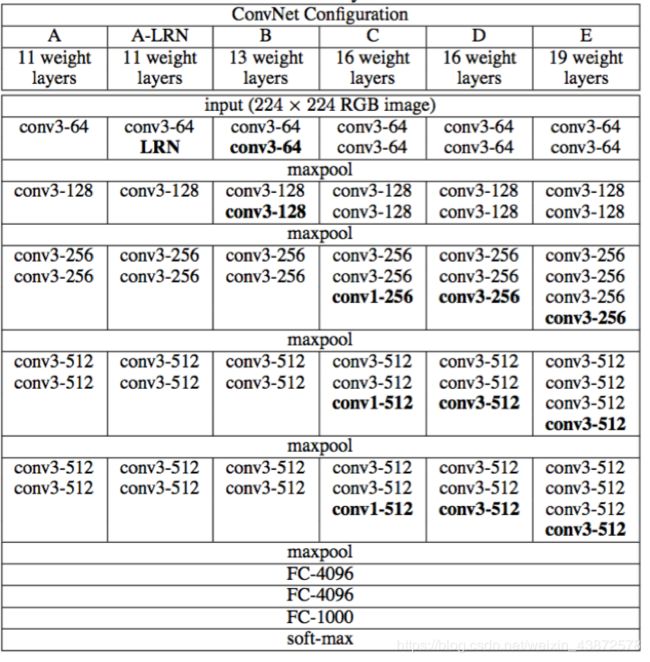
VGG结构图
VGG-16
Faster R-CNN用到了VGG-16
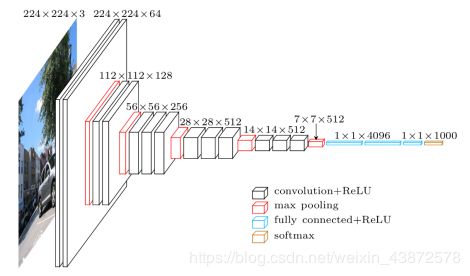
彩色图片输入到网络,白色框是卷积层,红色是池化,蓝色是全连接层,棕色框是预测层。预测层将全连接层输出的信息转化为相应的类别概率,而起到分类作用。
VGG16 是13个卷积层+3个全连接层叠加而成。
class Vgg16(torch.nn.Module):
    def __init__(self):
        super(Vgg16, self).__init__()
        self.conv1_1 = nn.Conv2d(3, 64, kernel_size=3, stride=1, padding=1)
        self.conv1_2 = nn.Conv2d(64, 64, kernel_size=3, stride=1, padding=1)

        self.conv2_1 = nn.Conv2d(64, 128, kernel_size=3, stride=1, padding=1)
        self.conv2_2 = nn.Conv2d(128, 128, kernel_size=3, stride=1, padding=1)

        self.conv3_1 = nn.Conv2d(128, 256, kernel_size=3, stride=1, padding=1)
        self.conv3_2 = nn.Conv2d(256, 256, kernel_size=3, stride=1, padding=1)
        self.conv3_3 = nn.Conv2d(256, 256, kernel_size=3, stride=1, padding=1)

        self.conv4_1 = nn.Conv2d(256, 512, kernel_size=3, stride=1, padding=1)
        self.conv4_2 = nn.Conv2d(512, 512, kernel_size=3, stride=1, padding=1)
        self.conv4_3 = nn.Conv2d(512, 512, kernel_size=3, stride=1, padding=1)

        self.conv5_1 = nn.Conv2d(512, 512, kernel_size=3, stride=1, padding=1)
        self.conv5_2 = nn.Conv2d(512, 512, kernel_size=3, stride=1, padding=1)
        self.conv5_3 = nn.Conv2d(512, 512, kernel_size=3, stride=1, padding=1)

    def forward(self, X):
        h = F.relu(self.conv1_1(X))
        h = F.relu(self.conv1_2(h))
        relu1_2 = h
        h = F.max_pool2d(h, kernel_size=2, stride=2)

        h = F.relu(self.conv2_1(h))
        h = F.relu(self.conv2_2(h))
        relu2_2 = h
        h = F.max_pool2d(h, kernel_size=2, stride=2)

        h = F.relu(self.conv3_1(h))
        h = F.relu(self.conv3_2(h))
        h = F.relu(self.conv3_3(h))
        relu3_3 = h
        h = F.max_pool2d(h, kernel_size=2, stride=2)

        h = F.relu(self.conv4_1(h))
        h = F.relu(self.conv4_2(h))
        h = F.relu(self.conv4_3(h))
        relu4_3 = h

        return [relu1_2, relu2_2, relu3_3, relu4_3]
Jianwei Yang 大神 Faster R-CNN中的vgg16 code
import torch
import torch.nn as nn
import torch.nn.functional as F
from torch.autograd import Variable
import math
import torchvision.models as models
from model.faster_rcnn.faster_rcnn import _fasterRCNN
import pdb

class vgg16(_fasterRCNN):
  def __init__(self, classes, pretrained=False, class_agnostic=False):
    self.model_path = 'data/pretrained_model/vgg16_caffe.pth'
    self.dout_base_model = 512
    self.pretrained = pretrained
    self.class_agnostic = class_agnostic

    _fasterRCNN.__init__(self, classes, class_agnostic)

  def _init_modules(self):
    vgg = models.vgg16()
    if self.pretrained:
        print("Loading pretrained weights from %s" %(self.model_path))
        state_dict = torch.load(self.model_path)
        vgg.load_state_dict({k:v for k,v in state_dict.items() if k in vgg.state_dict()})

    vgg.classifier = nn.Sequential(*list(vgg.classifier._modules.values())[:-1])

    # not using the last maxpool layer
    self.RCNN_base = nn.Sequential(*list(vgg.features._modules.values())[:-1])

    # Fix the layers before conv3:
    for layer in range(10):
      for p in self.RCNN_base[layer].parameters(): p.requires_grad = False

    # self.RCNN_base = _RCNN_base(vgg.features, self.classes, self.dout_base_model)

    self.RCNN_top = vgg.classifier

    # not using the last maxpool layer
    self.RCNN_cls_score = nn.Linear(4096, self.n_classes)

    if self.class_agnostic:
      self.RCNN_bbox_pred = nn.Linear(4096, 4)
    else:
      self.RCNN_bbox_pred = nn.Linear(4096, 4 * self.n_classes)

  def _head_to_tail(self, pool5):

    pool5_flat = pool5.view(pool5.size(0), -1)
    fc7 = self.RCNN_top(pool5_flat)

    return fc7
ResNet
使用了一种连接方式叫做“shortcut connection”,差不多就是抄近道的意思。
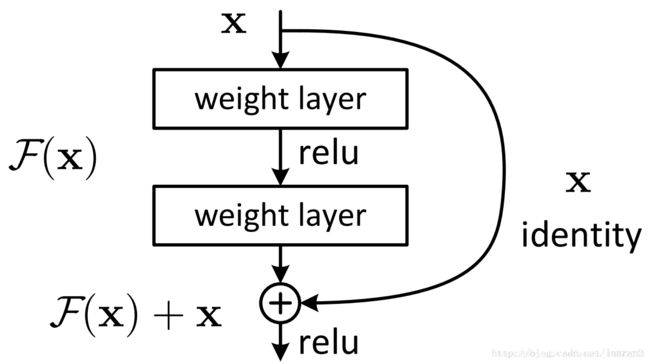
在论文中有两种ResNet设计
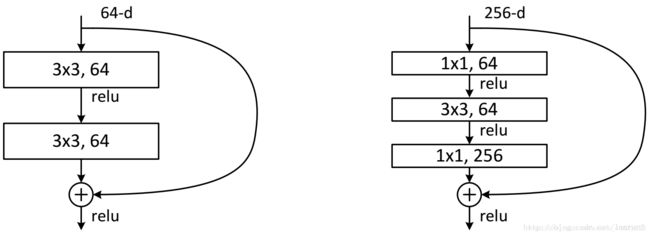
这两种结构分别针对ResNet34(左图)和ResNet50/101/152(右图),一般称整个结构为一个”building block“。其中右图又称为”bottleneck design”,目的一目了然,就是为了降低参数的数目,第一个1x1的卷积把256维channel降到64维,然后在最后通过1x1卷积恢复,整体上用的参数数目:1x1x256x64 + 3x3x64x64 + 1x1x64x256 = 69632,而不使用bottleneck的话就是两个3x3x256的卷积,参数数目: 3x3x256x256x2 = 1179648,差了16.94倍。
ResNet有以下几种结构
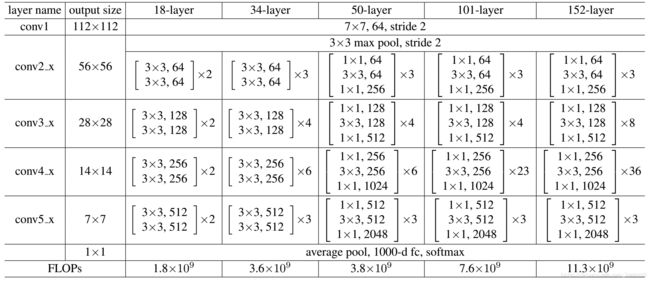
Faster R-CNN基于ResNet101取得了很好的效果。
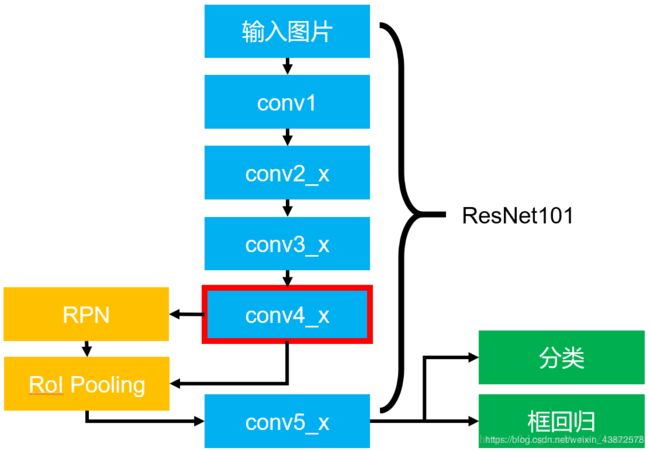
上图Faster R-CNN架构,其中蓝色的部分为ResNet101,可以发现conv4_x的最后的输出为RPN和RoI Pooling共享的部分,而conv5_x(共9层网络)都作用于RoI Pooling之后的一堆特征图(14 x 14 x 1024),特征图的大小维度也刚好符合原本的ResNet101中conv5_x的输入(ref: https://blog.csdn.net/lanran2/article/details/79057994)。
Jianwei Yang 大神 Faster R-CNN中的ResNet code
class ResNet(nn.Module):
  def __init__(self, block, layers, num_classes=1000):
    self.inplanes = 64
    super(ResNet, self).__init__()
    self.conv1 = nn.Conv2d(3, 64, kernel_size=7, stride=2, padding=3,
                 bias=False)
    self.bn1 = nn.BatchNorm2d(64)
    self.relu = nn.ReLU(inplace=True)
    self.maxpool = nn.MaxPool2d(kernel_size=3, stride=2, padding=0, ceil_mode=True) # change
    self.layer1 = self._make_layer(block, 64, layers[0])
    self.layer2 = self._make_layer(block, 128, layers[1], stride=2)
    self.layer3 = self._make_layer(block, 256, layers[2], stride=2)
    self.layer4 = self._make_layer(block, 512, layers[3], stride=2)
    # it is slightly better whereas slower to set stride = 1
    # self.layer4 = self._make_layer(block, 512, layers[3], stride=1)
    self.avgpool = nn.AvgPool2d(7)
    self.fc = nn.Linear(512 * block.expansion, num_classes)

    for m in self.modules():
      if isinstance(m, nn.Conv2d):
        n = m.kernel_size[0] * m.kernel_size[1] * m.out_channels
        m.weight.data.normal_(0, math.sqrt(2. / n))
      elif isinstance(m, nn.BatchNorm2d):
        m.weight.data.fill_(1)
        m.bias.data.zero_()

  def _make_layer(self, block, planes, blocks, stride=1):
    downsample = None
    if stride != 1 or self.inplanes != planes * block.expansion:
      downsample = nn.Sequential(
        nn.Conv2d(self.inplanes, planes * block.expansion,
              kernel_size=1, stride=stride, bias=False),
        nn.BatchNorm2d(planes * block.expansion),
      )

    layers = []
    layers.append(block(self.inplanes, planes, stride, downsample))
    self.inplanes = planes * block.expansion
    for i in range(1, blocks):
      layers.append(block(self.inplanes, planes))

    return nn.Sequential(*layers)

  def forward(self, x):
    x = self.conv1(x)
    x = self.bn1(x)
    x = self.relu(x)
    x = self.maxpool(x)

    x = self.layer1(x)
    x = self.layer2(x)
    x = self.layer3(x)
    x = self.layer4(x)

    x = self.avgpool(x)
    x = x.view(x.size(0), -1)
    x = self.fc(x)

    return x
(本文整合了看过的几篇涉及Faster R-CNN用到的网络以及PyTorch的博客)
reference:
-
https://github.com/jwyang/faster-rcnn.pytorch
-
https://www.cnblogs.com/duanhx/articles/9655228.html
-
https://www.jianshu.com/p/cde4a33fa129
-
https://blog.csdn.net/u014448054/article/details/80623514
-
https://blog.csdn.net/lanran2/article/details/79057994
