1 增加API接口服务
1.1 新增普通asp.net core 站点。
新增XxxxController在任一接口方法头加Authorize并指定角色。
 1 [Authorize(Roles = "FreeUser,Admin")]
 2
 3 [HttpGet]
 4
 5 public IActionResult Get()
 6
 7 {
 8
 9     return new JsonResult(from c in User.Claims select new { c.Type, c.Value });
10
11 }
1.2 启动项配置
1.2.1 在Startup.ConfigureServices方法中添加如下内容:
 1 // 添加权限验证
 2
 3 services.AddMvcCore()
 4
 5     .AddAuthorization()
 6
 7     .AddJsonFormatters();
 8
 9 // 添加认证配置
10
11 services.AddAuthentication(JwtBearerDefaults.AuthenticationScheme)
12
13 .AddIdentityServerAuthentication(options =>
14
15 {
16
17     options.Authority = "https://localhost:5001"; // 认证站点地址
18
19     options.RequireHttpsMetadata = false;
20
21     options.ApiName = "api1";
22
23     options.RoleClaimType = JwtClaimTypes.Role;
24
25 });
26
27 // 配置跨站
28
29 services.AddCors(options =>
30
31 {
32
33     // this defines a CORS policy called "default"
34
35     options.AddPolicy("default", policy =>
36
37     {
38
39         policy.WithOrigins("https://localhost:5007") // JS站点服务
40
41             .AllowAnyHeader()
42
43             .AllowAnyMethod();
44
45     });
46
47 });
1.2.2 启动项配置Startup.Configure方法中添加如下内容:
1 app.UseCors("default");
2
3 app.UseAuthentication();
4
5 app.UseMvc();
2 添加Js客户端
新建js项目,请参考官方文档(https://identityserver4.readthedocs.io/en/release/quickstarts/7_javascript_client.html)
2.1 安装依赖
oidc-client。
2.2 新增Html如下:
DOCTYPE html>
<html>
<head>
    <meta charset="utf-8" />
    <title>title>
head>
<body>
    <button id="login">Loginbutton>
    <button id="api">Call APIbutton>
    <button id="logout">Logoutbutton>
    <pre id="results">pre>
    <script src="oidc-client.js">script>
    <script src="app.js">script>
body>
html>
2.3 app.js内容如下:
  1 function log() {
  2
  3     document.getElementById('results').innerText = '';
  4
  5
  6
  7     Array.prototype.forEach.call(arguments, function (msg) {
  8
  9         if (msg instanceof Error) {
 10
 11             msg = "Error: " + msg.message;
 12
 13         }
 14
 15         else if (typeof msg !== 'string') {
 16
 17             msg = JSON.stringify(msg, null, 2);
 18
 19         }
 20
 21         document.getElementById('results').innerHTML += msg + '\r\n';
 22
 23     });
 24
 25 }
 26
 27
 28
 29 document.getElementById("login").addEventListener("click", login, false);
 30
 31 document.getElementById("api").addEventListener("click", api, false);
 32
 33 document.getElementById("logout").addEventListener("click", logout, false);
 34
 35
 36
 37 var config = {
 38
 39     authority: "https://localhost:5001", // 认证服务器
 40
 41     client_id: "js",
 42
 43     redirect_uri: "https://localhost:5007/callback.html", // 当前JS站点
 44
 45     response_type: "id_token token",
 46
 47     scope:"openid profile api1",
 48
 49     post_logout_redirect_uri : "https://localhost:5007/index.html", // 当前JS站点
 50
 51 };
 52
 53 var mgr = new Oidc.UserManager(config);
 54
 55 mgr.getUser().then(function (user) {
 56
 57     if (user) {
 58
 59         log("User logged in", user.profile);
 60
 61     }
 62
 63     else {
 64
 65         log("User not logged in");
 66
 67     }
 68
 69 });
 70
 71
 72
 73 function login() {
 74
 75     mgr.signinRedirect();
 76
 77 }
 78
 79
 80
 81 function api() {
 82
 83     mgr.getUser().then(function (user) {
 84
 85         var url = "https://localhost:5003/identity"; // 要访问的API接口站
 86
 87
 88
 89         var xhr = new XMLHttpRequest();
 90
 91         xhr.open("GET", url);
 92
 93         xhr.onload = function() {
 94
 95             log(xhr.status, JSON.parse(xhr.responseText));
 96
 97         };
 98
 99         xhr.setRequestHeader("Authorization", "Bearer " + user.access_token);
100
101         xhr.send();
102
103     });
104
105 }
106
107
108
109 function logout() {
110
111     mgr.signoutRedirect();
112
113 }
2.4 新增回调页面如下:
 1 DOCTYPE html>
 2
 3 <html>
 4
 5 <head>
 6
 7     <meta charset="utf-8" />
 8
 9     <title>JS客户端回调页面title>
10
11 head>
12
13 <body>
14
15     <script src="oidc-client.js">script>
16
17     <script>
18
19         new Oidc.UserManager().signinRedirectCallback().then(function () {
20
21             window.location = "index.html";
22
23         }).catch(function (e) {
24
25             console.error(e);
26
27         });
28
29     script>
30
31 body>
32
33 html>
3 安装配置IdentityServerAdmin服务
使用模板创建项目,源码地址(https://github.com/IdentityServer/IdentityServer4.Templates)。
3.1 安装模板
dotnet new -i identityserver4.templates
3.2 创建项目
3.2.1 新增目录
mkdir UserCenter
cd UseCenter
3.2.2 使用模板生成项目
dotnet new is4admin
打开项目,并运行。
配置角色
配置用户
设置用户角色
新增受保护资源
需要在声明中添加role。
新增JS客户端配置
配置URL
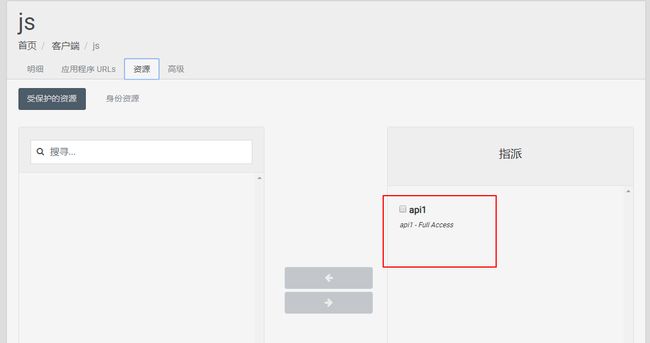
添加可访问的资源


