Processes and Threads
Processes and Threads Android Developer page
在 Android 系统中,默认情况下一个应用的所有组件都运行在一个相同的进程(process)和线程(thread)中,这个线程叫做主线程(main thread)。当一个应用存在已经运行的组件(component)时,再启动新的组件,默认情况下新的 component 将会在相同的进程和线程中运行.
当然,我们也可以安排不同的 component 运行在单独的 processes 中,也可以为 process 添加额外的 thread.
Processes
默认情况下,同一个 app 的所以 components 都运行在相同的 process 中。对于大部分应用,我们这样做就足够了,如果我们需要控制某个特定的 component 所属的进程,那么我们可以在 manifest file 中来更改。
在 manifest 中,每一个 component 元素,包括 android:process 指定这个 component 应该运行在哪个进程中。不同应用的组件可以通过设置这个属性来运行在同意个进程中,这样可以使不同的应用共享相同的 Linux user ID,使用相同的证书。
android:process 属性,用来指定所有 components 的默认值。
Threads
当应用启动后,系统创建一个叫做 main 的线程。这个线程非常重要,因为它控制着将包括绘制事件在内的事件(events)发送到合适的交互控件中。这个线程通常是应用和 Android UI toolkit(components from the android.widget and android.view package) 进行交互的进程,因此 the main thread 也有时被称作 the UI thread。当然,在一些特殊情况下,一个应用的主进程可能也不是其 UI 进程。
系统并不会为每个控件的实例创建单独的线程,所有的控件都会在 UI 线程中实例化,对于每一个控件的系统调用也都是通过这个线程。通常,相应系统调用的方法都会运行在 UI 线程中。
比如,当用户在屏幕上触摸一个 Button 的位置时,应用的 UI 进程将 touch event 发送到相应控件,反过来,相应的控件设置其为按下的状态,向事件队列发送一个取消的请求。UI 进程取消请求并且通知控件应当重新绘制。
当所有工作都在 UI 线程中,需要长时间的那些操作,比如网络访问和数据库查询,将会阻塞整个 UI 线程。当线程被阻塞,事件将不会被派发,包括绘制的事件。从用户的角度看,应用表现为卡顿。更糟的是,如果 UI 线程被阻塞超过一段时间(目前大概是 5 秒),用户将被提示 ANR 对话 “application not responding”。用户可能会选择停止应用或者不愉快的卸载应用。
注意:
Android UI toolkit 不是线程安全的,所以,严禁在工作线程处理 UI 工作,所有的 UI 操作都必须在 UI 线程中完成。
- Do not block the UI thread
- Do not access the Android UI toolkit from outside the UI thread
Work threads
因为单一线程模式下有诸多问题,你不能阻塞 UI 线程,如果你有一些非及时的操作,你就必须确保这些操作运行在单独的线程中(被称为后台线程或工作线程,"background" or "worker" threads)。
仍然要切记,不能在非 UI 线程中更新 UI。Android 提供了几种从其他线程访问 UI 线程的方法。
- Activity.runOnUiThread(Runnable)
- View.post(Runnable)
- View.postDelayed(Runnable, long)
下面的代码使用
public void onClick(View v) {
    new Thread(new Runnable() {
        public void run() {
            // a potentially  time consuming task
            final Bitmap bitmap =
                    processBitMap("image.png");
            mImageView.post(new Runnable() {
                public void run() {
                    mImageView.setImageBitmap(bitmap);
                }
            });
        }
    }).start();
}
Using AsyncTask
AsyncTask 用来方便的处理多线程的问题。AsyncTask 适合于短期的一次性任务。并不能完美完成所有异步任务。
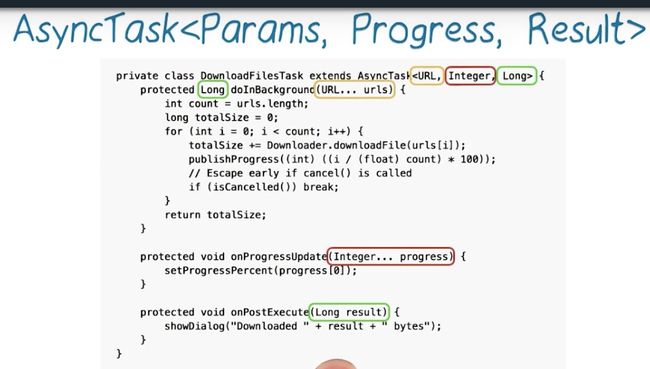
使用 AsyncTask,需要继承 AsyncTask 并且实现 doInBackground() 方法,来完成 background 工作。
实现 onPostExecute() 方法来处理 doInBackground() 的结果,这个函数在 UI 线程中运行,所以可以安全的更新 UI。
通过在 UI 线程中调用 execute() 方法来运行这段异步任务。
The 4 steps:
-
onPreExecute(), 在 UI 线程中执行,用来设置任务,例如,用来显示进度条。 -
doInBackground(Params...), 在 background 线程中执行,在onPreExecute()执行完成后被调用。 -
onProgressUpdate(Progress...), 在 UI 线程中执行,可以在doInBackground()方法中通过publishProgress(Progress...)调用。用来更新 UI,例如更新进度条。 -
onPostExecute(Result), 在 UI 线程中执行,会获得doInBackground方法所返回的结果。
AsyncTask's generic types:
-
Params, the type of the parameters sent to the task upon execution. -
Progress, the type of the progress units published during the background computation. -
Result, the type of the result of the background computation.
Not all types are always used by an asynchronous task. To mark a type as unused, simply use the type Void.
Threading rules
- The AsyncTask class must be loaded on the UI thread.
- The Task instance must be created on the UI thread.
-
execute(Params...)must be invoked on the UI thread. - Do not call
onPreExecute(),onPostExecute(Result),doInBackground(Params...),onProgressUpdate(Progress...)manually. - The task can be executed only once.
Limitations of ASyncTask
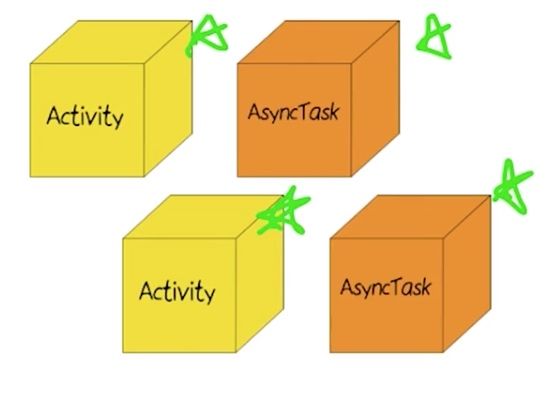
假设有这样的一个场景,当你的应用启动初始的 Activity, 然后启动了 AsyncTask,进行了 Http 请求操作,在操作完成之前,旋转手机,为了正确显示,系统会重新绘制我们的 Activity, 理想的操作应该是销毁旧的活动,将原先旧活动上的 AsyncTask 转移到新的 Activity 上执行。但是 AsyncTask 是怎么运行的呢?在新创建 Activity 时,会新创建一个 AsyncTask 并且进行 HTTP 请求。系统想要销毁旧的 Activity 但是由于旧的 AsyncTask 还没有完成所以无法销毁,但是旧的 AsyncTask 已经没有意义了,因为其执行获取的数据我们不会显示在屏幕上,是无意义的操作。这样造成了巨大的资源浪费。
Others
- AsyncTask: Helps get work on/off the UI thread.
- HandlerThread: Dedicated thread for API callbacks.
- ThreadPool: Running lots of parallel work.
- IntentService: Helps get intents off the UI thread.
Loaders
Loader 可以在 Activity 或 Fragment 中异步加载数据。 Loader 的特征有:
- Loader 运行在单独的线程中,不会阻塞 UI 线程。
- Loader 简化了线程管理,通过相应事件发生时的回调函数。
- Loader 在设置改变时保持并缓存结果,以免重复请求。
- Loader 可以实现 observer 去监视数据源的变化。比如,
CursorLoader可以自动注册一个ContentObserver,当数据变化时,触发重新加载事件。
Loader 的三个相关类:
- LoaderManager
- LoaderManager.LoaderCallbacks
- Loader
在 Android 应用中如何使用 Loaders
Start a Loader
LoaderManager 管理一个或多个 Loader 实例,在一个 Activity 或 Fragment 中,只能有一个 LoadManager。
通常我们在一个 activity 的 onCreate() 方法或者一个 fragment 的 onActivityCreated() 方法中初始化一个 Loader。通过以下的方式:
// Prepare the loader. Either re-connect with an existing one,
// or start a new one.
getLoaderManager().initLoader(0, null, this);
initLoader() 的参数介绍:
- 一个唯一区分 Loader 的 ID。
- 额外的参数。
-
LoaderManager.LoaderCallbacks的实现。LoaderManager会调用他的回调函数来报告 loader 的相关事件。在这个例子中,我们在当前类中实现了这个接口,所以我们使用this。
initLoader() 保证了一个 loader 被初始化并且被激活. 这个方法的调用有两种情况:
- 如果所指定的 ID 已经存在, 那么最后一次创建的 Loader 将会被重用.
- 如果所指定的 ID 不存在,那么
initLoader()将会出发LoaderManager.LoaderCallbacks中的方法onCreateLoader来初始化 Loader.
initLoader() 返回一个 Loader 实例但是我们不用去获取它, LoaderManager 将会自动管理它的生命周期. 所以, 我们很少直接与 Loader 进行交互,我们通常通过 LoaderManager.LoaderCallbacks 中的方法来交互.
Restarting a Loader
有时候, 我们想要抛弃掉旧的数据重新开始一个新的 Loader. 这时, 我们可以使用 restartLoader().
public boolean onQueryTextChanged(String newText) {
    // Called when the action bar search text has changed.  Update
    // the search filter, and restart the loader to do a new query
    // with this filter.
    mCurFilter = !TextUtils.isEmpty(newText) ? newText : null;
    getLoaderManager().restartLoader(0, null, this);
    return true;
}
Using the LoaderManager Callbacks
LoaderManager.LoaderCallbacks 是回调接口,可以使客户同 LoaderManager 进行交互.
LoaderManager.LoaderCallbacks 包含以下方法:
-
onCreateLoader(): 在新建 Loader 对象的时候调用,返回一个 Loader 对象. -
onLoadFinished(): 在 load 任务完成时调用. -
onLoaderReset(): 当前 loader 被重置, 其数据不再有效时调用, 我们应当在此时释放相关资源.
    @Override
    public Loader> onCreateLoader(int id, Bundle args) {
        Log.d(TAG, "TEST: onCreateLoader() method is called");
        return new EarthquakeLoader(this, URL_ADDRESS);
    }

    @Override
    public void onLoadFinished(Loader> loader, List data) {
        // this means that we fetched new data from the server.
        // 1. we clear the old data
        // 2. we set new data, the data may be empty
        // 3. make the spinner invisible
        // 4. set empty text view
        Log.d(TAG, "TEST: onLoadFinished() method is called");
        mAdapter.clear();
        if (data != null && !data.isEmpty()) {
            mAdapter.addAll(data);
        }
        mLoadingSpinnner.setVisibility(View.INVISIBLE);
        mEmptyStateTextView.setText(R.string.no_earthquakes);
    }

    @Override
    public void onLoaderReset(Loader> loader) {
        // the data we hold is out of data, we clear the data.
        Log.d(TAG, "TEST: OnLoaderReset() method is called");
        mAdapter.clear();
    }
AsyncTaskLoader
我们上面介绍了关于 Loader 的管理, 我们下面介绍一个具体的 Loader, AsyncTaskLoader.
AsyncTaskLoader 使用 AsyncTask 来执行工作. 当我们使用 AsyncTaskLoader 时, 我们需要继承他并且至少重写方法 loadInBackground, 这个方法是用来执行用户的任务的.
概括来说,Loader有两大生命周期: active 和 inactive,即活动状态和非活动状态。这一点在LoaderManager的源码中体现的很直观: LoaderManager内部有两个数组mLoaders和mInactiveLoaders,其中mLoaders存储着所有处于active状态的Loader,mInactiveLoaders存储着所有处于inactive状态的Loader。
细分来说,Loader的active状态又分为 started 状态和stopped 状态,即启动状态和停止状态,注意,stopped 状态也是 active 生命周期的。Loader的inactive状态又分为 abandoned 状态和 reseted 状态,即废弃状态和重置状态,其中 abandoned 状态表明 Loader 现在已经废弃了,过段时间也会被重置,reseted 状态表明该 Loader 完全被销毁重用了。Loader活跃度从高到低依次为 started -> stopped -> abandoned -> reseted,这也对应着 Loader 的四个生命周期,Loader 处于 started 状态时最活跃, Loader 处于 reseted 状态时完全不活跃。实际上,处于 stopped 状态的 Loader 也有可能再次转变为 started 状态,所以我们要稍将上面 started 到 stopped 之间单向箭头改为双向箭头,即Loader准确的生命周期应该是 started <-> stopped -> abandoned -> reseted。
启动任务流程:
- 如果没有我们的对象, 那么
LoaderManager调用onCreateLoader(), 我们在onCreateLoader会调用我们需要的 Loader 的constructor, 返回相应的 Loader 对象. - 如果有了 Loader 对象, 系统会调用
startLoading()方法, 进入 started 状态.startLoading()方法中, 会调用onStartLoading()方法. 我们可以重写onStartLoading()方法来实现我们的逻辑. - 我们可以在重写的
onStartLoading方法中调用forceLoad()方法, 这是一种调用forceLoad()的方法, 总之, 这个方法我们必须调用, 不然后台不会执行. Loader.forceLoad( ) -> AsyncTaskLoader.onForceLoad( ), 在 AsyncTaskLoader 的onForceLoad()方法中, 进行后台线程的运行, 执行loadInBackground()中的内容. - 在异步线程执行完后, 会调用
onLoadFinished()中的内容, 可以在这里更新 UI. - 在合适的时机, LoaderManager 会调用
stopLoading()方法, 进入 stopped 状态. 在stopLoading()方法中, 会调用onStopLoading()方法, 我们可以重写该方法来实现我们的逻辑. - 在需要清除数据的时候调用
onLoaderReset,reset(),onReset()方法.
About UI
Empty state of ListView
有时候, 我们可能没有获取到的数据, 比如在邮箱 app 中, 我们的收信箱是空的, 或者我们的通讯录一开始处于空的状态. 那么我们如果让列表处于空白状态, 对用户不是一个好的交互状态, Android 的开发者们为我们考虑到了这一点, 所以提供了方便的解决方案.
- 第一步, 我们需要在 ListView 的父视图中, 添加一个子视图, 就是我们想要在 ListView 空白的时候, 所显示的内容.
- 然后, 我们在
onCreate()中通过ListView.setEmptyView()来设置空状态的显示内容. - 需要注意的是, 我们可以看到有很多应用, 在刚启动的时候, 空白页面会一闪而过, 这是因为, 我们应用获取数据是异步获取, 那么, 刚启动应用的时候并没有获取数据, 就会默认显示空白屏, 那么, 我们可以通过设置空白屏的可见性 (Visibility), 启动时先将其设为不可见, 在异步进程中, 获取数据完成的回调函数中, 我们再将其设为可见.
ProgressBar
在加载数据的过程中, 我们最好显示应用的进度, 以给用户以好的体验. 我们可以使用 ProgressBar 来实现. 有两种基本的进度条:
Network state
Include Permission
检查网络状态:
// 检测网络状态
ConnectivityManager connectivityManager = (ConnectivityManager) getSystemService(Context.CONNECTIVITY_SERVICE);
NetworkInfo networkInfo = connectivityManager.getActiveNetworkInfo();
boolean isConnected = networkInfo != null && networkInfo.isConnectedOrConnecting();

