yolo使用笔记
1、安装
https://pjreddie.com/darknet/install/
2、调用gpu
3、整理数据集
图片:
坐标:
train.txt 和 test.txt
分类,voc.mane
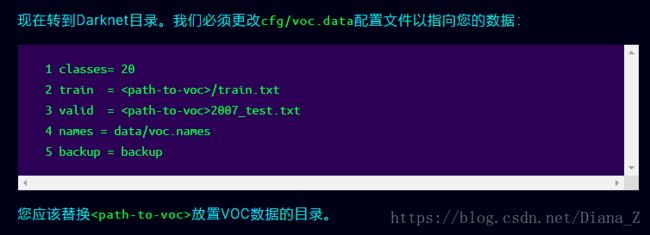
可以自己新建一个*.data文件,在里面按行输入分类名称
4、修改cfg文件
data文件,其中路径斗勇绝对路径,生成的数据模型保存在backup中
net文件:我使用的是下图的网络配置文件
参数修改以及意义:
参考:https://blog.csdn.net/lzglzj20100700/article/details/81096986
https://blog.csdn.net/hrsstudy/article/details/65447947
https://blog.csdn.net/yangdashi888/article/details/78032545
https://blog.csdn.net/qq_33485434/article/details/80907040
[net]
# Testing
# batch=1
# subdivisions=1
# Training
# batch=64         每batch个样本更新一次参数。
batch=1024
subdivisions=16    会将batch/subdivisions命名为batch
width=416          输入图片的宽高
height=416
channels=3         图片输入的通道数量
momentum=0.9
decay=0.0005       权重衰减正则项,防止过拟合
angle=0            通过旋转角度来生成更多训练样本
# saturation = 1.5   通过调整饱和度来生成更多训练样本
saturation = 0
# exposure = 1.5     通过调整曝光量来生成更多训练样本
exposure = 0
# hue=.1             通过调整色调来生成更多训练样本
hue=0

learning_rate=0.001   初始学习率
burn_in=1000
max_batches = 50000   训练达到max_batches后停止学习
policy=steps          调整学习率的策略,有:CONSTANT, STEP, EXP, POLY, STEPS, SIG, RANDOM
# steps=40000,45000     根据batch_num调整学习率
# scales=.1,.1          学习率变化的比例,累计相乘
steps=30000,45000
scales=.1,.1
'''
step,scales:这两个是组合一起的,举个例子:learn_rate: 0.001, step:100,25000,35000   scales: 10, .1, .1 这组数据的意思就是在0-100次iteration期间learning rate为原始0.001,在100-25000次iteration期间learning rate为原始的10倍0.01,在25000-35000次iteration期间learning rate为当前值的0.1倍,就是0.001, 在35000到最大iteration期间使用learning rate为当前值的0.1倍,就是0.0001。随着iteration增加,降低学习率可以是模型更有效的学习,也就是更好的降低train loss。
'''

[convolutional]
batch_normalize=1     是否做BN
filters=32            输出多少个特征图
size=3                卷积核的尺寸
stride=1              做卷积运算的步长
pad=1
activation=leaky      激活函数

***************************
[shortcut]                          ?
from=-3
activation=linear

**************************
[convolutional]
size=1
stride=1
pad=1
filters=18                将最后一个[convolutional]中的filte通过计算得到,与anchor个数有关
                          filters=(classes + 5)* (NUM),5的意义是5个坐标,论文中的tx,ty,tw,th,to
activation=linear

[yolo]
mask = 6,7,8
anchors = 10,13,  16,30 ……  预选框,可以手工挑选,也可以通过k means 从训练样本中学出
classes=1                   网络需要识别的物体种类数
num=3                       每个grid cell预测几个box,和anchors的数量一致
jitter=.3                   通过抖动增加噪声来抑制过拟合
softmax=1                   使用softmax做激活函数
ignore_thresh = .5			决定是否需要计算IOU误差的参数,大于thresh,IOU误差不会夹在cost function中
truth_thresh = 1
random=1                    如果设置为1的话,就是在训练的时候每一batch图片会随便改成320-640

[route]
layers = -4                这是指用当前层减去9得到的那一层来进行特征组合

[upsample]
stride=2                  把上面得到大分辨率的特征图以什么方式组合到当前层,成为当前层的特征
5、进行训练
首先根据推荐下载了预训练权重
然后根据命令运行训练
./darknet detector train cfg/.data cfg/.cfg -gpus 0,1,2,3 其中.data为我们修改的cfg中的data文件,4中第一个
其中
如果不用gpu就不用写最后-gpus 0,1,2,3
如果gpu不是4个,就按实际个数调用
如果预设权重的名字不叫darknet53.conv.74,就按实际换上
其中<>表示内容根据实际修改,使用的代码中不用加上
5、训练
训练过程中的log参数详解:
https://blog.csdn.net/dcrmg/article/details/78565440
Region 82 Avg IOU:
Region 94 Avg IOU:
Region 106 Avg IOU:
的详解:https://blog.csdn.net/qq_33444963/article/details/80842179
6、可视化:
https://blog.csdn.net/yudiemiaomiao/article/details/72469135
记录终端打印内容到log
之后的代码我没有运行成功,所以自己写了一个log文件读取:
#!/usr/bin/env python
# -*- coding: utf-8 -*-
# @File  : log_tidy.py
# @Author: DianaZhang
# @Date  : 18-10-11

import re

fs=open('../log/person_train_log.txt','r')
log_txt=fs.readlines()
fs.close()
count_epoch=0
count_step=1
name_list=['Avg IOU:','Class:','Obj:','No Obj:','.5R:','.75R:','count:']
key_list=[':','avg','rate','seconds','images']
for log_line in log_txt:
    if ':' in log_line:
        word_list = log_line.split(' ')
        if word_list[0]=='Region':
            dig=int(word_list[1])
            comma_list=log_line.split(',')
            data_list=[]
            for i in range(7):
                if name_list[i] in comma_list[i]:
                    data_list.append(comma_list[i].split(name_list[i])[1])
                else:
                    print('err:{}\n'.format(log_line))
            with open('../log/Region_{}.txt'.format(dig), 'a') as fs:
                fs.write('{} {} {}'.format(count_epoch,count_step,' '.join([x for x in data_list])))
                count_step=count_step+1
            fs.close()
        elif len(re.sub('\D','',word_list[0]))>0:
            count_epoch = re.sub('\D', '', word_list[0])
            count_step = 1

            comma_list = log_line.split(',')
            data_list = []
            data_list.append(comma_list[0].split(':')[1])

            for i in range(1,5):
                if key_list[i] in comma_list[i]:
                    data_list.append(comma_list[i].split(key_list[i])[0])
                else:
                    print('err:{}\n'.format(log_line))
            with open('../log/epoch.txt'.format(dig), 'a') as fs:
                fs.write('{} {}\n'.format(count_epoch,' '.join([x for x in data_list])))
            fs.close()


print(1)
完了之后会得到epoch.txt和Region_XX.txt两种txt,Region后面的数字可能会不同。
epoch.txt
Region.txt
7、测试
修改python里面的ducknet.py文件完成识别
if __name__ == "__main__":
    # 修改训练模型使用的cfg文件,data文件,以及训练得到的backup结尾的模型
    net = load_net(b"../cfg/yolo-origin.cfg", b"../backup/yolo-origin.backup", 0)
    meta = load_meta(b"../cfg/voc.data")

    path_out1 = 'E:\darknet\yanzheng_cut_1'# 存裁剪图
    path_out2 = 'E:\darknet\yanzheng_draw_1' # 存画框图
    if not os.path.exists(path_out1):
        os.mkdir(path_out1)
    if not os.path.exists(path_out2):
        os.mkdir(path_out2)

    path = 'E:\darknet\yanzheng_1' # 原图地址
    img_list = os.listdir(path)
    img_list.sort()
    count = 0
    for img_name in img_list:
        img_paht = '{}/{}'.format(path, img_name)
        # 检测
        results = detect(net, meta, bytes(img_paht, encoding="utf8"))
        # 读取图片,之后将在图片上做处理
        img = cv2.imread(img_paht)
        image = img.copy()
        # 输出识别结果,并处理结果
        print(results)
        if len(results) > 0:
            cat, score, bounds = results[0]
            x, y, w, h = bounds

            # 裁剪
            pts1 = np.float32([[int(x - w / 2), int(y - h / 2)], [int(x + w / 2), int(y - h / 2)],
                               [int(x - w / 2), int(y + h / 2)], [int(x + w / 2), int(y + h / 2)]])
            cutw = int(w)
            cuth = int(h)
            pts2 = np.float32([[0, 0], [cutw, 0], [0, cuth], [cutw, cuth]])
            M = cv2.getPerspectiveTransform(pts1, pts2)
            res = cv2.warpPerspective(img, M, (cutw, cuth))

            # 画框
            cv2.rectangle(image, (int(x - w / 2), int(y - h / 2)), (int(x + w / 2), int(y + h / 2)), (255, 0, 0), thickness=2)
            # 标注标签
            cv2.putText(image, str(cat.decode("utf-8")), (int(x), int(y)), cv2.FONT_HERSHEY_COMPLEX, 1, (255, 255, 0))

            # 保存图片
            cv2.imwrite('{}/{}'.format(path_out2, img_name), image)
            cv2.imwrite('{}/{}'.format(path_out1, img_name), res)


