RabbitMQ实现延时队列
首先我先介绍一下延时队列的应用场景,延迟队列存储的对象是对应的延迟消息,所谓"延迟消息"是指当消息被发送以后,并不想让消费者立刻拿到消息,而是等待特定时间后,消费者才能拿到这个消息进行消费。
延迟队列的使用场景有很多,比如:
在订单系统中, 个用户下单之后通常有 分钟的时间进行支付,如果 30 分钟之内没有支付成功,那么这个订单将进行异常处理,这时就可以使用延迟队列来处理这些订单了
用户希望通过手机远程遥控家里的智能设备在指定的时间进行工作。这时候就可以将用户指令发送到延迟队列,当指令设定的时间到了再将指令推送到智能设备
在AMQP协议中,或者RabbitMQ本身没有直接支持延迟队列的功能,但是可以通过配置死信队列和设置消息或队列的过期时间来模拟出延迟队列的功能。
在我个人文章里面实现死信队列的代码里其实已经隐约的体现了这一点,当我们将消息设置过期时间后,靠过期时间来触发死信队列将消息扔给替补队列进行处理的这个过程就是实现延迟队列。
在真实应用中,对于延迟队列可以根据延迟时间的长短分为多个等级,一般分为 秒、 10秒、 30 秒、 1分钟、 5分钟、 10 分钟、 30 分钟、 小时这几个维度,当然也可以再细化 下。
首先介绍一下两种对消息设置过期的方法
消息过期
1.对消息设置过期
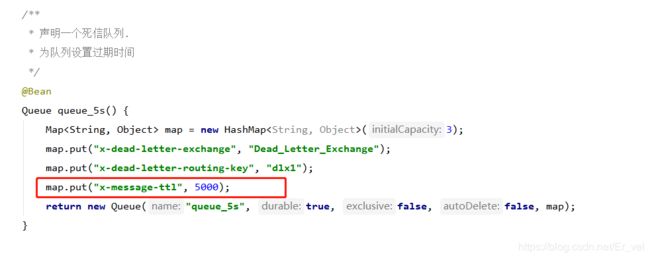
2.对队列设置消息过期
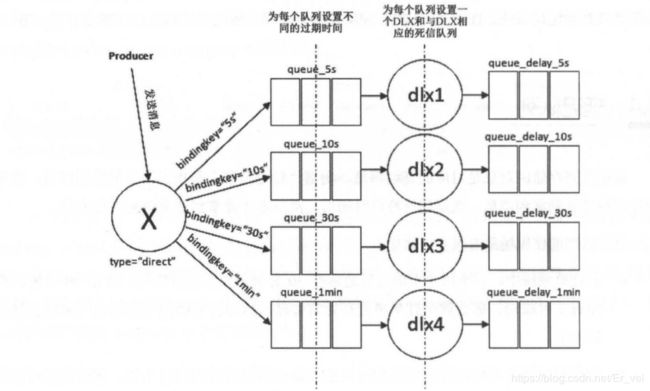
为了简化说明,这里只设置了 5秒、 10 秒、 30 秒、 1分钟这四个等级。根据应用需求的不同,生产者在发送消息的时候通过设置不同的路由键,以此将消息发送到与交换器绑定的不同的队列中。这里队列分别设置了过期时间为 5秒、 10 秒、 30 秒、 1分钟,同时也分别配置了 DLX 和相应的死信队列。当相应的消息过期时,就会转存到相应的死信队列(即延迟队列〉中,这样消费者根据业务自身的情况,分别选择不同延迟等级的延迟队列进行消费
代码如下:
/**
 * @Description: 消息队列配置类
 * @Author: zw
 */
@Configuration
public class RabbitConfig {


    /**
     * 死信队列跟交换机类型没有关系  不影响该类型交换机的特性.
     */
    @Bean
    DirectExchange deadLetterExchange() {
        return new DirectExchange("Dead_Letter_Exchange");
    }

    /**
     * 声明一个死信队列.
     * 为队列设置过期时间
     */
    @Bean
    Queue queue_5s() {
        Map map = new HashMap(3);
        map.put("x-dead-letter-exchange", "Dead_Letter_Exchange");
        map.put("x-dead-letter-routing-key", "dlx1");
        map.put("x-message-ttl", 5000);
        return new Queue("queue_5s", true, false, false, map);
    }

    /**
     * 死信路由通过 5s 绑定键绑定到死信队列上.
     */
    @Bean
    public Binding queue_5sBinding() {
        return new Binding("queue_5s", Binding.DestinationType.QUEUE, "Dead_Letter_Exchange", "5s", null);
    }

    /**
     * 定义死信队列转发队列.
     */
    @Bean
    public Queue queue_delay_5s() {
        return new Queue("queue_delay_5s");
    }

    @Bean
    public Binding queue_delay_5sBinding() {
        return new Binding("queue_delay_5s", Binding.DestinationType.QUEUE, "Dead_Letter_Exchange", "dlx1", null);
    }


    /**
     * 声明一个死信队列.
     * 为队列设置过期时间
     */
    @Bean
    Queue queue_10s() {
        Map map = new HashMap(3);
        map.put("x-dead-letter-exchange", "Dead_Letter_Exchange");
        map.put("x-dead-letter-routing-key", "dlx2");
        map.put("x-message-ttl", 10000);
        return new Queue("queue_10s", true, false, false, map);
    }

    /**
     * 死信路由通过 10s 绑定键绑定到死信队列上.
     */
    @Bean
    public Binding queue_10sBinding() {
        return new Binding("queue_10s", Binding.DestinationType.QUEUE, "Dead_Letter_Exchange", "10s", null);
    }

    /**
     * 定义死信队列转发队列.
     */
    @Bean
    public Queue queue_delay_10s() {
        return new Queue("queue_delay_10s");
    }

    @Bean
    public Binding queue_delay_10sBinding() {
        return new Binding("queue_delay_10s", Binding.DestinationType.QUEUE, "Dead_Letter_Exchange", "dlx2", null);
    }

    /**
     * 声明一个死信队列.
     * 为队列设置过期时间
     */
    @Bean
    Queue queue_30s() {
        Map map = new HashMap(3);
        map.put("x-dead-letter-exchange", "Dead_Letter_Exchange");
        map.put("x-dead-letter-routing-key", "dlx3");
        map.put("x-message-ttl", 30000);
        return new Queue("queue_30s", true, false, false, map);
    }

    /**
     * 死信路由通过 30s 绑定键绑定到死信队列上.
     */
    @Bean
    public Binding queue_30sBinding() {
        return new Binding("queue_30s", Binding.DestinationType.QUEUE, "Dead_Letter_Exchange", "30s", null);
    }

    /**
     * 定义死信队列转发队列.
     */
    @Bean
    public Queue queue_delay_30s() {
        return new Queue("queue_delay_30s");
    }

    @Bean
    public Binding queue_delay_30sBinding() {
        return new Binding("queue_delay_30s", Binding.DestinationType.QUEUE, "Dead_Letter_Exchange", "dlx3", null);
    }


    /**
     * 声明一个死信队列.
     * 为队列设置过期时间
     */
    @Bean
    Queue queue_60s() {
        Map map = new HashMap(3);
        map.put("x-dead-letter-exchange", "Dead_Letter_Exchange");
        map.put("x-dead-letter-routing-key", "dlx4");
        map.put("x-message-ttl", 60000);
        return new Queue("queue_60s", true, false, false, map);
    }

    /**
     * 死信路由通过 30s 绑定键绑定到死信队列上.
     */
    @Bean
    public Binding queue_60sBinding() {
        return new Binding("queue_60s", Binding.DestinationType.QUEUE, "Dead_Letter_Exchange", "60s", null);
    }

    /**
     * 定义死信队列转发队列.
     */
    @Bean
    public Queue queue_delay_60s() {
        return new Queue("queue_delay_60s");
    }

    @Bean
    public Binding queue_delay_60sBinding() {
        return new Binding("queue_delay_60s", Binding.DestinationType.QUEUE, "Dead_Letter_Exchange", "dlx4", null);
    }

}
消费者:
/**
 * author:zw
 */
@Component
public class RabbitMQConsumer {
    @RabbitListener(queues = "queue_delay_5s")
    public void delay_5s_lisener(Message msg, Channel channel) throws IOException {
        System.out.println("进入queue_delay_5s时间为" + new Date().toLocaleString());
        if (null != msg && null != msg.getBody() && 0 != msg.getBody().length) {
            channel.basicAck(msg.getMessageProperties().getDeliveryTag(), false);//消息确认
            System.out.println("消息确认");
        }
    }

    @RabbitListener(queues = "queue_delay_10s")
    public void delay_10s_lisener(Message msg, Channel channel) throws IOException {
        System.out.println("进入queue_delay_10s时间为" + new Date().toLocaleString());
        if (null != msg && null != msg.getBody() && 0 != msg.getBody().length) {
            channel.basicAck(msg.getMessageProperties().getDeliveryTag(), false);//消息确认
            System.out.println("消息确认");
        }
    }

    @RabbitListener(queues = "queue_delay_30s")
    public void delay_30s_lisener(Message msg, Channel channel) throws IOException {
        System.out.println("进入queue_delay_30s时间为" + new Date().toLocaleString());
        if (null != msg && null != msg.getBody() && 0 != msg.getBody().length) {
            channel.basicAck(msg.getMessageProperties().getDeliveryTag(), false);//消息确认
            System.out.println("消息确认");
        }
    }

    @RabbitListener(queues = "queue_delay_60s")
    public void delay_60s_lisener(Message msg, Channel channel) throws IOException {
        System.out.println("进入queue_delay_60s时间为" + new Date().toLocaleString());
        if (null != msg && null != msg.getBody() && 0 != msg.getBody().length) {
            channel.basicAck(msg.getMessageProperties().getDeliveryTag(), false);//消息确认
            System.out.println("消息确认");
        }
    }
}
发送端代码如下,这里我们使用传入的age参数来达到调用不同消息的发送方法
/**
 * author:zw
 */
@Component
public class RabbitMQSender implements RabbitTemplate.ConfirmCallback, RabbitTemplate.ReturnCallback {

    private static final Logger logger = LoggerFactory.getLogger(RabbitMQSender.class);
    @Autowired
    RabbitTemplate rabbitTemplate;

    @PostConstruct
    public void init() {
        rabbitTemplate.setConfirmCallback(this);
        rabbitTemplate.setReturnCallback(this);
    }

    public void sendDirectMsg(Object msg) {
        CorrelationData correlationData = new CorrelationData(UUID.randomUUID().toString());
        System.out.println("消息id" + correlationData.getId());
        Map map = (HashMap) msg;
        if (Integer.parseInt(map.get("age").toString()) == 5) {
            System.out.println("发送5s延时队列" + new Date().toLocaleString());
            rabbitTemplate.convertAndSend("Dead_Letter_Exchange", "5s", msg, correlationData);
        } else if (Integer.parseInt(map.get("age").toString()) == 10) {
            System.out.println("发送10s延时队列" + new Date().toLocaleString());
            rabbitTemplate.convertAndSend("Dead_Letter_Exchange", "10s", msg, correlationData);
        } else if (Integer.parseInt(map.get("age").toString()) == 30) {
            System.out.println("发送30s延时队列" + new Date().toLocaleString());
            rabbitTemplate.convertAndSend("Dead_Letter_Exchange", "30s", msg, correlationData);
        } else if (Integer.parseInt(map.get("age").toString()) == 60) {
            System.out.println("发送60s延时队列" + new Date().toLocaleString());
            rabbitTemplate.convertAndSend("Dead_Letter_Exchange", "60s", msg, correlationData);
        }
    }
}
观察结果
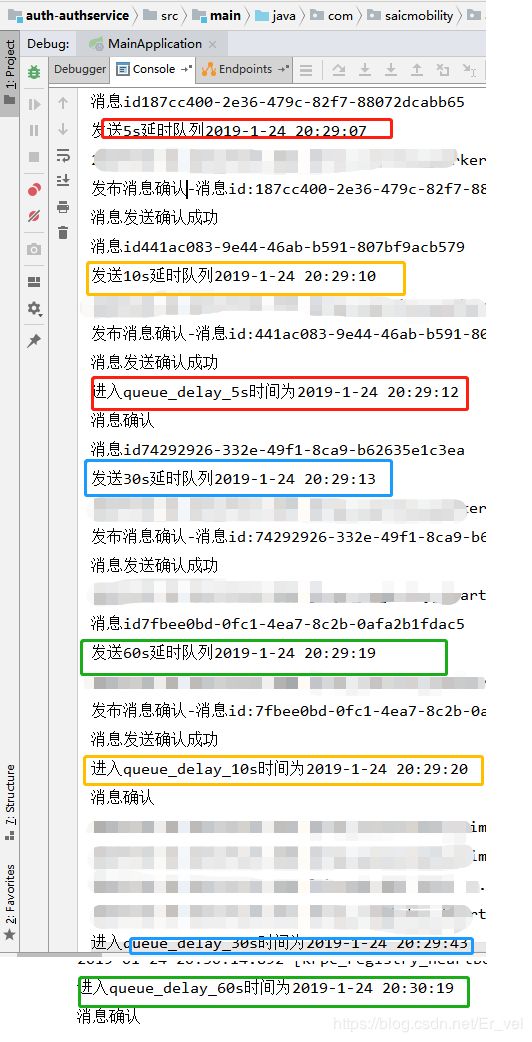
由图可见设置不同队列的消息过期时间可以将往这个队列发的消息模拟出延时重新投递的功能,以上就是延时队列的演示。


