一.流程说明
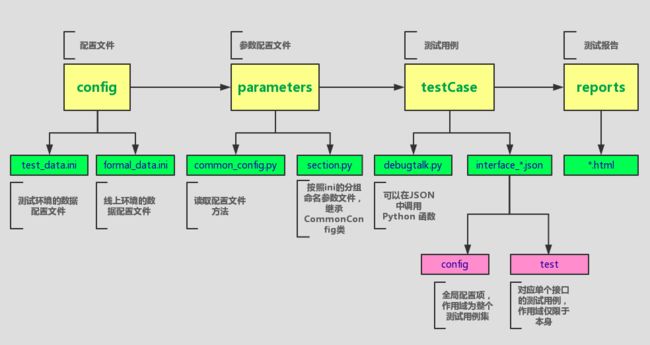
二.配置config
1. 为什么要配置?
在接口测试过程中,会有好多参数需要指定,如果没有一个统一的配置文件的话,数据会散落在各个测试用例中,后期维护的时候特别浪费时间。
为了解决这个问题,我们增加了一个配置文件,python自带的有一个配置文件的模块为-ConfigParser,支持动态配置数据。
在测试过程中,为了区分测试环境和正式环境的数据,我们配置了两套文件,其中test_data.ini为测试环境的数据文件,formal_data.ini为正式环境的数据。
2. 如何配置?
2.1 ini文件配置格式
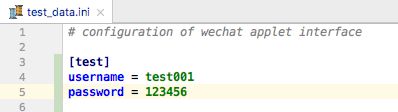
解释说明:
[test]:为分组的名称,不区分大小写,不要与其他分组名称重复;一个分组下可以配置多个数据信息,注意不要重名
username = test001: 为test组下的数据信息
password = 123456:也是test组下的数据信息,不要与同分组下的数据信息重名
2.2 读取ini配置文件
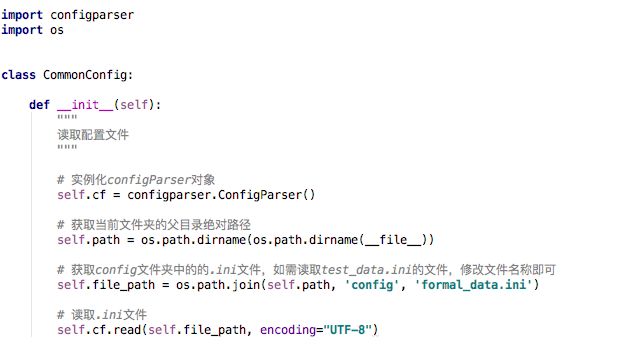
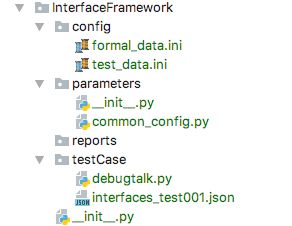
文件位置:wechatInterfaceTestCases--parameters--common_config.py
读取方法:
from parameters.common_config import CommonConfig


class Common(CommonConfig):

    def test_useranme(self):
        """
        读取配置文件中的test分组中的username
        :return:
        """
        return self.cf.get("test", "username")
三.增加参数文件,获取参数信息
1. 为什么要有参数文件?
参数文件是为了提取ini文件中的数据,参数文件对应ini配置文件的分组信息,比如公共数据[test],对应test.py文件;test组下面的的username和password,对应common.py的username和password方法。
如果直接把所有的数据存放到一个文件中,那这个文件会非常庞大,如果遇到不同分组下的同名数据,还会导致debugtalk调用的时候出现混乱的情况。
像这样分开设计,可以更方便、直接的查找和调用自己需要的数据。
2. 如何增加参数文件?
ini文件中,当在某个分组下增加数据的时候,就需要在对应的配置文件下增加相应的获取参数信息方法;当新增一个分组的时候,就要创建一个参数文件,并增加获取参数信息相应的方法。
配置位置:参数文件统一放置在parameters文件下
文件命名规则:一般为ini文件中的分组名称,例如:test.py
方法命名规则:一般为ini中分组下的数据名称,例如:username
3. 如何获取参数信息?
"""
获取参数信息
:author: test
"""

from parameters.common_config import CommonConfig


class Test(CommonConfig):

    def username(self):
        """
        用户名
        :return:
        """
        return self.cf.get("test", "username")

    def password(self):
        """
        密码
        :return:
        """
        return self.cf.get("test", "password")
文件中要增加注释,首先是顶部注释,注明文件的主要内容;其次是方法的注释,注释此方法的内容。
四.debugtalk
1. 什么是debugtalk?
文档中是这样说明的:
HttpRunner 的实现方式为,支持热加载的插件机制(debugtalk.py),可以在 YAML/JSON 中调用 Python 函数。具体地做法,我们可以在测试用例文件的同级或其父级目录中创建一个 debugtalk.py 文件,然后在其中定义相关的函数和变量。
2. 如何使用debugtalk?
例如,我们需要一个获取ini文件test分组中的username方法,可以定义一个test_useranme函数
from parameters.test import Test

test = Test()

def test_useranme():
    """
    获取test分组下的用户名
    :return:
    """
    return test.username()
然后,我们在 JSON 测试用例文件中,就可以对定义的函数进行调用,对定义的变量进行引用了。引用变量的方式仍然与前面讲的一样,采用$ + 变量名称的方式;调用函数的方式为${func($var)}。
"variables": [
  {"username": "${test_username()}"}
]
五.编写用例
1. 测试用例组织形式
在 HttpRunner 中,测试用例组织主要基于两种概念(在不考虑用例分层概念的情况下):
测试用例集(testset):单个或多个测试用例的集合,存储形式为一个 JSON 文件
测试用例(testcase):单次请求、响应、校验过程,对应 JSON 文件中的一个 test
对于单个 JSON 文件来说,数据存储结构为 list of dict 的形式,其中可能包含一个全局配置项(config)和若干个测试用例(test);测试用例存在顺序关系,运行时将从前往后依次运行。
[
  {
    "config": {...}
  },
  {
    "test": {...}
  }
]
config:作为整个测试用例集的全局配置项
test:对应单个测试用例
2.用例组织结构
config:
{
        "config": {
            "name": "小程序自考圈接口自动化脚本",
            "variables": [
                {"openId":"${self_test_circle_openId()}"},
                {"msgContent":"${self_test_circle_msgContent()}"},
                {"zkTopicId":"${self_test_circle_zkTopicId()}"},
                {"zkPersonId":"${self_test_circle_zkPersonId()}"}
            ],
            "request": {
                "base_url": "${base_url()}",
                "headers":{
                    "mobile_type":"${mobile_type()}",
                    "Accept-Encoding":"${header_Accept_Encoding()}",
                    "User-Agent":"${header_User_Agent()}",
                    "Connection":"${header_Connection()}"
                }
            }
        }
    }
name:测试用例集的名称,在测试报告中将作为标题
variables:定义的全局变量,作用域为整个用例集;在本测试框架中,测试用例集中用到的所有变量,统一放在config中的variables下,test只调用,不再定义新的变量;目的是直接明了的知道该测试用例集下有多少个变量被使用了,也方便后续的修改和优化
request:request 的公共参数,作用域为整个用例集
base_url:测试用例集请求 URL 的公共 host,指定该参数后,test 中的 url 可以只描述 path 部分
headers:request 中 headers 的公共参数,作用域为整个用例集;headers中的信息可以使用fiddler或者charles录制出来,一般需要指定Accept-Encoding、User-Agent、Connection;其他参数可以自己选择是否需要。
test:
{
        "test": {
            "name": "22.2  自考百科问题列表api-问题类型-正常情况",
            "parameters":[
                {"type":["1", "2"]}
            ],
            "request": {
                "url": "/wechat/wiki/questionByType",
                "method": "GET",
                "params":{
                    "type":"$type"
                }
            },
            "extract": [
                {"status_code22_2": "status_code"}
            ],
            "validate": [
                {"eq": ["status_code", 200]},
                {"eq": ["headers.Content-Type",
                        "application/json;charset=UTF-8"]},
                {"eq": ["content.state", 1]},
                {"eq": ["content.alertMessage", "找到匹配数据。"]},
                {"eq": ["content.message", "obtain success."]},
                {"type_match": ["content.content", "dict"]},
                {"type_match": ["content.content.data", "list"]},
                {"type_match": ["content.content.data.0.id", "int"]},
                {"type_match": ["content.content.data.0.reportKey", "str"]},
                {"type_match": ["content.content.data.0.title", "str"]},
                {"type_match": ["content.content.data.0.totalTimes", "int"]},
                {"eq": ["content.content.data.0.type", "${str_transformt_int($type)}"]},
                {"type_match": ["content.content.descript", "str"]},
                {"type_match": ["content.content.total", "int"]},
                {"eq": ["content.content.type", "${str_transformt_int($type)}"]},
                {"eq": ["content.message", "obtain success."]}
            ]
        }
    }
name:测试用例的名称,在测试报告中将作为每一项测试的标题
parameters:测试用例中定义的参数列表,作用域为当前测试用例,用于实现对当前测试用例进行数据化驱动
request:HTTP 请求的详细内容
params:请求参数
extract:从当前 HTTP 请求的响应结果中提取参数,并保存到参数变量中(例如token),后续测试用例可通过$token的形式进行引用
validate:测试用例中定义的结果校验项,作用域为当前测试用例,用于实现对当前测试用例运行结果的校验
六.举例说明
步骤一:配置ini文件
目录位置:config/test_data.ini
test_data.ini文件:
[common]
base_url = https://www.sunlands.wang
openId = test0123456789

[header]
Accept-Encoding = gzip
User-Agent = Mozilla/5.0 (Linux; Android 7.1.1; OPPO R11 Build/NMF26X; wv) AppleWebKit/537.36 (KHTML, like Gecko) Version/4.0 Chrome/57.0.2987.132 MQQBrowser/6.2 TBS/043909 Mobile Safari/537.36 MicroMessenger/6.6.6.1300(0x26060636) NetType/WIFI Language/zh_CN MicroMessenger/6.6.6.1300(0x26060636) NetType/WIFI Language/zh_CN
content-type = application/x-www-form-urlencoded
content-type-two: application/json
Connection = Keep-Alive
mobile_type = android
步骤二:创建参数文件,调用ini中的数据
目录位置:parameters/header.py;parameters/common.py
创建header.py文件
"""
header参数文件
:author: author
"""

from parameters.common_config import CommonConfig


class Header(CommonConfig):

    def Accept_Encoding(self):
        """
        Accept_Encoding
        :return:
        """
        return self.cf.get("header", "Accept-Encoding")

    def User_Agent(self):
        """
        User_Agent
        :return:
        """
        return self.cf.get("header", "User-Agent")

    def content_type(self):
        """
        content_type
        :return:
        """
        return self.cf.get("header", "content-type")

    def content_type_two(self):
        """
        content_type_two
        :return:
        """
        return self.cf.get("header", "content-type-two")

    def Connection(self):
        """
        Connection
        :return:
        """
        return self.cf.get("header", "Connection")

    def mobile_type(self):
        """
        mobile_type
        :return:
        """
        return self.cf.get("header", "mobile_type")
创建common.py文件
"""
公共参数文件
:author: author
"""

from parameters.common_config import CommonConfig


class Common(CommonConfig):

    def base_url(self):
        """
        base_url
        :return:
        """
        return self.cf.get("common", "base_url")

    def openId(self):
        """
        微信openId
        :return:
        """
        return self.cf.get("common", "openId")
步骤三:debugtalk获取需要的测试数据
目录位置:testCase/debugtalk.py
debugtalk.py文件:
"""
httprunner支持热加载的插件机制,此函数供JSON测试用例文件调用

:author: author
"""

from parameters.common import Common
from parameters.header import Header


common = Common()
header = Header()

def base_url():
    """
    base_url
    :return:
    """
    return common.base_url()

def openId():
    """
    微信openId
    :return:
    """
    return common.openId()

def mobile_type():
    """
    终端类型
    :return:
    """
    return header.mobile_type()

def header_Accept_Encoding():
    """

    :return:
    """
    return header.Accept_Encoding()


def header_User_Agent():
    """

    :return:
    """
    return header.User_Agent()


def header_content_type():
    """

    :return:
    """
    return header.content_type()


def header_content_type_two():
    """

    :return:
    """
    return header.content_type_two()


def header_Connection():
    """

    :return:
    """
    return header.Connection()
步骤四:编写测试用例
目录位置:testCase/interface_test.json
创建interface_test.json文件
[
    {
        "config": {
            "name": "测试用户使用帮助相关接口自动化脚本",
            "variables":[
                {"openId":"${openId()}"}
            ],
            "request": {
                "base_url": "${base_url()}",
                "headers":{
                    "mobile_type":"${mobile_type()}",
                    "Accept-Encoding":"${header_Accept_Encoding()}",
                    "User-Agent":"${header_User_Agent()}",
                    "content-type":"${header_content_type_two()}",
                    "Connection":"${header_Connection()}"
                }
            }
        }
    },
    {
        "test": {
            "name": "获取是否弹出红包-正常情况",
            "request": {
                "url": "/wechat/getIsThongbao",
                "method": "GET",
                "params":{
                    "openId":"$openId"
                }
            },
            "extract": [
                {"status_code": "status_code"}
            ],
            "validate": [
                {"eq": ["status_code", 200]},
                {"eq": ["headers.Content-Type",
                        "application/json;charset=UTF-8"]},
                {"eq": ["content.state", 1]},
                {"eq": ["content.message", "success"]},
                {"type_match": ["content.content.flag", "int"]}
            ]
        }
    },
    {
        "test": {
            "name": "获取上一个test提取的status_code并检查",
            "request": {
                "url": "/wechat/getIsThongbao",
                "method": "GET"
            },
            "validate": [
                {"eq": ["$status_code", 200]}
            ]
        }
    }
]
步骤五:运行测试用例
运行测试用例的命令为hrun,后面直接指定测试用例文件的路径即可
hrun testCase/interface_test.json

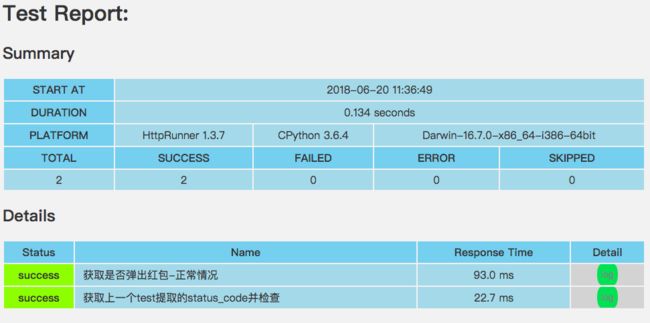
步骤六:查看测试报告
目录位置:report/*.html
七. 参考网址:
HttpRunner中文使用手册:http://cn.httprunner.org/
httprunner中validate的比较方法总结:https://www.jianshu.com/p/0367fb6ab5a2