基于YOLOv3+Kalman-Filter实现Multi-target tracking
本文以kears-yolov3做detector,以Kalman-Filter算法做tracker,进行多人物目标追踪,其应用常见于客流量统计,行人追踪检测,可延伸至Fall Detection,Loitering Detection徘徊检测等项目。
自有数据集上,如何用keras最简单训练YOLOv3目标检测
应用举例:
这个可以看做多目标跟踪任务,图中追踪到三个行人,记录在视频左上方数字3.其他被检测到的物体不参与数字统计。
其实是一种比较简单的多目标追踪方式:detector+tracker,两者其实是相对独立的。 另外可以支持应用算法扩展,比如添加跌倒,徘徊,轨迹计算等算法。
这里的流程就是,图片经过detector,得到人体坐标框,然后计算中心点位置centers(x0,y0),将该centers(x0,y0)输入给追踪器,追踪器去学习(Update)并给出预测。 其中每一帧的图,tracker都会给出多条轨迹,每条轨迹都可能由若干个点组成:
来看一下常规的update里面发生了什么?(简单贴一下)
# 第一段
       cost = np.zeros(shape=(N, M))   # Cost matrix
       for i in range(len(self.tracks)):
           for j in range(len(detections)):
               try:
                   diff = self.tracks[i].prediction - detections[j]
                   distance = np.sqrt(diff[0][0]*diff[0][0] +
                                      diff[1][0]*diff[1][0])
                   cost[i][j] = distance
               except:
                   pass

# 第二段
row_ind, col_ind = linear_sum_assignment(cost)
新的一帧物体中心点centers给入之后,tracker与给出预测值prediction ,同时预测值与实际detections的距离去迭代匈牙利算法匹配(linear_sum_assignment)。
当然这套算法好处是在,可以任意组合比较好的detector/tracker算法,项目Smorodov/Multitarget-tracker中就是Opencv中的 face detector + Kalman filter multitarget tracker。 笔者引用的是项目:srianant/kalman_filter_multi_object_tracking中的KF算法。
项目准备:
1.环境配置:tensorflow-gpu 1.2.1 + python 3.5 +
2.YOLOV3: (Real-time Multi-person tracker using YOLO v3 and deep_sort with tensorflow)
Download YOLOv3 or tiny_yolov3 weights from YOLO website.Then convert the Darknet YOLO model to a Keras model.
python3 convert.py yolov3.cfg yolov3.weights model_data/yolo.h5那么在model_data文件夹下得到yolo.h5,这正是我们需要的keras model.详见源码3
笔者也提供一下转化之后的h5文件。
链接:https://pan.baidu.com/s/1ppQH_FEbYSHob2T7NQOVmg 提取码:e345
步骤为:
- 根据yolov3跑出结果
yolo_test.detect_image - 计算人物框的中心点
calc_center - 更新tracker,
trackerDetection
再来看看tracker里面的属性:
self.track_id = trackIdCount  # identification of each track object
self.KF = KalmanFilter()  # KF instance to track this object
self.prediction = np.asarray(prediction)  # predicted centroids (x,y)
self.skipped_frames = 0  # number of frames skipped undetected
self.trace = []  # trace path
track_id每个追踪物体的标识;prediction预测下一个点;trace轨迹点。
>>> tracker.tracks[0].trace
>>>[array([[116.],
        [491.]]), array([[135.],
        [570.]]), array([[142.],
        [597.]])]

>>>tracker.tracks[0].track_id
>>>100

>>>tracker.tracks[0].prediction
>>>array([[116.],
[491.]])详见源码1. 效果如开篇上图。
核心代码:
# -*- coding: utf-8 -*-
# 可用于客流量统计,行人检测跟踪
#from tracker import Tracker
import copy
import colorsys
import os,sys,argparse,random,time

project = 'keras-yolov3-KF-objectTracking'  # 工作项目根目录
sys.path.append(os.getcwd().split(project)[0] + project)

from timeit import default_timer as timer
import cv2
import numpy as np
from keras import backend as K
from keras.models import load_model
from keras.layers import Input
from PIL import Image, ImageFont, ImageDraw

from yolo3.model import yolo_eval, yolo_body, tiny_yolo_body
from yolo3.utils import letterbox_image
from keras.utils import multi_gpu_model
from yolo_matt import YOLO, detect_video

from tqdm import tqdm
from scipy import misc

from objecttracker.KalmanFilterTracker import Tracker  # 加载卡尔曼滤波函数

def calc_center(out_boxes,out_classes,out_scores,score_limit = 0.5):
    outboxes_filter = []
    for x,y,z in zip(out_boxes,out_classes,out_scores):
        if z > score_limit:
            if y == 0: # 0:person ,coco_classes.txt
                outboxes_filter.append(x)

    centers= []
    number = len(outboxes_filter)
    for box in outboxes_filter:
        top, left, bottom, right = box
        center=np.array([[(left+right)//2],[(top+bottom)//2]])
        centers.append(center)
    return centers,number


def get_colors_for_classes(num_classes):
    """Return list of random colors for number of classes given."""
    # Use previously generated colors if num_classes is the same.
    if (hasattr(get_colors_for_classes, "colors") and
            len(get_colors_for_classes.colors) == num_classes):
        return get_colors_for_classes.colors

    hsv_tuples = [(x / num_classes, 1., 1.) for x in range(num_classes)]
    colors = list(map(lambda x: colorsys.hsv_to_rgb(*x), hsv_tuples))
    colors = list(
        map(lambda x: (int(x[0] * 255), int(x[1] * 255), int(x[2] * 255)),
            colors))
    #colors = [(255,99,71) if c==(255,0,0) else c for c in colors ]  # 单独修正颜色,可去除
    random.seed(10101)  # Fixed seed for consistent colors across runs.
    random.shuffle(colors)  # Shuffle colors to decorrelate adjacent classes.
    random.seed(None)  # Reset seed to default.
    get_colors_for_classes.colors = colors  # Save colors for future calls.
    return colors

def trackerDetection(tracker,image,centers,number,max_point_distance = 30,max_colors = 20,track_id_size = 0.8):
    '''
        - max_point_distance为两个点之间的欧式距离不能超过30
            - 有多条轨迹,tracker.tracks;
            - 每条轨迹有多个点,tracker.tracks[i].trace
        - max_colors,最大颜色数量
        - track_id_size,每个
    '''
    #track_colors = [(255, 0, 0), (0, 255, 0), (0, 0, 255), (255, 255, 0),
    #            (0, 255, 255), (255, 0, 255), (255, 127, 255),
    #            (127, 0, 255), (127, 0, 127)]
    track_colors = get_colors_for_classes(max_colors)

    result = np.asarray(image)
    font = cv2.FONT_HERSHEY_SIMPLEX
    cv2.putText(result, str(number), (20,  40), font, 1, (0, 0, 255), 5)  # 左上角,人数计数

    if (len(centers) > 0):
        # Track object using Kalman Filter
        tracker.Update(centers)
        # For identified object tracks draw tracking line
        # Use various colors to indicate different track_id
        for i in range(len(tracker.tracks)):
            # 多个轨迹
            if (len(tracker.tracks[i].trace) > 1):
                x0,y0 = tracker.tracks[i].trace[-1][0][0],tracker.tracks[i].trace[-1][1][0]
                cv2.putText(result,str(tracker.tracks[i].track_id),(int(x0),int(y0)),font,track_id_size,(255, 255, 255),4)
                # (image,text,(x,y),font,size,color,粗细)
                for j in range(len(tracker.tracks[i].trace) - 1):
                    #每条轨迹的每个点
                    # Draw trace line
                    x1 = tracker.tracks[i].trace[j][0][0]
                    y1 = tracker.tracks[i].trace[j][1][0]
                    x2 = tracker.tracks[i].trace[j + 1][0][0]
                    y2 = tracker.tracks[i].trace[j + 1][1][0]
                    clr = tracker.tracks[i].track_id % 9
                    distance = ((x2 - x1)** 2 + (y2 - y1)**2)**0.5
                    if distance <  max_point_distance:
                        cv2.line(result, (int(x1), int(y1)), (int(x2), int(y2)),
                                 track_colors[clr], 4)
    return tracker,result


def main(yolo_test):
    # Definition of the parameters

    path = "video_demo/tracking.avi"
    tracker = Tracker(100, 8, 15, 100)

    writeVideo_flag = True

    cap = cv2.VideoCapture(path) # path
    n = 0
    if writeVideo_flag:
        # Define the codec and create VideoWriter object
        w = int(cap.get(cv2.CAP_PROP_FRAME_WIDTH))
        h = int(cap.get(cv2.CAP_PROP_FRAME_HEIGHT))
        fourcc = cv2.VideoWriter_fourcc(*'MJPG')
        out = cv2.VideoWriter('output.avi', fourcc, 15, (w, h))

    fps = 0.0
    while True:
        ret, frame = cap.read()  # frame shape 640*480*3
        if ret != True:
            break
        t1 = time.time()

        image = Image.fromarray(frame)
        r_image, out_boxes, out_scores, out_classes = yolo_test.detect_image(image)
        print("box_num:",len(out_boxes))

        #print(out_classes)

        centers, number = calc_center(out_boxes, out_classes, out_scores, score_limit=0.6)
        tracker, result = trackerDetection(tracker, r_image, centers, number, max_point_distance=20)


        cv2.imshow('', result)

        if writeVideo_flag:
            # save a frame
            out.write(result)

        fps = (fps + (1. / (time.time() - t1))) / 2
        print("fps= %f" % (fps))

        # Press Q to stop!
        if cv2.waitKey(1) & 0xFF == ord('q'):
            break

    print('Down!')
    cap.release()
    if writeVideo_flag:
        out.release()
    cv2.destroyAllWindows()


if __name__ == '__main__':
    # 加载keras yolov3 voc预训练模型
    yolo_test_args = {
    "model_path": 'model_data/yolo.h5',
    "anchors_path": 'model_data/yolo_anchors.txt',
    "classes_path": 'model_data/coco_classes.txt',
    "score" : 0.3,
    "iou" : 0.45,
    "model_image_size" : (416, 416),
    "gpu_num" : 1,
    }


    yolo_test = YOLO(**yolo_test_args)
    main(yolo_test)


    '''
        解析方式一: 从视频保存成的图像文件中进行解析
        先把视频-> 拆分成图像文件夹,在文件夹中逐帧解析


    tracker = Tracker(100, 8, 15, 100)
    for n in tqdm(range(100)):
        image = Image.open('video_demo/video2jpg1/%s.jpg'%n)
        r_image,out_boxes, out_scores, out_classes = yolo_test.detect_image(image)
        centers,number = calc_center(out_boxes,out_classes,out_scores,score_limit = 0.5)
        tracker,result = trackerDetection(tracker,r_image,centers,number)
        misc.imsave('video_demo/jpg2video/%s.jpg'%n, result)
    '''

    '''
        解析方式二:视频流直接解析
        直接读取视频流,并保存在某一个文件夹之中

    # 视频 -> 图像
    path = "video_demo/tracking.avi"
    tracker = Tracker(100, 8, 15, 100)

    cap = cv2.VideoCapture(path)
    n = 0
    while(True):
        ret, frame = cap.read()
        if frame is None:
            break
        image = Image.fromarray(frame )
        r_image,out_boxes, out_scores, out_classes = yolo_test.detect_image(image)
        centers,number = calc_center(out_boxes,out_classes,out_scores,score_limit = 0.6)
        tracker,result = trackerDetection(tracker,r_image,centers,number,max_point_distance = 20)
        #misc.imsave('unilever/grom_pic/%s.jpg'%n, result)
        cv2.imwrite('video_demo/tracking/%s.jpg'%n,result, [int(cv2.IMWRITE_JPEG_QUALITY), 100] )
        n += 1
    print('Down!')

     '''

    '''
        辅助函数
        图像文件夹直接变为视频并保存

    # 图像 -> 视频
    def get_file_names(search_path):
        for (dirpath, _, filenames) in os.walk(search_path):
            for filename in filenames:
                yield filename#os.path.join(dirpath, filename)


    def save_to_video(output_path,output_video_file,frame_rate):
        list_files = sorted([int(i.split('_')[-1].split('.')[0]) for i in get_file_names(output_path)])
        # 拿一张图片确认宽高
        img0 = cv2.imread(os.path.join(output_path,'%s.jpg'%list_files[0]))
        #print(img0)
        height , width , layers =  img0.shape
        # 视频保存初始化 VideoWriter
        fourcc = cv2.VideoWriter_fourcc(*'mp4v')
        videowriter = cv2.VideoWriter(output_video_file,fourcc, frame_rate, (width,height))
        # 核心,保存的东西
        for f in list_files:
            f = '%s.jpg'%f
            #print("saving..." + f)
            img = cv2.imread(os.path.join(output_path, f))
            videowriter.write(img)
        videowriter.release()
        cv2.destroyAllWindows()
        print('Success save %s!'%output_video_file)
        pass

    # 图片变视频
    output_dir='video_demo/tracking/'
    output_path= os.path.join(output_dir, '')                       # 输入图片存放位置
    output_video_file = 'video_demo/tracking_100_8_6_100_optimization_fps20.mp4' # 输入视频保存位置以及视频名称
    save_to_video(output_path,output_video_file,20)
    '''
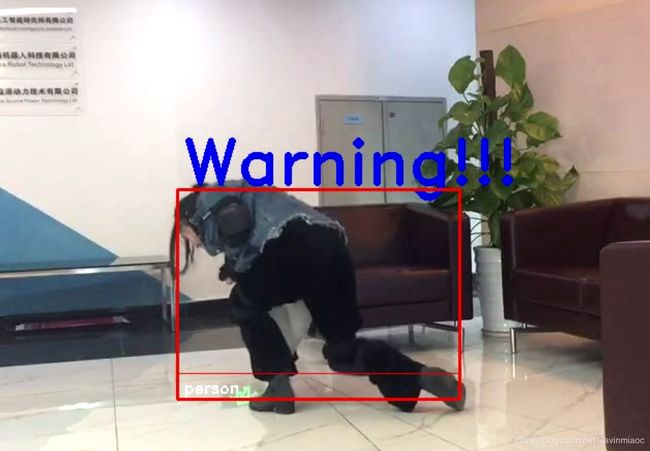
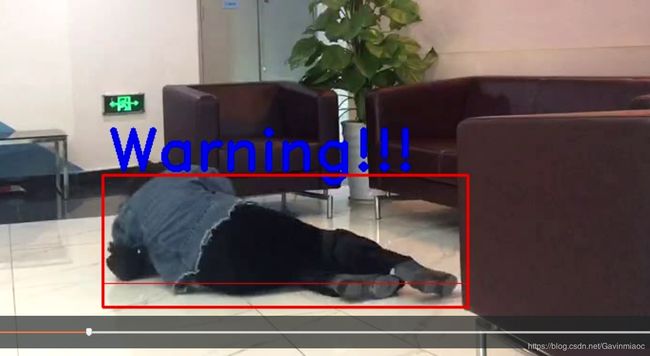
接下来看看Fall-detection效果:
核心代码:
# -*- coding: utf-8 -*-
# 基于yolov3的行人跌倒检测 by gavin

import colorsys
import os, sys, random, time

import cv2
import numpy as np

from PIL import Image, ImageFont, ImageDraw


from yolo_matt import YOLO, detect_video


from objecttracker.KalmanFilterTracker import Tracker  # 加载卡尔曼滤波函数


def calc_center(out_boxes, out_classes, out_scores, score_limit=0.5):
    outboxes_filter = []
    for x, y, z in zip(out_boxes, out_classes, out_scores):
        if z > score_limit:
            if y == 0:
                outboxes_filter.append(x)

    centers = []
    number = len(outboxes_filter)
    for box in outboxes_filter:
        top, left, bottom, right = box
        center = np.array([[(left + right) // 2], [(top + bottom) // 2]])
        centers.append(center)
    return centers, number


def get_colors_for_classes(num_classes):
    """Return list of random colors for number of classes given."""
    # Use previously generated colors if num_classes is the same.
    if (hasattr(get_colors_for_classes, "colors") and
            len(get_colors_for_classes.colors) == num_classes):
        return get_colors_for_classes.colors

    hsv_tuples = [(x / num_classes, 1., 1.) for x in range(num_classes)]
    colors = list(map(lambda x: colorsys.hsv_to_rgb(*x), hsv_tuples))
    colors = list(
        map(lambda x: (int(x[0] * 255), int(x[1] * 255), int(x[2] * 255)),
            colors))
    # colors = [(255,99,71) if c==(255,0,0) else c for c in colors ]  # 单独修正颜色,可去除
    random.seed(10101)  # Fixed seed for consistent colors across runs.
    random.shuffle(colors)  # Shuffle colors to decorrelate adjacent classes.
    random.seed(None)  # Reset seed to default.
    get_colors_for_classes.colors = colors  # Save colors for future calls.
    return colors


def trackerDetection(tracker, image, centers, number, max_point_distance=30, max_colors=20, track_id_size=0.8):
    '''
        - max_point_distance为两个点之间的欧式距离不能超过30
            - 有多条轨迹,tracker.tracks;
            - 每条轨迹有多个点,tracker.tracks[i].trace
        - max_colors,最大颜色数量
        - track_id_size,每个
    '''
    # track_colors = [(255, 0, 0), (0, 255, 0), (0, 0, 255), (255, 255, 0),
    #            (0, 255, 255), (255, 0, 255), (255, 127, 255),
    #            (127, 0, 255), (127, 0, 127)]
    track_colors = get_colors_for_classes(max_colors)

    result = np.asarray(image)
    font = cv2.FONT_HERSHEY_SIMPLEX
    cv2.putText(result, str(number), (20, 40), font, 1, (0, 0, 255), 5)  # 左上角,人数计数

    if (len(centers) > 0):
        # Track object using Kalman Filter
        tracker.Update(centers)
        # For identified object tracks draw tracking line
        # Use various colors to indicate different track_id
        for i in range(len(tracker.tracks)):
            # 多个轨迹
            if (len(tracker.tracks[i].trace) > 1):
                x0, y0 = tracker.tracks[i].trace[-1][0][0], tracker.tracks[i].trace[-1][1][0]
                cv2.putText(result, str(tracker.tracks[i].track_id), (int(x0), int(y0)), font, track_id_size,
                            (255, 255, 255), 4)
                # (image,text,(x,y),font,size,color,粗细)
                for j in range(len(tracker.tracks[i].trace) - 1):
                    # 每条轨迹的每个点
                    # Draw trace line
                    x1 = tracker.tracks[i].trace[j][0][0]
                    y1 = tracker.tracks[i].trace[j][1][0]
                    x2 = tracker.tracks[i].trace[j + 1][0][0]
                    y2 = tracker.tracks[i].trace[j + 1][1][0]
                    clr = tracker.tracks[i].track_id % 9
                    distance = ((x2 - x1) ** 2 + (y2 - y1) ** 2) ** 0.5
                    if distance < max_point_distance:
                        cv2.line(result, (int(x1), int(y1)), (int(x2), int(y2)),
                                 track_colors[clr], 4)
    return tracker, result

def isFall(w, h):
    if float(w) / h >= 0.9:# 1.1
        return True
    else:
        return False


def main(yolo_test):
    # Definition of the parameters

    path = 'video_demo/cs4.mp4' # "video_demo/tracking.avi", 'video_demo/cs4.mp4' 'video_demo/faint7.avi'
    tracker = Tracker(100, 8, 15, 100)

    writeVideo_flag = True

    # begin:open the input video file
    input_movie = cv2.VideoCapture(path)  # 'cs4.mp4' faint7.avi

    length = int(input_movie.get(cv2.CAP_PROP_FRAME_COUNT))
    # Create an output movie file (make sure resolution/frame rate matches input video!)
    # get fps the size
    fps = input_movie.get(cv2.CAP_PROP_FPS)
    size = (int(input_movie.get(cv2.CAP_PROP_FRAME_WIDTH)),
            int(input_movie.get(cv2.CAP_PROP_FRAME_HEIGHT)))

    # define the type of the output movie
    output_movie = cv2.VideoWriter('out_fall_detect.avi', cv2.VideoWriter_fourcc(*'MJPG'), fps, size)

    res = []
    frame_number = 0
    while True:
        # Grab a single frame of video
        ret, frame = input_movie.read()
        frame_number += 1

        # Quit when the input video file ends
        if not ret:
            break
        '''
        # detect per 2 frame
        if frame_number%2==0:
            continue
        '''
        # append all the coordinate of the detected person to res
        image = Image.fromarray(frame)
        start = time.time()
        # yolov3 detector
        r_image, out_boxes, out_scores, out_classes = yolo_test.detect_image(image)
        print("box_num:", len(out_boxes))

        centers, number = calc_center(out_boxes, out_classes, out_scores, score_limit=0.6)
        # number :人数统计
        tracker, result = trackerDetection(tracker, r_image, centers, number, max_point_distance=20)

        # cv2.imshow('', result)


        # 以下添加跌倒检测算法
        res = []

        for i, c in list(enumerate(out_classes)): #eg:output: [0 0 0 0 0 2 2 7]
            predicted_class = yolo_test.class_names[c] # 0:person,2:car,...
            box = out_boxes[i]
            score = out_scores[i]

            top, left, bottom, right = box
            x, y = (left + right) // 2,(top + bottom) // 2
            w = abs(right - left)
            h = abs(bottom - top)
            res.append((predicted_class, score, (x, y, w, h)))

        res = sorted(res, key=lambda x: -x[1])

        print('the whole running time is: ' + str(time.time() - start))
        resAll = []
        for item in res:
            if item[0] == 'person' or item[0] == 'dog' or item[0] == 'cat' or item[0] == 'horse': # item[0] == 'dog'
                resAll.append(item)
        # if multiple exist, and there also contains person,  preserve person only!
        print('--------------')
        #print(resAll)


        # get the max rectangle
        result = []
        maxArea = 0
        if len(resAll) > 1:
            for item in resAll:
                if item[2][2] * item[2][3] > maxArea:
                    maxArea = item[2][2] * item[2][3]
                    result = item
        elif len(resAll) == 1:
            result = resAll[0]
            # draw the result
        if (len(result) > 0):
            # label the result
            left = int(result[2][0] - result[2][2] / 2)
            top = int(result[2][1] - result[2][3] / 2)
            right = int(result[2][0] + result[2][2] / 2)
            bottom = int(result[2][1] + result[2][3] / 2)

            # whether fall?
            if isFall(result[2][2], result[2][3]):
                cv2.rectangle(frame, (left, top), (right, bottom), (0, 0, 255), 2)

                # Draw a label with a name below the face
                cv2.rectangle(frame, (left, bottom - 25), (right, bottom), (0, 0, 255))
                font = cv2.FONT_HERSHEY_DUPLEX
                cv2.putText(frame, 'Warning!!!', (left + 6, top - 6), font, 2, (255, 0, 0), 3)
            else:
                cv2.rectangle(frame, (left, top), (right, bottom), (255, 0, 0), 2)

        # label the result
        for item in resAll: # res:所有检测到的结果 ;resPerson:仅仅记录人
            # Draw a box around the face
            name = item[0]

            left = int(item[2][0] - item[2][2] / 2)
            top = int(item[2][1] - item[2][3] / 2)
            right = int(item[2][0] + item[2][2] / 2)
            bottom = int(item[2][1] + item[2][3] / 2)
            cv2.rectangle(frame, (left, top), (right, bottom), (0, 0, 255), 2)
            # Draw a label with a name below the face
            cv2.rectangle(frame, (left, bottom - 25), (right, bottom), (0, 0, 255))
            font = cv2.FONT_HERSHEY_DUPLEX
            if name == 'person':
                cv2.putText(frame, name, (left + 6, bottom - 6), font, 0.5, (255, 255, 255), 1)

        # Display the result
        cv2.imshow('Fall detection', frame)
        # Write the resulting image to the output video file
        print("Writing frame {} / {}".format(frame_number, length))
        if writeVideo_flag:
            # save a frame
            output_movie.write(frame)

        # Hit 'q' on the keyboard to quit!
        if cv2.waitKey(1) & 0xFF == ord('q'):
            break


    # All done!
    print('All done!')
    input_movie.release()
    if writeVideo_flag:
        output_movie.release()
    cv2.destroyAllWindows()


if __name__ == '__main__':
    # 加载keras yolov3 voc预训练模型
    yolo_test_args = {
        "model_path": 'model_data/yolo.h5',
        "anchors_path": 'model_data/yolo_anchors.txt',
        "classes_path": 'model_data/coco_classes.txt',
        "score": 0.3,
        "iou": 0.45,
        "model_image_size": (416, 416),
        "gpu_num": 1,
    }

    yolo_test = YOLO(**yolo_test_args)
    main(yolo_test)
源码参考1:https://github.com/mattzheng/keras-yolov3-KF-objectTracking
源码参考2:https://github.com/qiaoguan/Fall-detection
源码参考3:https://github.com/Qidian213/deep_sort_yolov3

