MyBatis逆向工程的使用
什么是逆向工程?
逆向工程就是针对单表自动生成MyBatis执行所需要的代码(mapper、mapper.xml、pojo),可以让程序员将更多的精力放在繁杂的业务逻辑上。
MyBatis逆向工程实战
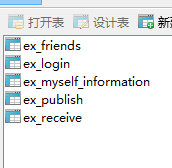
我们有如下的数据表

现在我们的任务就是根据上面的数据表,来生成项目代码。
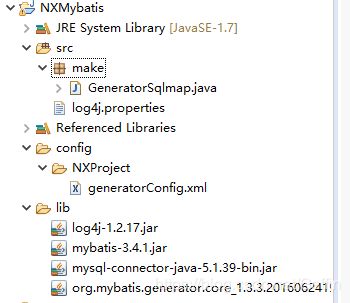
GeneratorSqlmap.java
package make;

import java.io.File;
import java.util.*;

import org.mybatis.generator.api.MyBatisGenerator;
import org.mybatis.generator.config.Configuration;
import org.mybatis.generator.config.xml.ConfigurationParser;
import org.mybatis.generator.internal.DefaultShellCallback;

public class GeneratorSqlmap {

	public void generator() throws Exception {
		List<String> warnings = new ArrayList<String>();
		boolean overwrite = false;
		// 指定配置文件
		File configFile = new File("./config/NXProject/generatorConfig.xml");
		ConfigurationParser cp = new ConfigurationParser(warnings);
		Configuration config = cp.parseConfiguration(configFile);
		DefaultShellCallback callback = new DefaultShellCallback(overwrite);
		MyBatisGenerator myBatisGenerator = new MyBatisGenerator(config, callback, warnings);
		myBatisGenerator.generate(null);
	}


	// 执行main方法以生成代码
	public static void main(String[] args) {
		try {
			GeneratorSqlmap generatorSqlmap = new GeneratorSqlmap();
			generatorSqlmap.generator();
		} catch (Exception e) {
			e.printStackTrace();
		}
	}
}
generatorConfig.xml
<generatorConfiguration>
  <context id="DB2Tables" targetRuntime="MyBatis3">
    <commentGenerator>

    	<property name="suppressAllComments" value="true"/>
    commentGenerator>

    <jdbcConnection driverClass="com.mysql.jdbc.Driver"
        connectionURL="jdbc:mysql://localhost:3306/exchange"
        userId="root"
        password="root">
    jdbcConnection>


    <javaTypeResolver >
		<property name="forceBigDecimals" value="false" />
    javaTypeResolver>


    <javaModelGenerator targetPackage="exchange.pojo" targetProject=".\src">

		<property name="enableSubPackages" value="false" />

		<property name="trimStrings" value="true" />
    javaModelGenerator>


    <sqlMapGenerator targetPackage="exchange.mapper"  targetProject=".\src">

		<property name="enableSubPackages" value="false" />
    sqlMapGenerator>


	<javaClientGenerator type="XMLMAPPER" targetPackage="exchange.mapper"  targetProject=".\src">

		<property name="enableSubPackages" value="false" />
    javaClientGenerator>


	<table schema="" tableName="ex_friends">table>
	<table schema="" tableName="ex_login">table>
	<table schema="" tableName="ex_information">table>
	<table schema="" tableName="ex_publish">table>
	<table schema="" tableName="ex_receive">table>

  context>
generatorConfiguration>
运行 GeneratorSqlmap.java,可得到如下文件

易看到,我们需要的 mapper、mapper.xml、pojo 都直接生成了。
接下来我们对生成的 mapper 文件进行简单的分析,我们先来看这个pojo:
package exchange.pojo;

public class ExFriends {
    private Integer id;

    private Integer myId;

    private Integer youId;

    public Integer getId() {
        return id;
    }

    public void setId(Integer id) {
        this.id = id;
    }

    public Integer getMyId() {
        return myId;
    }

    public void setMyId(Integer myId) {
        this.myId = myId;
    }

    public Integer getYouId() {
        return youId;
    }

    public void setYouId(Integer youId) {
        this.youId = youId;
    }
}
看起来真的跟我们自己写的一模一样,有点神奇。。。
其生成的 mapper 如下:
package exchange.mapper;

import exchange.pojo.ExFriends;
import exchange.pojo.ExFriendsExample;
import java.util.List;
import org.apache.ibatis.annotations.Param;

public interface ExFriendsMapper {
    int countByExample(ExFriendsExample example);

    int deleteByExample(ExFriendsExample example);

    int deleteByPrimaryKey(Integer id);

    int insert(ExFriends record);

    int insertSelective(ExFriends record);

    List<ExFriends> selectByExample(ExFriendsExample example);

    ExFriends selectByPrimaryKey(Integer id);

    int updateByExampleSelective(@Param("record") ExFriends record, @Param("example") ExFriendsExample example);

    int updateByExample(@Param("record") ExFriends record, @Param("example") ExFriendsExample example);

    int updateByPrimaryKeySelective(ExFriends record);

    int updateByPrimaryKey(ExFriends record);
}
下面我们对这些方法逐一分析
int countByExample(ExFriendsExample example);
该方法表示对限制条件进行计数,其中 example 用于生成一个 Criteria 对象来设置查询条件,而且具体可设置的条件很多,根据表的结构的不同会有不同的可限制条件。
int deleteByExample(ExFriendsExample example);
根据特定限制条件删除
int deleteByPrimaryKey(Integer id);
根据主键删除
int insert(ExFriends record);
直接插入,注意返回值是受影响的行数。它会插入所有行,若传入对象某一属性为空,则插入亦为空,若数据库中设置了默认值,则默认值会失效。
int insertSelective(ExFriends record);
直接插入,注意返回值是受影响的行数。他只插入含有数据的行,若传入对象某一属性为空,插入不予以处理,若数据库中设置了默认值,其不会被空值覆盖。
List<ExFriends> selectByExample(ExFriendsExample example);
通过特定限制条件查询信息
ExFriends selectByPrimaryKey(Integer id);
通过主键进行查询
int updateByExampleSelective(@Param("record") ExFriends record, @Param("example") ExFriendsExample example);
第一个参数是要更新的对象,第二个参数用于生成一个 Criteria 对象来设置更新条件,其作用为根据特定的限制条件更新所有设置了值的列
int updateByExample(@Param("record") ExFriends record, @Param("example") ExFriendsExample example);
参数含义与上面相同,其作用为根据特定的限制条件更新除了 text 类型的所有列。
int updateByPrimaryKeySelective(ExFriends record);
通过 id 对所有设置了值的列进行更新
int updateByPrimaryKey(ExFriends record);
通过 id 对除了text类型的所有列进行更新
参考:MyBatis逆向工程代码的生成以及使用详解(持续更新)
