Appium+Python移动端自动化测试常见问题总结【持续更新】
一、运行Appium,执行测试脚本,报错信息为:error: Failed to start an Appium session, err was: Error: Could not find adb. Please set the ANDROID_HOME environment variable with the Android SDK root directory path.
如图所示:
原因分析:
这种错误并不是ANDROID_HOME环境变量没有配置,也不是配置有问题(你要确定自己的ANDROID_HOME环境变量一定要配对)
解决办法:
以管理员身份运行Appium即可
二、出错信息里含有"ps 'uiautomator',具体信息为 A new session could not be created. (Original error: Command failed: C:\Windows\system32\cmd.exe /s /c "C:\Users\sxie\AppData\Local\Android\sdk\platform-tools\adb.exe -s emulator-5554 shell "ps 'uiautomator'"",如图所示:
这种情况,直接在cmd中执行"C:\Windows\system32\cmd.exe /s /c "C:\Users\sxie\AppData\Local\Android\sdk\platform-tools\adb.exe -s emulator-5554 shell "ps 'uiautomator'"", 报错为: bad pid 'uiautomator'
原因分析:
对应执行的指令是ps 'uiautomator', Android7不支持这个指令格式,所以执行结果是bad pid 'uiautomator';
目前Appium未对此进行处理,所以需要修改此指令的执行方式
解决办法(重点,重点,本人亲自尝试,保证解决问题):
1.打开adb.js(路径:X:\Program Files (x86)\Appium\node_modules\appium\node_modules\appium-adb\lib\adb.js)
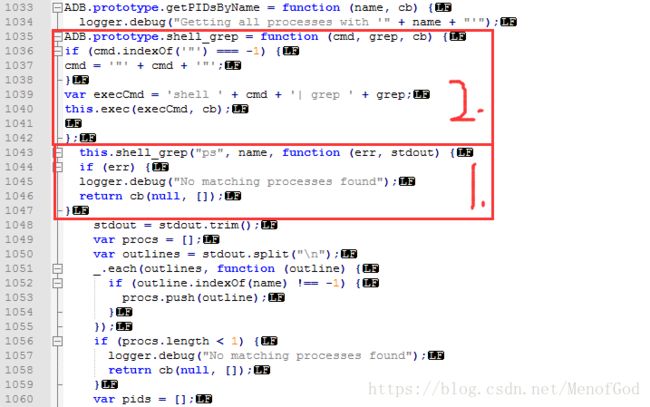
2.找到第1035 行this.shell,也就是:
this.shell("ps '" + name + "'", function (err, stdout) {
if (err) return cb(err);
将此部分代码替换为:
this.shell_grep("ps", name, function (err, stdout) {
if (err) {
logger.debug("No matching processes found");
return cb(null, []);
}
3.替换完成后,在此代码的上边加入如下代码:
ADB.prototype.shell_grep = function (cmd, grep, cb) {
if (cmd.indexOf('"') === -1) {
cmd = '"' + cmd + '"';
}
var execCmd = 'shell ' + cmd + '| grep ' + grep;
this.exec(execCmd, cb);
};
4.修改后的adb.js如图所示(注意符号,空格之类容易报错的地,切记!切记!):
三、第二次运行python脚本时,appium报错如下:
报错详细信息为:
Error: Command failed: C:\WINDOWS\system32\cmd.exe /s /c ""D:\Program Files\android-sdk-windows\platform-tools\adb.exe" -s HMKNW17414008402 install "D:\Program Files (x86)\Appium\node_modules\appium\build\settings_apk\settings_apk-debug.apk""
> adb: failed to install D:\Program Files (x86)\Appium\node_modules\appium\build\settings_apk\settings_apk-debug.apk: Failure [INSTALL_FAILED_ALREADY_EXISTS: Attempt to re-install io.appium.settings without first uninstalling.]
原因分析:
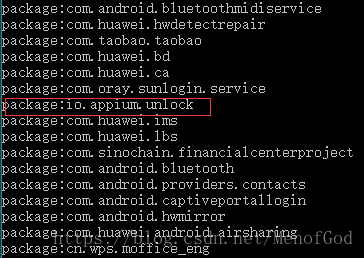
每次通过Appium运行python脚本时,当连接手机(真机)之后,使用appium在执行app自动化测试时,是会在手机上安装2个应用程序的,分别是:AppiumSettings和Unlock,也就是说在运行脚本的时候需要手动去删除这两个程序,我们先打开cmd看下手机都装了哪些程序,命令:adb shell pm list package,如图所示:
确定手机中确实安装了这两个程序之后,我们手动将其卸载即可
命令:adb uninstall io.appium.unlock adb uninstall io.appium.settings
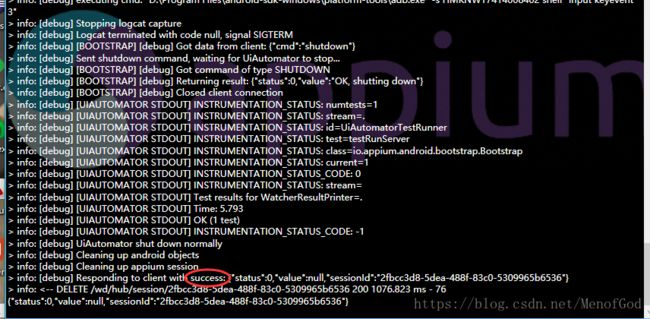
如图所示,提示success,则卸载成功:
再次运行脚本,完美解决此问题:
ps:如果这两个apk你不需要的话,也可以阻止其安装,设置方法如下:
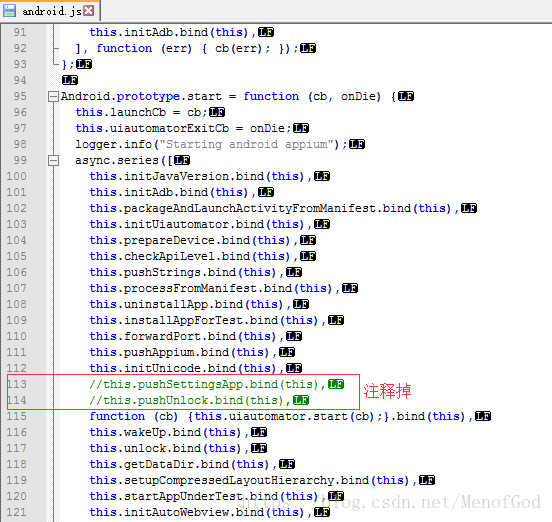
1.找到appium的安装路径,X:\Program Files (x86)\Appium\node_modules\appium\lib\devices\android下的android.js并打开
2.找到113行和114行,将其注释掉,如图所示:
3.设置好重启appium,再次运行,完美解决每次都要安装、卸载这两个apk的问题
四、启动appium输入法
默认情况下,安卓手机是没有appium输入法的,需要在测试脚本中输入:
driver.activate_ime_engine('io.appium.android.ime/.UnicodeIME')运行脚本后,手机中才会有appium输入法


