Android绘制工具Canvas
在Android自定义View的学习中,我们经常需要绘制,Canvas类就承担起绘制的作用。在Android中,绘制一个View需要四个基本的步骤:
- 一个视图或者像素的承载体:Bitmap
- 一个绘制方法的承载体:Canvas
- 绘制物:Rect、Path、text、Bitmap
- 绘制方式的承载体:Paint
如何构建一个Canvas对象
通过查看Canvas的api得知:
- Canvas():创建一个空的栅格画布。
- Canvas(Bitmap bitmap):构建一个指定bitmap的画布。
构造方法有两种,一种是创建空的栅格画布画布对象用来绘制。另一种是构建一个Canvas对象,绘制在Bitmap上。
Canvas方法介绍
1、clipXXX:裁剪画布
- clipPath(Path path):裁剪掉指定的path区域的Canvas
- clipPath(Path path, Region.Op op):裁剪掉指定的path区域的Canvas,同时指定与上次裁剪的类型。
- clipRect(int left, int top, int right, int bottom):裁剪掉指定矩形的Canvas区域
- clipRect(float left, float top, float right, float bottom):裁剪指定区域
- clipRect(RectF rect):裁剪指定矩形区域
- clipRect(float left, float top, float right, float bottom, Region.Op op)
- clipRect(Rect rect)
- clipRegion(Region region)
- clipRegion(Region region, Region.Op op)
在ClipXX方法中,可以分为三类:Path类、Rect类、Region类。注意,**在ClipXX的方法中,通过ClipXX方法,即改变显示区域,但是坐标区域并没有改变。**在ClipXX方法中,我们需要重要介绍下Region.Op(区域操作符)的使用。
通过查看源码,Region.Op是一个枚举类型:
// the native values for these must match up with the enum in SkRegion.h
public enum Op {
    DIFFERENCE(0),
    INTERSECT(1),
    UNION(2),
    XOR(3),
    REVERSE_DIFFERENCE(4),
    REPLACE(5);

    Op(int nativeInt) {
        this.nativeInt = nativeInt;
    }

    /**
     * @hide
     */
    public final int nativeInt;
}
第一裁剪区域A,第二裁剪区域B。介绍如下:
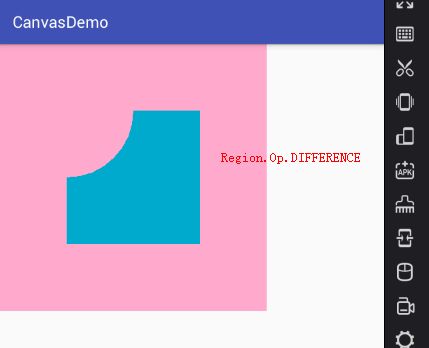
- Region.Op.DIFFERENCE:A-B的差集,即裁剪Canvas区域显示A与B的差集。
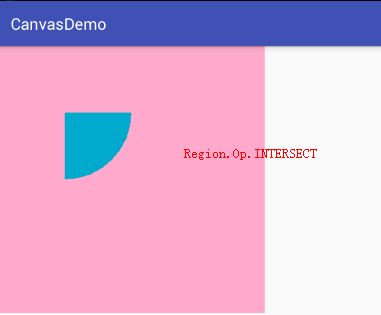
- Region.Op.INTERSECT:A∩B的交集,即裁剪Canvas区域显示A与B的差集。
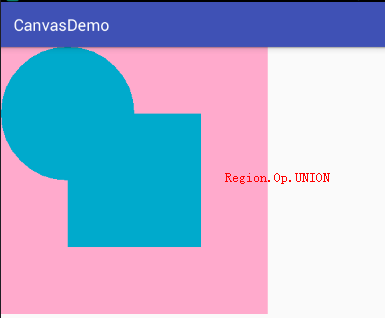
- Region.Op.UNION:A∪B的并集,即裁剪Canvas区域显示A与B的并集。
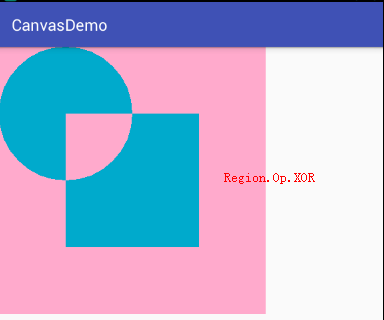
- Region.Op.XOR:a⊕b的异或,即裁剪Canvas区域显示A与B的异或。如果A与B有相交,则A、B的并集减去相交的部分。如果A与B不想交,则显示A、B的并集。
- Region.Op.REVERSE_DIFFERENCE:反转差集,即B-A生成的差集。即裁剪区域显示B-A的差集。
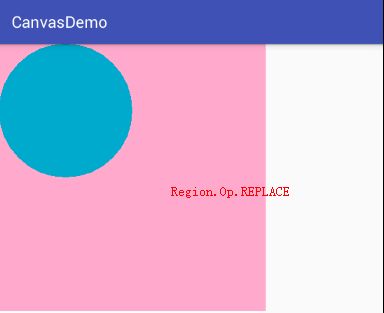
- Region.Op.REPLACE:用当前要剪切的区域代替之前剪切过的区域。
在这里,通过简单的实例看下效果。
private void createBitmap(){
    //创建一个空白的Bitmap对象
    Bitmap bitmap = Bitmap.createBitmap(400,400, Bitmap.Config.ARGB_8888);
    //绘制一个矩形区域
    Canvas canvas = new Canvas(bitmap);
    Paint paint = new Paint(Paint.ANTI_ALIAS_FLAG);
    paint.setStyle(Paint.Style.FILL_AND_STROKE);
    paint.setColor(Color.parseColor("#ffaacc"));
    canvas.drawRect(0, 0, 500, 500,paint);

    //裁剪出一个矩形,区域A
    canvas.clipRect(100,100,300,300);

    //再次裁剪一个区域,区域B
    Path path = new Path();
    path.addCircle(100,100,100, Path.Direction.CW);
    //此处修改op的值,来进行判断。
    canvas.clipPath(path, Region.Op.REPLACE);

    //裁剪后,绘制Canvas的画布
    paint.setColor(Color.parseColor("#00aacc"));
    canvas.drawRect(0, 0, 500, 500,paint);
    iv_image.setImageBitmap(bitmap);
}
通过上面的简单案例,我们通过修改以下代码片段,来修改效果:
//此处修改op的值,来进行判断。
canvas.clipPath(path, Region.Op.REPLACE);
1、Region.Op.DIFFERENCE效果
2、Region.Op.INTERSECT
3、Region.Op.UNION
4、Region.Op.XOR
5、Region.Op.REVERSE_DIFFERENCE
6、Region.Op.REPLACE
2、drawXXX系列方法
Canvas是我们的画布,给我们提供了一系列的方法满足我们在画布上进行绘制的需求,通过对api的分类,主要可以分为以下几种的绘制:
- drawArc:绘制圆弧。
- drawARGB:给整个可见的画布区域绘制颜色,即背景色。
- drawBitmap:绘制Bitmap对象。
- drawBitmapMesh:
- drawCircle:绘制圆形。
- drawColor:给整个可见的画布区域绘制颜色,即背景色。同drawARGB。
- drawLine(s):绘制线条。
- drawOval:绘制椭圆。
- drawPaint:给Canvas设置画笔paint。
- drawPatch:绘制.9.png图片。
- drawPath:绘制Path路径。
- drawPicture:绘制Picture对象。
- drawPoint(s):绘制点。
- drawRect:绘制矩形。
- drawRoundRect:绘制圆角矩形。
- drawRGB:给整个可见的画布区域绘制颜色,即背景色。同drawARGB。
- drawText:绘制文本。
1、drawArc:绘制圆弧
- drawArc(RectF oval, float startAngle, float sweepAngle, boolean useCenter, Paint paint)
- public void drawArc(float left, float top, float right, float bottom, float startAngle,float sweepAngle, boolean useCenter, Paint paint)
以上两个方法中,本质的核心都是根据指定的RectF矩形约束的范围进行圆弧的绘制。重点的以下几个参数的约束。
- startAngle:起始角度,这里需要注意:如果起始角度<0或>=360度,则取angle %360作为起始角度。
- sweepAngle:如果旋转角度>360度,则绘制全部。这点不同于path.arcTo的angle%360度取余数。如果angle是负数,则进行取余处理。
- useCenter:如果设置中心,则绘制圆弧的时候连接起点、中点和终点的连线闭合。
此处补充一点,负数的余数是负整数<=0,正数的余数是正整数>=0。绘制的圆弧会自动进行缩放来填充指定矩形的椭圆形状,不会超过指定的矩形区域大小。换种说法,绘制的圆弧片段是矩形的内切椭圆上的指定角度的圆弧。
/**
 * 绘制圆弧
 */
private void drawArc(){
    //创建空白的Bitmap对象
    Bitmap bitmap = Bitmap.createBitmap(500, 500, Bitmap.Config.ARGB_8888);
    Canvas canvas = new Canvas(bitmap);
    Paint paint = new Paint(Paint.ANTI_ALIAS_FLAG);
    paint.setColor(Color.BLUE);
    paint.setStyle(Paint.Style.STROKE);
    //绘制我们约束的矩形的范围,以便形成对比
    RectF rect = new RectF(100,200,400,400);
    canvas.drawRect(rect,paint);

    //绘制圆弧的形状
    paint.setColor(Color.CYAN);
    canvas.drawArc(rect,-180,90,false,paint);
    canvas.drawArc(rect,20,80,true,paint);
    iv_image.setImageBitmap(bitmap);
}
效果图:
2、drawBitmap系列:绘制Bitmap资源
- drawBitmap(int[] colors, int offset, int stride, float x, float y, int width, int height, boolean hasAlpha, Paint paint):将集合中的Colors绘制成Bitmap对象。需要开启硬件加速器,已经在api21中过期。
- drawBitmap(Bitmap bitmap, Matrix matrix, Paint paint):绘制一个给定matrix的Bitmap对象。
- drawBitmap(int[] colors, int offset, int stride, int x, int y, int width, int height, boolean hasAlpha, Paint paint):将集合中的Colors绘制成Bitmap对象。需要开启硬件加速器,已经在api21中过期。
- drawBitmap(Bitmap bitmap, Rect src, RectF dst, Paint paint):绘制一个适应给定RectF大小的Bitmap资源。
- drawBitmap(Bitmap bitmap, float left, float top, Paint paint):在left、top的位置出绘制一个Bitmap资源。
- drawBitmap(Bitmap bitmap, Rect src, Rect dst, Paint paint)
绘制Bitmap对象。
private class BitmapView extends View{
    Paint paint = null;
    Bitmap bitmap = null;
    public BitmapView(Context context) {
        super(context);
        paint = new Paint(Paint.ANTI_ALIAS_FLAG);
        paint.setFlags(Paint.DITHER_FLAG);
    }

    @Override
    protected void onDraw(Canvas canvas) {
        super.onDraw(canvas);
        bitmap = BitmapFactory.decodeResource(getResources(), R.mipmap.ic_launcher)
                .copy(Bitmap.Config.ARGB_8888,true);
        drawBitmap(canvas, 100, 100, paint);
        drawBitmapWithMatrix(canvas);
        drawBitmapWithRect(canvas);
        drawBitmapColors(canvas);
    }

    /**
     * 在指定的位置绘制Bitmap对象
     * @param canvas
     * @param left
     * @param top
     * @param paint
     */
    private void drawBitmap(Canvas canvas, int left, int top, Paint paint){
        canvas.drawBitmap(bitmap, left, top,paint);
    }

    /**
     * 绘制指定Matrix变换的bitmap
     * @param canvas
     */
    private void drawBitmapWithMatrix(Canvas canvas){
        Matrix matrix = new Matrix();
        matrix.setTranslate(200,200);
        matrix.postRotate(30);
        canvas.drawBitmap(bitmap, matrix, paint);
    }

    /**
     * 绘制指定DstRect大小的Bitmap
     * @param canvas
     */
    private void drawBitmapWithRect(Canvas canvas){
        Rect rectSrc = new Rect(0,0,100,100);
        Rect rectDst = new Rect(100,100,300,400);
        canvas.drawBitmap(bitmap, rectSrc,rectDst,paint);
    }

    private void drawBitmapColors(Canvas canvas){
        Bitmap bitmap = Bitmap.createBitmap(200, 200, Bitmap.Config.ARGB_8888);
        canvas.setBitmap(bitmap);
        canvas.drawBitmap(new int[]{Color.RED,Color.BLUE,Color.GREEN},
                1,1,0,0,200,200,false,paint);
    }
}
3、drawColor系列 Canvas为我们提供了绘制背景色的方法。
- drawARGB(int a, int r, int g, int b)
- drawColor(int color)
- drawColor(int color, PorterDuff.Mode mode)
- drawRGB(int r, int g, int b)
首先简单介绍下几个参数:
- a:透明度,取值(0..255),0表示完全透明,255表示完全不透明
- r:三元素中的红,取值(0..255)
- g:三元素中的绿,取值(0..255)
- b:三元素中的蓝,取值(0..255)
- PorterDuff.Mode:颜色混合模式,共有18中混合方式。
在drawColor系列的方法中,我认为掌握的难点就是针对PorterDuff.Mode的掌握和使用。
- PorterDuff.Mode.CLEAR:所绘制不会提交到画布上。
- PorterDuff.Mode.SRC:显示上层绘制图片
- PorterDuff.Mode.DST:显示下层绘制图片
- PorterDuff.Mode.SRC_OVER:正常绘制显示,上下层绘制叠盖。
- PorterDuff.Mode.DST_OVER:上下层都显示。下层居上显示。
- PorterDuff.Mode.SRC_IN:取两层绘制交集。显示上层。
- PorterDuff.Mode.DST_IN:取两层绘制交集。显示下层。
- PorterDuff.Mode.SRC_OUT:取上层绘制非交集部分。
- PorterDuff.Mode.DST_OUT:取下层绘制非交集部分。
- PorterDuff.Mode.SRC_ATOP:取下层非交集部分与上层交集部分
- PorterDuff.Mode.DST_ATOP:取上层非交集部分与下层交集部分
- PorterDuff.Mode.XOR: 异或:去除两图层交集部分
- PorterDuff.Mode.DARKEN:取两图层全部区域,交集部分颜色加深
- PorterDuff.Mode.LIGHTEN: 取两图层全部,点亮交集部分颜色
- PorterDuff.Mode.MULTIPLY: 取两图层交集部分叠加后颜色
- PorterDuff.Mode.SCREEN:取两图层全部区域,交集部分变为透明色
- PorterDuff.Mode.ADD:饱和度叠加
- PorterDuff.Mode.OVERLAY:像素是进行 Multiply (正片叠底)混合还是 Screen (屏幕)混合,取决于底层颜色,但底层颜色的高光与阴影部分的亮度细节会被保留
注意:在上面的描述中下层的图层对应的是Dst图层,上层对应的是Src图层。注意PorterDuff.Mode是作用于相互叠加的位置。
通过一段测试代码进行测试该功能的使用。
/**
 * PorterDuff的使用测试
 */
private void drawColorWithPorterDuff(){
    //首先我们创建一个绘制的背景画布
    Bitmap bitmapBG = Bitmap.createBitmap(400, 400, Bitmap.Config.ARGB_8888);
    Bitmap bitmapDst = createDst(400, 400);
    Bitmap bitmapSrc = createSrc(400, 400);
    Canvas canvas = new Canvas(bitmapBG);
    Paint paint = new Paint(Paint.ANTI_ALIAS_FLAG);
    canvas.drawColor(Color.GRAY);

    int sc = canvas.saveLayer(0, 0, 400, 400,null,
            Canvas.CLIP_TO_LAYER_SAVE_FLAG);
    //创建Dst图,绘制出来
    canvas.drawBitmap(bitmapDst,0,0,paint);
    //创建Src图
    paint.setXfermode(new PorterDuffXfermode(PorterDuff.Mode.SRC_IN));
    canvas.drawBitmap(bitmapSrc,0,0,paint);
    canvas.restoreToCount(sc);
    iv_image.setImageBitmap(bitmapBG);
}

/**
 * 创建Dst图
 * @param w
 * @param h
 * @return
 */
private Bitmap createDst(int w, int h) {
    Bitmap bitDstMap = Bitmap.createBitmap(w, h, Bitmap.Config.ARGB_8888);
    Canvas canvas = new Canvas(bitDstMap);
    Paint paint = new Paint(Paint.ANTI_ALIAS_FLAG);
    paint.setColor(0xFFFFCC44);
    canvas.drawRect(0, 0, 200, 200,paint);
    return bitDstMap;
}

/**
 * 创建Src资源图
 * @param w     宽度
 * @param h     高度
 * @return
 */
private Bitmap createSrc(int w, int h) {
    Bitmap bitSrcMap = Bitmap.createBitmap(w, h, Bitmap.Config.ARGB_8888);
    Canvas canvas = new Canvas(bitSrcMap);
    Paint paint = new Paint(Paint.ANTI_ALIAS_FLAG);
    paint.setColor(0xFF66AAFF);
    canvas.drawRect(100, 100, 300, 300,paint);
    return bitSrcMap;
}
在上面的测试代码中,我们创建两个矩形来模拟这个叠加效果。创建一个400×400大小的Dst图像区域,然后我们绘制一个[(0,0),(200,200)]位置的矩形。同样,创建一个400×400大小的Src图像区域,然后我们绘制一个[(100,100),(300,300)]位置的矩形。然后我们将Dst和Src绘制在400×400大小底图中,这里有一个细节,为了达到比较好的展示效果,我们让Dst和Src矩形所占的“图纸”大小相同,但是图形的位置不同。谨记,PorterDuff.Mode作用于叠加部分。 演示效果: 
建议,最好实际拿着我上面的实例进行操作下,看看实际的效果。
4、drawCircle绘制圆形 通过drawCircle进行圆形的绘制。
/**
 * 绘制圆形
 */
private void drawCircle(){
    Bitmap bitmap = Bitmap.createBitmap(800, 800, Bitmap.Config.ARGB_8888);
    Canvas canvas = new Canvas(bitmap);
    Paint paint = new Paint(Paint.ANTI_ALIAS_FLAG);
    paint.setFilterBitmap(true);
    /**
     * 此处设置Style样式:
     * Paint.Style.STROKE:描边
     * Paint.Style.FILL:填充
     * Paint.Style.FILL_AND_STROKE:描边+填充
     */
    paint.setStyle(Paint.Style.FILL_AND_STROKE);
    paint.setColor(Color.BLUE);
    canvas.drawCircle(400, 400, 250, paint);
    iv_image.setImageBitmap(bitmap);
}
5、drawOval绘制椭圆
- drawOval(float left, float top, float right, float bottom, Paint paint)
- drawOval(RectF oval, Paint paint)
通过以上两个重载方法实现椭圆的绘制。参照一下简单的demo。
/**
 * 绘制椭圆
 */
private void drawOval(){
    Bitmap bitmap = Bitmap.createBitmap(400,400, Bitmap.Config.ARGB_8888);
    Canvas canvas = new Canvas(bitmap);
    Paint paint = new Paint(Paint.ANTI_ALIAS_FLAG);
    paint.setColor(Color.BLUE);
    paint.setStyle(Paint.Style.FILL);
    //通过指定定点坐标Rect来绘制椭圆
    //canvas.drawOval(0,0,400,400,paint);
    //通过指定RectF绘制椭圆
    RectF rectF = new RectF(0,0,400,400);
    canvas.drawOval(rectF,paint);
}
6、drawRect绘制矩形
- drawRect(float left, float top, float right, float bottom, Paint paint)
- drawRect(RectF rect, Paint paint)
- drawRect(Rect r, Paint paint)
绘制矩形。
/**
 * 绘制矩形
 */
private void drawRect(){
    Bitmap bitmap = Bitmap.createBitmap(400,400, Bitmap.Config.ARGB_8888);
    Canvas canvas = new Canvas(bitmap);
    Paint paint = new Paint();
    paint.setColor(Color.BLUE);

    paint.setStyle(Paint.Style.FILL);
    canvas.drawRect(0, 0, 400, 100,paint);

    canvas.translate(0,150);
    paint.setStyle(Paint.Style.STROKE);
    canvas.drawRect(new RectF(0, 0, 399, 100),paint);

    canvas.translate(0,150);
    paint.setStyle(Paint.Style.FILL_AND_STROKE);
    canvas.drawRect(new Rect(0, 0, 400, 100),paint);

    iv_image.setImageBitmap(bitmap);
}
7、drawRoundRect绘制圆角矩形
- drawRoundRect(float left, float top, float right, float bottom, float rx, float ry, Paint paint)
- drawRoundRect(RectF rect, float rx, float ry, Paint paint)
- left、top、right、bottom:用于指定Rect的大小。
- rx:x方向上圆的半径;ry:y方向上圆的半径。
- paint:画笔
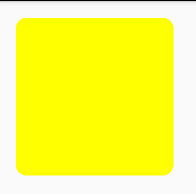
通过指定Rect来绘制圆角矩形。
/**
 * 绘制圆角矩形
 */
private void drawRoundRect(){
    Bitmap bitmap = Bitmap.createBitmap(400, 400, Bitmap.Config.ARGB_8888);
    Canvas canvas = new Canvas(bitmap);
    Paint paint = new Paint();
    paint.setColor(Color.YELLOW);

    canvas.drawRoundRect(new RectF(10, 10, 300, 300),20, 20, paint);

    iv_image.setImageBitmap(bitmap);
}
8、drawPoint绘制点
- drawPoint(float x, float y, Paint paint):绘制单点操作
- x:x轴坐标
- y:y轴坐标
- paint:画笔
- drawPoints(float[] pts, int offset, int count, Paint paint):绘制一系列点
- pts:一系列的点坐标集合[x0 y0 x1 y1 x2 y2 ...];
- offset:开头跳过的点数
- count:处理数据的个数,注意这里一个点会使用两个数据,所以最终的点数为count>>1
- paint:用来绘制点的画笔
- drawPoints(float[] pts, Paint paint):同2.
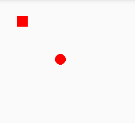
在绘制点的方法中,核心是绘制一列点的方法。每个点在当前的坐标系下以给点的x、y作为中心,它的直接通过stroke width来指定,一般默认是1px。同时点的形状通过Cap来指定、有三种类型:
- Paint.Cap.BUTT:无
- Paint.Cap.ROUND:圆形
- Paint.Cap.SQUARE:方形
/**
 * 绘制圆点
 */
private void drawPoints(){
    Bitmap bitmap = Bitmap.createBitmap(400, 400, Bitmap.Config.ARGB_8888);
    Canvas canvas = new Canvas(bitmap);
    Paint paint = new Paint();
    paint.setColor(Color.RED);
    paint.setStrokeWidth(20);
    paint.setStrokeCap(Paint.Cap.SQUARE);
    canvas.drawPoint(20, 20,paint);

    paint.setStrokeCap(Paint.Cap.ROUND);
    canvas.drawPoints(new float[]{50,50,90,90},2,2,paint);

    iv_image.setImageBitmap(bitmap);
}
9、drawLines绘制线条
- drawLine(float startX, float startY, float stopX, float stopY, Paint paint)
- drawLines(float[] pts, Paint paint)
- drawLines(float[] pts, int offset, int count, Paint paint)
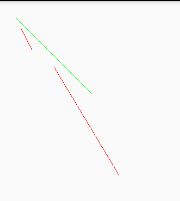
这里要注意pts参数,这个pts数组的长度要求必须是4的整数倍。绘制的顺序如下:drawLine(pts[0], pts[1], pts[2], pts[3]) 接着是:drawLine(pts[4], pts[5], pts[6], pts[7]) ,依次下去。
private void drawLines(){
    Bitmap bitmap = Bitmap.createBitmap(400, 400, Bitmap.Config.ARGB_8888);
    Canvas canvas = new Canvas(bitmap);
    Paint paint = new Paint();
    paint.setColor(Color.GREEN);
    canvas.drawLine(10, 10, 150, 150, paint);

    paint.setColor(Color.RED);
    canvas.drawLines(new float[]{20,30,40,70,80,100,200,300},paint);
    iv_image.setImageBitmap(bitmap);
}
10、drawText绘制文本
- drawText(String text, float x, float y, Paint paint)
- text:绘制文本
- x、y:绘制文本的起始坐标位置
- drawText(CharSequence text, int start, int end, float x, float y, Paint paint)
- text:绘制文本
- start:绘制文本的起始下标
- end:绘制文本的终点下标,end - 1是最后一个字符的位置。所以一般绘制到文本的结尾,直接 text.length
- drawText(char[] text, int index, int count, float x, float y, Paint paint)
- drawText(String text, int start, int end, float x, float y, Paint paint)
- drawTextOnPath(String text, Path path, float hOffset, float vOffset, Paint paint)
- text:绘制文本
- path:文本绘制依附的路径path
- hOffset:text绘制时距离path开头处的距离
- vOffset:text绘制在path上面还是下面的距离,above < 0, below >0
- drawTextOnPath(char[] text, int index, int count, Path path, float hOffset, float vOffset, Paint paint)
- drawTextRun(CharSequence text, int start, int end, int contextStart, int contextEnd, float x, float y, boolean isRtl, Paint paint)
- text:绘制文本
- 0<= contextStart <= start <=end <= contextEnd <= text.length
- isRtl:是否是从右往左绘制,true是;false:从左往右。
- drawTextRun(char[] text, int index, int count, int contextIndex, int contextCount, float x, float y, boolean isRtl, Paint paint)
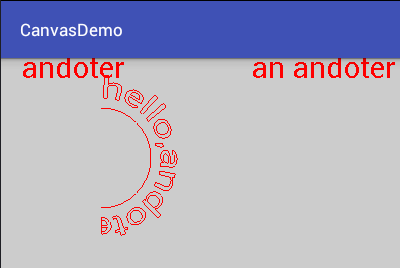
private void createBitmapWithText(){
    Bitmap bitmap = Bitmap.createBitmap(400,400, Bitmap.Config.ARGB_8888);
    Canvas canvas = new Canvas(bitmap);
    Paint paint = new Paint();
    paint.setColor(Color.RED);
    paint.setStyle(Paint.Style.STROKE);
    paint.setTextSize(30);
    canvas.drawColor(Color.LTGRAY);
    //drawText(String text, float x, float y, Paint paint)
    canvas.drawText("andoter",20,20,paint);

    /**
     * drawText(CharSequence text, int start, int end, float x, float y, Paint paint)
     * text:绘制的文本
     * start:绘制文本的起始下标
     * end:绘制文本的终点下标,end - 1是最后一个字符的位置。所以一般绘制到文本的结尾,直接
     *      text.length。
     * x、y:文本绘制的位置
     * paint:画笔
     */
    CharSequence text = "I`m an andoter";
    canvas.drawText(text, 4, text.length(), 250, 20, paint);

    /**
     * drawTextRun(CharSequence text, int start, int end, int contextStart,int contextEnd,
     *              float x, float y, boolean isRtl,Paint paint)
     *  注意:0<= contextStart <= start <=end <= contextEnd <= text.length
     *  isRtl:是否是从右往左绘制,true是;false:从左往右。
     */
    CharSequence textRun = "I`m an andoter";
    //canvas.drawTextRun(text, 0, 10, 0,text.length(),20, 60, true,paint);

    /**
     * drawTextOnPath(String text, Path path, float hOffset,float vOffset, Paint paint)
     *  text:绘制文本
     *  path:文本所依附的路径
     *  hOffset:text绘制时距离path开头处的距离
     *  vOffset:text绘制在path上面还是下面的距离,above < 0, below >0
     *  paint:画笔
     */
    Path path = new Path();
    path.addArc(new RectF(50, 50, 150, 150), -90, 180);
    //首先绘制出圆弧,突出效果
    canvas.drawPath(path,paint);
    canvas.drawTextOnPath("hello,andoter",path,0,-10,paint);

    iv_image.setImageBitmap(bitmap);
}
11、drawPath绘制path路径图形 绘制path路径。这里需要熟练掌握通过path构建路径,然后绘制。一个简单的例子:
private void createBitmapWithPath(){
    Bitmap bitmap = Bitmap.createBitmap(400,400, Bitmap.Config.ARGB_8888);
    Canvas canvas = new Canvas(bitmap);
    Paint paint = new Paint();
    paint.setStrokeWidth(2);
    paint.setStyle(Paint.Style.STROKE);
    paint.setColor(Color.BLUE);

    Path path = new Path();
    path.addCircle(100,100,50, Path.Direction.CW);
    canvas.drawPath(path,paint);
    iv_image.setImageBitmap(bitmap);
}
12、drawPicture绘制Picture对象 Picture对应可用于记录我们的绘制过程,所以自然少不了canvas对它的支持。这里就不展开了。
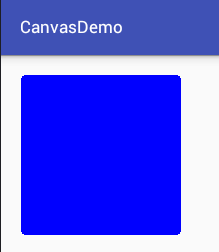
private void createBitmapWithPicture(){
    Picture picture = new Picture();
    Canvas  canvas = picture.beginRecording(200,200);
    Paint paint = new Paint();
    paint.setColor(Color.BLUE);
    canvas.drawRoundRect(new RectF(20, 20, 180, 180),5, 5, paint);
    picture.endRecording();
    iv_image.setImageDrawable(new PictureDrawable(picture));
}
通过对上面draw方法的总结,可以看出Canvas画布给我们提供了很多绘图形的类。
3、Canvas基础变换
在第二小节中,我们对于Canvas中的绘制功能有了一定初步认识。这节中,我们开始学习Canvas的基本变换操作。这里主要包含:
- translate(float dx, float dy)
- scale(float sx, float sy)
- rotate(float degrees)
- skew(float sx, float sy)
1、Canvas.translate(float dx, float dy)
- dx:横坐标在X轴方向的平移距离
- dy:纵坐标在Y轴方向的平移距离
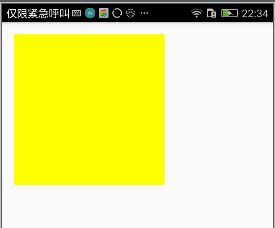
在这里,我仅仅说是坐标值在X、Y轴上的平移距离,并没有说是画布的平移。这个通过下面的实例很好证明“画布Canvas的平移”这句话描述是片面的。
private void drawCanvas(){
    Bitmap bitmap = Bitmap.createBitmap(400, 400, Bitmap.Config.ARGB_8888);
    Canvas canvas = new Canvas(bitmap);
    Paint paint = new Paint();
    canvas.drawColor(Color.GRAY);

    canvas.save();
    paint.setColor(Color.BLUE);
    canvas.translate(100f,100f);
    canvas.drawColor(Color.YELLOW);
    canvas.restore();

    iv_image.setImageBitmap(bitmap);
}
如下图:
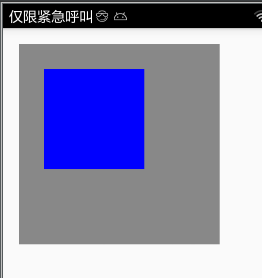
在上面代码中,我们绘制一个400×400大小的画布,同时进行平移100px。但是根据效果图来看,我们并没有发现画布的位置出现了移动,所以很容易发现,针对画布进行的translate、scale、rotate、skew仅仅是针对画布中的图形的X、Y进行对应的变换。而画布的位置、大小并没有发生改变。
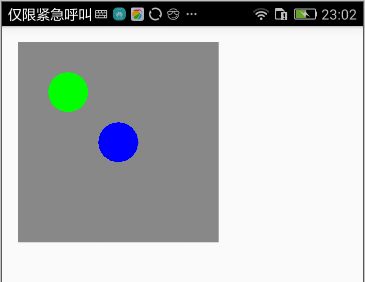
通过下面一个简单的实例,看看translate的具体效果。
private void drawTranslateCanvas(){
    Bitmap bitmap = Bitmap.createBitmap(400, 400, Bitmap.Config.ARGB_8888);
    Canvas canvas = new Canvas(bitmap);
    Paint paint = new Paint();
    canvas.drawColor(Color.GRAY);
    paint.setColor(Color.GREEN);
    canvas.drawCircle(100, 100, 40, paint);

    canvas.save();
    paint.setColor(Color.BLUE);
    canvas.translate(100f,100f);
    canvas.drawCircle(100, 100, 40, paint);
    canvas.restore();

    iv_image.setImageBitmap(bitmap);
}
可以看到,两个圆之间的x和y坐标差值就是我们的平移dx、dy。即,平移是针对图形的X、Y坐标值进行平移。
2、Canvas.scale() 坐标值进行缩放
- scale(float sx, float sy)
- sx:横坐标对应的缩放比例
- sy:纵坐标对应的缩放比例
- scale(float sx, float sy, float px, float py)
- sx:横坐标对应的缩放比例
- sy:纵坐标对应的缩放比例
- px:横坐标缩放的中心点
- py:纵坐标缩放的中心店
1、canvas.scale(float sx, float sy)
我们可以通过查看scale的源码:
/**
 * Preconcat the current matrix with the specified scale.
 *
 * @param sx The amount to scale in X
 * @param sy The amount to scale in Y
 */
public void scale(float sx, float sy) {
    native_scale(mNativeCanvasWrapper, sx, sy);
}
通过上面的注释,我们可以看到sx、sy指的是X、Y的缩放比例,这里并没有指定是Canvas画布进行缩放。通过下面的一个简单例子可以发现:
private void drawScaleCanvas(){
    Bitmap bitmap = Bitmap.createBitmap(400, 400, Bitmap.Config.ARGB_8888);
    Canvas canvas = new Canvas(bitmap);
    Paint paint = new Paint();
    paint.setColor(Color.GRAY);
    canvas.drawRect(new Rect(0, 0, 400, 400), paint);

    canvas.save();
    paint.setColor(Color.BLUE);
    canvas.scale(0.5f, 0.5f);
    canvas.drawRect(new Rect(0, 0, 400, 400), paint);
    canvas.restore();

    iv_image.setImageBitmap(bitmap);
}
2、scale(float sx, float sy, float px, float py)
/**
 * Preconcat the current matrix with the specified scale.
 *
 * @param sx The amount to scale in X
 * @param sy The amount to scale in Y
 * @param px The x-coord for the pivot point (unchanged by the scale)
 * @param py The y-coord for the pivot point (unchanged by the scale)
 */
public final void scale(float sx, float sy, float px, float py) {
    translate(px, py);
    scale(sx, sy);
    translate(-px, -py);
}
通过上面可以看到scale(sx,sy,px,py)的执行过程,是先进行平移px,py,然后在进行按照sx、sy的比例进行缩放,最后在平移回去。通过对过程的精简,即等价于:
public final void scale(float sx, float sy, float px, float py) {
    translate(px- sx*px, py - sy*py);
    scale(sx, sy);
}
我们通过一个简单的例子来观察下:
private void drawScaleCanvas(){
    Bitmap bitmap = Bitmap.createBitmap(400, 400, Bitmap.Config.ARGB_8888);
    Canvas canvas = new Canvas(bitmap);
    Paint paint = new Paint();
    paint.setColor(Color.GRAY);
    canvas.drawRect(new Rect(0, 0, 400, 400), paint);

    canvas.save();
    paint.setColor(Color.BLUE);
    canvas.scale(0.5f, 0.5f, 100, 100);
    canvas.drawRect(new Rect(0, 0, 400, 400), paint);
    canvas.restore();

    iv_image.setImageBitmap(bitmap);
}
3、Canvas.rotate坐标值进行旋转
1、rotate(float degrees)
将canvas中绘制图形进行旋转角度degree。
private void drawRotateCanvas(){
    Bitmap bitmap = Bitmap.createBitmap(400, 400, Bitmap.Config.ARGB_8888);
    Canvas canvas = new Canvas(bitmap);
    Paint paint = new Paint();
    paint.setColor(Color.GRAY);
    canvas.drawRect(new Rect(0, 0, 400, 400), paint);

    canvas.save();
    paint.setColor(Color.BLUE);
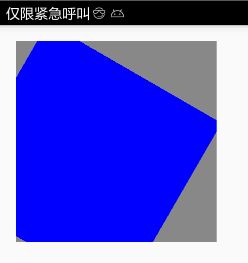
    canvas.rotate(30);
    canvas.drawRect(new Rect(0, 0, 400, 400), paint);
    canvas.restore();

    iv_image.setImageBitmap(bitmap);
}
2、rotate(float degrees, float px, float py)
查看源码:
/**
 * Preconcat the current matrix with the specified rotation.
 *
 * @param degrees The amount to rotate, in degrees
 * @param px The x-coord for the pivot point (unchanged by the rotation)
 * @param py The y-coord for the pivot point (unchanged by the rotation)
 */
public final void rotate(float degrees, float px, float py) {
    translate(px, py);
    rotate(degrees);
    translate(-px, -py);
}
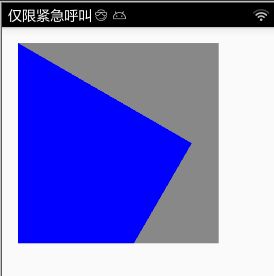
我们可以看到,执行的过程是跟scale的重载方法执行过程是相同的。起始就是以点(px,py)作为旋转中心,旋转degrees角度。
private void drawRotateCanvas(){
    Bitmap bitmap = Bitmap.createBitmap(400, 400, Bitmap.Config.ARGB_8888);
    Canvas canvas = new Canvas(bitmap);
    Paint paint = new Paint();
    paint.setColor(Color.GRAY);
    canvas.drawRect(new Rect(0, 0, 400, 400), paint);

    canvas.save();
    paint.setColor(Color.BLUE);
    canvas.rotate(30, 100, 100);
    canvas.drawRect(new Rect(0, 0, 400, 400), paint);
    canvas.restore();

    iv_image.setImageBitmap(bitmap);
}
4、Canvas.skew() 坐标值进行错切
3、Canvas画布图层操作
在上面的基本图层操作中,我们对canvas的图层操作有了初次见面,下面我们看看基本的图层操作包含哪些。
- save
- saveLayer
- saveLayerAlpha
- restore
- getSaveCount
- restoreToCount
以上几个方法,可以归结为两类,一类是保存Canvas信息,另外一类是恢复Canvas保存信息。
1、cavnas.save()
/**
 * Saves the current matrix and clip onto a private stack.
 *
 * Subsequent calls to translate,scale,rotate,skew,concat or clipRect,
 * clipPath will all operate as usual, but when the balancing call to
 * restore() is made, those calls will be forgotten, and the settings that
 * existed before the save() will be reinstated.
 *
 * @return The value to pass to restoreToCount() to balance this save()
 */
public int save() {
    return native_save(mNativeCanvasWrapper, MATRIX_SAVE_FLAG | CLIP_SAVE_FLAG);
}
通过源码的了解,我们可以得知save方法用于单独保存当前的matrix和clip信息。当我们调用save方法之后,我们调用canvas的translate、scale、rotate、skew、clipXX类的Canvas变换操作的时候,当吊起restore方法的时候,这些操作都会舍弃,重新恢复到save之前的状态。
关于save方法的实例,我们可以参照之前的Cavnas变换的相关操作。
2、save(int saveFlags)
/**
 * Based on saveFlags, can save the current matrix and clip onto a private
 * stack.
 * Note: if possible, use the
 * parameter-less save(). It is simpler and faster than individually
 * disabling the saving of matrix or clip with this method.
 *
 * Subsequent calls to translate,scale,rotate,skew,concat or clipRect,
 * clipPath will all operate as usual, but when the balancing call to
 * restore() is made, those calls will be forgotten, and the settings that
 * existed before the save() will be reinstated.
 *
 * @param saveFlags flag bits that specify which parts of the Canvas state
 *                  to save/restore
 * @return The value to pass to restoreToCount() to balance this save()
 */
public int save(@Saveflags int saveFlags) {
    return native_save(mNativeCanvasWrapper, saveFlags);
}
从上面的源码中可以看出,根据指定的saveFlag进行保存当前图层的信息。同样当调用save方法之后,调用Canvas的变换操作,我们在调用restore方法,就会设置我们所做的变换操作,恢复到save之前的状态。这里,可以通过指定saveFlag的值来保存Canvas的属性。
- MATRIX_SAVE_FLAG:保存对应的matrix信息
- CLIP_SAVE_FLAG:保存clip裁剪信息
- HAS_ALPHA_LAYER_SAVE_FLAG:保存Alpha信息
- FULL_COLOR_LAYER_SAVE_FLAG:保存颜色信息
- CLIP_TO_LAYER_SAVE_FLAG,:保存Clip裁剪信息
- ALL_SAVE_FLAG:保存所有信息
3、saveLayer
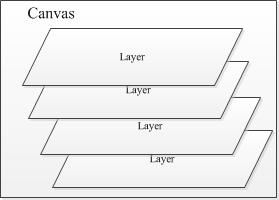
保存图层信息系列方法。saveLayer方法与save方法有些类似,但是区别在于saveLayer方法在一个“离屏”bitmap对象上进行绘制。saveLayer可以为canvas创建一个新的透明图层,在新的图层上绘制,并不会直接绘制到屏幕上,而会在restore之后,绘制到上一个图层或者屏幕上(如果没有上一个图层)。为什么会需要一个新的图层,例如在处理xfermode的时候,原canvas上的图(包括背景)会影响src和dst的合成,这个时候,使用一个新的透明图层是一个很好的选择。对PS有点了解的我们可以想象下图层的概念。
4、restore
恢复Canvas到上一次调用save之前的状态。注意,resotre方法调用的次数不能大于save调用的次数。
5、getSaveCount
获取Canvas单独栈中所做的Matrix和Clip操作的次数。与调用的save次数或restore次数相同。
6、restoreToCount(int saveCount)
快速回退到某次save的操作。注意saveCount值不能小于1.
int count = canvas.save();
... // more calls potentially to save()
canvas.restoreToCount(count);
// now the canvas is back in the same state it was before the initial
// call to save().
至此,对Canvas的基本使用有了初步的介绍。
