第一部分
To Build Share Disk For rac1 and Rac2
在Windows的cmd DOS運行命令窗口運行
C:\Program Files (x86)\VMware\VMware Workstation>
vmware-vdiskmanager.exe -c -s 1000Mb -a lsilogic -t 2 E:\VMware\RAC\Sharedisk\ocr.vmdk
vmware-vdiskmanager.exe -c -s 1000Mb -a lsilogic -t 2 E:\VMware\RAC\Sharedisk\ocr2.vmdk
vmware-vdiskmanager.exe -c -s 1000Mb -a lsilogic -t 2 E:\VMware\RAC\Sharedisk\votingdisk.vmdk
vmware-vdiskmanager.exe -c -s 20000Mb -a lsilogic -t 2 E:\VMware\RAC\Sharedisk\data.vmdk
vmware-vdiskmanager.exe -c -s 10000Mb -a lsilogic -t 2 E:\VMware\RAC\Sharedisk\backup.vmdk
2. Installing Linux
1).新建虚拟机并添加一张host_noly网卡
2).存储空间
/boot 200M
/home 30000M
/swap 5000M
/ 40000M
3)Linux安装时的选项
Base System > Base
Base System > Client management tools
Base System > Compatibility libraries
Base System > Hardware monitoring utilities
Base System > Large Systems Performance
Base System > Network file system client
Base System > Performance Tools
Base System > Perl Support
Servers > Server Platform
Servers > System administration tools
Desktops > Desktop
Desktops > Desktop Platform
Desktops > Fonts
Desktops > General Purpose Desktop
Desktops > Graphical Administration Tools
Desktops > Input Methods
Desktops > X Window System
Development > Additional Development
Development > Development Tools
Applications > Internet Browser
4).配置虚拟机RAC1 RAC2目录下的vmx虚拟机配置文件,在行最后添加如下:
是否安裝成功可以在下方進行分區的時候只需要一個節點進行分區,重啟之後,所有節點的磁盤分區階已經分好
scsi1.present = "TRUE"
scsi1.virtualDev = "lsilogic"
scsi1.sharedBus = "virtual"
scsi1:1.present = "TRUE"
scsi1:1.mode = "independent-persistent"
scsi1:1.filename = "E:\VMDisk\Sharedisk\ocr.vmdk"
scsi1:1.deviceType = "Disk"
scsi1:2.present = "TRUE"
scsi1:2.mode = "independent-persistent"
scsi1:2.filename = "E:\VMDisk\Sharedisk\votingdisk.vmdk"
scsi1:2.deviceType = "Disk"
scsi1:3.present = "TRUE"
scsi1:3.mode = "independent-persistent"
scsi1:3.filename = "E:\VMDisk\Sharedisk\data.vmdk"
scsi1:3.deviceType = "Disk"
scsi1:4.present = "TRUE"
scsi1:4.mode = "independent-persistent"
scsi1:4.filename = "E:\VMDisk\Sharedisk\backup.vmdk"
scsi1:4.deviceType = "Disk"
scsi1:5.present = "TRUE"
scsi1:5.mode = "independent-persistent"
scsi1:5.filename = "E:\VMDisk\Sharedisk\ocr2.vmdk"
scsi1:5.deviceType = "Disk"
disk.locking = "false"
diskLib.dataCacheMaxSize = "0"
diskLib.dataCacheMaxReadAheadSize = "0"
diskLib.DataCacheMinReadAheadSize = "0"
diskLib.dataCachePageSize = "4096"
diskLib.maxUnsyncedWrites = "0"
5).reboot the system.
[root@rac1 ~]#reboot
[root@rac2 ~]#reboot
6).配置ip
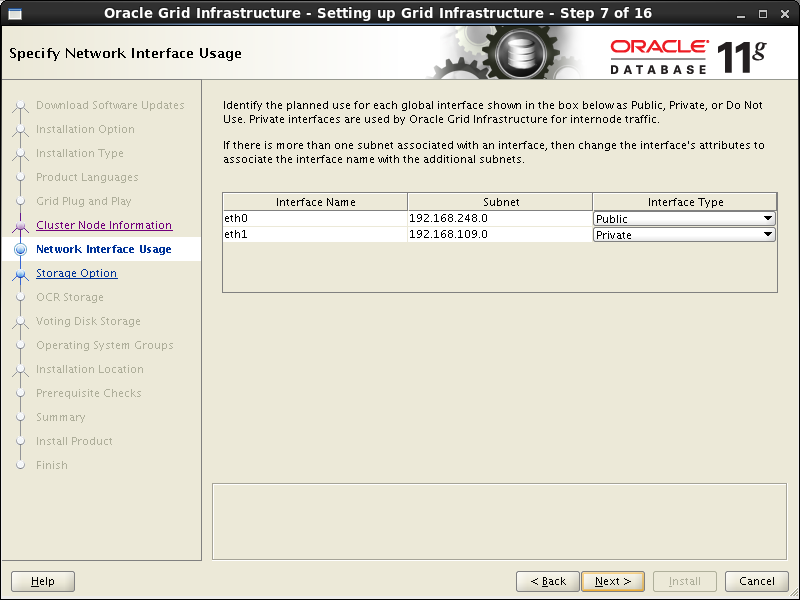
//这里的网关有vmware中网络设置决定,eth0为连接外网,eth0内网心跳
//rac1主机下:
[root@rac1 ~]# vi /etc/sysconfig/network-scripts/ifcfg-eth0
IPADDR=192.168.248.101
PREFIX=24
GATEWAY=192.168.248.2
DNS1=114.114.114.114
[root@rac1 ~]# vi /etc/sysconfig/network-scripts/ifcfg-eth1
IPADDR=192.168.109.101
PREFIX=24
//rac2主机下
[root@rac2 ~]# vi /etc/sysconfig/network-scripts/ifcfg-eth0
IPADDR=192.168.248.102
PREFIX=24
GATEWAY=192.168.248.2
DNS1=114.114.114.114
[root@rac2 ~]# vi /etc/sysconfig/network-scripts/ifcfg-eth1
IPADDR=192.168.109.102
PREFIX=24
(2)配置hostname
//rac1主机下
[root@rac1 ~]# vi /etc/sysconfig/network
NETWORKING=yes
HOSTNAME=rac1
GATEWAY=192.168.248.2
NOZEROCONF=yes
//rac2主机下
[root@rac2 ~]# vi /etc/sysconfig/network
NETWORKING=yes
HOSTNAME=rac2
GATEWAY=192.168.248.2
NOZEROCONF=yes
(3)配置hosts
rac1和rac2均要添加:
[root@rac1 ~]# vi /etc/hosts
192.168.248.101 rac1
192.168.248.201 rac1-vip
192.168.109.101 rac1-priv
192.168.248.102 rac2
192.168.248.202 rac2-vip
192.168.109.102 rac2-priv
192.168.248.110 scan-ip
[root@rac2 ~]# vi /etc/hosts
192.168.248.101 rac1
192.168.248.201 rac1-vip
192.168.109.101 rac1-priv
192.168.248.102 rac2
192.168.248.202 rac2-vip
192.168.109.102 rac2-priv
192.168.248.110 scan-ip
重启网络
[root@rac1 ~]# service network restart
重启网络
[root@rac2 ~]# service network restart
3. 安装准备
1).关闭防火墙
[root@rac1 ~]#chkconfig iptables off
[root@rac1 ~]#service iptables stop
[root@rac1 ~]#reboot
[root@rac2 ~]#chkconfig iptables off
[root@rac2 ~]#service iptables stop重启生效
[root@rac2 ~]#reboot
2).修改 /etc/selinux/config
[root@rac1 ~]#vi /etc/selinux/config
SELINUX=disabled
[root@rac2 ~]#vi /etc/selinux/config
SELINUX=disabled
3)指定本地yum源
对/etc/yum.repos.d/rhel-source.repo 进行修改
[root@rac1 ~]# vi /etc/yum.repos.d/rhel-source.repo
[rhel-source]
name=Red Hat Enterprise Linux $releasever -$basearch - Source
baseurl=file:///setup/rhel6Setup/Server
enabled=1
gpgcheck=1
gpgkey=file:///setup/rhel6Setup/RPM-GPG-KEY-redhat-release
[root@rac2 ~]# vi /etc/yum.repos.d/rhel-source.repo
[rhel-source]
name=Red Hat Enterprise Linux $releasever -$basearch - Source
baseurl=file:///setup/rhel6Setup/Server
enabled=1
gpgcheck=1
gpgkey=file:///setup/rhel6Setup/RPM-GPG-KEY-redhat-release
4)添加 /etc/pam.d/login
[root@rac1 ~]#vi /etc/pam.d/login
session required pam_limits.so
[root@rac2 ~]#vi /etc/pam.d/login
session required pam_limits.so
5). 创建必要的用户、组和目录,并授权 (rac1,rac2)
/usr/sbin/groupadd -g 1000 oinstall
/usr/sbin/groupadd -g 1020 asmadmin
/usr/sbin/groupadd -g 1021 asmdba
/usr/sbin/groupadd -g 1022 asmoper
/usr/sbin/groupadd -g 1031 dba
/usr/sbin/groupadd -g 1032 oper
useradd -u 1100 -g oinstall -G asmadmin,asmdba,asmoper,oper,dba grid
useradd -u 1101 -g oinstall -G dba,asmdba,oper oracle
mkdir -p /u01/app/11.2.0/grid
mkdir -p /u01/app/grid
mkdir /u01/app/oracle
chown -R grid:oinstall /u01
chown oracle:oinstall /u01/app/oracle
chmod -R 775 /u01
[root@rac1 ~]# passwd grid
[root@rac1 ~]# passwd oracle
[root@rac2 ~]# passwd grid
[root@rac2 ~]# passwd oracle
6)内核参数设置:(rac1,rac2)
[root@rac1 ~]# vi /etc/sysctl.conf
kernel.msgmnb = 65536
kernel.msgmax = 65536
kernel.shmmax = 68719476736
kernel.shmall = 4294967296
fs.aio-max-nr = 1048576
fs.file-max = 6815744
kernel.shmall = 2097152
kernel.shmmax = 1306910720
kernel.shmmni = 4096
kernel.sem = 250 32000 100 128
net.ipv4.ip_local_port_range = 9000 65500
net.core.rmem_default = 262144
net.core.rmem_max = 4194304
net.core.wmem_default = 262144
net.core.wmem_max = 1048586
net.ipv4.tcp_wmem = 262144 262144 262144
net.ipv4.tcp_rmem = 4194304 4194304 4194304
这里后面检测要改
kernel.shmmax = 68719476736
确认修改内核
[root@rac1 ~]# sysctl -p
7).配置oracle、grid用户的shell限制 (rac1,rac2)
[root@rac1 ~]# vi /etc/security/limits.conf
grid soft nproc 2047
grid hard nproc 16384
grid soft nofile 1024
grid hard nofile 65536
oracle soft nproc 2047
oracle hard nproc 16384
oracle soft nofile 1024
oracle hard nofile 65536
8).配置oracle用户ssh互信
这是很关键的一步,虽然官方文档中声称安装GI和RAC的时候OUI会自动配置SSH,但为了在安装之前使用CVU检查各项配置,还是手动配置互信更优。
[root@rac1 ~]#su - oracle
[oracle@rac1 ~]$mkdir ~/.ssh
[oracle@rac1 ~]$chmod 700 ~/.ssh
[oracle@rac1 ~]$ssh-keygen -t rsa
[oracle@rac1 ~]$ssh-keygen -t dsa
root@rac2 ~]#su - oracle
[oracle@rac2 ~]$mkdir ~/.ssh
[oracle@rac2 ~]$chmod 700 ~/.ssh
[oracle@rac2 ~]$ssh-keygen -t rsa
[oracle@rac2 ~]$ssh-keygen -t dsa
[oracle@rac1 ~]$
cat ~/.ssh/id_rsa.pub >> ~/.ssh/authorized_keys
cat ~/.ssh/id_dsa.pub >> ~/.ssh/authorized_keys
ssh rac2 cat ~/.ssh/id_rsa.pub >> ~/.ssh/authorized_keys
ssh rac2 cat ~/.ssh/id_dsa.pub >> ~/.ssh/authorized_keys
[oracle@RAC1]$ scp ~/.ssh/authorized_keys rac2:~/.ssh/authorized_keys
[oracle@RAC1]$ssh rac1 date
[oracle@RAC1]$ssh rac2 date
[oracle@RAC1]$ssh rac1-priv date
[oracle@RAC1]$ssh rac2-priv date
切换到rac2执行
[oracle@RAC2]$ssh rac1 date
[oracle@RAC2]$ssh rac2 date
[oracle@RAC2]$ssh rac1-priv date
[oracle@RAC2]$ssh rac2-priv date
给grid重新操作一遍
[root@rac1 ~]#su - grid
[grid@rac1 ~]$mkdir ~/.ssh
[grid@rac1 ~]$chmod 700 ~/.ssh
[grid@rac1 ~]$ssh-keygen -t rsa
[grid@rac1 ~]$ssh-keygen -t dsa
root@rac2 ~]#su - oracle
[grid@rac2 ~]$mkdir ~/.ssh
[grid@rac2 ~]$chmod 700 ~/.ssh
[grid@rac2 ~]$ssh-keygen -t rsa
[grid@rac2 ~]$ssh-keygen -t dsa
[grid@rac1 ~]$
cat ~/.ssh/id_rsa.pub >> ~/.ssh/authorized_keys
cat ~/.ssh/id_dsa.pub >> ~/.ssh/authorized_keys
ssh rac2 cat ~/.ssh/id_rsa.pub >> ~/.ssh/authorized_keys
ssh rac2 cat ~/.ssh/id_dsa.pub >> ~/.ssh/authorized_keys
[grid@RAC1]$ scp ~/.ssh/authorized_keys rac2:~/.ssh/authorized_keys
[grid@RAC1]$ssh rac1 date
[grid@RAC1]$ssh rac2 date
[grid@RAC1]$ssh rac1-priv date
[grid@RAC1]$ssh rac2-priv date
切换到rac2执行
[grid@RAC2]$ssh rac1 date
[grid@RAC2]$ssh rac2 date
[grid@RAC2]$ssh rac1-priv date
[grid@RAC2]$ssh rac2-priv date
需要注意的是生成密钥时不设置密码,授权文件权限为600,同时需要两个节点互相ssh通过一次
9).配置grid和oracle用户环境变量(rac1,rac2)
Oracle_sid需要根据节点不同进行修改
[root@rac1 ~]# su - grid
[grid@rac1 ~]$ vi .bash_profile
export TMP=/tmp
export TMPDIR=$TMP
export ORACLE_SID=+ASM1
export ORACLE_SID=+ASM2
export ORACLE_BASE=/u01/app/grid
export ORACLE_HOME=/u01/app/11.2.0/grid
export PATH=/usr/sbin:$PATH
export PATH=$ORACLE_HOME/bin:$PATH
export LD_LIBRARY_PATH=$ORACLE_HOME/lib:/lib:/usr/lib
export CLASSPATH=$ORACLE_HOME/JRE:$ORACLE_HOME/jlib:$ORACLE_HOME/rdbms/jlib
umask 022
需要注意的是ORACLE_UNQNAME是数据库名,创建数据库时指定多个节点是会创建多个实例,ORACLE_SID指的是数据库实例名
[root@rac1 ~]# su - oracle
[oracle@rac1 ~]$ vi .bash_profile
export TMP=/tmp
export TMPDIR=$TMP
export ORACLE_SID=orcl1
export ORACLE_SID=orcl2
export ORACLE_UNQNAME=orcl
export ORACLE_BASE=/u01/app/oracle
export ORACLE_HOME=$ORACLE_BASE/product/11.2.0/db_1
export TNS_ADMIN=$ORACLE_HOME/network/admin
export PATH=/usr/sbin:$PATH
export PATH=$ORACLE_HOME/bin:$PATH
export LD_LIBRARY_PATH=$ORACLE_HOME/lib:/lib:/usr/lib1
$ source .bash_profile使配置文件生效
6).需要添加以下的包,以确保Oracle的正常安装(暂时不添加也可以,在安装Oracle时会详细提示缺少哪个包的)(rac1,rac2)
需在root用户下面安装
[]su - root
yum -y install binutils-2.*
yum -y install compat-libstdc33*
yum -y install elfutils-libelf-0.*
yum -y install elfutils-libelf-devel-*
yum -y install gcc-4.*
yum -y install gcc-c4.*
yum -y install glibc-2.*
yum -y install glibc-common-2.*
yum -y install glibc-devel-2.*
yum -y install glibc-headers-2.*
yum -y install pdksh-5*
yum -y install libaio-0.*
yum -y install libaio-devel-0.*
yum -y install libgcc-4.*
yum -y install libstdc4.*
yum -y install libstdcdevel-4.*
yum -y install make-3.*
yum -y install sysstat-7.*
yum -y install unixODBC-2.*
yum -y install unixODBC-devel-2.*
8)安装cvuqdisk包
在grid安装包目录下,安装cvuqdisk包
yum -y install cvuqdisk*
9).配置裸盘(rac1)
使用asm管理存储需要裸盘,前面配置了共享硬盘到两台主机上。配置裸盘的方式有两种
(1)oracleasm添加
(2)/etc/udev/rules.d/60-raw.rules配置文件添加(字符方式帮绑定udev)
(3)脚本方式添加(块方式绑定udev,速度比字符方式快,最新的方法,推荐用此方式)
在配置裸盘之前需要先格式化硬盘:
fdisk /dev/sdb
Command (m for help): n
Command action
e extended
p primary partition (1-4)
p
Partition number (1-4): 1
最后 w 命令保存更改1
重复步骤,格式化其他盘,得到如下分区
/dev/sdb1 /dev/sdc1 /dev/sdd1 /dev/sde1 /dev/sdf1
Attention:是否安裝成功可以在下方進行分區的時候只需要一個節點進行分區,重啟之後,所有節點的磁盤分區階已經分好
10).REBOOT SYSTEM(rac1,rac2)
[rac1~]reboot
[rac2~]reboot
11)添加裸盘:(rac1,rac2)
[root@rac1 ~]# vi /etc/udev/rules.d/60-raw.rules
ACTION=="add",KERNEL=="/dev/sdb1",RUN+='/bin/raw /dev/raw/raw1 %N"
ACTION=="add",ENV{MAJOR}=="8",ENV{MINOR}=="17",RUN+="/bin/raw /dev/raw/raw1 %M %m"
ACTION=="add",KERNEL=="/dev/sdc1",RUN+='/bin/raw /dev/raw/raw2 %N"
ACTION=="add",ENV{MAJOR}=="8",ENV{MINOR}=="33",RUN+="/bin/raw /dev/raw/raw2 %M %m"
ACTION=="add",KERNEL=="/dev/sdd1",RUN+='/bin/raw /dev/raw/raw3 %N"
ACTION=="add",ENV{MAJOR}=="8",ENV{MINOR}=="49",RUN+="/bin/raw /dev/raw/raw3 %M %m"
ACTION=="add",KERNEL=="/dev/sde1",RUN+='/bin/raw /dev/raw/raw4 %N"
ACTION=="add",ENV{MAJOR}=="8",ENV{MINOR}=="65",RUN+="/bin/raw /dev/raw/raw4 %M %m"
ACTION=="add",KERNEL=="/dev/sdf1",RUN+='/bin/raw /dev/raw/raw5 %N"
ACTION=="add",ENV{MAJOR}=="8",ENV{MINOR}=="81",RUN+="/bin/raw /dev/raw/raw5 %M %m"
KERNEL=="raw[1-5]",OWNER="grid",GROUP="asmadmin",MODE="660"
[root@rac1 ~]# start_udev
Starting udev: [ OK ]
[root@rac1 ~]# ll /dev/raw/
total 0
crw-rw---- 1 grid asmadmin 162, 1 Apr 13 13:51 raw1
crw-rw---- 1 grid asmadmin 162, 2 Apr 13 13:51 raw2
crw-rw---- 1 grid asmadmin 162, 3 Apr 13 13:51 raw3
crw-rw---- 1 grid asmadmin 162, 4 Apr 13 13:51 raw4
crw-rw---- 1 grid asmadmin 162, 5 Apr 13 13:51 raw5
crw-rw---- 1 root disk 162, 0 Apr 13 13:51 rawctl
这里需要注意的是配置的,前后都不能有空格,否则会报错。最后看到的raw盘权限必须是grid:asmadmin用户。
12).手动运行cvu使用验证程序验证Oracle集群件要求(所有节点都执行)(rac1,rac2)
rac1到grid软件目录下执行runcluvfy.sh命令:
这里可能出现问题
wait ...[grid@rac1 grid]$ Exception in thread "main" java.lang.NoClassDefFoundError
at java.lang.Class.forName0(Native Method)
at java.lang.Class.forName(Class.java:164)
at java.awt.Toolkit$2.run(Toolkit.java:821)
at java.security.AccessController.doPrivileged(Native Method)
at java.awt.Toolkit.getDefaultToolkit(Toolkit.java:804)
at com.jgoodies.looks.LookUtils.isLowResolution(Unknown Source)
at com.jgoodies.looks.LookUtils.(Unknown Source)
需要直接登录grid用户,而不是su - 切换
[root@rac1 ~]#chown -R grid:oinstall /u01
给grid用户分配u01的安装权限
[root@rac1 ~]#chmod -R 775 /u01
[root@rac1 ~]# su - grid
[grid@rac1 ~]$ cd db/grid/
[grid@rac1 grid]$ ls
doc readme.html rpm runInstaller stage
install response runcluvfy.sh sshsetup welcome.html
[grid@rac1 grid]$ ./runcluvfy.sh stage -pre crsinst -n rac1,rac2 -fixup -verbose
解决NTP时间不一致的问题
mv /etc/ntp.conf /etc/ntp.conf.bak
安装Grid Infrastructure
1.安装流程
1.安装流程
只需要在一个节点上安装即可,会自动复制到其他节点中,这里在rac1中安装。
进入图形化界面,在grid用户下进行安装
[grid@rac1 ~]$ cd db/grid/
doc/ readme.html rpm/ runInstaller stage/
install/ response/ runcluvfy.sh sshsetup/ welcome.html
[grid@rac1 ~]$ cd db/grid/
[grid@rac1 grid]$ ./runInstaller
选择安装集群

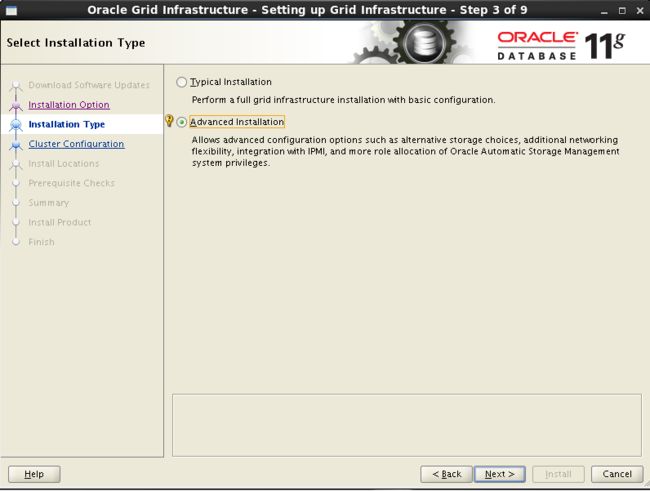
选择自定义安装
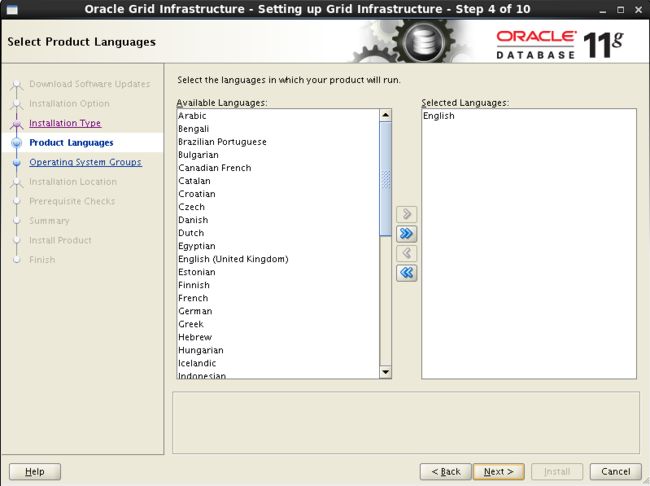
选择语言为English
定义集群名字,SCAN Name 为hosts中定义的scan-ip,取消GNS

界面只有第一个节点rac1,点击“Add”把第二个节点rac2加上

选择网卡
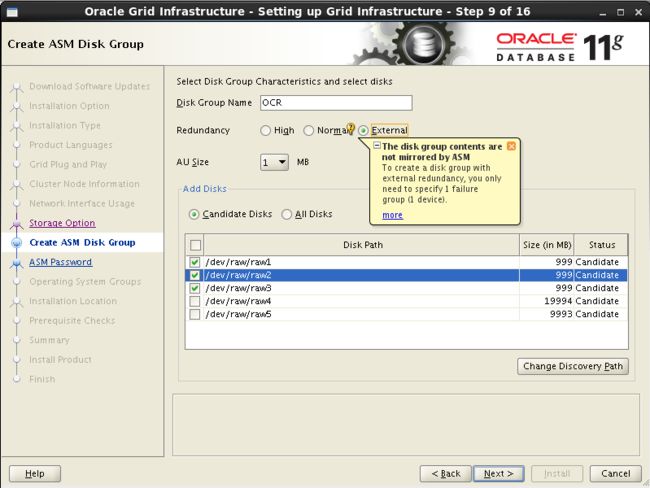
配置ASM,这里选择前面配置的裸盘raw1,raw2,raw3,冗余方式为External即不冗余。因为是不用于,所以也可以只选一个设备。这里的设备是用来做OCR注册盘和votingdisk投票盘的。
配置ASM实例需要为具有sysasm权限的sys用户,具有sysdba权限的asmsnmp用户设置密码,这里设置统一密码为oracle,会提示密码不符合标准,点击OK即可
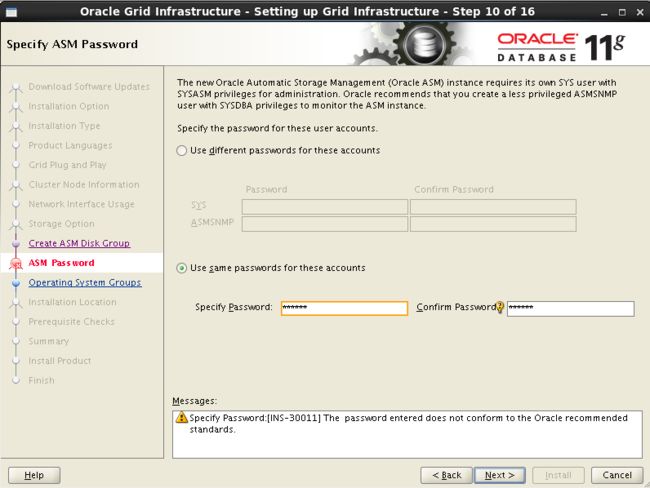
不选择智能管理

检查ASM实例权限分组情况
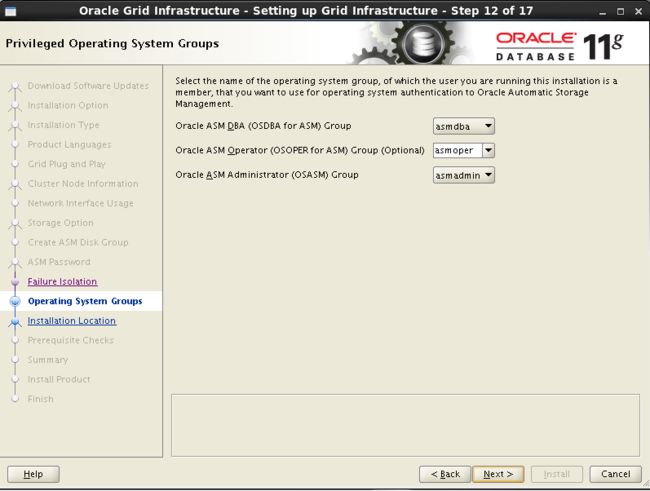
选择grid软件安装路径和base目录

选择grid安装清单目录

环境检测出现resolv.conf错误,是因为没有配置DNS,可以忽略

安装grid概要
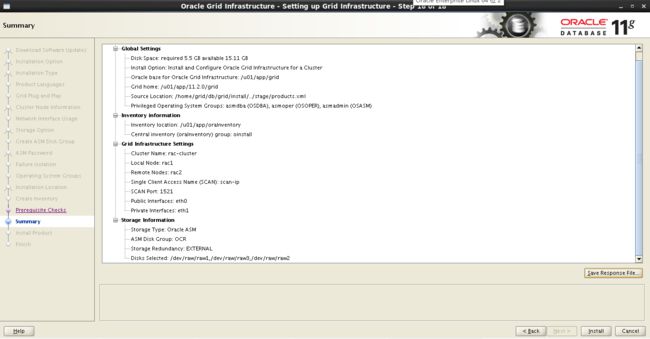
开始安装

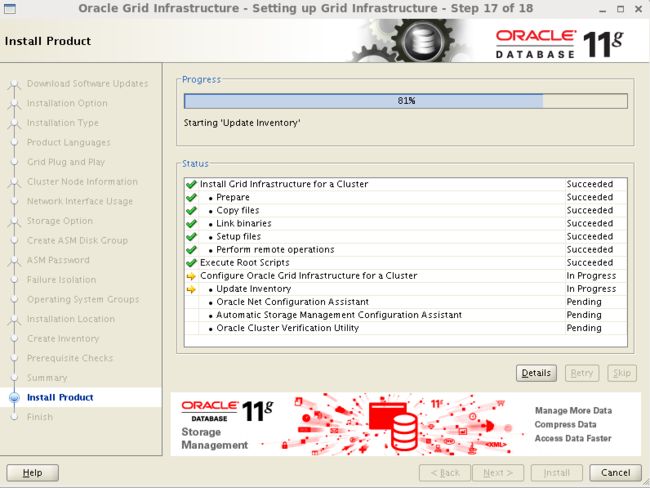
复制安装到其他节点

安装grid完成,提示需要root用户依次执行脚本orainstRoot.sh ,root.sh (一定要先在rac1执行完脚本后,才能在其他节点执行)

在rac1中执行脚本
[root@rac1 rpm]# /u01/app/oraInventory/orainstRoot.sh
Changing permissions of /u01/app/oraInventory.
Adding read,write permissions for group.
Removing read,write,execute permissions for world.
Changing groupname of /u01/app/oraInventory to oinstall.
The execution of the script is complete.
[root@rac1 rpm]# /u01/app/
11.2.0/ grid/ oracle/ oraInventory/
[root@rac1 rpm]# /u01/app/11.2.0/grid/root.sh
Performing root user operation for Oracle 11g
The following environment variables are set as: ORACLE_OWNER= grid ORACLE_HOME= /u01/app/11.2.0/grid Enter the full pathname of the local bin directory: [/usr/local/bin]: Copying dbhome to /usr/local/bin ... Copying oraenv to /usr/local/bin ... Copying coraenv to /usr/local/bin ... Creating /etc/oratab file... Entries will be added to the /etc/oratab file as needed byDatabase Configuration Assistant when a database is created Finished running generic part of root script. Now product-specific root actions will be performed.Using configuration parameter file: /u01/app/11.2.0/grid/crs/install/crsconfig_params Creating trace directoryUser ignored Prerequisites during installation OLR initialization - successful root wallet root wallet cert root cert export peer wallet profile reader wallet pa wallet peer wallet keys pa wallet keys peer cert request pa cert request peer cert pa cert peer root cert TP profile reader root cert TP pa root cert TP peer pa cert TP pa peer cert TP profile reader pa cert TP profile reader peer cert TP peer user cert pa user cert Adding Clusterware entries to upstart CRS-2672: Attempting to start 'ora.mdnsd' on 'rac1'CRS-2676: Start of 'ora.mdnsd' on 'rac1' succeeded CRS-2672: Attempting to start 'ora.gpnpd' on 'rac1'CRS-2676: Start of 'ora.gpnpd' on 'rac1' succeeded CRS-2672: Attempting to start 'ora.cssdmonitor' on 'rac1'CRS-2672: Attempting to start 'ora.gipcd' on 'rac1'CRS-2676: Start of 'ora.cssdmonitor' on 'rac1' succeeded CRS-2676: Start of 'ora.gipcd' on 'rac1' succeeded CRS-2672: Attempting to start 'ora.cssd' on 'rac1'CRS-2672: Attempting to start 'ora.diskmon' on 'rac1'CRS-2676: Start of 'ora.diskmon' on 'rac1' succeeded CRS-2676: Start of 'ora.cssd' on 'rac1' succeeded ASM created and started successfully. Disk Group OCR created successfully. clscfg: -install mode specified Successfully accumulated necessary OCR keys. Creating OCR keys for user 'root', privgrp 'root'.. Operation successful. CRS-4256: Updating the profile Successful addition of voting disk 496abcfc4e214fc9bf85cf755e0cc8e2. Successfully replaced voting disk group with +OCR. CRS-4256: Updating the profile CRS-4266: Voting file(s) successfully replaced ## STATE File Universal Id File Name Disk group-- ----- ----------------- --------- --------- 1. ONLINE 496abcfc4e214fc9bf85cf755e0cc8e2 (/dev/raw/raw1) [OCR] Located 1 voting disk(s). CRS-2672: Attempting to start 'ora.asm' on 'rac1'CRS-2676: Start of 'ora.asm' on 'rac1' succeeded CRS-2672: Attempting to start 'ora.OCR.dg' on'rac1'CRS-2676: Start of 'ora.OCR.dg' on 'rac1' succeeded Configure Oracle Grid Infrastructure for a Cluster ... succeeded
第二部分
这期间报如下错误:
Failed to create keys in the OLR, rc = 127, Message:
/u01/app/11.2.0/grid/bin/clscfg.bin: error while loading shared libraries: libcap.so.1: cannot open shared object file: No such file or directory
[root@web1 /]# cd /lib64/
[root@web1 lib64]# ln -s libcap.so.2.16 libcap.so.1
[root@web1 grid]# ./root.sh
在rac2执行脚本
[root@rac2 grid]# /u01/app/oraInventory/orainstRoot.shChanging permissions of /u01/app/oraInventory.
Adding read,write permissions for group.
Removing read,write,execute permissions for world.

Changing groupname of /u01/app/oraInventory to oinstall.
The execution of the script is complete.
[root@rac2 grid]# /u01/app/11.2.0/grid/root.sh Performing root user operation for Oracle 11g

The following environment variables are set as:
    ORACLE_OWNER= grid
    ORACLE_HOME=  /u01/app/11.2.0/grid

Enter the full pathname of the local bin directory: [/usr/local/bin]:
   Copying dbhome to /usr/local/bin ...
   Copying oraenv to /usr/local/bin ...
   Copying coraenv to /usr/local/bin ...


Creating /etc/oratab file...
Entries will be added to the /etc/oratab file as needed byDatabase Configuration Assistant when a database is created
Finished running generic part of root script.
Now product-specific root actions will be performed.
Using configuration parameter file: /u01/app/11.2.0/grid/crs/install/crsconfig_params
Creating trace directory
User ignored Prerequisites during installation
OLR initialization - successful
Adding Clusterware entries to upstart
CRS-4402: The CSS daemon was started in exclusive mode but found an active CSS daemon on node rac1, number 1, and is terminating
An active cluster was found during exclusive startup, restarting to join the cluster
Configure Oracle Grid Infrastructure for a Cluster ... succeeded
[grid@rac2 ~]$ crs_stat -t -v
完成脚本后,点击OK,Next,下一步
这里出现了一个错误
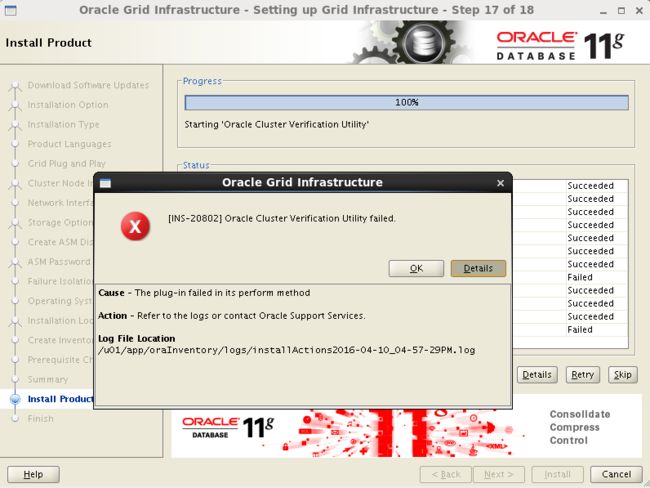
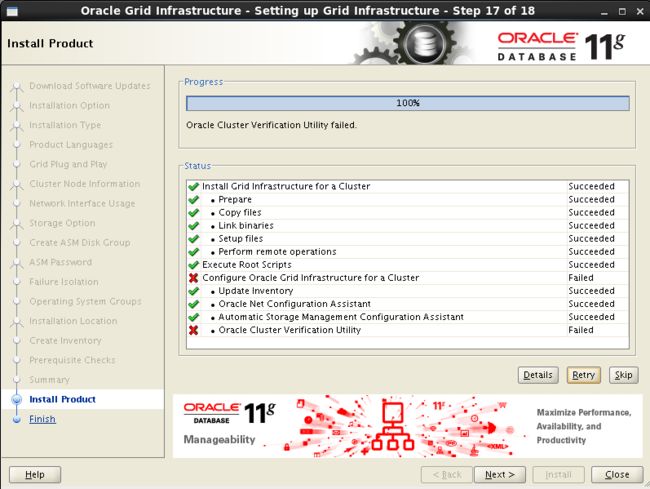
根据提示查看日志
[grid@rac1 grid]$ vi /u01/app/oraInventory/logs/installActions2016-04-10_04-57-29PM.log
命令模式查找错误:/ERROR
WARNING:
INFO: Completed Plugin named: Oracle Cluster Verification Utility
INFO: Checking name resolution setup for "scan-ip"...INFO: ERROR:
INFO: PRVG-1101 : SCAN name "scan-ip" failed to resolve
INFO: ERROR:
INFO: PRVF-4657 : Name resolution setup check for "scan-ip" (IP address: 192.168.248.110) failed
INFO: ERROR:
INFO: PRVF-4664 : Found inconsistent name resolution entries for SCAN name "scan-i
p"INFO: Verification of SCAN VIP and Listener setup failed1234567891011121314
由错误日志可知,是因为没有配置resolve.conf,可以忽略

安装完成

安装grid清单位置

至此grid集群软件安装完成
2.安装grid后的资源检查
以grid用户执行以下命令。
[root@rac1 ~]# su - grid
检查crs状态
[grid@rac1 ~]$ crsctl check crsCRS-4638: Oracle High Availability Services is online
CRS-4537: Cluster Ready Services is online
CRS-4529: Cluster Synchronization Services is online
CRS-4533: Event Manager is online12345
检查Clusterware资源
[grid@rac1 ~]$ crs_stat -t -v
Name           Type           R/RA   F/FT   Target    State     Host
----------------------------------------------------------------------
ora....ER.lsnr ora....er.type 0/5    0/     ONLINE    ONLINE    rac1
ora....N1.lsnr ora....er.type 0/5    0/0    ONLINE    ONLINE    rac1
ora.OCR.dg     ora....up.type 0/5    0/     ONLINE    ONLINE    rac1
ora.asm        ora.asm.type   0/5    0/     ONLINE    ONLINE    rac1
ora.cvu        ora.cvu.type   0/5    0/0    ONLINE    ONLINE    rac1
ora.gsd        ora.gsd.type   0/5    0/     OFFLINE   OFFLINE
ora....network ora....rk.type 0/5    0/     ONLINE    ONLINE    rac1
ora.oc4j       ora.oc4j.type  0/1    0/2    ONLINE    ONLINE    rac1
ora.ons        ora.ons.type   0/3    0/     ONLINE    ONLINE    rac1
ora....SM1.asm application    0/5    0/0    ONLINE    ONLINE    rac1
ora....C1.lsnr application    0/5    0/0    ONLINE    ONLINE    rac1
ora.rac1.gsd   application    0/5    0/0    OFFLINE   OFFLINE
ora.rac1.ons   application    0/3    0/0    ONLINE    ONLINE    rac1
ora.rac1.vip   ora....t1.type 0/0    0/0    ONLINE    ONLINE    rac1
ora....SM2.asm application    0/5    0/0    ONLINE    ONLINE    rac2
ora....C2.lsnr application    0/5    0/0    ONLINE    ONLINE    rac2
ora.rac2.gsd   application    0/5    0/0    OFFLINE   OFFLINE
ora.rac2.ons   application    0/3    0/0    ONLINE    ONLINE    rac2
ora.rac2.vip   ora....t1.type 0/0    0/0    ONLINE    ONLINE    rac2
ora.scan1.vip  ora....ip.type 0/0    0/0    ONLINE    ONLINE    rac1  1234567891011121314151617181920212223
检查集群节点
[grid@rac1 ~]$ olsnodes -n
rac1    1rac2    2123
检查两个节点上的Oracle TNS监听器进程
[grid@rac1 ~]$ ps -ef|grep lsnr|grep -v 'grep'|grep -v 'ocfs'|awk '{print$9}'LISTENER_SCAN1
LISTENER123
确认针对Oracle Clusterware文件的Oracle ASM功能:
如果在 Oracle ASM 上暗转过了OCR和表决磁盘文件,则以Grid Infrastructure 安装所有者的身份,使用给下面的命令语法来确认当前正在运行已安装的Oracle ASM:
[grid@rac1 ~]$ srvctl status asm -a
ASM is running on rac2,rac1
ASM is enabled.123
3.为数据和快速恢复去创建ASM磁盘组
官方文档中规定了不同冗余策略下OCR、Voting disk、Database和Recovery所需的大小
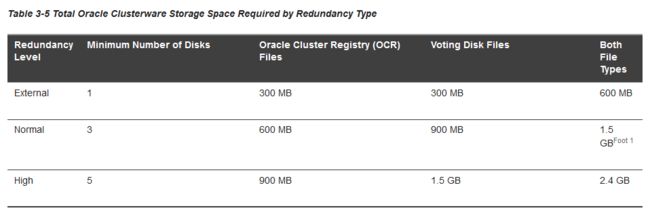
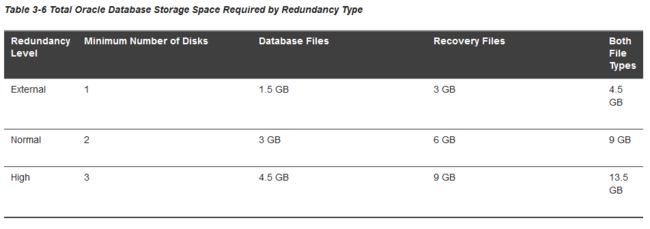
只在节点rac1执行即可
进入grid用户下
[root@rac1 ~]# su - grid
利用asmca
[grid@rac1 ~]$ asmca
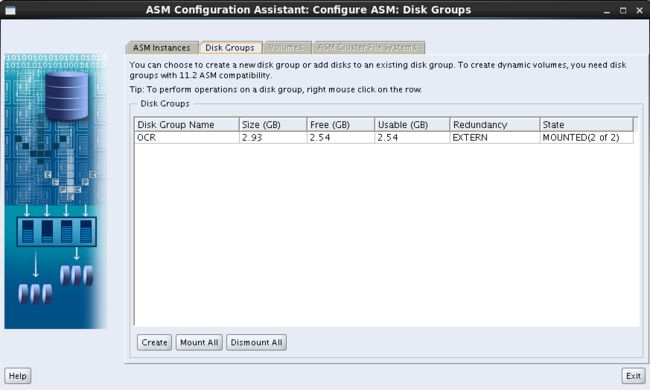
这里看到安装grid时配置的OCR盘已存在
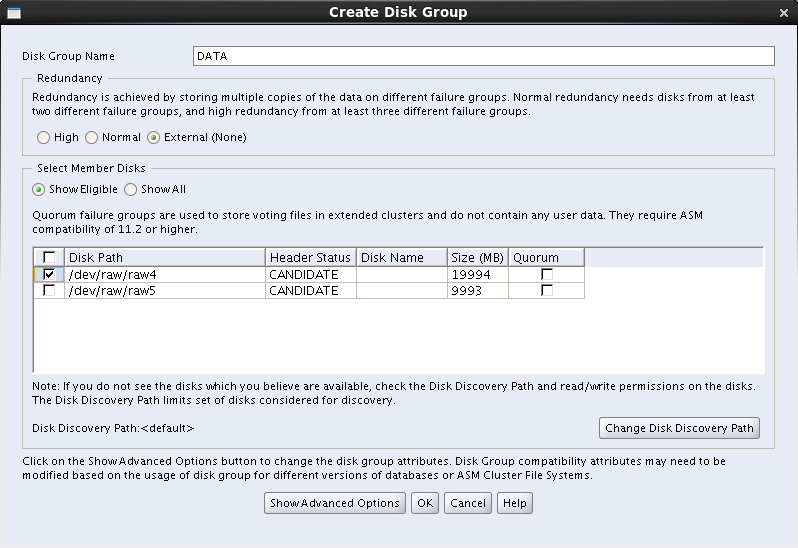
添加DATA盘,点击create,使用裸盘raw4

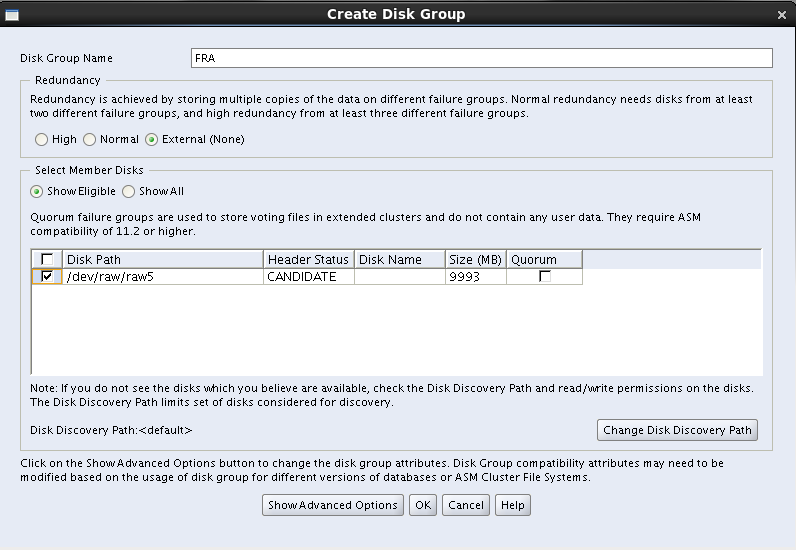
同样创建FRA盘,使用裸盘raw5

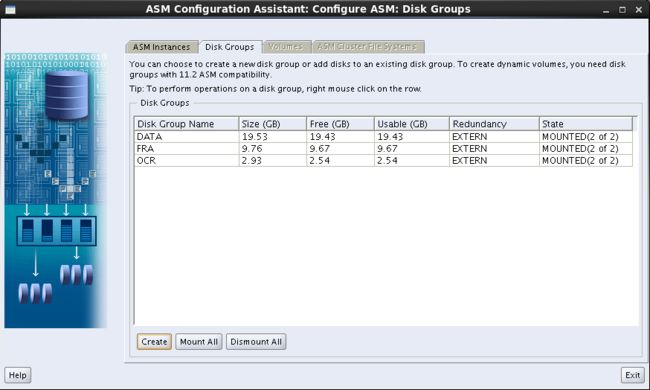
ASM磁盘组情况
ASM实例
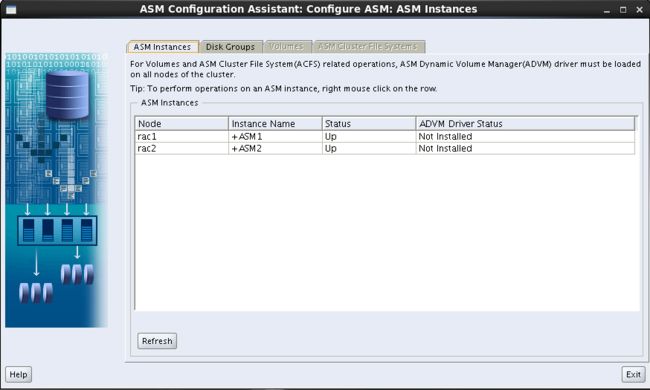
第三部分
安装Oracle database软件(RAC)
1.安装流程
只需要在节点rac1上执行即可
[root@rac1 ~]# su - oracle
[oracle@rac1 ~]$ cd db/database
[oracle@rac1 database]$ ./runInstaller
进入图形化界面,跳过更新
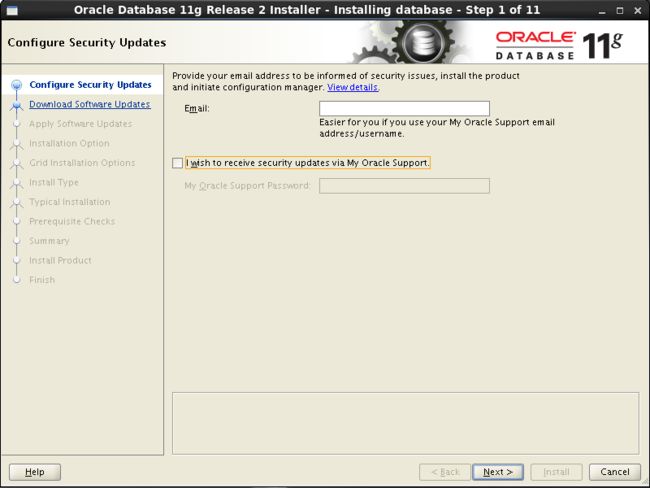
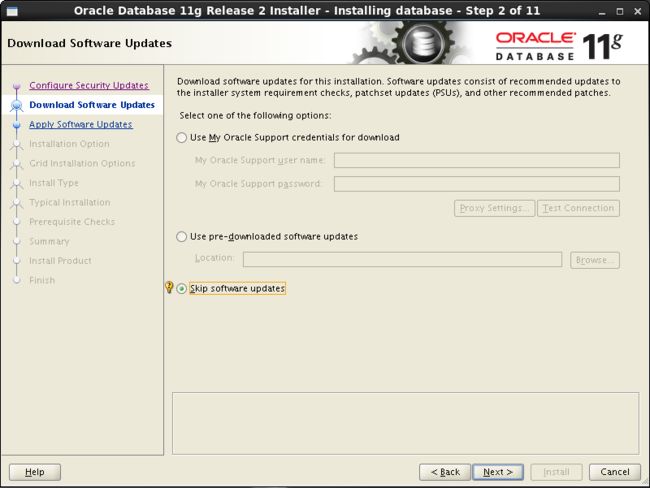
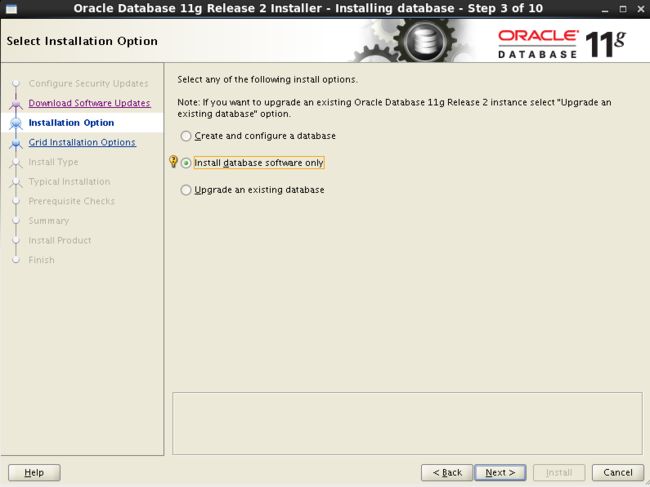
选择只安装数据库软件
选择Oracel Real Application Clusters database installation按钮(默认),确保勾选所有的节点
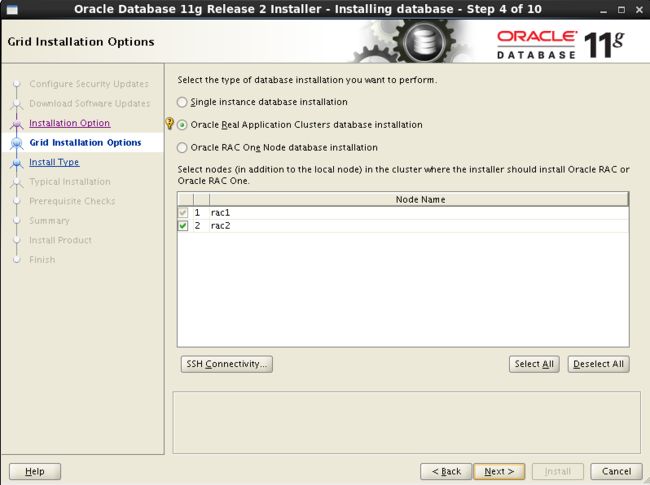
这里的SSH Connectivity是配置每个节点之间的oracle用户互信,前面已手动配置过,可以不配
选择语言English

选择安装企业版软件

选择安装Oracle软件路径,其中ORACLE_BASE,ORACLE_HOME均选择之前配置好的

oracle权限授予用户组

安装前的预检查
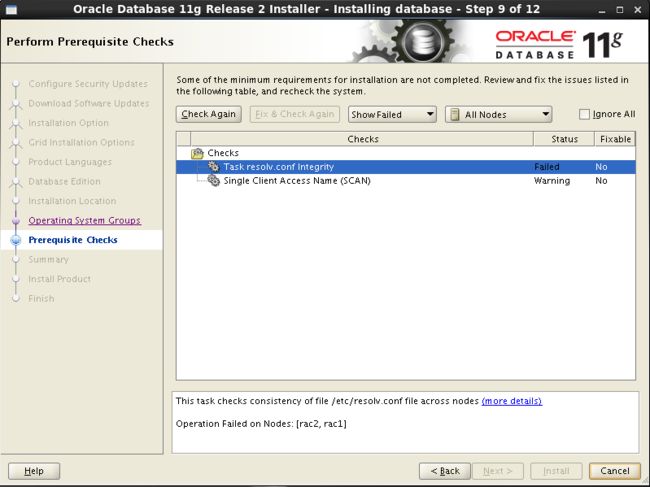
这两个错误前面有说明,忽略
安装RAC的概要信息
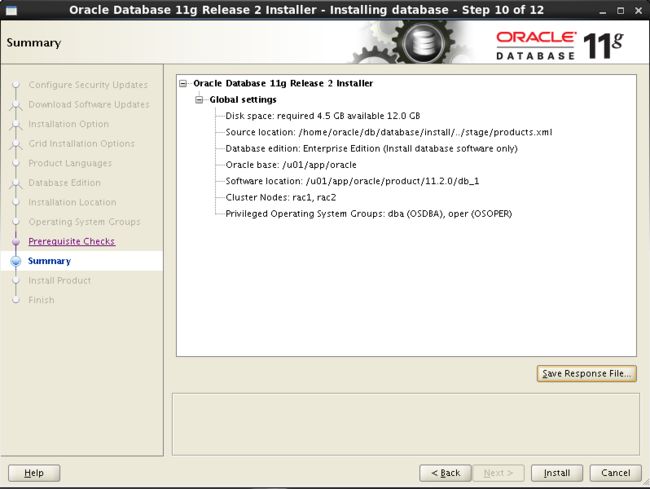
开始安装,会自动复制到其他节点
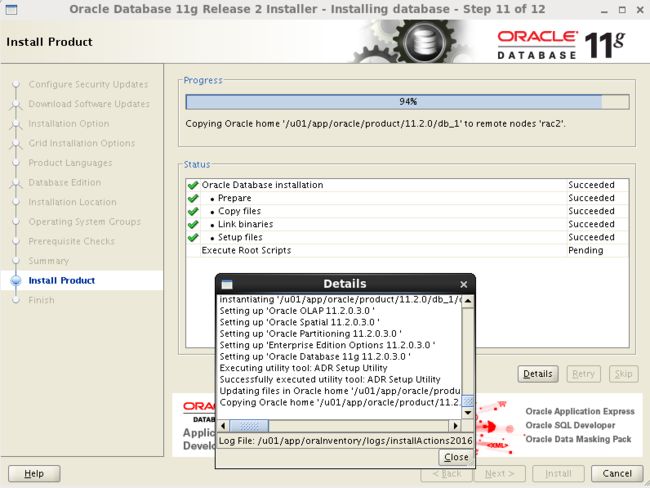
安装完,在每个节点用root用户执行脚本

[root@rac1 etc]# /u01/app/oracle/product/11.2.0/db_1/root.sh Performing root user operation for Oracle 11g

The following environment variables are set as:
    ORACLE_OWNER= oracle
    ORACLE_HOME=  /u01/app/oracle/product/11.2.0/db_1

Enter the full pathname of the local bin directory: [/usr/local/bin]:
The contents of "dbhome" have not changed. No need to overwrite.
The contents of "oraenv" have not changed. No need to overwrite.
The contents of "coraenv" have not changed. No need to overwrite.

Entries will be added to the /etc/oratab file as needed byDatabase Configuration Assistant when a database is created
Finished running generic part of root script.
Now product-specific root actions will be performed.
Finished product-specific root actions.123456789101112131415161718
安装完成,close
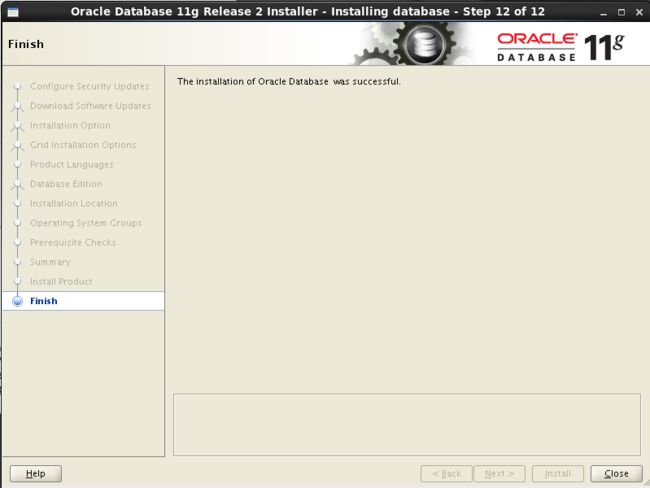
至此在RAC双节点上完成oracle软件安装,安装日志在

2.创建集群数据库
在节点rac1上用oracle用户执行dbca创建RAC数据库
[root@rac1 ~]# su - oracle
[oracle@rac1 ~]$ dbca
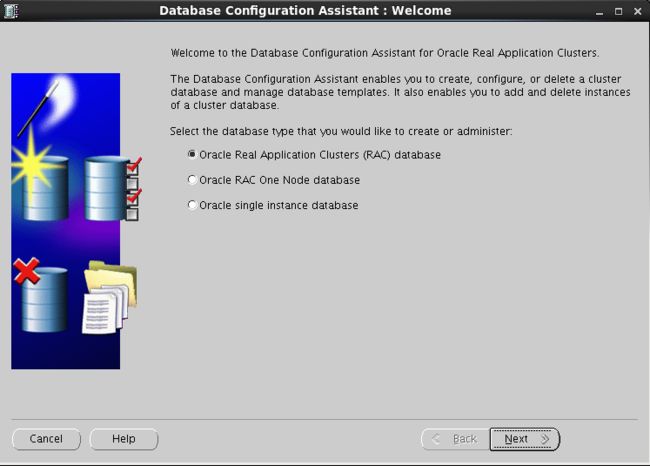
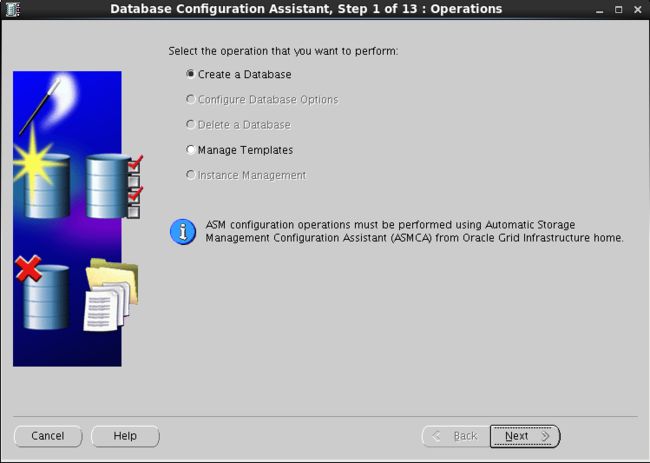
选择创建数据库
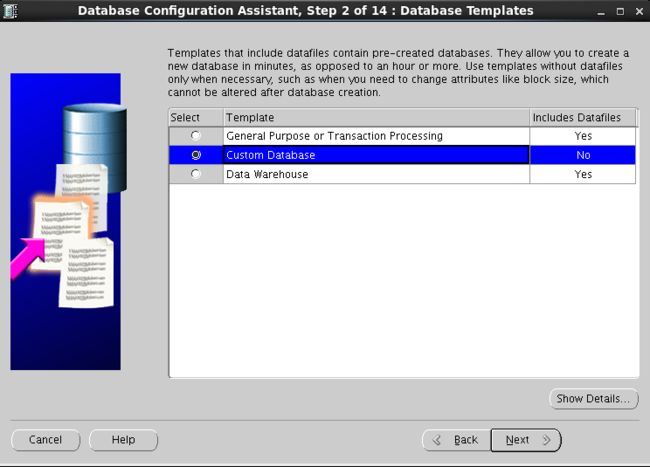
选择自定义数据库(也可以是通用)
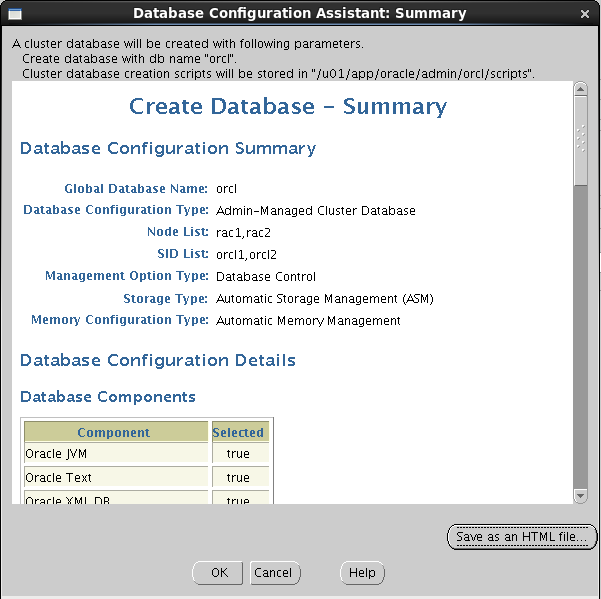
配置类型选择Admin-Managed,输入全局数据库名orcl,每个节点实例SID前缀为orcl,选择双节点
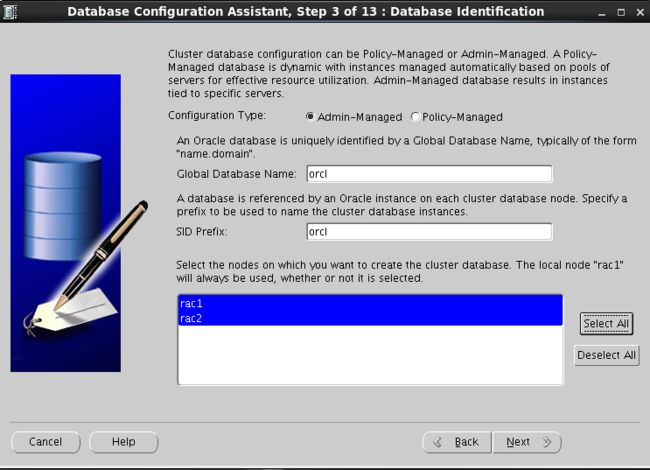
选择默认,配置OEM,启用数据库自动维护任务

统一设置sys,system,dbsnmp,sysman用户的密码为oracle

使用ASM存储,使用OMF(oracle的自动管理文件),数据区选择之前创建的DATA磁盘组

设置ASM密码为oracle
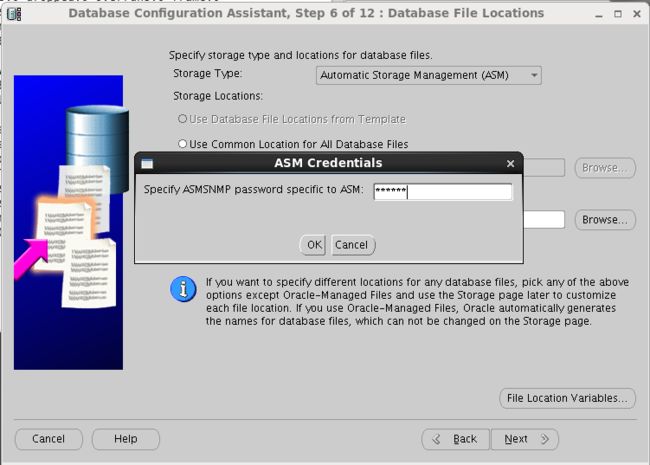
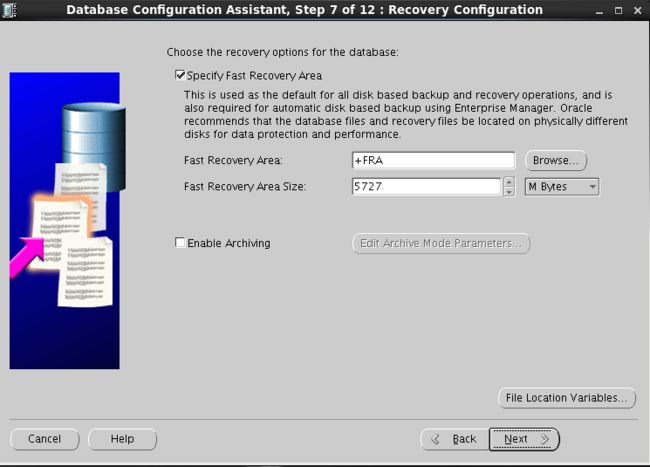
指定数据闪回区,选择之前创建好的FRA磁盘组,不开归档
组建选择

选择字符集AL32UTF8
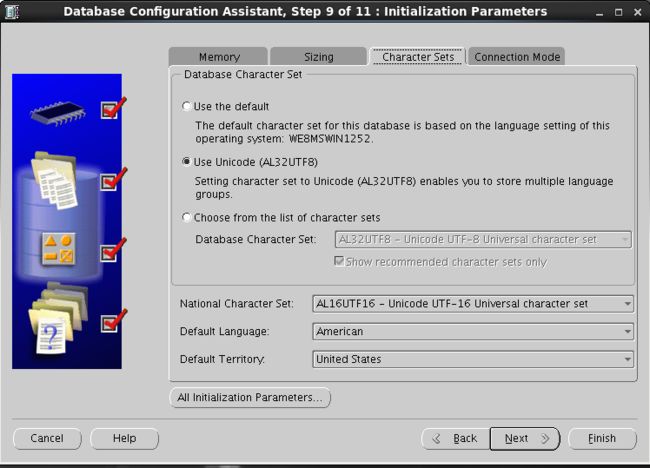
选择默认的数据存储信息
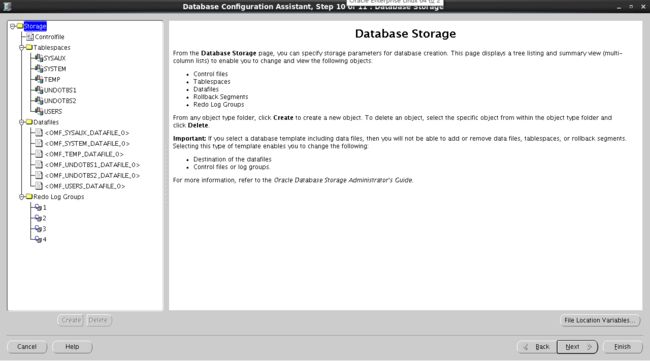
开始创建数据库,勾选生成数据库的脚本

数据库的概要信息
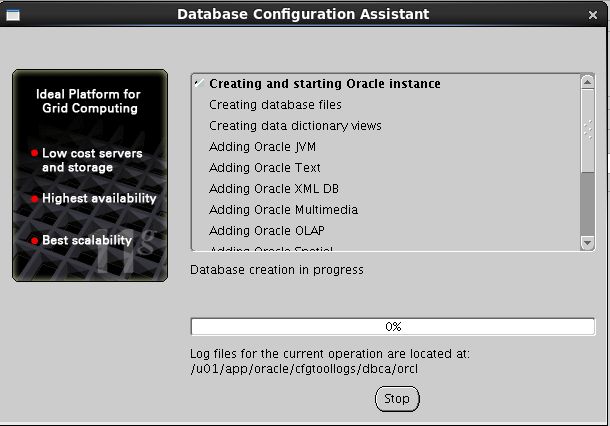
开始安装组建

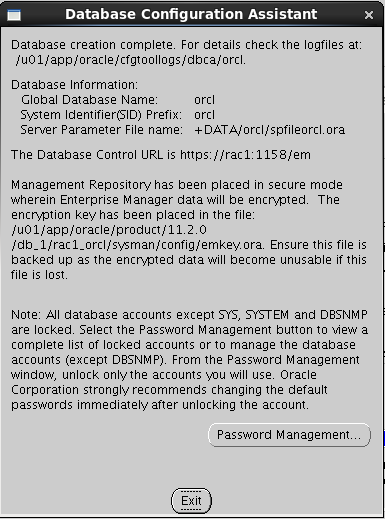
完成数据库安装
RAC维护
1.查看服务状态
忽略gsd问题
[root@rac1 ~]# su - grid[grid@rac1 ~]$ crs_stat -t
Name           Type           Target    State     Host
------------------------------------------------------------
ora.DATA.dg    ora....up.type ONLINE    ONLINE    rac1
ora.FRA.dg     ora....up.type ONLINE    ONLINE    rac1
ora....ER.lsnr ora....er.type ONLINE    ONLINE    rac1
ora....N1.lsnr ora....er.type ONLINE    ONLINE    rac1
ora.OCR.dg     ora....up.type ONLINE    ONLINE    rac1
ora.asm        ora.asm.type   ONLINE    ONLINE    rac1
ora.cvu        ora.cvu.type   ONLINE    ONLINE    rac1
ora.gsd        ora.gsd.type   OFFLINE   OFFLINE
ora....network ora....rk.type ONLINE    ONLINE    rac1
ora.oc4j       ora.oc4j.type  ONLINE    ONLINE    rac1
ora.ons        ora.ons.type   ONLINE    ONLINE    rac1
ora.orcl.db    ora....se.type ONLINE    ONLINE    rac1
ora....SM1.asm application    ONLINE    ONLINE    rac1
ora....C1.lsnr application    ONLINE    ONLINE    rac1
ora.rac1.gsd   application    OFFLINE   OFFLINE
ora.rac1.ons   application    ONLINE    ONLINE    rac1
ora.rac1.vip   ora....t1.type ONLINE    ONLINE    rac1
ora....SM2.asm application    ONLINE    ONLINE    rac2
ora....C2.lsnr application    ONLINE    ONLINE    rac2
ora.rac2.gsd   application    OFFLINE   OFFLINE
ora.rac2.ons   application    ONLINE    ONLINE    rac2
ora.rac2.vip   ora....t1.type ONLINE    ONLINE    rac2
ora.scan1.vip  ora....ip.type ONLINE    ONLINE    rac1123456789101112131415161718192021222324252627
检查集群运行状态
[grid@rac1 ~]$ srvctl status database -d orcl
Instance orcl1 is running on node rac1
Instance orcl2 is running on node rac2
2.检查CRS状态
检查本地节点的CRS状态
[grid@rac1 ~]$ crsctl check crsCRS-4638: Oracle High Availability Services is online
CRS-4537: Cluster Ready Services is online
CRS-4529: Cluster Synchronization Services is online
CRS-4533: Event Manager is online12345
检查集群的CRS状态
[grid@rac1 ~]$ crsctl check clusterCRS-4537: Cluster Ready Services is online
CRS-4529: Cluster Synchronization Services is online
CRS-4533: Event Manager is online1234
3.查看集群中节点配置信息
[grid@rac1 ~]$ olsnodes
rac1
rac2

[grid@rac1 ~]$ olsnodes -n
rac1    1rac2    2[grid@rac1 ~]$ olsnodes -n -i -s -t
rac1    1       rac1-vip        Active  Unpinnedrac2    2       rac2-vip        Active  Unpinned1234567891011
4.查看集群件的表决磁盘信息
[grid@rac1 ~]$ crsctl query css votedisk##  STATE    File Universal Id                File Name Disk group--  -----    -----------------                --------- ---------
 1. ONLINE   496abcfc4e214fc9bf85cf755e0cc8e2 (/dev/raw/raw1) [OCR]Located 1 voting disk(s).12345
5.查看集群SCAN VIP信息
[grid@rac1 ~]$ srvctl config scanSCAN name: scan-ip, Network: 1/192.168.248.0/255.255.255.0/eth0SCAN VIP name: scan1, IP: /scan-ip/192.168.248.110123
查看集群SCAN Listener信息
[grid@rac1 ~]$ srvctl config scan_listener
SCAN Listener LISTENER_SCAN1 exists. Port: TCP:152112
6.启、停集群数据库
整个集群的数据库启停
进入grid用户
[grid@rac1 ~]$ srvctl stop database -d orcl
[grid@rac1 ~]$ srvctl start database -d orcl
关闭所有节点
进入root用户
关闭所有节点
[root@rac1 bin]# pwd
/u01/app/11.2.0/grid/bin
[root@rac1 bin]# ./crsctl stop crs
实际只关闭了当前结点
EM管理
oracle用户下执行
[oracle@rac1 ~]$ emctl status dbconsole
[oracle@rac1 ~]$ emctl start dbconsole
[oracle@rac1 ~]$ emctl stop dbconsole123
本地sqlplus连接
windows中安装oracle客户端版
修改tsnames.ora
D:\develop\app\orcl\product\11.2.0\client_1\network\admin\tsnames.ora
添加
RAC_ORCL =
    (DESCRIPTION =
      (ADDRESS_LIST =
        (ADDRESS = (PROTOCOL = TCP)(HOST = 192.168.248.110)(PORT = 1521))
      )
      (CONNECT_DATA =
        (SERVER = DEDICATED)
        (SERVICE_NAME = orcl)
      )
    )12345678910
这里的HOST写的是scan-ip
C:\Users\sxtcx>sqlplus sys/oracle@RAC_ORCL as sysdba

SQL*Plus: Release 11.2.0.1.0 Production on 星期四 4月 14 14:37:30 2016Copyright (c) 1982, 2010, Oracle.  All rights reserved.


连接到:
Oracle Database 11g Enterprise Edition Release 11.2.0.3.0 - 64bit ProductionWith the Partitioning, Real Application Clusters, Automatic Storage Management, OLAP,
Data Mining and Real Application Testing options

SQL> select instance_name, status from v$instance;

INSTANCE_NAME                    STATUS-------------------------------- ------------------------orcl1                            OPEN1234567891011121314151617
当开启第二个命令行窗口连接时,发现实例名为orcl2,可以看出,scan-ip的加入可以具有负载均衡的作用。


