WebDriverJS和WebDriverIO
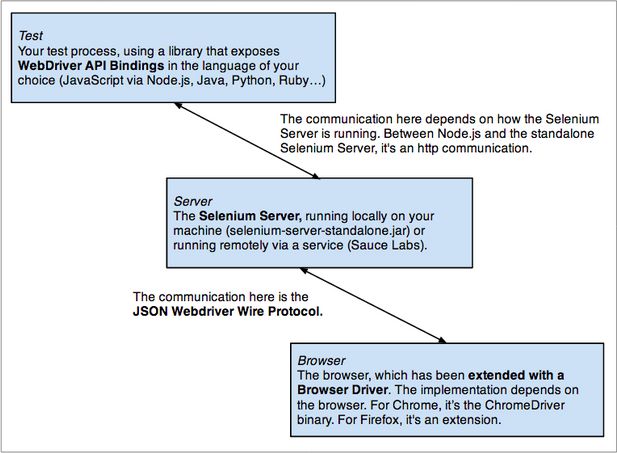
WebDriver 通过JSONWire Protocol将不同的语言和浏览器控制器进行通信。
WebDriver拥有很多不同的语言绑定,像是Ruby,Python等等。JavaScript是web世界的主要语言,也载入了WebDriver的列表中。于是我们迎来了WebDriverJS!
WebDriverJS的另外一个名字又叫Selenuim-webdriver,Node.JS官方实现JSONWire(WebDriver Wire)协议的一种方式,它对JSONWire协议进行了一个包装。
"WebdriverJS" is another name for selenium-webdriver, the official Node.JS implementation of the JSONWire (WebDriver Wire) Protocol by the Selenium team.
WebDriverIO是另外一种JSONWire协议的实现,是由一位在提供基于云的多浏览器测试公司Sauce Labs工作的员工Christian Broman实现的,非NodeJS官方实现,它用了更加单的语法来达到相同的目的。
"WebdriverIO" is an independent implementation of the JSON Wire Protocol by Christian Bromann(SO profile), who works at Sauce Labs, a provider of cloud-base cross-browser testing. WebdriverIO wraps its lower level requests into useful commands, with a concise syntax:
它的语法如下:
client
    .url('http://google.com')
    .setValue('#q','webdriver')
    .click('#btnG')
而同样的测试代码,WebDriverJS的语法就比较复杂:
driver.get('http://www.google.com');
driver.findElement(webdriver.By.id('q')).sendKeys('webdriver');
driver.findElement(webdriver.By.id('btnG')).click();
如若需要知道更多的WedDriverIO的信息,请点击官网地址
Protractor
Protractor是一个为了AngularJS而生的,基于NodeJS的开源E2E测试框架,但它也支持其他普通web的前端测试,它是一个对WebDriverJS的封装,它支持Jasmine。

它的优点:
- 在测试脚本里,不需要加入waits或者sleeps,它会帮你自动优化时间;
- 针对基于angular的web开发,它会提供新的定位元素的方法和策略,使用更方便;
- 它可以执行真实的浏览器,也可以执行headless模式;
Protractor的安装步骤:
- 安装NodeJS
- 安装Java
- 安装protractor
npm install -g protractor
它会自动下载比如Protractor, Protractor APIs,webdriver-manager,ChromeDriver,Jasmine等等。安装完毕后,用 "protractor --version" 检查是否安装成功。
- 更新webdriver-manager(可选步骤)
webdriver-manager update
它会更新selenium-server-standalone,chromedriver,geckodriver等等文件。
- 启动Selenium Server(可选步骤)
webdriver-manager start
这就启动了一个Selenium Server,它用于把浏览器的地址告诉给webdriver。启动以后,你会看到更多的信息在http://localhost:4444/wd/hub.
其实最简单的模式是,你可以选择不用经过Selenium Server,让webdriver和浏览器直接通信。
官网解释说:Protractor可以直接让测试脚本和Chrome和Firefox的Driver直连,不需要通过Selenium Server。
Protractor can test directly against Chrome and Firefox without using a Selenium Server. To use this, in your config file set directConnect: true.
directConnect: true - Your test script communicates directly Chrome Driver or Firefox Driver, bypassing any Selenium Server. If this is true, settings for seleniumAddress and seleniumServerJar will be ignored. If you attempt to use a browser other than Chrome or Firefox an error will be thrown.
Protractor写一个简单的E2E测试
因为我们在测试之后,总会想要看到一个漂亮简单的测试报告,所以在开始之前,我们选择需要安装可以自动生成HTML测试报告的模块。
npm install protractor-jasmine2-html-reporter -g
注意,这里需要在你安装protractor后生成的npm文件目录下安装该module,比如,在我的windows系统里安装protractor后,它的路径在C:\Users\godn1t\AppData\Roaming\npm,那么我需要在这个路径下运行上面的命令来安装。
- 先写一个conf.js文件来配置下的test case.
这里我用的是firefox进行测试,并且需要生成测试报告,当有测试发生失败的时候,会Screenshots记录下失败。conf.js文件直接放在npm这个文件路径下的。
var Jasmine2HtmlReporter = require('./node_modules/protractor-jasmine2-html-reporter');
exports.config = {
  framework: 'jasmine',
  seleniumAddress: 'http://localhost:4444/wd/hub',
  specs: ['spec.js'],
  capabilities:{
  'browserName':'firefox'
  },
  onPrepare: function(){jasmine.getEnv().addReporter(new Jasmine2HtmlReporter({savePath: 'report/e2e/',takeScreenshots: true,takeScreenshotsOnlyOnFailures: true}));}
}
- 测试用例实现
这里我直接用的官网上的例子, 需要注意的是,如果你的web app不是AngularJS写的,需要额外加一条语句将Angular禁掉,如下;同时将其保存为spec.js跟conf.js同一个路径下。
describe('Protractor Demo App', function() {
  it('should have a title', function() {
    browser.waitForAngularEnabled(false);
    browser.get('http://juliemr.github.io/protractor-demo/');
    expect(browser.getTitle()).toEqual('Super Calculator');
  });
});
Protractor跑起来
在同样的路径下,执行很简单的命令:
protractor conf.js
Protractor使用中常见问题以及解决
其实,我很不解,为什么说protractor的脚本里不需要加入waits和sleeps,因为它会帮你自动优化时间,我一开始会认为,它会自动等待页面元素的加载,然后顺序执行下一步,然而事实并非如此。
所以,当你遇到元素无法加载(点击)的情况下,还是需要用到waits或者sleeps,有点尴尬。
 var until = protractor.ExpectedConditions;
 browser.wait(until.elementToBeClickable(element(by.id('submitButton'))), 15000, 'Element taking too long to click in the DOM');
 var elem = element(by.xpath('/html/body/div[4]/div/div/div/div/div[2]/div/div[1]/div[1]/table/tbody/tr[1]/td[1]/a'));
 browser.wait(until.presenceOf(elem), 10000, 'Element taking too long to appear in the DOM');
或者直接用很暴力的sleeps:
browser.sleep(15000);
以上。
=====================================================================================
因为Protractor官网的内容,国内网络是不能访问的。所以,我把官网里的部分内容贴出来。
Tutorial
This is a simple tutorial that shows you how to set up Protractor and start running tests.
Prerequisites
Protractor is a Node.js program. To run, you will need to have Node.js installed. You will download Protractor package using npm, which comes with Node.js. Check the version of Node.js you have by running node --version. Then, check the compatibility notes in the Protractor README to make sure your version of Node.js is compatible with Protractor.
By default, Protractor uses the Jasmine test framework for its testing interface. This tutorial assumes some familiarity with Jasmine, and we will use version 2.4.
This tutorial will set up a test using a local standalone Selenium Server to control browsers. You will need to have the Java Development Kit (JDK)installed to run the standalone Selenium Server. Check this by running java -version from the command line.
Setup
Use npm to install Protractor globally with:
npm install -g protractor
This will install two command line tools, protractor and webdriver-manager. Try running protractor --version to make sure it's working.
The webdriver-manager is a helper tool to easily get an instance of a Selenium Server running. Use it to download the necessary binaries with:
webdriver-manager update
Now start up a server with:
webdriver-manager start
This will start up a Selenium Server and will output a bunch of info logs. Your Protractor test will send requests to this server to control a local browser. Leave this server running throughout the tutorial. You can see information about the status of the server at http://localhost:4444/wd/hub.
Step 0 - write a test
Open a new command line or terminal window and create a clean folder for testing.
Protractor needs two files to run, a spec file and a configuration file.
Let's start with a simple test that navigates to an example AngularJS application and checks its title. We’ll use the Super Calculator application at http://juliemr.github.io/protractor-demo/.
Copy the following into spec.js:
// spec.js
describe('Protractor Demo App', function() {
  it('should have a title', function() {
    browser.get('http://juliemr.github.io/protractor-demo/');

    expect(browser.getTitle()).toEqual('Super Calculator');
  });
});
The describe and it syntax is from the Jasmine framework. browser is a global created by Protractor, which is used for browser-level commands such as navigation with browser.get.
Now create the configuration file. Copy the following into conf.js:
// conf.js
exports.config = {
  framework: 'jasmine',
  seleniumAddress: 'http://localhost:4444/wd/hub',
  specs: ['spec.js']
}
This configuration tells Protractor where your test files (specs) are, and where to talk to your Selenium Server (seleniumAddress). It specifies that we will be using Jasmine for the test framework. It will use the defaults for all other configuration. Chrome is the default browser.
Now run the test with
protractor conf.js
You should see a Chrome browser window open up and navigate to the Calculator, then close itself (this should be very fast!). The test output should be 1 tests, 1 assertion, 0 failures. Congratulations, you've run your first Protractor test!
Step 1 - interacting with elements
Now let's modify the test to interact with elements on the page. Change spec.js to the following:
// spec.js
describe('Protractor Demo App', function() {
  it('should add one and two', function() {
    browser.get('http://juliemr.github.io/protractor-demo/');
    element(by.model('first')).sendKeys(1);
    element(by.model('second')).sendKeys(2);

    element(by.id('gobutton')).click();

    expect(element(by.binding('latest')).getText()).
        toEqual('5'); // This is wrong!
  });
});
This uses the globals element and by, which are also created by Protractor. The element function is used for finding HTML elements on your webpage. It returns an ElementFinder object, which can be used to interact with the element or get information from it. In this test, we use sendKeysto type into s, click to click a button, and getText to return the content of an element.
element takes one parameter, a Locator, which describes how to find the element. The by object creates Locators. Here, we're using three types of Locators:
by.model('first')to find the element withng-model="first". If you inspect the Calculator page source, you will see this is.by.id('gobutton')to find the element with the given id. This finds.-
by.binding('latest')to find the element bound to the variablelatest. This finds the span containing{{latest}}Learn more about locators and ElementFinders.
Run the tests with
protractor conf.js
You should see the page enter two numbers and wait for the result to be displayed. Because the result is 3, not 5, our test fails. Fix the test and try running it again.
Step 2 - writing multiple scenarios
Let's put these two tests together and clean them up a bit. Change spec.js to the following:
// spec.js
describe('Protractor Demo App', function() {
  var firstNumber = element(by.model('first'));
  var secondNumber = element(by.model('second'));
  var goButton = element(by.id('gobutton'));
  var latestResult = element(by.binding('latest'));

  beforeEach(function() {
    browser.get('http://juliemr.github.io/protractor-demo/');
  });

  it('should have a title', function() {
    expect(browser.getTitle()).toEqual('Super Calculator');
  });

  it('should add one and two', function() {
    firstNumber.sendKeys(1);
    secondNumber.sendKeys(2);

    goButton.click();

    expect(latestResult.getText()).toEqual('3');
  });

  it('should add four and six', function() {
    // Fill this in.
    expect(latestResult.getText()).toEqual('10');
  });

  it('should read the value from an input', function() {
    firstNumber.sendKeys(1);
    expect(firstNumber.getAttribute('value')).toEqual('1');
  });
});
Here, we've pulled the navigation out into a beforeEach function which is run before every it block. We've also stored the ElementFinders for the first and second input in nice variables that can be reused. Fill out the second test using those variables, and run the tests again to ensure they pass.
In the last assertion we read the value from the input field with firstNumber.getAttribute('value') and compare it with the value we have set before.
Step 3 - changing the configuration
Now that we've written some basic tests, let's take a look at the configuration file. The configuration file lets you change things like which browsers are used and how to connect to the Selenium Server. Let's change the browser. Change conf.js to the following:
// conf.js
exports.config = {
  framework: 'jasmine',
  seleniumAddress: 'http://localhost:4444/wd/hub',
  specs: ['spec.js'],
  capabilities: {
    browserName: 'firefox'
  }
}
Try running the tests again. You should see the tests running on Firefox instead of Chrome. The capabilities object describes the browser to be tested against. For a full list of options, see the config file.
You can also run tests on more than one browser at once. Change conf.js to:
// conf.js
exports.config = {
  framework: 'jasmine',
  seleniumAddress: 'http://localhost:4444/wd/hub',
  specs: ['spec.js'],
  multiCapabilities: [{
    browserName: 'firefox'
  }, {
    browserName: 'chrome'
  }]
}
Try running once again. You should see the tests running on Chrome and Firefox simultaneously, and the results reported separately on the command line.
Step 4 - lists of elements
Let's go back to the test files. Feel free to change the configuration back to using only one browser.
Sometimes, you will want to deal with a list of multiple elements. You can do this with element.all, which returns an ElementArrayFinder. In our calculator application, every operation is logged in the history, which is implemented on the site as a table with ng-repeat. Let's do a couple of operations, then test that they're in the history. Change spec.js to:
// spec.js
describe('Protractor Demo App', function() {
  var firstNumber = element(by.model('first'));
  var secondNumber = element(by.model('second'));
  var goButton = element(by.id('gobutton'));
  var latestResult = element(by.binding('latest'));
  var history = element.all(by.repeater('result in memory'));

  function add(a, b) {
    firstNumber.sendKeys(a);
    secondNumber.sendKeys(b);
    goButton.click();
  }

  beforeEach(function() {
    browser.get('http://juliemr.github.io/protractor-demo/');
  });

  it('should have a history', function() {
    add(1, 2);
    add(3, 4);

    expect(history.count()).toEqual(2);

    add(5, 6);

    expect(history.count()).toEqual(0); // This is wrong!
  });
});
We've done a couple things here - first, we created a helper function, add. We've added the variable history. We use element.all with the by.repeater Locator to get an ElementArrayFinder. In our spec, we assert that the history has the expected length using the count method. Fix the test so that the second expectation passes.
ElementArrayFinder has many methods in addition to count. Let's use last to get an ElementFinder that matches the last element found by the Locator. Change the test to:
  it('should have a history', function() {
    add(1, 2);
    add(3, 4);

    expect(history.last().getText()).toContain('1 + 2');
    expect(history.first().getText()).toContain('foo'); // This is wrong!
  });
Since the Calculator reports the oldest result at the bottom, the oldest addition (1 + 2) be the last history entry. We're using the toContain Jasmine matcher to assert that the element text contains "1 + 2". The full element text will also contain the timestamp and the result.
Fix the test so that it correctly expects the first history entry to contain the text "3 + 4".
ElementArrayFinder also has methods each, map, filter, and reduce which are analogous to JavaScript Array methods
中文参考文献
使用Protractor进行web功能测试
以上。