JAVA---NIO的理解与使用
一.NIo的简介
Java NIO (New IO,Non-Blocking IO)是从Java 1.4版本开始引入的一套新的IO API,可以替代标准的Java IO API。NIO与原来的IO有同样的作用和目的,但是使用的方式完全不同,NIO支持面向缓冲区的、基于通道的IO操作。NIO创建目的是为了让 Java 程序员可以实现高速 I/O 而无需编写自定义的本机代码。NIO 将最耗时的 I/O 操作(即填充和提取缓冲区)转移回操作系统,因而可以极大地提高速度。
二.NIO和传统IO的区别
IO: 面向流 单向的 阻塞IO
NIO:面向缓冲区(Buffer Oriented):通道可以是单向的,也可以是双向的
非阻塞IO(Non Blocking IO)
选择器(Selectors)
三.NIO的核心
1.缓冲区Buffer
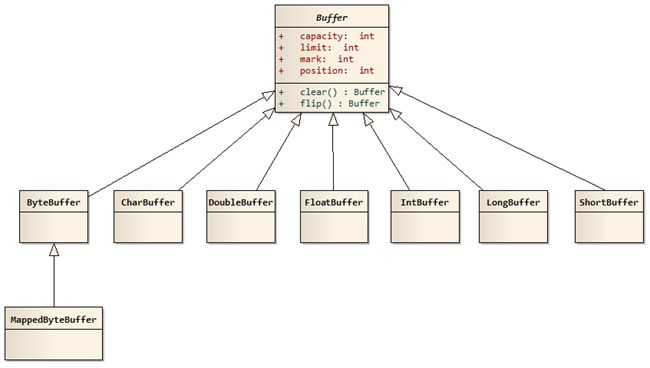
Buffer实际上是一个容器对象,更直接的说是一个数组,在NIO中,所有数据都是用Buffer处理的
在读取数据时,它是直接读到缓冲区中的; 在写入数据时,它也是写入到缓冲区中的
Buffer的常见属性
容量 (capacity) :表示 Buffer 最大数据容量,一旦声明后,不能更改。通过Buffer中的capacity()获取。缓冲区capacity不能为负。
限制 (limit):第一个不应该读取或写入的数据的索引,即位于 limit
后的数据不可读写。通过Buffer中的limit()获取。缓冲区的limit不能为负,并且不能大于其capacity。位置 (position):当前要读取或写入数据的索引。通过Buffer中的position()获取。缓冲区的position不能为负,并且不能大于其limit。
标记 (mark):标记是一个索引,通过 Buffer 中的 mark() 方法将mark标记为当前position位置。
之后可以通过调用 reset() 方法将 position恢复到标记的mark处。标记、位置、限制、容量遵守以下不变式:
0 <= mark <= position <= limit <= capacity
Buffer的常见方法
allocate():用于创建buffer时设置空间
put():将指定数据写入缓冲区中,然后当前索引位置加1
get():将缓冲区当前位置的数据读出,然后当前索引位置加1
flip():重设此缓冲区,将limit设置成当前position,再将当前position置0(将存数据模式变为取数据模式)
rewind():重置position位置,同时取消mark
clear():将缓冲区清空,一般是在重新写缓冲区时调用。
remaining():return limit-position ,获取之间的元素个数,用于判断缓冲区内是否还有数据
hasRemaining():return position
asCharBuffer():获得缓冲器的视图,然后使用视图的put方法存入char
直接缓冲区与非直接缓冲区
非直接缓冲区:对于HeapByteBuffer,通过allocate()分配缓冲区,将缓冲区建立在JVM的堆内存中。当需要和io设备打交道的时候,会将jvm堆上所维护的byte[]拷贝至堆外内存,然后堆外内存直接和io设备交互。
直接缓冲区:1.DirectByteBuffer通过allocateDirect()分配直接缓冲区,将缓冲区建立在JVM堆内存中,对于DirectByteBuffer所生成的ByteBuffer对象,一部分是在jvm堆内存上,一部分是操作系统上的堆内存上,在JVM堆上的对象就会有一个堆外内存的一个引用;此方式不需要拷贝,将大大提升io的效率,这种称之为零拷贝。
此方法返回的缓冲区进行分配和取消分配所需成本通常高于非直接缓冲区。直接缓冲区主要分配给那些易受基础系统的本机 I/O 操作影响的大型、持久的缓冲区。2.还可以通过 FileChannel 的 map() 方法 将文件区域直接映射到内存中来创建。该方法返回MappedByteBuffer 。
为什么对io的操作都需要将jvm内存区的数据拷贝到堆外内存呢?
是因为JVM需要进行GC,如果I/O设备直接和JVM堆上的数据进行交互,这个时候JVM进行了GC,那么有可能会导致没有被回收的数据进行了压缩,位置被移动到了连续的存储区域,这样会导致正在进行的I/O操作相关的数据全部乱套,显然是不合理的,
2.Channel通道
通道是一个对象,通过它可以读取和写入数据,当然了所有数据都通过Buffer对象来处理。我们永远不会将字节直接写入通道中,相反是将数据写入包含一个或者多个字节的缓冲区。同样不会直接从通道中读取字节,而是将数据从通道读入缓冲区,再从缓冲区获取这个字节。channel本身不能存数据,只能与buffer交互 。
Channel的主要实现类:都实现并Channel接口
1.FileChannel:适用于本地数据传输
2.SocketChannel:适用于TCP中的网络传输的客户端
3.ServerSocketChannel:适用于TCP中的网络传输的服务器端
4.DatagramChannel:适用于UDP中的网络传输
5.Pipe.SinkChannel:
Pipe.SourceChannel
Channel的实例化方法:
方式一: 调用getChannel()
* FileInputStream—>FileChannel
* FileOutpuStream—>FileChannel
* RandomAccessFile—>FileChannel例:FileChannel fc = new FileOutputStream(path).getChannel();
* Socket—>SocketChannel
* ServerSocket—>ServerSocketChannel
* DatagramSocket—>DatagramChannel* 方式二: jdk7.0以上才可以使用
* 调用XxxChannel的静态方法:open(),得到XxxChannel实例。
例:FileChannel fc = FileChannel.open(Paths.get(path)StandardOpenOption.WRITE);
* 方式三:jdk7.0以上才可以使用
* Files.newByteBuffer(),返回一个字节通道
例:ByteChannel bc = Files.newByteChannel(Paths.get(path),StandardOpenOption.READ);*方式四:
Channels.newChannel():Channles工具类中提供了静态方法
例:ReadableByteChannel bc = Channels.newChannel(new FileInputStream(path));
* Channel特点:既可以是单向的,也可以是双向的。
* ServerSocketChannel TCP 监听TCP读写网络中
* DatagramChannel 适用于UDP 读写网络中的数据通道
客户端
 public static void client(){
        ByteBuffer buffer = ByteBuffer.allocate(1024);
        SocketChannel socketChannel = null;
        try
        {

            socketChannel = SocketChannel.open();   //打开套接字通道
            socketChannel.configureBlocking(false);  //实现非阻塞
            socketChannel.connect(new InetSocketAddress("10.10.195.115",8080));//连接通道
            if(socketChannel.finishConnect())
            {
                int i=0;
                while(true)
                {
                    TimeUnit.SECONDS.sleep(1);
                    String info = "I'm "+i+++"-th information from client";
                    buffer.clear();
                    buffer.put(info.getBytes());
                    buffer.flip();
                    while(buffer.hasRemaining()){
                        System.out.println(buffer);
                        socketChannel.write(buffer);         //读取数据
                    }
                }
            }
        }
        catch (IOException | InterruptedException e)
        {
            e.printStackTrace();
        }
        finally{
            try{
                if(socketChannel!=null){
                    socketChannel.close();      //关闭通道
                }
            }catch(IOException e){
                e.printStackTrace();
            }
        }
    }
服务端:
public void initServer(int port) throws Exception {
        // 获得一个ServerSocket通道
        ServerSocketChannel serverChannel = ServerSocketChannel.open();
        // 设置通道为非阻塞
        serverChannel.configureBlocking(false);
        // 将该通道对于的serverSocket绑定到port端口
        serverChannel.socket().bind(new InetSocketAddress(port));
        // 获得一个通道管理器(选择器)
        this.selector = Selector.open();
        /*
         * 将通道管理器和该通道绑定,并为该通道注册selectionKey.OP_ACCEPT事件
         * 注册该事件后,当事件到达的时候,selector.select()会返回,
         * 如果事件没有到达selector.select()会一直阻塞
         */
        serverChannel.register(selector, SelectionKey.OP_ACCEPT);
    }
3.Selector选择器
一个SelectionKey键表示了一个特定的通道对象和一个特定的选择器对象之间的注册关系。
用于检测一到多个通道,并能够知晓通道是否为诸如读写事件做好准备的组件。这样,一个单独的线程可以管理多个channel,从而管理多个网络连接。
Selector的使用方法:
1.注册事件:
/*
 * 注册事件
 * */
protected Selector getSelector() throws IOException {
    // 创建Selector对象
    Selector select = Selector.open();

    // 创建可选择通道,并配置为非阻塞模式
    ServerSocketChannel server = ServerSocketChannel.open();
    server.configureBlocking(false);

    // 绑定通道到指定端口
    ServerSocket socket = server.socket();
    InetSocketAddress address = new InetSocketAddress(port);
    socket.bind(address);

    // 向Selector中注册感兴趣的事件
    //1. SelectionKey.OP_CONNECT
    //2. SelectionKey.OP_ACCEPT
    //3. SelectionKey.OP_READ
    //4. SelectionKey.OP_WRITE
     server.register(select , SelectionKey.OP_ACCEPT); //OP_ACCEPT:新的连接发 生时所产生的事件
    return select ;
}
2.监听事件:当向Selector注册Channel时,register()方法会返回一个SelectionKey对象。
一.SelectionKey包含的属性:
1.interest集合
2.ready集合
3.Channel
4.Selector
二.检测Channel的什么事件就绪
selectionKey.isAcceptable();
selectionKey.isConnectable();
selectionKey.isReadable();
selectionKey.isWritable();三.从SelectionKey访问Channel和Selector
Channel channel = key.channel();
Selector selector = key.selector();
key.attachment();
/*
 * 开始监听
 * */
public void listen() {
    System.out.println("listen on " + port);
    try {
        while(true) {

            //1.int select():阻塞到至少有一个通道在你注册的事件上就绪了。
            //2.int select(long timeout):和select()一样,但最长阻塞时间为timeout毫秒。
            //3.int selectNow():非阻塞,只要有通道就绪就立刻返回。
            // 该调用会阻塞,直到至少有一个事件发生
            selector.select();

            Iterator iterator = selector.selectedKeys().iterator();
            while (iterator .hasNext()) {
                //获取(channel,selector)封装成了一个SelectionKey对象
                SelectionKey key = (SelectionKey) iterator .next();
                iterator .remove(); //移除已选择键集中的SelectionKey实例
                process(key);
            }
        }
    } catch (IOException e) {
        e.printStackTrace();
    }
}
3.根据不同的事件,进行处理
/*
 * 根据不同的事件做处理
 * */
protected void process(SelectionKey key) throws IOException{
    // 接收请求
    if (key.isAcceptable()) {
        //创建新的连接,并且把连接注册到selector上
        ServerSocketChannel server = (ServerSocketChannel) key.channel();
        SocketChannel channel = server.accept(); //接受客户端请求
        channel.configureBlocking(false);
        channel.register(selector, SelectionKey.OP_READ);
    }
    // 读信息
    else if (key.isReadable()) {
        SocketChannel channel = (SocketChannel) key.channel();
        int count = channel.read(buffer);
        if (count > 0) {
            buffer.flip();
            CharBuffer charBuffer = decoder.decode(buffer);
            name = charBuffer.toString();
            SelectionKey sKey = channel.register(selector, SelectionKey.OP_WRITE);
            sKey.attach(name);
        } else {
            channel.close();
        }
        buffer.clear();
    }
    // 写事件
    else if (key.isWritable()) {
        SocketChannel channel = (SocketChannel) key.channel();
        String name = (String) key.attachment();

        ByteBuffer block = encoder.encode(CharBuffer.wrap("Hello " + name));
        if(block != null){
            channel.write(block);
        }
        else{
            channel.close();
        }
     }
}
内存印射文件
MappedByteBuffer是NIO引入的文件内存映射方案,读写性能极高。NIO最主要的就是实现了对异步操作的支持。
ByteBuffer有两种模式:直接/间接。1.间接模式:HeapByteBuffer,即操作堆内存 (byte[]).
2."直接"模式:MappedByteBuffer,文件映射.(效率高) DirectByteBuffer是MappedByteBuffer的一个子类。
MappedByteBuffer mbb = fileChannel.map(int mode,long position,long size);
mode指出了 可访问该内存映像文件的方式:FileChannel.MapMode.READ_ONLY
1.READ_ONLY,(只读)
2.READ_WRITE(读/写)
3.PRIVATE(专用)
可以把文件的从position开始的size大小的区域映射为内存映像文件
文件加锁
JDK1.4引入了文件加锁机制,它允许我们同步访问某个作为共享资源的文件。
例:FileLock fl = FileChannel.tryLock();
fl.tryLock():是非阻塞式的,尝试是否能获得锁 如果不能获得立即返回
fl.lock():是阻塞式的,它会阻塞进程直到锁可以获得
fl.release();释放锁
fl.isShared():查询锁的类型(独占锁或共享锁)