springboot微信授权登录
水平有限!实现方法直接找的网上的以为大神所编写的api来实现,这里主要是记录一下自己实现的过程.具体方法请参考网址:https://github.com/liyiorg/weixin-popular,关于微信授权登录的步骤,可以参考:https://mp.weixin.qq.com/wiki?t=resource/res_main&id=mp1421140842
1.关于如何建立一个springboot项目这里就不说了,网上关于springboot的一大片一大片.
2.创建公众账号,账号应该都得认证过才行,我所做过的授权登录都是认证过的.然后在公众号中进行配置;配置如下:
(1).登录微信公众号.
(2).在左边的菜单栏中点击基本配置,如图:

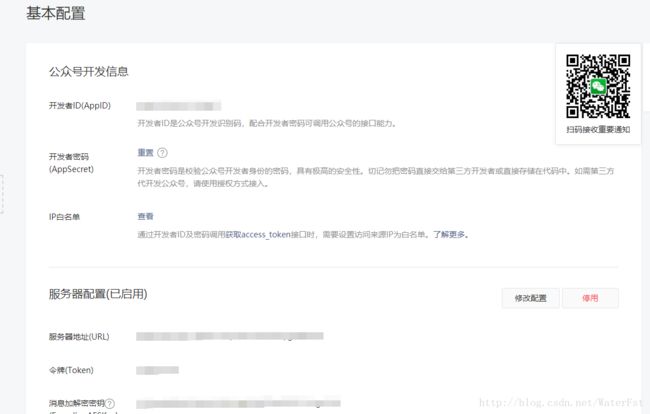
(3).到了这一步呢,在公众号卡发信息中,我们可以看到开发者ID,也就是网上各个微信授权登录所说的AppId,AppSecret,IP白名单,这三个中前两个我们待会儿做微信授权登录时会在代码中需要,第三个ip白名单将你的ip放入到里边就可以了,外网的ip哦
(4).下面来配置服务器配置;其中服务器地址:必须是外网地址,就是微信服务器可以通过这个地址给你发验证消息,没有外网的可以用花生壳等内网穿透软件,我第一次做的时候用的就是花生壳,后来直接用公司的nginx映射出去了,也就省下这笔钱了,哈哈!虽然说花生壳要的钱也不算多,但是苍蝇再小也是肉啊!!!备注:这个地址必须是80端口哈;消息加解密方式我选的兼容模式,因为加密方式的话还得修改jdk中的东西,具体请参考微信开发文档,我这里就不多介绍了.
(5).配置好了上一步之后,别提交,我们就需要在项目中写一个接口来让微信给我们发送验证消息.
(6).在建立好的springboot项目中引入依赖:
<dependency>
  <groupId>com.github.liyiorggroupId>
  <artifactId>weixin-popularartifactId>
  <version>2.8.17version>
dependency>
这个依赖就是我开头说的大神所写的api,挺好用的.
(7)在我们的项目中建一个WxCheckController,
package cn.com.bonc.wx.controller;


import cn.com.bonc.wx.service.WxService;
import cn.com.bonc.wx.util.SignUtil;
import org.springframework.beans.factory.annotation.Autowired;
import org.springframework.web.bind.annotation.RequestMapping;
import org.springframework.web.bind.annotation.RequestMethod;
import org.springframework.web.bind.annotation.RestController;

import javax.servlet.http.HttpServletRequest;
import javax.servlet.http.HttpServletResponse;
import java.io.IOException;
import java.io.PrintWriter;

@RestController
@RequestMapping("/getResult")
public class WxCheckController {

    @Autowired
    private WxService wxUserService;


    /**
     * 与公众号服务器配置进行比对
     * @param req
     * @param res
     */
    @RequestMapping(method = RequestMethod.GET)
    public void getWxResult(HttpServletRequest req, HttpServletResponse res){
        // 微信加密签名,signature结合了开发者填写的token参数和请求中的timestamp参数、nonce参数。
        String signature = req.getParameter("signature");
        // 时间戳
        String timestamp = req.getParameter("timestamp");
        // 随机数
        String nonce = req.getParameter("nonce");
        // 随机字符串
        String echostr = req.getParameter("echostr");


        PrintWriter out = null;
        try {
            out = res.getWriter();
            // 通过检验signature对请求进行校验,若校验成功则原样返回echostr,否则接入失败
            if (SignUtil.checkSignature(signature, timestamp, nonce)) {
                out.print(echostr);
            }
        } catch (IOException e) {
            e.printStackTrace();
        } finally {
            out.close();
            out = null;
        }
        System.out.println(req);
    }

    /**
     * 接收公众号的各种信息
     * @param request
     * @return
     */
    @RequestMapping(method = RequestMethod.POST)
    public String processRequest(HttpServletRequest request) {
        String message = wxUserService.saveWxUserOperation(request);
        return message;
    }


}
写好以后,我们启动项目,不管你们的启动没启动,我的反正启动了;刚才我们配置完呈现这个状态:

当我们点击提交的时候,微信会给我们写的接口来发送验证消息,如果提醒你出现这个消息:
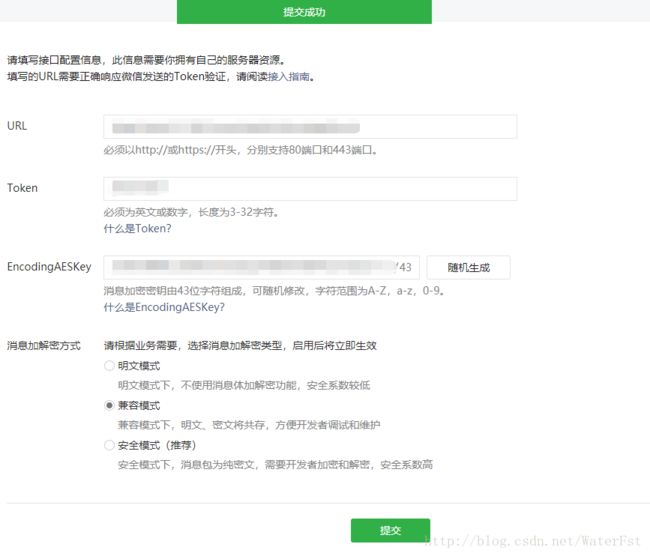
上面会出现提交成功,那么恭喜你,你的一只脚已经在成功的大门里边了!
3.下面我们来实现网页授权登录.
(1).刚才项目建好的时候我们导入过一个依赖,下面我们依据这个依赖来进行授权登录;首先,我们写一个类,我这里是实现过程,所以都写Controller,至于微信返回的信息怎么操作,看各位心情了.类名WxDevController,建好类后我们将我们上面提到的AppId和AppSecret放入到类中,定义一个全局变量吧.下面请看代码:
package cn.com.bonc.wx.controller;
import cn.com.bonc.common.util.JsonResultNew;
import cn.com.bonc.common.util.MyBusinessEnum;
import cn.com.bonc.wx.service.WxService;
import cn.com.bonc.wx.util.HttpRequestUtil;
import cn.com.bonc.wx.util.TokenUtil;
import cn.com.bonc.wx.util.WeiXinResult;
import org.springframework.beans.factory.annotation.Autowired;
import org.springframework.beans.factory.annotation.Value;
import org.springframework.web.bind.annotation.RequestMapping;
import org.springframework.web.bind.annotation.RestController;
import weixin.popular.api.QrcodeAPI;
import weixin.popular.api.SnsAPI;
import weixin.popular.bean.qrcode.QrcodeTicket;
import weixin.popular.bean.user.User;
import javax.imageio.ImageIO;
import javax.servlet.http.HttpServletRequest;
import javax.servlet.http.HttpServletResponse;
import java.awt.image.BufferedImage;
import java.io.IOException;
import java.util.HashMap;
import java.util.Map;
import java.util.TreeMap;
/**
* 微信其他功能开发
*/
@RestController
@RequestMapping("/account")
public class WxDevController {
@Autowired
private TokenUtil tokenUtil;
@Autowired
private WxService wxUserService;
@Value("${wx.appId}")
private String appID ;//这里是AppId,我放到配置文件中了,也可以在这里写,直接定义全局变量,下面的开发者密码一样
@Value("${wx.appSecret}")
private String appSecret;//AppSecret,开发者密码
/**
* 网页微信授权登录接口
* @return
*/
@RequestMapping(value = "/login")
public void wxLogin(String url, HttpServletResponse response) throws Exception {
System.out.println("授权登录url:"+url);
String urls = SnsAPI.connectOauth2Authorize(appID, url, true, "STATE");
response.sendRedirect(urls);
}
@RequestMapping(value = "/goIndex")
public JsonResultNew其中的方法只要导入包就一定可以调出来的,里边的返回结果是我自己封装的方法,各位可以直接返回一个Json对象,不必照着我的来.
写好这些后剩下的就是前端调你的接口,然后返回微信授权登陆后的信息了.我说一下我实现的步骤吧:
首先前端先写一个授权登录的页面,如果是测试的话随便写点儿啦,先调用login接口,参数是你要授权登录后返回的页面地址;说道这里呢,我得讲一下我理解的微信授权登录的原理了.
(1).前端调用login接口,后端重定向到微信的授权页面,但是你得告诉微信授权登录后我给你返回到哪个网址,这个网址就是你填写的url,也就是我上面代码中login接口所接收的参数.这个url必须和你在微信公众号中配置的服务器地址的url在同一个域名下,否则就失败了.
(2).微信在用户授权登录后,返回到你刚才填写的url,这个url中会带一个参数code,这个code就是调用第二个接口goIndex中所需要的参数,这个参数是从微信端拉取用户信息所需要的参数,没有这个参数,那你就获取不到用户基本信息,所以,前端页面中必须获取地址栏中的参数.
我将我写的粗陋前端代码贴一下,望各位前端工程师勿喷.
js示例:
function getRequest() {
    var url = window.location.search; //获取url中"?"符后的字串
    var theRequest = new Object();
    if (url.indexOf("?") != -1) {
        var str = url.substr(1);
        strs = str.split("&");
        for(var i = 0; i < strs.length; i ++) {

            theRequest[strs[i].split("=")[0]]=decodeURI(strs[i].split("=")[1]);

        }
    }
    return theRequest;
}
//定义获取微信用户信息的code
var code = "";
//定义微信用户信息
var users = "";
//用方法获取url中的code
code = getRequest().code;
//判断code
if(code!=""&&code!=undefined){
    //code存在的话从后台拉取微信用户信息
	$.ajax({
        url:'http://stock.511860.com/waterFashion/account/goIndex',
        data:{code:code},
        success:function (res) {
            users = res.map.data;
        }
    })
}else {
    //code不存在就发起获取code的请求
	window.location.href="http://stock.511860.com/waterFashion/account/login?url=http://stock.511860.com/car/index.html"
}
到此,微信用户基本信息就拉下来了.如有不足之处,望各位大神指点一二.