一个图形学萌新的学习记录。
学习了直线生成算法之后,继续来学习绘制圆弧的方法,如果要生成一个整圆,可以利用坐标系的八对称性,在其中一个象限绘制之后再在其他象限的对称点绘制即可。
我们首先考虑圆心在原点,半径为r的圆,计算出像素之后只需加上一个偏移量即可绘制圆心在任意一点的圆。
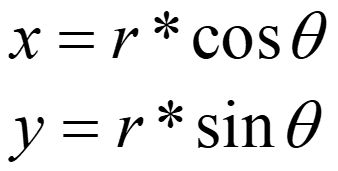
要画圆最暴力的方法当然是利用圆的参数方程来计算:
但这样计算使用了三角函数和浮点运算,效率低下,所以通常我们使用中点画圆法来进行圆的绘制。
中点画圆法
中点画圆法利用的也是类似于Bresenham直线算法的思想,利用判别式选择像素,只需做简单的整数运算。
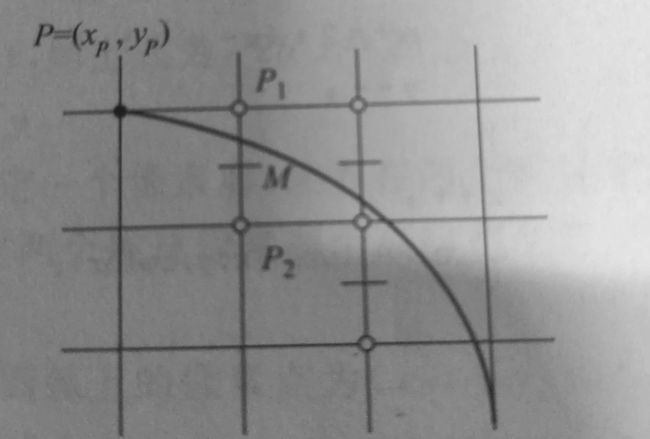
我们八象限中第二象限的1/8圆为例,若确定了一个像素点为($x_{p},y_{p}$),那么下一个点要么是右方的P1,要么是右下方的P2。
构造函数一个函数F(x,y)=$x^{2}$+$y^{2}$-$R^{2}$,当F大于0时,点在圆外,反之则在圆内。
图中的M是P1和P2的中点,所以M=($x_{p}$+1,$y_{p}-0.5$),当F(M)<0时,M在圆内,说明P1离圆弧更近,反之M在圆外,P2更近。
根据以上原理,可构造判别式:
当$d_{p}$<0时,取P1为下一像素,下一像素判别式为:
当$d_{p}$>0时,取P2为下一像素,下一像素判别式为:
我们按顺时针方式生成八分圆,所以第一个像素为(0,R),初始判别式为:
1.25-R可以简化成1-R,去除浮点数运算,因为运算过程中增量都为整数,所以减去0.25是不会影响符号的。
代码实现如下:
void CirclePoints(HDC hdc, int x, int y,int offx,int offy)//利用对称性画整圆
{
    SetPixel(hdc, x + offx, y + offy, RGB(0, 0, 0));
    SetPixel(hdc, y + offx, x + offy, RGB(0, 0, 0));
    SetPixel(hdc, x + offx, -y + offy, RGB(0, 0, 0));
    SetPixel(hdc, -y + offx, x + offy, RGB(0, 0, 0));
    SetPixel(hdc, -x + offx, y + offy, RGB(0, 0, 0));
    SetPixel(hdc, y + offx, -x + offy, RGB(0, 0, 0));
    SetPixel(hdc, -x + offx, -y + offy, RGB(0, 0, 0));
    SetPixel(hdc, -y + offx, -x + offy, RGB(0, 0, 0));
}

void MidPointCircle(HDC hdc, int x1, int y1, int r)//中点画圆
{
    int x, y, e;
    x = 0; y = r; e = 1 - r;
    CirclePoints(hdc, x, y, x1, y1);
    while (x <= y)
    {
        if (e < 0)
            e += 2 * x + 3;
        else
        {
            e += 2 * (x - y) + 5;
            y--;
        }
        x++;
        CirclePoints(hdc, x, y, x1, y1);
    }
}
完整可运行Windows代码:
#include#include #include using namespace std; const int ScreenWidth = 500; const int ScreenHeight = 500; LRESULT CALLBACK WinProc(HWND hWnd, UINT message, WPARAM wParam, LPARAM lParam) { switch (message) { case WM_CLOSE: DestroyWindow(hWnd); break; case WM_DESTROY: PostQuitMessage(0); break; default: return DefWindowProc(hWnd, message, wParam, lParam); break; } return 0; } void CirclePoints(HDC hdc, int x, int y,int offx,int offy)//利用对称性画整圆 { SetPixel(hdc, x + offx, y + offy, RGB(0, 0, 0)); SetPixel(hdc, y + offx, x + offy, RGB(0, 0, 0)); SetPixel(hdc, x + offx, -y + offy, RGB(0, 0, 0)); SetPixel(hdc, -y + offx, x + offy, RGB(0, 0, 0)); SetPixel(hdc, -x + offx, y + offy, RGB(0, 0, 0)); SetPixel(hdc, y + offx, -x + offy, RGB(0, 0, 0)); SetPixel(hdc, -x + offx, -y + offy, RGB(0, 0, 0)); SetPixel(hdc, -y + offx, -x + offy, RGB(0, 0, 0)); } void MidPointCircle(HDC hdc, int x1, int y1, int r) { int x, y, e; x = 0; y = r; e = 1 - r; CirclePoints(hdc, x, y, x1, y1); while (x <= y) { if (e < 0) e += 2 * x + 3; else { e += 2 * (x - y) + 5; y--; } x++; CirclePoints(hdc, x, y, x1, y1); } } int WINAPI WinMain(HINSTANCE hInstance, HINSTANCE hPrevInstance, PSTR szCmdLine, int nShowCmd) { WNDCLASS wcs; wcs.cbClsExtra = 0; wcs.cbWndExtra = 0; wcs.hbrBackground = (HBRUSH)GetStockObject(WHITE_BRUSH); wcs.hCursor = LoadCursor(hInstance, IDC_CROSS); wcs.hIcon = LoadIcon(NULL, IDI_WINLOGO); wcs.hInstance = hInstance; wcs.lpfnWndProc = (WNDPROC)WinProc; wcs.lpszClassName = "CG"; wcs.lpszMenuName = NULL; wcs.style = CS_VREDRAW | CS_HREDRAW; RegisterClass(&wcs); HWND hWnd; hWnd = CreateWindow("CG", "DrawCircle", WS_OVERLAPPEDWINDOW, 200, 200, ScreenWidth, ScreenHeight, NULL, NULL, hInstance, NULL); ShowWindow(hWnd, nShowCmd); UpdateWindow(hWnd); MSG msg; // hdc init HDC hdc = GetDC(hWnd); MidPointCircle(hdc, 200, 200, 150); // 消息循环 while (GetMessage(&msg, 0, NULL, NULL)) { TranslateMessage(&msg); DispatchMessage(&msg); } // release ReleaseDC(hWnd, hdc); return 0; }
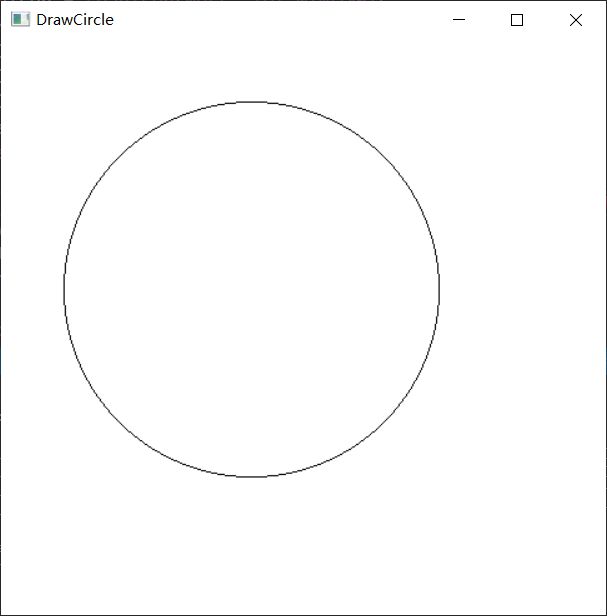
运行结果:
接下来是区域填充算法,加油~


