mina学习笔记四:交互的核心IoSession
这一章讲的就是IoSession,session这个词做web应用的人应该都是耳熟能详,在mina中IoSession也是起着相同的作用。mina为每个客户端提供了会话session,session是服务器端和客户端的连接持有者,直到连接中断session才会被销毁。
IoSession不仅是connection的相关信息,同时,服务器端还能通过他存储其他可能需要的数据信息。好,让我们一步一步剖析IoSession那不平凡的一生吧。
1. IoSession在服务器端的创建第一步:accept(processor,handle)
接着上节说,我们已经知道,NioSocketAcceptor.bind()后,最终会生成一个在自身维护的executor线程池内提交的任务Acceptor(单一线程),该任务不断的轮询判断服务是否关闭、同时等待新的连接接入。当有新的连接接入时:
Acceptor.run(){
	...
	//selectedHandles()获取一个selector中注册的服务监听的serversocketchannel的迭代器
	processHandles(selectedHandles());
	...
} private void processHandles(Iterator handles) throws Exception {
while (handles.hasNext()) {
H handle = handles.next();
handles.remove();
// 创建session并将本地的processor处理池当参数传递给session
// 注意这里还未分配具体的processor
S session = accept(processor, handle);
if (session == null) {
continue;
}
// 初始化Session
initSession(session, null, null);
// 将session分配给具体的processor
session.getProcessor().add(session);
}
} public NioSocketSession(IoService service, IoProcessor processor, SocketChannel channel) {
//AbstractIoSession(IoService service)
this.service = service;
this.handler = service.getHandler();
//保存当前的处理时间信息
long currentTime = System.currentTimeMillis();
creationTime = currentTime;
lastThroughputCalculationTime = currentTime;
lastReadTime = currentTime;
lastWriteTime = currentTime;
lastIdleTimeForBoth = currentTime;
lastIdleTimeForRead = currentTime;
lastIdleTimeForWrite = currentTime;
//在关闭时的动作,下面以此展开对IoFuture的探讨。
closeFuture.addListener(SCHEDULED_COUNTER_RESETTER);
//为session创建唯一的ID
sessionId = idGenerator.incrementAndGet();
//END AbstractIoSession(IoService service)
//NioSession(IoProcessor processor, IoService service, Channel channel)
//即当前session的SocketChannel
this.channel = channel;
//这是ioservice中的processor池哦
this.processor = processor;
//这步过滤器链厉害了,后面细说
filterChain = new DefaultIoFilterChain(this);
//END NioSession(IoProcessor processor, IoService service, Channel channel)
//设置各种初始参数
config = new SessionConfigImpl();
this.config.setAll(service.getSessionConfig());
} 
我们细细的分析一下NioSocketSession在初始化时做了哪些工作,首先持有了sevice及其处理类引用,并设置了一些初始时间信息,然后他在关闭时注册了监听操作closeFuture.addListener(SCHEDULED_COUNTER_RESETTER)。
1.1 IoFuture
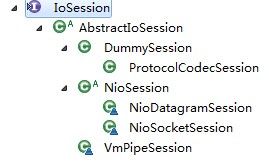
我们已经很多次看到IoFuture,有必要来详细了解一下IoFuture的作用。那用过Executor的同学都知道,submit()提交Callback的任务后将返回一个Future表示这个任务的操作结果,这里的IoFuture的作用是类似的,他代表一次相关于IoSession的操作的操作结果,同时,还可以在他完成时获取定义相关的操作。我们看下他的子类结构图
图4.1 IoFuture子类结构图
由图中可见,对session相关的操作例如关闭、连接、写、读等操作,IoFuture全都有子类去支持。session的操作可以很方便的通过IoFuture查看处理的结果。我们看下IoFuture接口的API清单:
addListener(IoFutureListener)
await()
await(long)
await(long, TimeUnit)
awaitUninterruptibly()
awaitUninterruptibly(long)
awaitUninterruptibly(long, TimeUnit)
getSession()
isDone()
removeListener(IoFutureListener)public interface IoFutureListener extends EventListener {
void operationComplete(F future);
}
在他的直接实现子类DefaultIoFuture里面,我们看一下该类很主要一个实现方法setValue(Object newValue),所有其他子类都会调用该方法以完成具体的操作:
    public void setValue(Object newValue) {
        synchronized (lock) {
            // 已经完成则直接返回
            if (ready) {
                return;
            }
	    //设置结果
            result = newValue;
	    //设置完成状态
            ready = true;
	    //唤醒所有等待线程
            if (waiters > 0) {
                lock.notifyAll();
            }
        }
	//通知监听器执行完成操作
        notifyListeners();
} private void checkDeadLock() {
// Only read / write / connect / write future can cause dead lock.
if (!(this instanceof CloseFuture || this instanceof WriteFuture || this instanceof ReadFuture || this instanceof ConnectFuture)) {
return;
}
// Get the current thread stackTrace.
// Using Thread.currentThread().getStackTrace() is the best solution,
// even if slightly less efficient than doing a new Exception().getStackTrace(),
// as internally, it does exactly the same thing. The advantage of using
// this solution is that we may benefit some improvement with some
// future versions of Java.
StackTraceElement[] stackTrace = Thread.currentThread().getStackTrace();
// Simple and quick check.
for (StackTraceElement s : stackTrace) {
if (AbstractPollingIoProcessor.class.getName().equals(s.getClassName())) {
IllegalStateException e = new IllegalStateException("t");
e.getStackTrace();
throw new IllegalStateException("DEAD LOCK: " + IoFuture.class.getSimpleName()
+ ".await() was invoked from an I/O processor thread. " + "Please use "
+ IoFutureListener.class.getSimpleName() + " or configure a proper thread model alternatively.");
}
}
// And then more precisely.
for (StackTraceElement s : stackTrace) {
try {
Class cls = DefaultIoFuture.class.getClassLoader().loadClass(s.getClassName());
if (IoProcessor.class.isAssignableFrom(cls)) {
throw new IllegalStateException("DEAD LOCK: " + IoFuture.class.getSimpleName()
+ ".await() was invoked from an I/O processor thread. " + "Please use "
+ IoFutureListener.class.getSimpleName()
+ " or configure a proper thread model alternatively.");
}
} catch (Exception cnfe) {
// Ignore
}
}
}1.2 IoSession的过滤器链
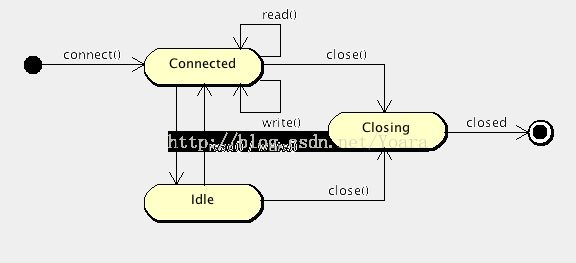
IoSession是有状态的,它包括:- Connected :IoSession已被创建且生效。
- Idle :会话在一定时间内没有处理任何请求,它包括下面三个子状态:
- Idle for read : 一段时间内没有接受数据。
- Idle for write : 一段时间内没有发送数据。
- Idle for both : 一段时间内没有产生接受或发送数据的操作。
- Closing : IoSession正在关闭中。
- Closed : session已经被关闭。
图4.2 IoSession状态变化图
filterChain = new DefaultIoFilterChain(this);
IoSession会先继承IoService的过滤器链,过滤器链将放在下一节统一分析。
2. IoSession在服务器端的创建第二步:initSession(session, null, null)
这一步initSession(session, null, null);主要的有两段可配置的属性,一个就是存储attribute属性键值对的Map,默认是ConcurrentHashMap;另一个就是发送队列,默认是ConcurrentLinkedQueue。若要实现自己的数据结构,需要重写接口IoSessionDataStructureFactory或继承DefaultIoSessionDataStructureFactory。 try {
((AbstractIoSession) session).setAttributeMap(session.getService().getSessionDataStructureFactory()
.getAttributeMap(session));
} catch (IoSessionInitializationException e) {
throw e;
} catch (Exception e) {
throw new IoSessionInitializationException("Failed to initialize an attributeMap.", e);
}
try {
((AbstractIoSession) session).setWriteRequestQueue(session.getService().getSessionDataStructureFactory()
.getWriteRequestQueue(session));
} catch (IoSessionInitializationException e) {
throw e;
} catch (Exception e) {
throw new IoSessionInitializationException("Failed to initialize a writeRequestQueue.", e);
}3. IoSession在服务器端的创建第三步:session.getProcessor().add(session);
这一步就是为我们新生成的IoSession在IoService的Processor池中指定一个Processor处理。分配的方式就是取模分配,完成后在分配Processor中增加该IoSession的引用。SimpleIoProcessorPool中的代码如下: public final void add(S session) {
//请注意这里是两步,第一步getProcessor(session)在下面段代码,创建(若没有)并返回Processor
//第二步在该Processor中add(session),这里就是调用AbstractPollingIoProcessor.add(),后面有更多描述
getProcessor(session).add(session);
} private IoProcessor getProcessor(S session) {
IoProcessor processor = (IoProcessor) session.getAttribute(PROCESSOR);
if (processor == null) {
if (disposed || disposing) {
throw new IllegalStateException("A disposed processor cannot be accessed.");
}
processor = pool[Math.abs((int) session.getId()) % pool.length];
if (processor == null) {
throw new IllegalStateException("A disposed processor cannot be accessed.");
}
session.setAttributeIfAbsent(PROCESSOR, processor);
}
return processor;
}4. SimpleIoProcessorPool、IoProcess和NioSocketAcceptor之间的关系
上节我们留了个悬念,SimpleIoProcessorPool、IoProcess和IoServices之间的到底是关系呢?我们从SimpleIoProcessorPool初始化池说起:
            for (int i = 1; i < pool.length; i++) {
                ...
                pool[i] = processorConstructor.newInstance(this.executor);
                ...
} public final void add(S session) {
if (disposed || disposing) {
throw new IllegalStateException("Already disposed.");
}
// 将session添加到ConcurrentLinkedQueue的队列中,并启动Processor 的worker线程
newSessions.add(session);
//启动Processor线程
startupProcessor();
}
我们很有必要具体看一下Processor线程做了什么:
    private class Processor implements Runnable {
        public void run() {
	    ...
            for (;;) {
                try {
                    // 监控空闲时间
                    long t0 = System.currentTimeMillis();
                    int selected = select(1000);
                    long t1 = System.currentTimeMillis();
                    long delta = (t1 - t0);

                    ...
                    // 注册新的session连接,并初始化session信息,如过滤器链,
		    // 通知service的监听器
                    nSessions += handleNewSessions();
		    ...
                    // 处理新的请求
                    if (selected > 0) {
                        process();
                    }
		    ...
                    // 移除
                    nSessions -= removeSessions();

                    // 通知空闲监听器
                    notifyIdleSessions(currentTime);

                    ...
		    //关闭
                    if (isDisposing()) {
                        for (Iterator i = allSessions(); i.hasNext();) {
                            scheduleRemove(i.next());
                        }

                        wakeup();
                    }
                } catch ...
            }
	    ...
        }
} //在selector上注册感兴趣的相应集合读操作
SelectableChannel ch = (SelectableChannel) session.getChannel();
ch.configureBlocking(false);
session.setSelectionKey(ch.register(selector, SelectionKey.OP_READ, session));
//将service的过滤器链设置在session上
IoFilterChainBuilder chainBuilder = session.getService().getFilterChainBuilder();
chainBuilder.buildFilterChain(session.getFilterChain());
//回调监听器
IoServiceListenerSupport listeners = ((AbstractIoService) session.getService()).getListeners();
listeners.fireSessionCreated(session);- SimpleIoProcessorPool维护一组IoProcess[] ,每个IoProcess都在线程池中绑定了工作线程,该工作线程开启一个selector并监听session交互OP_READ。
    public NioProcessor(Executor executor) {
        super(executor);

        try {
            selector = Selector.open();
        } catch (IOException e) {
            throw new RuntimeIoException("Failed to open a selector.", e);
        }
}- NioSocketAcceptor持有一个pool的引用
- NioSocketAcceptor自身也有个单线程的executor,用于监听新的session的链接OP_ACCEPT。
    NioSocketAcceptor.init() throws Exception {
        selector = Selector.open();
    }