本片文章是基于前一篇写的,《Spring Boot 入门(六):集成 treetable 和 zTree 实现树形图》,本篇主要介绍了spring boot集成swagger2。关于swagger的介绍,自行谷歌。我这里有在网上购买的相关视频资料,有需要可以呼叫我。
1.引入相关依赖
 1  <dependency>
 2             <groupId>io.springfoxgroupId>
 3             <artifactId>springfox-swagger2artifactId>
 4             <version>2.4.0version>
 5         dependency>
 6         <dependency>
 7             <groupId>io.springfoxgroupId>
 8             <artifactId>springfox-swagger-uiartifactId>
 9             <version>2.4.0version>
10         dependency>
11
12         <dependency>
13             <groupId>org.apache.directory.studiogroupId>
14             <artifactId>org.apache.commons.codecartifactId>
15             <version>1.8version>
16         dependency>
很多地方只引入了前2个依赖,这里如果缺少第3个依赖,容易产生一个异常: java.lang.NoSuchMethodError: com.google.common.collect.FluentIterable.toList()Lcom/google/common/collect/ImmutableList;
2.增加conf
 3 import io.swagger.annotations.ApiOperation;
 4 import org.springframework.context.annotation.Bean;
 5 import org.springframework.context.annotation.Configuration;
 6 import springfox.documentation.builders.ApiInfoBuilder;
 7 import springfox.documentation.builders.PathSelectors;
 8 import springfox.documentation.builders.RequestHandlerSelectors;
 9 import springfox.documentation.service.ApiInfo;
10 import springfox.documentation.service.Contact;
11 import springfox.documentation.spi.DocumentationType;
12 import springfox.documentation.spring.web.plugins.Docket;
13 import springfox.documentation.swagger2.annotations.EnableSwagger2;
14
15 /**
16  * @program:
17  * @description: Swagger配置
18  * @author: DZ
19  * @create: 2019-10-14 18:41
20  **/
21 @Configuration
22 @EnableSwagger2
23 public class SwaggerConfig {
24
25     @Bean
26     public Docket createRestApi() {
27         return new Docket(DocumentationType.SWAGGER_2)
28                 .apiInfo(apiInfo())
29                 .select()
30                 // 设置basePackage会将包下的所有类的所有方法作为api
31 //                .apis(RequestHandlerSelectors.basePackage("com.example.demo2.controller"))
32                 //只有标记了@ApiOperation的方法才会暴露出给swagger
33                 .apis(RequestHandlerSelectors.withMethodAnnotation(ApiOperation.class))
34                 .paths(PathSelectors.any())
35                 .build();
36     }
37
38
39     private ApiInfo apiInfo() {
40         //swagger2中termsOfServiceUrl方法已经启用,且contact的参数时一个对象,弃用字符串了
41         Contact contact=new Contact("dz",
42                 "https://www.cnblogs.com/dz-boss/p/11729334.html","[email protected]");
43         return new ApiInfoBuilder()
44                 .title("xx项目说明文档")
45                 .description("xx系统说明")
46                 //.termsOfServiceUrl("https://www.cnblogs.com/dz-boss/p/11729334.html")
47                 .contact(contact)
48                 .version("1.0")
49                 .build();
50     }
51
52 }
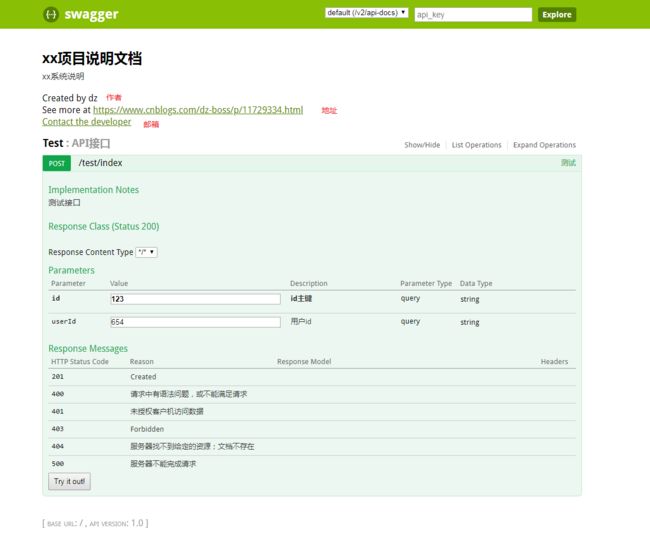
其中Contact构造函数中3个参数依次是:作者,地址,邮箱
3.增加注解
 6 import io.swagger.annotations.*;
 7 import lombok.extern.slf4j.Slf4j;
 8 import org.springframework.amqp.rabbit.connection.CorrelationData;
 9 import org.springframework.amqp.rabbit.core.RabbitTemplate;
10 import org.springframework.beans.factory.annotation.Autowired;
11 import org.springframework.beans.factory.annotation.Value;
12 import org.springframework.stereotype.Controller;
13 import org.springframework.web.bind.annotation.*;
14
15 /**
16  * @program:
17  * @description:
18  * @author: DZ
19  * @create: 2019-10-09 15:27
20  **/
21 @Api(value = "API接口", tags = "Test", description = "API接口")
22 @Slf4j25
@Controller
26 public class Test {
27
28     //测试接口
29     @ApiOperation(value = "测试", notes = "测试接口")
30     @ApiImplicitParams({
31             @ApiImplicitParam(name = "id", value = "id", required = true, dataType = "String", paramType = "query", defaultValue = "123"),
32             @ApiImplicitParam(name = "userId", value = "用户id", required = false, dataType = "String", paramType = "query", defaultValue = "654")
33     })
34     @ApiResponses(value = {
35             @ApiResponse(code = 200, message = "Successful — 请求已完成"),
36             @ApiResponse(code = 400, message = "请求中有语法问题,或不能满足请求"),
37             @ApiResponse(code = 401, message = "未授权客户机访问数据"),
38             @ApiResponse(code = 404, message = "服务器找不到给定的资源;文档不存在"),
39             @ApiResponse(code = 500, message = "服务器不能完成请求")}
40     )
41     @ResponseBody
42     @RequestMapping(value = "index", method = RequestMethod.POST)
43     public String test(@RequestParam("id") String id, @RequestParam(value = "userId", required = false) String userId) {
44         return "";
45     }
46 }
其中关键的注解为类的注解:@Api和方法的注解@ApiOperation,增加了这2个注解,就可以通过swagger的方式访问;
@ApiImplicitParams和@ApiResponses这2个注解主要对入参和出参进行增加中文注解,可有可无。
最后还需要在启动类增加注解@EnableSwagger2
访问:http://localhost:8080/swagger-ui.html
