Appium 1.6.3 在Xcode 8 (真机)测试环境搭建 经验总结
Appium 1.6.3 在Xcode 8 (真机)测试环境搭建经验总结
关于 Appium 1.6.3 在Xcode 8, 1真机上环境搭建问题更多,写此文章,供大家参考,让大家少走弯路。
在开始iOS真机测试之前,请大家务必 将 Appium 1.6.3 + xcode 8 在iOS模拟器上的环境搭建OK,请参见我的上一篇博文:Appium 1.6.3在Xcode 8, iOS 10.2(模拟器)测试环境搭建经验总结
如果iOS模拟器上的环境OK,再来真机上搭建,要不然 你还是放弃吧。
进入正题 :
首先,上边文章:Appium 1.6.3 在Xcode 8, iOS 10.2(模拟器)试环境搭建经验总结 中 第一、第二、第三步 必须结束掉,然后开始,务必!
一、安装相关依赖
(1)安装ios-deploy
npm i -g ios-deploy
不然会执行错误会报错:
[XCUITest] Could not initialize ios-deploy make sure it is installed and works on your system
[XCUITest] Error: Could not initialize ios-deploy make sure it is installed and works on your system
at XCUITestDriver.getIDeviceObj$ (../../lib/driver.js:685:13)
(2)安装libimobiledevice
brew install libimobiledevice --HEAD
说明:2019年4月 xcode10.2和macOS 10.14.4,安装libimobiledevice 报错 :
“Requested 'libusbmuxd >= 1.1.0' but version of libusbmuxd is 1.0.10
Consider adjusting the PKG_CONFIG_PATH environment variable if you
installed software in a non-standard prefix.
Alternatively, you may set the environment variables libusbmuxd_CFLAGS
and libusbmuxd_LIBS to avoid the need to call pkg-config.
See the pkg-config man page for more details.”
解决方法:参考 https://testerhome.com/topics/16390?locale=en
brew update
brew uninstall --ignore-dependencies libimobiledevice
brew uninstall --ignore-dependencies usbmuxd
brew install --HEAD usbmuxd
brew unlink usbmuxd
brew link usbmuxd
brew install --HEAD libimobiledevice
执行 brew install --HEAD usbmuxd 过程还会遇到问题:主要是Xcode路径不对
错误:Making install in common
/bin/sh: /Users/cheersli/Downloads/Xcode: No such file or directory
make: *** [install-recursive] Error 1
解决: 将 原本/Users/cheersli/Downloads/目录下 Xcode 2.app 改名为 Xcode.app
错误:xcrun: error: active developer path ("/Users/cheersli/Downloads/Xcode 2.app/Contents/Developer") does not exist
Use `sudo xcode-select --switch path/to/Xcode.app` to specify the Xcode that you wish to use for command line developer tools, or use `xcode-select --install` to install the standalone command line developer tools.
See `man xcode-select` for more details.
Error: An exception occurred within a child process:
CompilerSelectionError: usbmuxd cannot be built with any available compilers.
Install GNU's GCC
brew install gcc
解决:选择正确的Xcode启动路径
sudo xcode-select --switch /Users/cheersli/Downloads/Xcode.app
说明下:过程有点艰辛,不过看日志和百度都能解决
二、安装 appium-xcuitest-driver (先卸载在重新安装新版本2.5.3)(2019-4月9日备注,这一步可以省略)
原因:appium 默认安装的appium-xcuitest-driver版本有点老,貌似是 2.4.0的版本,老的版本问题,运行测试的时候会提示
debug] [WebDriverAgent] Device: Mar 29 15:29:21 Cheersde-iPhone XCTRunner[2848]
[debug][WebDriverAgent] Device: Mar 29 15:29:22 Cheersde-iPhone XCTRunner[2848]
[debug] [XCUITest] Waiting for WebDriverAgent server to finish loading...
导致被测试的app launch不起来,一直卡在 [debug][XCUITest] Waiting for WebDriverAgent server to finish loading... 这块
而新的版本appium-xcuitest-driver 2.5.3 就解决了这个问题。
安装方法:
cd /usr/local/lib/node_modules/appium
npm uninstall appium-xcuitest-driver 先卸载
npm install [email protected] 重新安装 2.5.3
三、编译 WebDriverAgentRunner,并安装到 真机(我的是iPhone 5s)
说明:appium是通过手机上WebDriverAgentRunner,来运行测试的,没有这个 在真机上没有办法测试(模拟器上需要着个,不过会自动安装)
3.1用Xcode打开WebDriverAgent,并且编译(编译之前需要一些设置)
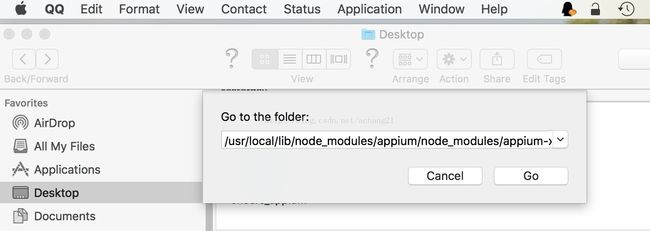
(1)进入WebDriverAgent 文件夹,可用如下方法
目录是 /usr/local/lib/node_modules/appium/node_modules/appium-xcuitest-driver/WebDriverAgent
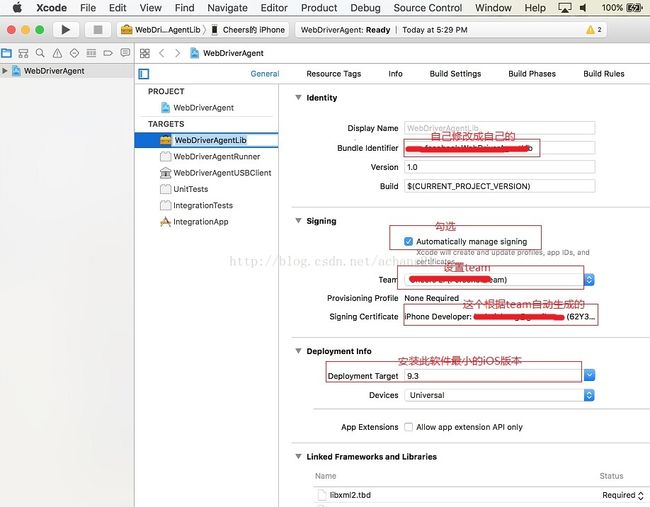
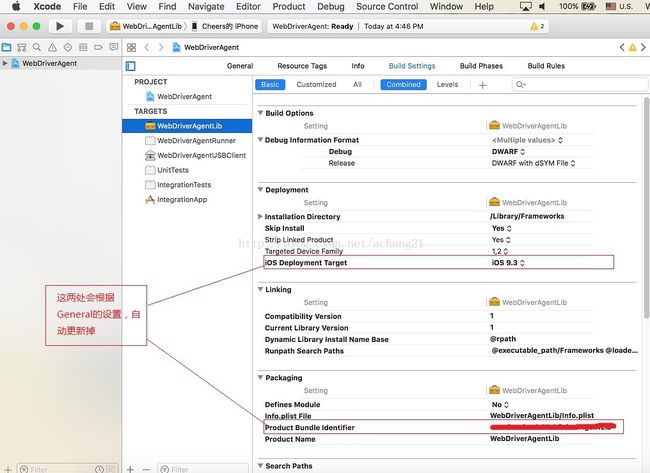
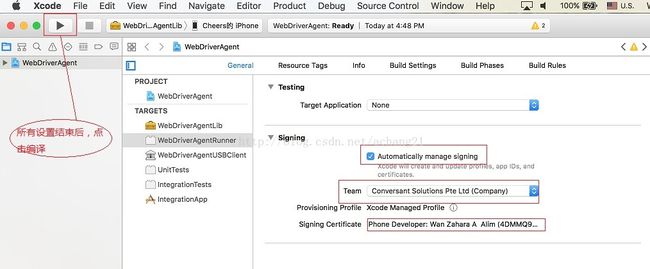
(2)选中WebDriverAgent.xcodeproj 文件,用xcode打开,并做如图设置。
见图
编译WebDriverAgent 点击编译按钮,见上图。 提示 Build Success 后编译结束。
3.2 在手机上安装WebDriverAgent (手机和MAC都在同一个网段下)
(1)连接手机和Mac电脑
(2)终端 进入WebDriverAgent文件夹
cd /usr/local/lib/node_modules/appium/node_modules/appium-xcuitest-driver/WebDriverAgent
执行:
xcodebuild -project WebDriverAgent.xcodeproj -scheme WebDriverAgentRunner -destination 'id=真机的udid' test
这时候,会在手机上安装 WebDriverAgentRunner 的app。
请注意手机,如果提示是不收信任的开发者,请在设置-通用-设备管理(描述文件)信任你的apple id就可以了。
再次运行
xcodebuild -project WebDriverAgent.xcodeproj -scheme WebDriverAgentRunner -destination 'id=真机的udid' test
这样WebDriverAgentRunner在手机上就安装成功了。
四、启动appium
命令行执行 appium
五、编写一个简单的测试用例,Java编写(基于TESTNG):
package com.cheers.qa;

import io.appium.java_client.ios.IOSDriver;
import io.appium.java_client.remote.MobileCapabilityType;
import org.openqa.selenium.By;
import org.openqa.selenium.WebElement;
import org.openqa.selenium.remote.DesiredCapabilities;
import org.testng.annotations.Test;
import java.net.MalformedURLException;
import java.net.URL;
import java.util.concurrent.TimeUnit;

public class Cheers_TC1 {
	private IOSDriver wd;
	public Cheers_TC1(){}
	@Test
	public void test1() throws InterruptedException{
		DesiredCapabilities capabilities = new DesiredCapabilities();
		capabilities.setCapability("appium-version", "1.6.3");
		capabilities.setCapability("platformName", "iOS");
		capabilities.setCapability("platformVersion", "10.2.1");
		capabilities.setCapability("deviceName", "iPhone 5s");
		capabilities.setCapability(MobileCapabilityType.AUTOMATION_NAME, "XCUITest");
		capabilities.setCapability(MobileCapabilityType.APP, "/Users/***/Documents/workspace/swiftlive_ios_appium/ipa_files/SwiftLive.ipa");
		capabilities.setCapability(MobileCapabilityType.UDID, "iPhone真机UDID");

		try {
			wd =new IOSDriver(new URL("http://127.0.0.1:4723/wd/hub"), capabilities);
		} catch (MalformedURLException e) {
			e.printStackTrace();
		}
		wd.manage().timeouts().implicitlyWait(60, TimeUnit.SECONDS);
		System.out.println("******************** Cheers Appium iOS 真机测试 **************************");

		wd.close();
	}
}
然后右键,run as testng,就可以在真机上看到效果
参考文章:
https://testerhome.com/topics/6962
Appium iOS真机 sendkeys 不能输入数据(不起作用) 解决
解决方法及原因:这是第三放输入法导致的问题,删除掉第三输入法,如 搜狗等,只留下默认的输入法,重新运行测试,sendkeys方法正常起作用。


