sublime text3 安装及python,c环境搭建及简单技巧使用
1.sublime text3
想要学习python语言,需要好用的编译开发环境,python的安装仍然推荐anaconda。anaconda自带jupyter notebook,是一个在线的python root编译环境,生成的文件是.ipynb文件,但可以在网页上直接编译运行,结果直接可视,适合课堂讲解用以及少量编辑。同样,IDLE同样可以编译python。
但对于大规模编译程序以及丰富的程序调试功能等需求,则需要使用专门的编译器,对于常年使用js的人肯定适合使用eclipse,只需要添加python的编译环境即可。但eclipse启动太慢。另外notepad++,pycharm都是不错的选择。但个人还是比较使用更加轻量级的文本编辑器,也就是今天的主角—sublime text 3.
-
1.安装
https://www.sublimetext.com/3
选择自己需要的版本,这里使用windows下的sublimetext3.license自己百度即可。 -
2.python编译环境
- 2.1 package control
sublime text只是文本编辑器,打开极快,但是需要添加一些package来完善编译环境。
https://packagecontrol.io/installation
按照说明安装即可,建议手工安装。 - 2.2 sublimeREPL
ctrl+shift+p快捷键打开package control输入install然后输入sublimeREPL,等待安装成功。
打开Preferences—Key Bindings,右侧窗口输入
	{"keys":["f1"],
"caption": "SublimeREPL: Python",
"command": "run_existing_window_command", "args":
{"id": "repl_python",
"file": "config/Python/Main.sublime-menu"}}
,
{"keys":["f2"],
"caption": "SublimeREPL: Python - RUN current file",
"command": "run_existing_window_command", "args":
{"id": "repl_python_run",
"file": "config/Python/Main.sublime-menu"}}
,
[f1]表示的是打开类似于IDLE形式的窗口,[f2]表示的是编译当前python环境。
- 2.3 sublimeTmpl
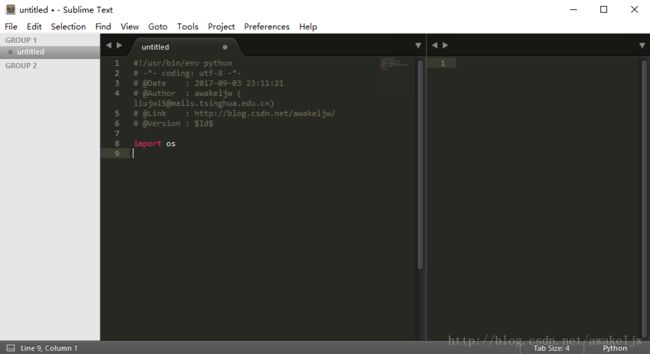
sublime临时模板打开效果
#!/usr/bin/env python
# -*- coding: utf-8 -*-
# @Date    : 2017-09-03 23:11:21
# @Author  : awakeljw ([email protected])
# @Link    : http://blog.csdn.net/awakeljw/
# @Version : $Id$

import os
打开Preferences—Package Settings—sublimeTmpl—settings-User输入
{
            "disable_keymap_actions": false, // "all"; "html,css"
            "date_format" : "%Y-%m-%d %H:%M:%S",
            "attr": {
                "author": "awakeljw",
                "email": "[email protected]",
                "link": "http://blog.csdn.net/awakeljw/"
            }
        }
打开Preferences—Key Bindings,右侧窗口输入
{
    "caption": "Tmpl: Create python", "command": "sublime_tmpl",
    "keys": ["ctrl+alt+p"], "args": {"type": "python"}
}
使用快捷键ctrl+alt+p即可打开新的python模板。
-
2.4 sidebarEnhancements
sidebar功能增强版 -
2.5 sublimeCodeIntel
 "Python3": {
            "python3": "C:/Anaconda3/python.exe",
            "pythonExtraPaths":[
         "C:/Anaconda3/DLLs",
         "C:/Anaconda3/Lib",
         "C:/Anaconda3/Lib/lib-tk",
         "C:/Anaconda3/Lib/site-packages",

    ]
        },
设置路径为anaconda3安装的路径。
- 2.6 pylinter
pylinter是python的一个模板
设置view-layout-columns:2,最终效果图

c环境搭建
1、sublime主要是文本编辑器,要想具有编译功能,需要增加编译器,一般保存为.c文件,执行ctrl+shift+b可以选择编译选项,但首先你需要下载gcc编译工具,推荐使用MinGW.
下载地址:http://www.mingw.org/ ,下载安装即可。
2.配置环境变量,将安装好的MinGW安装路径lib,include,bin目录添加到环境变量PATH中。
3.新建编译系统tool->Build System,输入
{
    "cmd": ["g++", "${file}", "-o", "${file_path}/${file_base_name}"],
    "file_regex": "^(..[^:]*):([0-9]+):?([0-9]+)?:? (.*)$",
    "working_dir": "${file_path}",
    "selector": "source.c, source.c++",

    "variants":
    [
        {
            "name": "Run",
            "shell": true,
            "cmd" : ["start", "cmd", "/k", "${file_path}/${file_base_name} &&echo. & pause && exit"]
        }
    ]
}
然后按ctrl+s进行保存,文件名为c.sublime-build即可
c++编译设置如下
{
"encoding": "utf-8",
"working_dir": "$file_path",
"shell_cmd": "g++ -Wall -std=c++11 \"$file_name\" -o \"$file_base_name\"",
"file_regex": "^(..[^:]*):([0-9]+):?([0-9]+)?:? (.*)$",
"selector": "source.c++", "variants":
[
    {
    "name": "Run",
        "shell_cmd": "g++ -Wall -std=c++11  \"$file\" -o \"$file_base_name\" && start cmd /c \"\"${file_path}/${file_base_name}\" & pause\""
    }
]
}
最后,一些简单的sublime实用技巧
1.ALT+F3,批量替换非常有用。比如将”\n"替换为回车键,以及批量删除某些字符非常有用
2.Ctrl+Shift+L可以将当前选中区域打散,然后进行同时编辑
3.有打散自然就有合并,Ctrl + J(mac下Command+J)可以把当前选中区域合并为一行
4. Ctrl+Shift+T可以打开之前关闭的tab页,这点同chrome是一样的
5.Ctrl+R定位函数;Ctrl+G定位到行
详细可以参考https://www.jianshu.com/p/3cb5c6f2421c/